Honeymoon in Belize

For our honeymoon, we wanted to travel someplace warm where we could relax on a beach and go swimming. Coco Plum became our destination of choice. It's a small reef island with a few huts on it. 

The only issue is getting to this remote island. 2 jets, a tiny propeller plane and a boat ride to get here!

Maddie was a trooper, hopping onto the smallest commercial plane she had ever been on to get there. She is used to large organized airports with different terminals and pathways to get you to your plane, but she went along with the relaxed attitude in Belize where you walk out onto the tarmac to find your small propeller plane. 

My favorite part of this was the local security inspection:

Security officer: "Do you have anything you shouldn't have?"

Me: "Nope."

Security officer: "Ok."

No hassle with metal detectors or strip searches, just walk into the airplane and hold on for the flight! We will be spending a week on these reef islands, relaxing and enjoying the tropical waters for our honeymoon.

Spotting an Uncharted Shoal

When cruising near coastlines, knowing how to spot a shoal can prove to be an invaluable skill!

New shoals can appear along a coastline, especially after periods of heavy rainfall. The runoff will carry sediment out into the water and deposit them near the shore. These shoals won't appear on charts, but they do present a very real navigational hazard.

These shoals are easy to spot, even if the bottom is not visible. The trick is to watch the waters surface! As swells approach the shore, the enter shallow water along the beach and turn into breaking waves. Shoals along the coast will have the same effect on the swells, converting them to breaking waves and warning mariners of their presence.

This birds eye view of a river draining into the sea clearly shows how the waves break along the shallow water bottom contour. While sailing along at sea level, these characteristics are not as visible, simply knowing to watch out for an area where all the waves break can warn you that you are heading towards a shoal.

Deck Lights

Illuminating the deck is crucial on dark nights. I am not a fan of harsh bright spreader lights that blind away your night vision and turn the deck into daylight since they also eat away at your batteries precious amps.

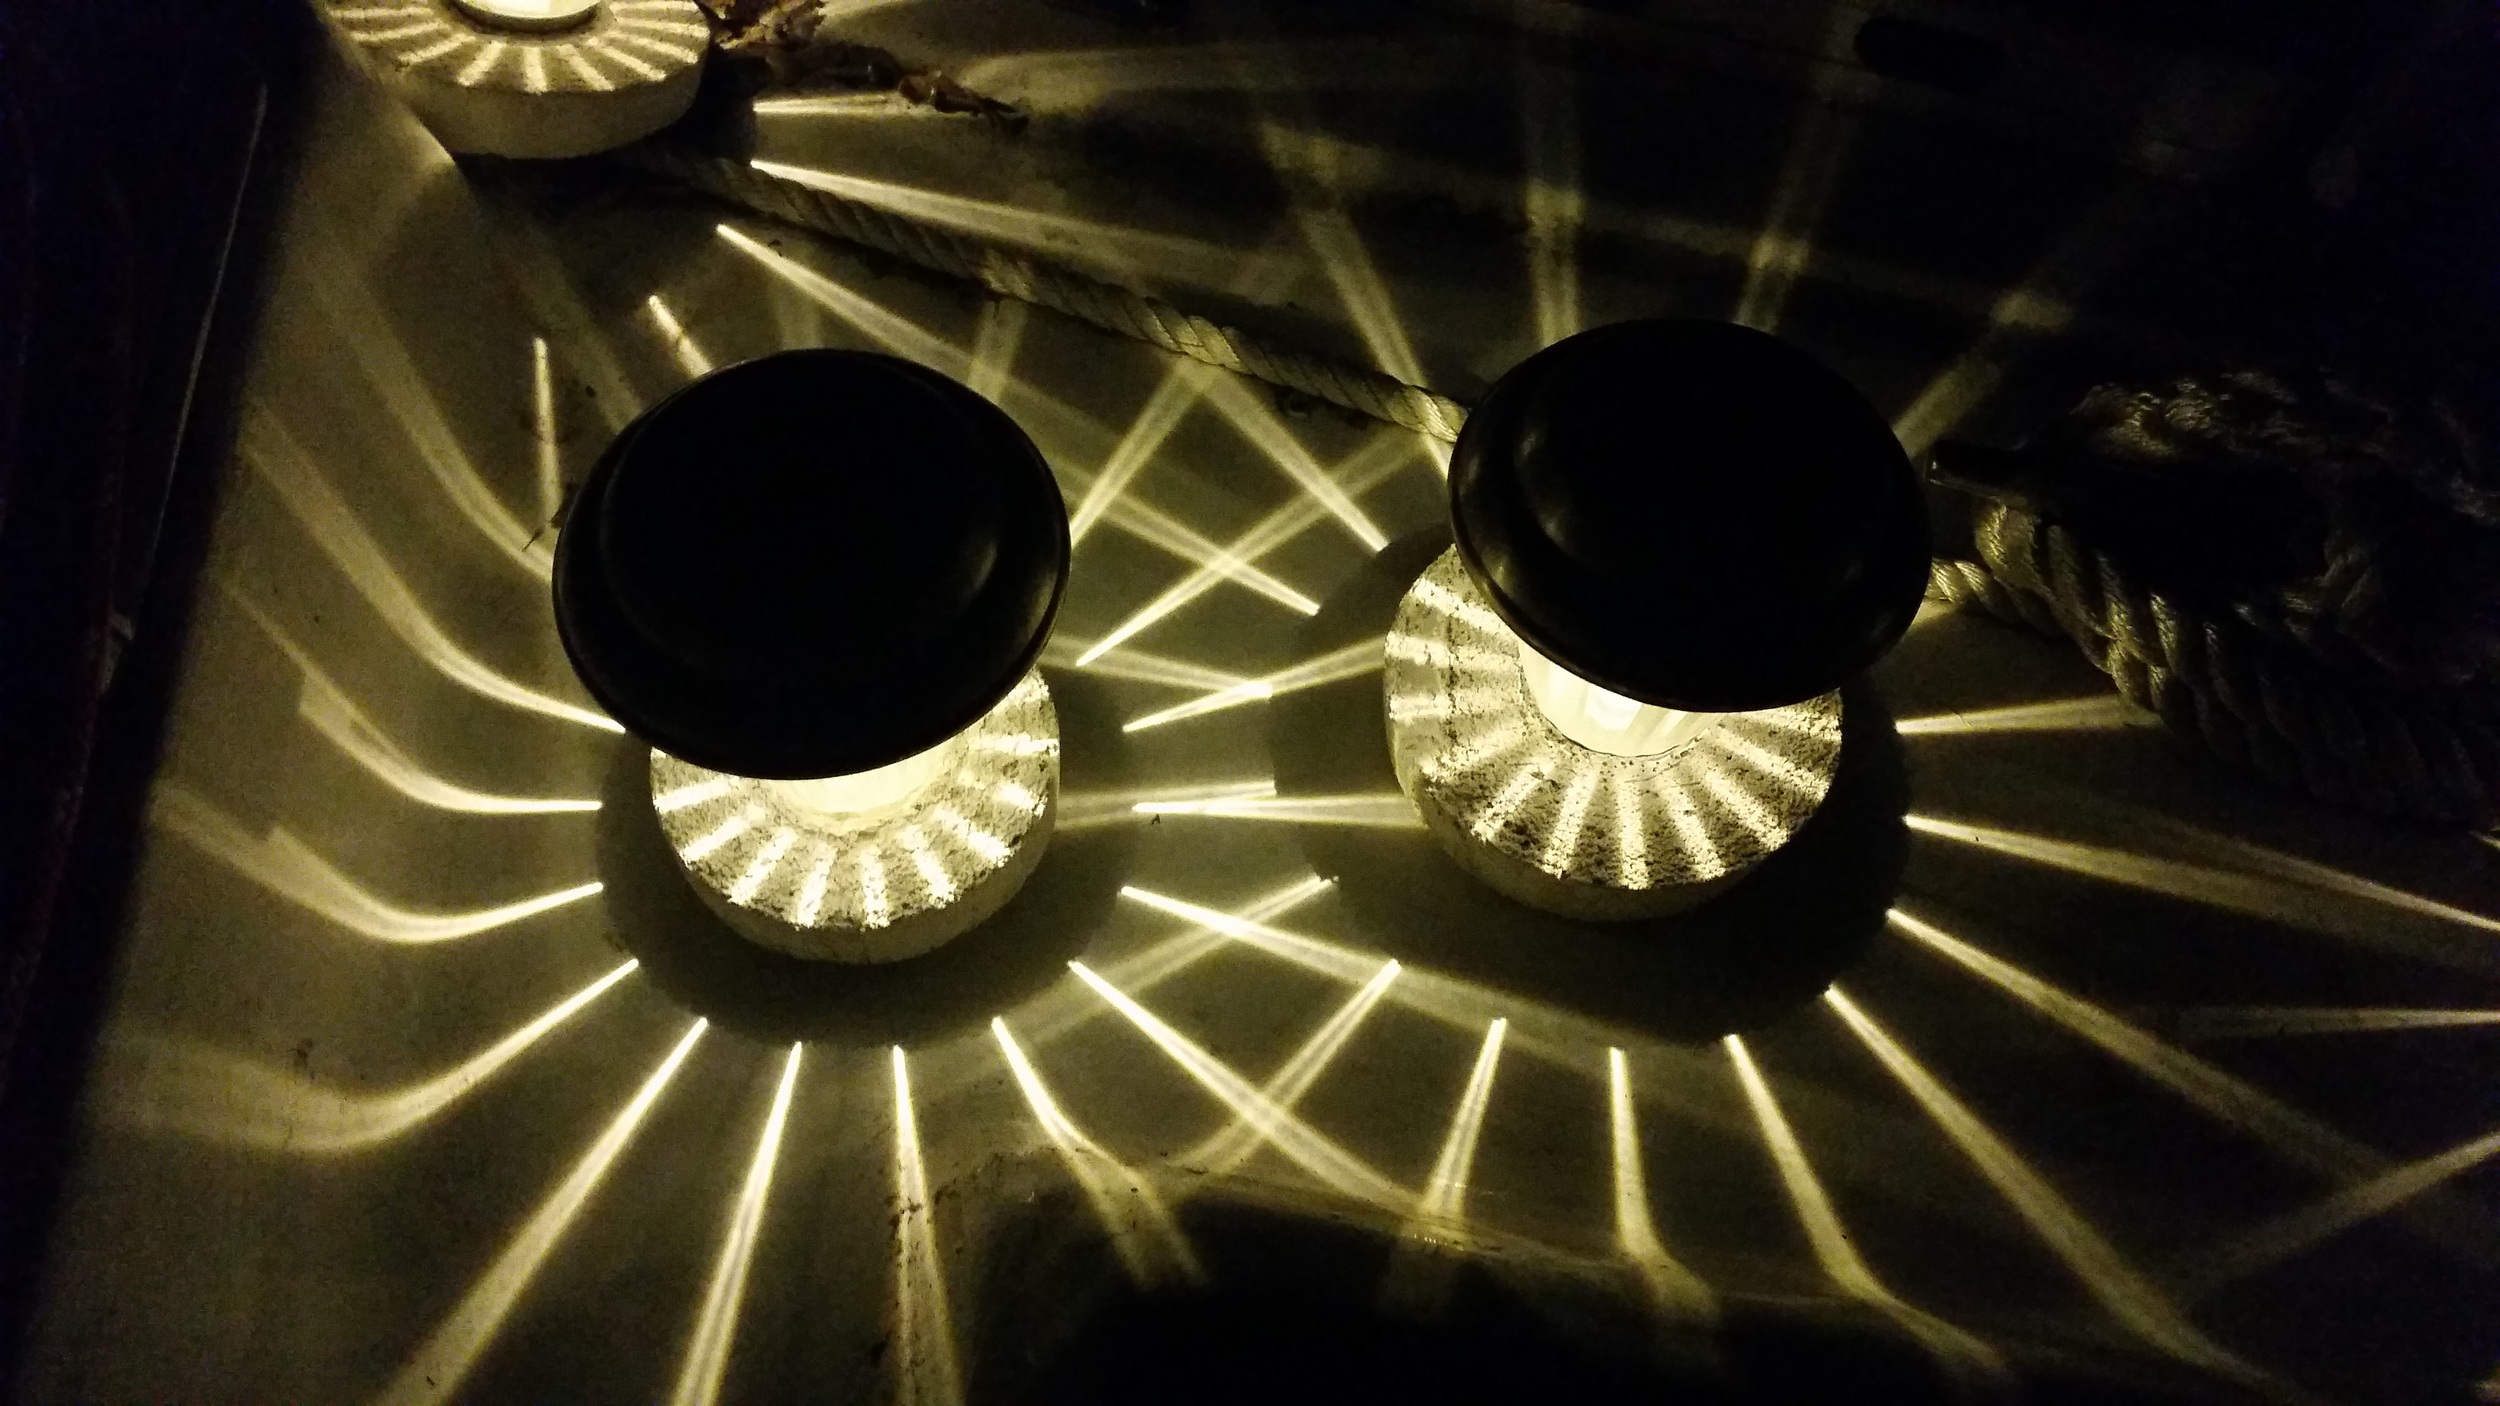
My alternative is to use solar powered yard lights from Home Depot! They do not draw on the batteries and provide a gentle light that will not kill your night vision. They also stay on all night long, letting other boats know that you are anchored and the mast head anchor light is not a star in the sky!

I removed the grass stake and set the lens into a tupperware filled with plaster. As the plaster set, the light was trapped in the stone and properly weighted to keep them from falling over while sailing.

I made a bunch of these a few years back and they have worked very well! They do not slide around on deck and best of all, do not fall overboard!

When we anchor, we spread them around the deck to provide a gentle light and to let other boats know the length of our boat (marking the bow and stern with lights). When morning comes, we collect the lights and set them in the stern where the solar panels charge their AA battery for tomorrow nights illumination.

Halyard Service

Our main halyard takes a lot of abuse! Since we sail everywhere, it lives its life with the mainsail raised all the way to the sheave.

The sheave rubs on the halyard covering in one of three locations:

  1. Next to the shackle (full sail)
  2. Midway on the halyard (1st reef)
  3. Further on the halyard (2nd reef)

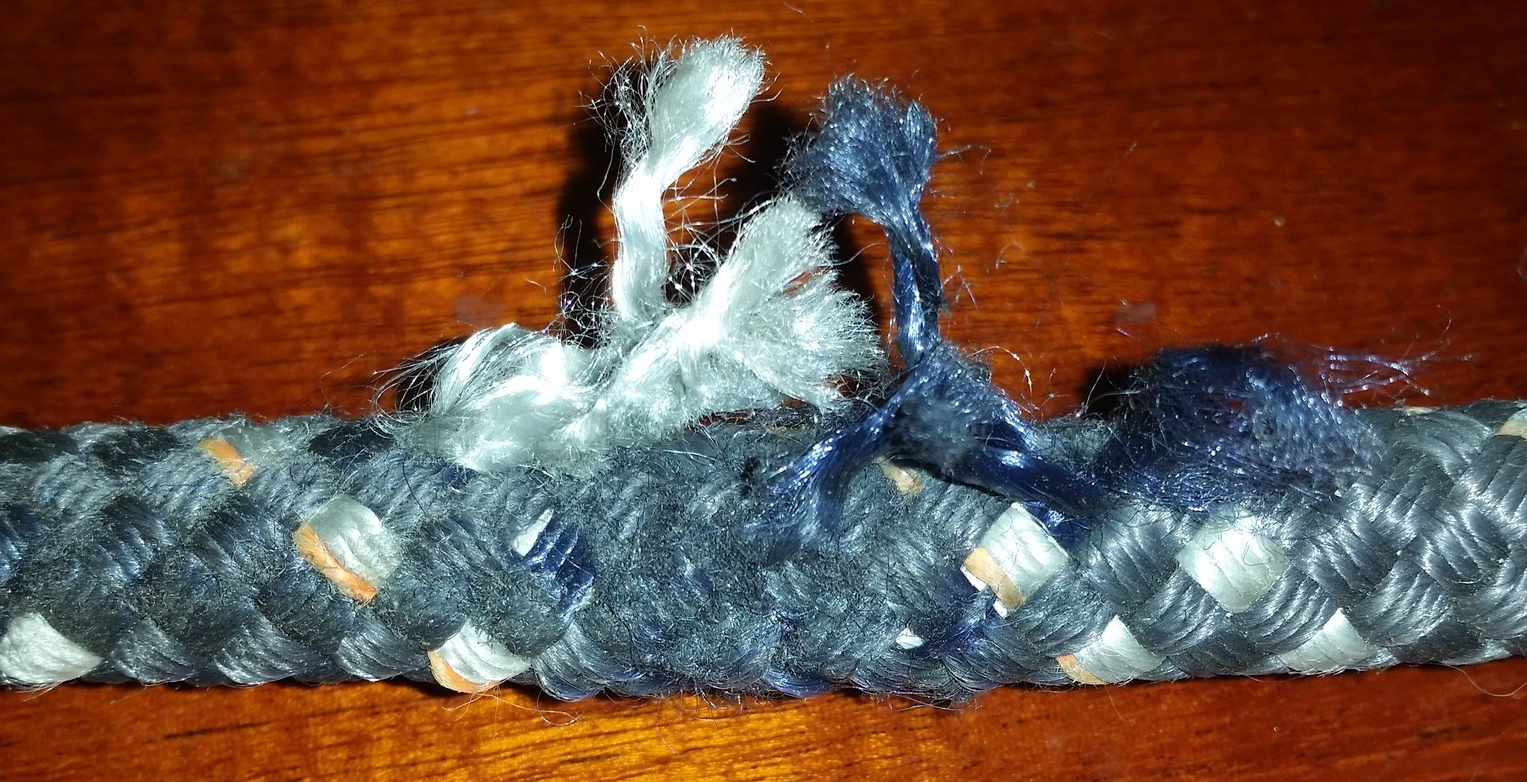
I don't spend that much time in the first or second reef, so most of the wear occurs near the shackle. Over the past 2 years, the polyester fibers have chafed and parted where they rest on the edges of the sheave. My choices are: 

  1. Let it continue to chafe until the halyard breaks and I have the pleasure of running a new halyard inside the mast.
  2. Replace the whole halyard
  3. Cut off the worn section and re-splice the end
  4. Repair the cover
  5. Service the cover

Obviously, I am opposed to ignoring the chafe, so option 1 is lunacy to me.

Replacing the whole halyard is a pricey endeavor, being nearly 180 feet in length, a new halyard would cost around $380! That's a lot of money for a single halyard that is only 2 years old and a little worn in one spot.

Cutting off the worn section and re-splicing the shackle onto the end is a valid alternative, but over time, I will end up with a short halyard. A splice consumes a lot of rope and I like having this length of halyard so that the line can reach into the water for emergency recovery. This would work in a pinch, but not over the long term.

Repairing the cover is a valid option, this would fix the chafed cover and continue to protect the core. The problem with repairing the cover is that this area of halyard is exposed to a lot of chafe and it will wear out again in roughly the same amount of time.

The last option is to service the halyard in a very strong cordage which will repair the chafed area and protect it from further chafe in the future. When the service becomes severely chafed, I can easily remove it and re-service the area with no adverse effects to the underlying core. Best of all, serviced line is very resistant to chafe, making this repair even stronger than it originally was.

The first step is to asses the extent of the chafe. If the chafe is only affecting the cover, repairing is acceptable; if the chafe is affecting the core, consider replacing that section of line (cut off and re-splice). 

My chafe occurred where the sides of the cover rubbed on the sides of the sheave and where the halyard exits the mast. 

The parted strands in the cover are pulled away from the affected area and cut off further back. This reduces the risk of further chafe from these ends on the core. The core is visible through some gaps in the cover.

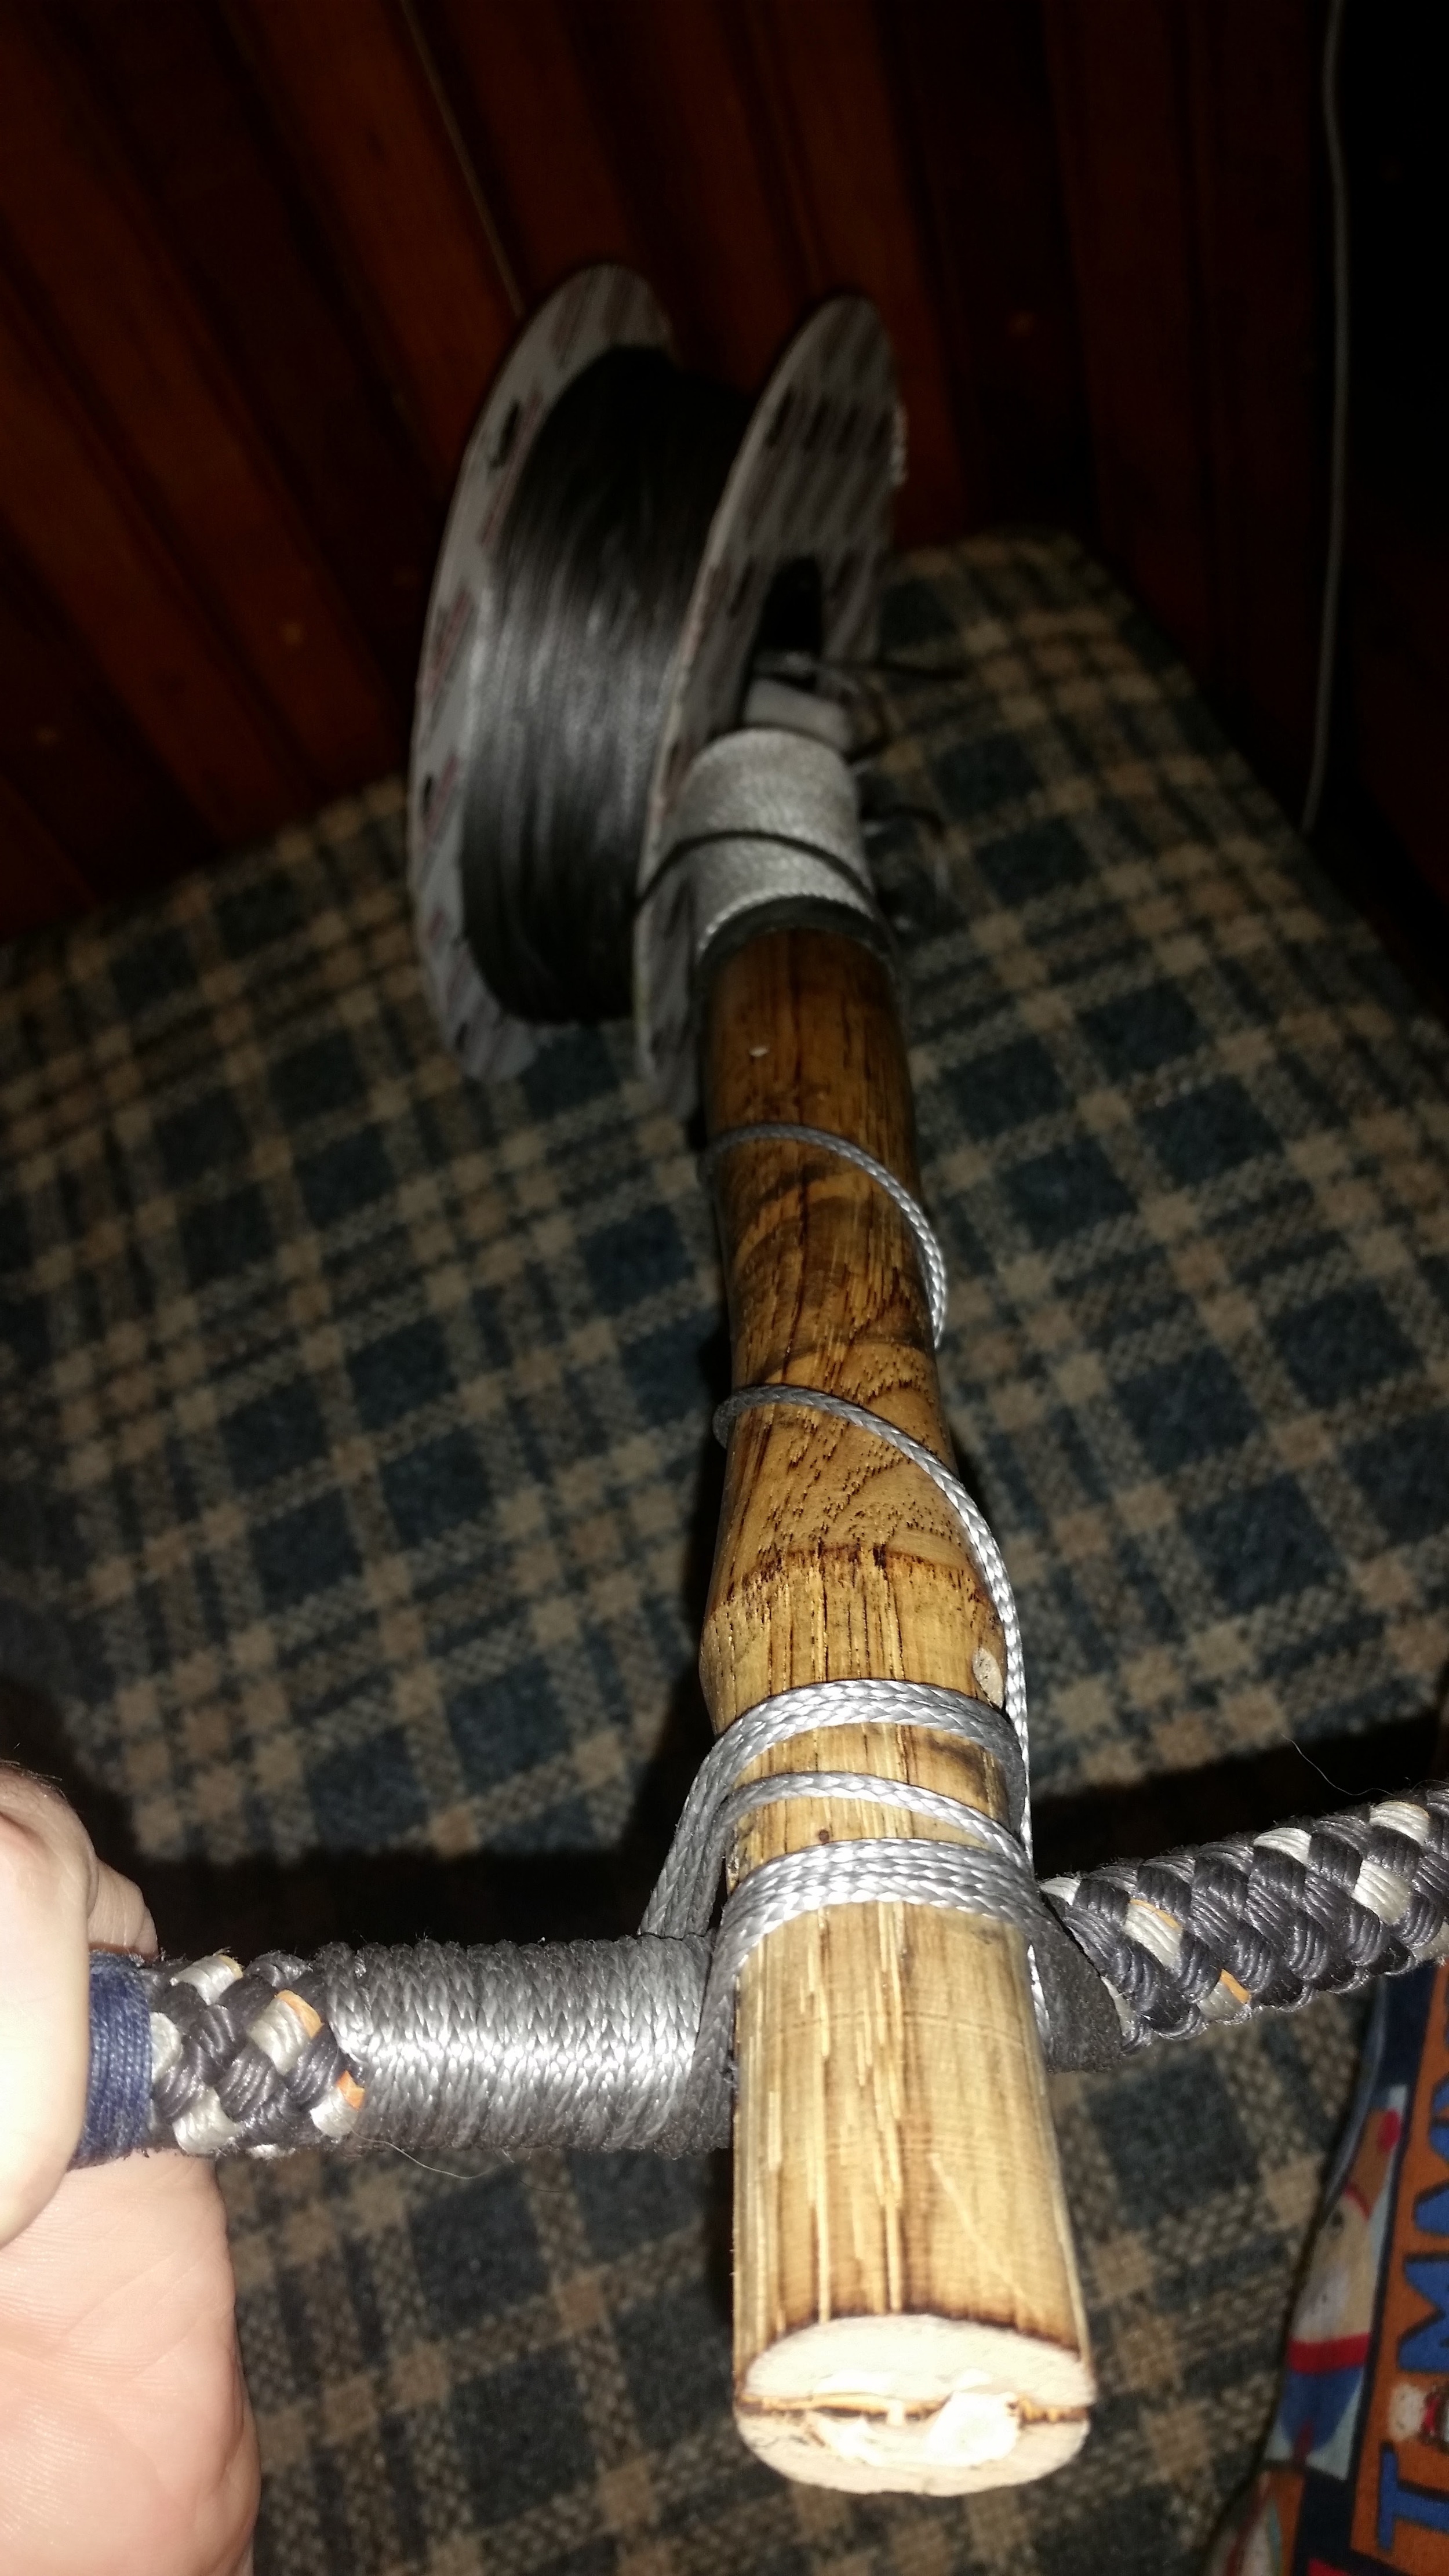
For service, I chose to use 2.7mm dyneema applied directly over the remaining cover and core. Service was started by hand until enough was in place to start using the serving mallet.

The ends of service are the weakest portions of the covering, so it is a good idea to place the beginning far away from the location of chafe. This way, the stronger service applied with the serving mallet is in the harshest location of wear and chafe. 

Once the service has been started, I lash the shackle to a strong point that will not rotate and continue to apply service from there.

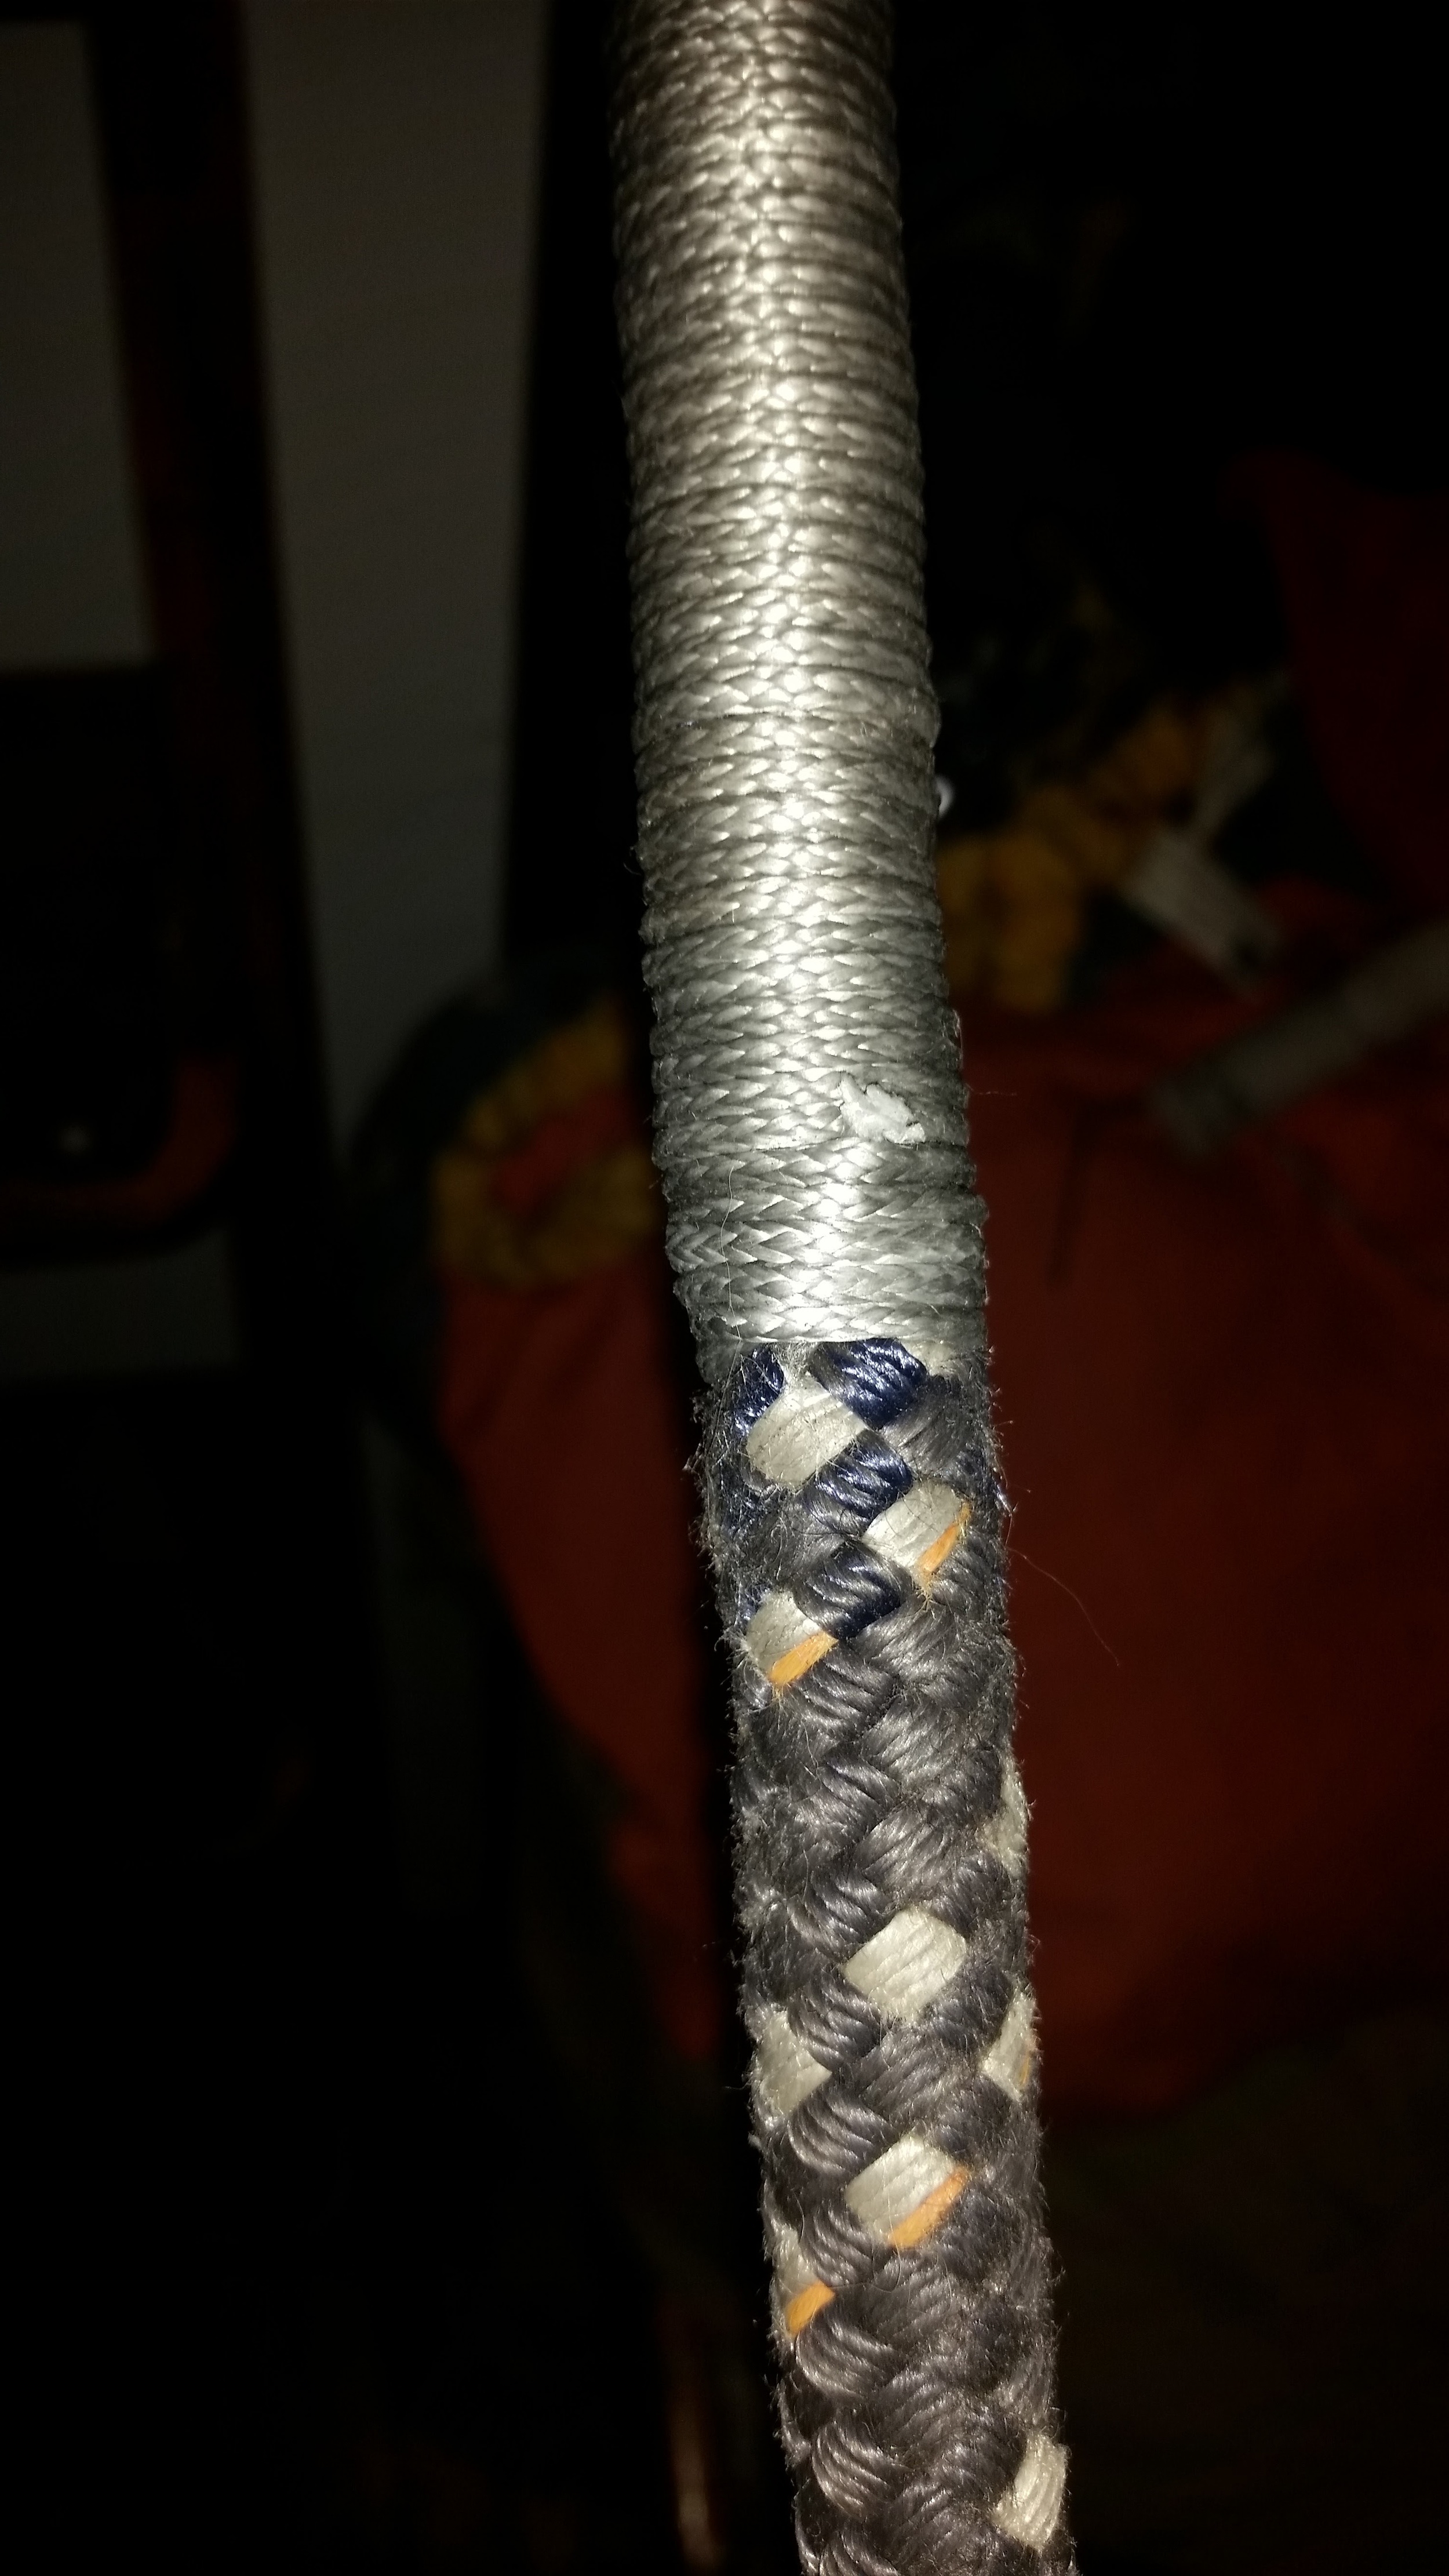
The service applied with the serving mallet is much stronger, harder, and more uniform than the service applied by hand. After several turns of the serving mallet, the halyard will be covered and protected. 

To finish the service, you need to bury the tail in the service. I service the line to the very end and then unwind the last 5 wraps and re-wrap them around my finger over the line. 

I pass the tail through the space between my finger and the halyard and pull the end tight using a marlin spike hitch. The end is then cut off where it exits the service and the tail edge is fuzzed to avoid chafing anything else.

Now the halyard can be set back up with new protection against chafe!

Living aboard made this project much easier. I was able to feed the halyard through the salon hatch and secure it to the companionway grab rail. When I was finished, I simply pulled the halyard back out through the hatch and re-attached it to the mainsail. If I had to take the halyard off, I would have needed to run a messenger line up to hold the place of the halyard and then replace the halyard after the service was completed. This is not incredibly difficult to do (it's how I replace halyards all the time) but it does add an extra step to the project which was avoidable by having a long halyard and living aboard!

Marina Community

Maddie and I got married on June 4th, and during the toasts I realized something.

Many of the people from the marina were present at the wedding because they are like family. We might not be related by blood, but we love each other, take care of each other, and look out for each other. I have never experienced this type of close nit community on land, where neighbors seem to keep to themselves and avoid interactions with one another.

In the marina, we all hang out together on the docks and in each others boats. If you are inside and hear people having a good time, you come out and join in the fun!

I had taken this sense of community for granted all these years until my neighbors began giving toasts at the wedding. These people have known me from the first day I arrived in the marina. I just bought Wisdom and brought her into her slip, giving everyone a spectacle as I had no experience reversing a full keel boat into a slip!

They helped me situate the dock lines and position fenders, they gave me pointers and were always available to lend a hand when I was coming or going. I took this for "friendly boat neighbors" and didn't realize that this is because we are all family in the marina.

We connect on a much deeper level! We go through the same struggles and we are always around to help in time of need. 

When Maddie came into my life, everyone noticed how I had changed. I was much more open, and they all said I seemed so much happier; and they were happy to see this change in me. 

It was very touching to see how much everyone cares about us in the marina. It is a bond that I have never had on land, and it's a special bond between liveaboards.