Preventing Preventer Castastrophe

When sailing downwind, a preventer is usually run from the boom forward to the boat to avoid having the boom swing across the boat during an accidental jibe. The theory is sound, but the practicality is often overlooked. 

The setup is simple, the boom is held out in place via four sheets: Mainsheet, Preventer, Topping Lift, and Vang.

The Mainsheet keeps the spar from moving forward.
The Preventer keeps the spar from moving aft.
The Topping Lift keeps the spar from moving down.
The Vang keeps the spar from moving up.

While it may seem very simplistic, specific details must not be overlooked to ensure proper function and prevent catastrophic damages.

First, the preventer and the mainsheet should connect to the same point on the boom, and this point should be nearest the end of the boom. If you mainsheet attaches as various points to the boom, place the preventer on the most aft attachment of the mainsheet.

Second, the preventer should be of equal strength to the mainsheet. If the mainsheet is setup with a block and tackle system, the preventer should be setup with an equally sized block and tackle system.

The purpose of the preventer is to avoid the boom from swinging across the yacht during an accidental jibe. Should the wind get ahead of the boom, the preventer will act as the working sheet and will be placed under incredible loads. If these two simple rules are not followed, the boom could break, or the preventer could snap and an accidental jibe would ensue.

If the Preventer is attached to the Vang attachment on the boom, the boom could snap when the Preventer is loaded. The force exerted on the boom is incredible, and the mainsheet attachment area is reinforced to handle these loads. The Vang area is not set up to handle these forces as it's job is only to hold the boom down and resist the opening of the sails leech.

If you attach the preventer to the vang area and subject the yacht to an accidental jibe situation, the force on the clew is going to push the boom aft, and the preventer is going to pull on the spar near the mast forward. This will cause the boom to bend and snap as the clew is pushed aft and the vanged portion of the boom is held forward.

Another common issue is to attach the vang to the toe rail to act as a vang and a preventer. The vang is more efficient when attached to the toe rail, as its pull would be directly downward, but it will not double as a preventer. If an accidental jibe were to occur, the boom could bend and snap at the vang attachment point and cause a catastrophic disaster. 

If you decide to run the vang to the toe rail, you need to also have a dedicated preventer run forward that is attached to the mainsheet and appropriately sized for the task at hand.

This yacht owner has setup a permanently and properly installed preventer. The preventer is attached with padeyes between the two mainsheet blocks and the line is appropriately sized for the task at hand. To avoid issues with chafe, the preventers are not led forward of the spreaders, allowing the system to work with minimal chafe on the rigging on any point of sail.
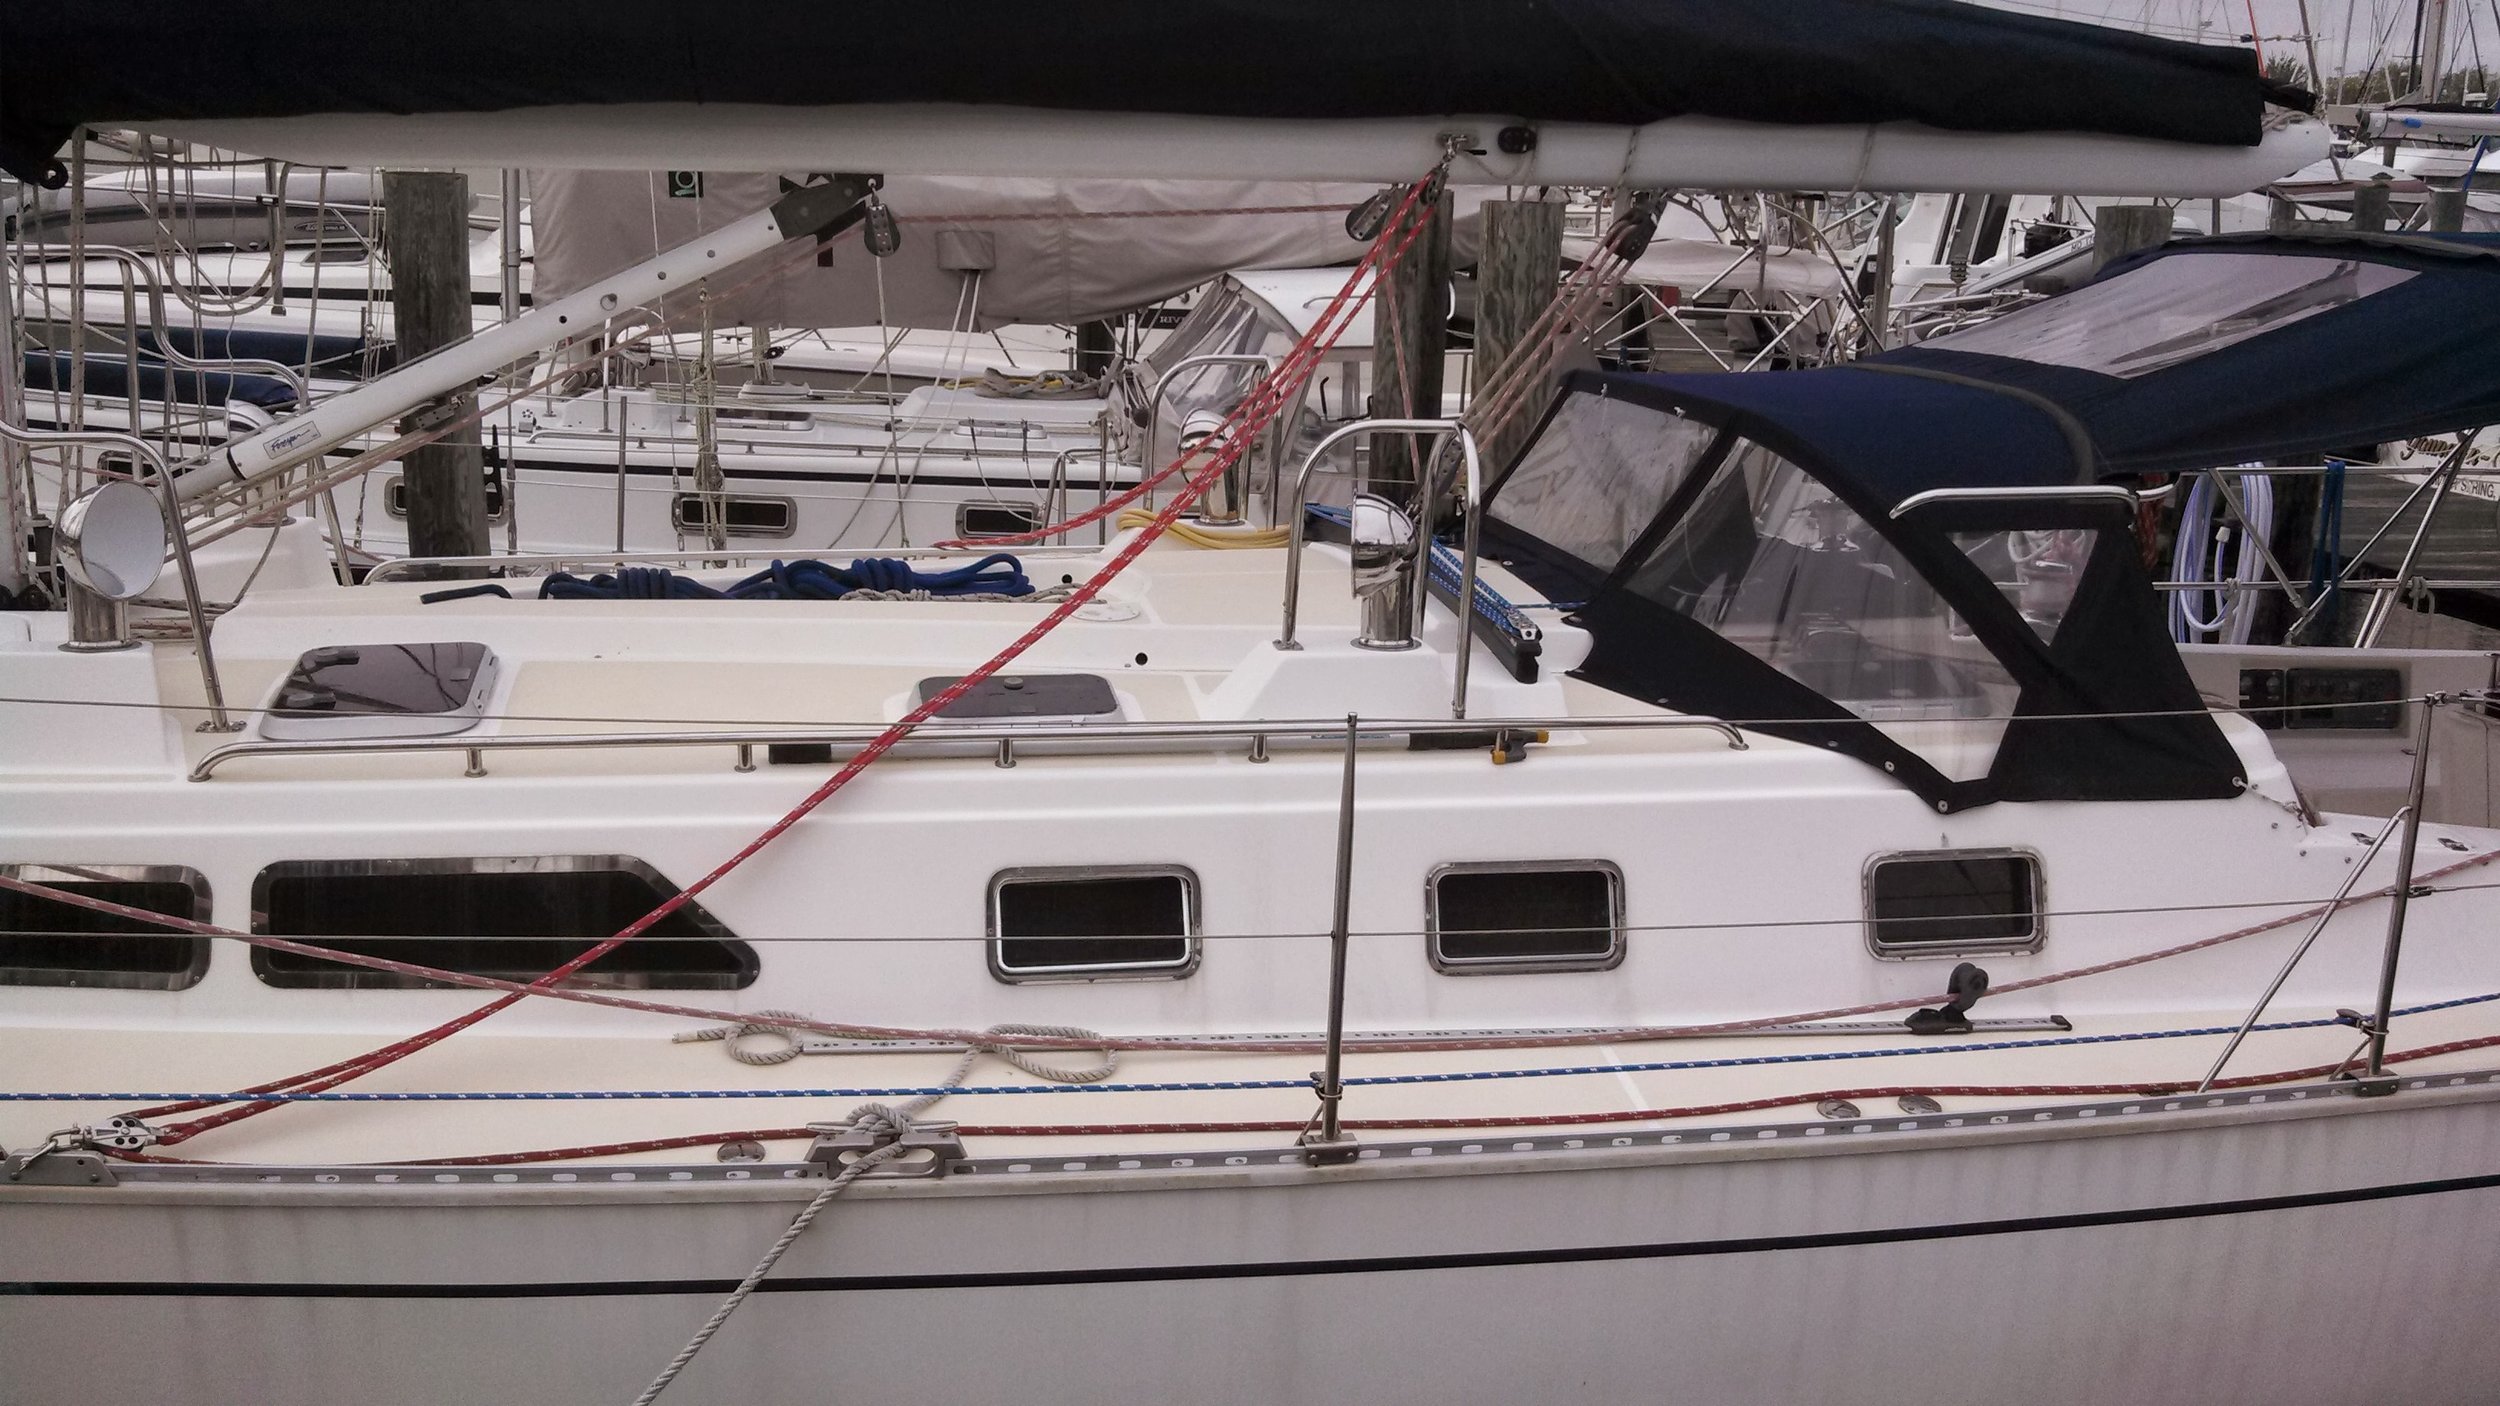
The lines are setup with appropriately sized blocks and have fair leads leading the lines back to the cockpit. This allows the captain to set and release the preventers from the cockpit without the need to go forward. This would let you manage all the sheets from the helm in quick order, allowing you to execute your maneuvers quickly and easily.

Preventers are another part of the running rigging that needs to be setup properly and managed the same way as the rest of your running rigging. If you are going to rely on it to save your rigging from an accidental jibe, you need to make sure that it can withstand the forces and loads that it will be subjected to.

Mounting the Bilge Pump Frames

After the bilge pump frames were mounted in their ideal location and the bolt holes for the bilge pump were drilled, it became time to more formally mount the bilge pump frames to the bulkheads.

Those little brass screws are only there to hold the frames in place. The fiberglass and resin are going to do the actual mounting. Bonding the frames to the bulkhead over paint would result in a bond only as strong as the paint adhesion to the wood. This means that the paint needs to be removed and the surface taken down to the bare wood.

Using a block plane, I scraped the paint off the wood and freshened up the woods surface. There are many holes in this area from the multiple attempts to position the frames, so the correct holes were circled and the outline of the brackets marked. This will aid in positioning the frames into the correct holes when I go to mount the unit with the fiberglass.

With one screw into the brass L bracket, I was able to add a large clump of chop strand mat onto the end of the wooden frame. Swinging the frame into position pressed and pinched the chop strand mat between the bulkhead and the frame end. The other brass screws were added to help hold it in position, but none of the screws were tightened yet.

With the aft end of the frame loosely attached, I was able to swing the forward end of the frame away from the angled bulkhead. This created enough space for me to stuff in some more chop strand mat before pinching the frame against the bulkhead. 

With both frames pinching chop strand mat against the bulkhead, I was then able to tighten all the brass screws to lock the whole unit in place and in position.

The chop strand mat was all added dry, with no resin at all. Doing all the work dry, I am able to work in a clean environment without getting resin all over my tools (or the rest of the boat). I will need to pay extra attention to make sure that the resin makes it all the way to the center of the chop strand mat to avoid incomplete wetting of the mat. 

This can be easily achieved by thinning the epoxy resin before application, making it runnier and more able to penetrate deep into the wood and surfaces. It is important to fully saturate the whole structure before applying the fillets which will be a much thicker epoxy mixture and won't allow much penetration into the dry contact of the frame and bulkhead. Applying all the epoxy at once allows the entire unit to cure as a single giant polymer which will have much greater strength in the end.

Planking the Stem

The stem is a very important part of the dinghy, this area will get a beating as it cuts through waves, bangs into piers, and is dragged up beaches. To make everything strong and watertight, the strakes need to tuck into a rabbet joint on the stem that is filled completely with bedding compound. 

Bedding compound is messy as it is goopy and sticks to everything! To avoid these messes, dry fitting the planks is crucial. Once all the planks are cut and fitted, then the bedding will be applied as the boards are nailed on.

The bow on our dinghy is going to have a very narrow angle of entry to facilitate its ability to cut into a wave and decrease the slapping and banging that occurs in a slight chop. The topsides are going to extend down to the forefoot, and the bottom planking will fit around this area.

To get this effect, long strakes were cut that could reach from the sheer to the forefoot, and then the rest of the planks were cut and fitted to match. Cutting the planks is simple, the first cut is marked with a pen at the sheer, then it is cut. Once that part is test fitted, another line is made where the plank reaches the stem. Marks are made where the rabbet line is, and the board is cut with a miter handsaw along that line. This produces a very tight fit that will keep out any water that might try to works its way through.

Up to the first frame, all the planks ended at the chine log. For the very short span between the first frame and the stem, the planks skipped the chine log and continued on to meet up with the stem. This produced the very fine entry angle I was looking for when I designed the hull without the issues of fitting tiny bottom planks that will practically need to be scarphed to the join them securely.

Once everything was test fitted dry, it was time to remove all the boards and install them again using copper nails and bedding compound.  With everything attached, it is now time to wait for the bedding compound to cure so that the hull can be faired and prepared for the second skin going in the opposing direction.

Single Vs Double Reef Line

On yachts where the running rigging is led aft to the cockpit, you will want all the lines led aft to the cockpit. The worst setup is one where the halyard is led aft and the reef lines are left at the mast. Reefing a setup like this would require working the halyard in the cockpit, then run up to the mast to set the reef lines, then run back to the cockpit to tighten the halyard again. In a perfect world, this setup works just as described. In the real world, this setup leads to many trips between the mast and cockpit to carry out a reef. These problems could all be avoided by simply leaving all the lines at the mast or running all the lines back to the cockpit.

In the case of leading lines back to the cockpit, you have two choices with the reefing lines: Single or Double. 

Single or Double refers to how many reef lines are required to reef the sail properly. When reefing a sail, there are two places that need tension: the tack and the clew. With Double Reef Lines, the tack and clew are controlled by separate lines. With Single Reef Lines, the tack and clew are both controlled by a single line.

To properly decide which setup to go with, you need to weigh out the problems with each and find which system you feel more comfortable with. If you enjoy the benefits and don't mind the draw backs, then you have found your ideal setup!

Double Reef Line Setup

Double Reef Line Setup

Double Reef Line Setup Reefed

Double Reef Line Setup Reefed

Double Reef Line Setups allow you to tension the tack and clew from the cockpit, where you also have access to the main halyard when all the lines are led aft. The advantage of a double reef line setup is there is reduced friction, less resistance, and more control of tack and clew tension. 

The reduced friction directly leads to the reduced resistance in working the sail. Each turn a line makes adds friction to the system. If you want to shake a reef out of a sail, you will need to raise the sail by cranking in on the halyard. In a double reef line setup, the reef lines will twist and turn as they make their way from the cockpit to the mast, but then they will only have 2 major twists after that. A turning block on the boom will send the reef line up, and the cringle in the sail will send the reef line back down. Since the reef line only needs to work its way through one cringle, less line is needed to pass through the cringle to raise the sail and equates to less resistance.

Since the reef lines are separate, you are able to properly control the tension in the tack and clew independently. If you feel that the sail is a bit full, you can simply crank harder on the clew reef line to act as an outhaul and pull the sail flatter. 

While less resistance and more control over the sail does sound rather wonderful, double reef line setups do have their draw backs. For starters, you have an extra line to manage. If you are trying to reef in a hurry, you need to:

  1. Lower the main halyard
  2. Crank in on the reef tack line
  3. Crank in on the clew tack line
  4. Crank in on the main halyard

This might not sound that horrible, but most of the times, this is done with a single winch and a clutch bank. This means that you have to wind and unwind the winch drum in a hurry as you switch between lines. If you find that you need a bit more tension on a line, you will have to repeat these steps as you switch between them all.

The other problem with double reef lines is they are double the amount of lines led to the cockpit. If you have a single reef point, you will have 2 reef lines in the cockpit. If you have 3 reef points, you will have 6 reef lines in the cockpit! The cockpit spaghetti can quickly become overwhelming if you do not keep your lines organized and in a situation of panic, the spaghetti confusion can lead to the sail not getting reefed as quickly as it might be desired to have been reefed.

Single Reef Line Setup

Single Reef Line Setup

Single Reef Line Setup Reefed

Single Reef Line Setup Reefed

The alternative to double reef line setups is a single reef line setup. As you can imagine, it's most appealing feature is that it only requires one line to operate. This makes reefing a sail with multiple reef points less confusing. If you have 3 reef points, you will only have 3 reef lines leading to the cockpit! The lack of cockpit spaghetti will make this setup seem more enticing until you start to look at the problems that come with simplicity.

The procedure to reef is simple:

  1. Lower the main halyard
  2. Crank in on the reefing line
  3. Crank in on the main halyard

The first issue is the shared tension on the line. The tack and clew share the reef line, as it makes its journey from the boom to the clew cringle to the clew turning block to the tack turning block to the mast and then through all the twists and turns to get back to the cockpit. The setup can also be run in reverse where the fixed point is near the tack and the line returns to the mast from the end of the boom. Either way, the line runs a very long path with lots of turns resulting in a setup where the same line is supporting the loads of the clew and the tack.

If you feel that the sail is a bit full and you wish to flatten the sail out, you will need to tension the heck out of the line so that it can pull on the clew enough to produce the desired effect. The clew and the tack share the force. Any effort you put in to the reef line, only half the force reaches the clew as the tack is taking the other half.

Since the reef line is running to both points on the sail, the load on the reef line is also significantly increased. With a double reef line setup, your effort is only affecting one part of the sail. With a single reef line setup, any effort you do is going to affect the entire foot of the sail. 

All the twists and turns carried out by the sail will also greatly increase the amount of resistance involved in shaking out a reef. To raise the sail, the reef line will need to make its way through both cringles and that will add a lot of resistance and effort onto the arms of the person grinding the winch.

The last issue involved with single reef line setups is the length of line needed to rig the reefing system. Purchasing the length of line is no the big issues, the real problem is dealing with the line while you sail. Imagine a yacht with a really high reef point, say for a third reef, that is located 20 feet up the luff. The reef line will need to travel from the cockpit to the mast, up the mast, then up the sail to the cringle and back to the boom, and then again at the second cringle. This reef line is going to have to cross a 20 foot span four times!

Aside from all the length of line to get to the mast and to travel the boom, you will have 80 feet of line that needs to be worked to manage that sail. This means that when you go to shake out a reef, 80 feet of line will have to travel through the first cringle and 20 feet through the second cringle. When you go to reef, you will have to pull in 80 feet of line and then store it somewhere in the cockpit! While 80 feet may sound like a lot of line, but it gets worse. If that was the third reef, you will also need to haul in the reef line for the first and second reef line. If you don't the reef lines will lay slack and can fall into the water or get snagged on your deck. Not only will you have to deal with 80 feet for the 3rd reef, but the long length of line of the 1st and 2nd reef. This is how the cockpit spaghetti forms and gets really confusing when the lines are not properly color coded.

While it may sound like both of these systems are flawed in dumping all this line in the cockpit and adding a lot of extra resistance to the system, the truth is they do a great job of bringing the lines back to the cockpit. If you do not feel comfortable when you leave your cockpit, then this type of setup would be ideal for you as you would be able to raise, lower, and reef your mainsail all from the cockpit without setting foot on the deck.

Single and double reef line setups are a favorite among coastal cruisers and racers. Coastal cruisers love them because no one needs to leave the cockpit if the weather turns for the worse. Racers love them because it allows the crew to work the entire boat from a central location where they can easily hear commands. Blue water cruisers don't seem to favor either of these systems as the added resistance, effort, and spaghetti all lead to more points of failure and instead opt for the lines to be left at the mast where resistance is minimized as are failure points.

The final decision comes down to those who are sailing the yacht. All systems have their pros and cons, and finding a system that you enjoy the pros and don't mind the cons is the goal!  

Morty is Out!

Morty went with us to visit Maddie's cousins that were in town. Maddie's cousins are really young so they played with Morty and Morty played with them all day long! 

The kids would run and Morty would chase them, then they would throw his toys for him to fetch. After the kids got tired, they moved inside to play ping pong, and Morty designated himself as the designated ball boy. Any ping pong ball that fell off the table was appropriately and promptly tracked down and captured. Morty would then march back over to the kids with an air of greatness and a ping pong ball in his mouth. 

This continued late into the night, and when we loaded Morty into the car, he checked out! The little corgi that was running all around, all day long, was now sleeping with his head on the arm rest. 

When we arrive at the marina, Morty usually perks up. When I unbuckle my seat belt, Morty jumps around his seat and is ready to run around the parking lot as I make my way to the pier, only to join me as I begin my march down the dock. This time, Morty slept as we entered the parking lot, and flinched his ear when I unbuckled my seat belt. There was no excitement, no jumping, no energy at all. Morty was tuckered out and ready to continue sleeping as soon as we got into the boat. 

As I got out of the car, Morty looked at me with eyes that urged me to carry him to the boat. I denied his offer and he walked slowly and directly to the pier. There was no energy wasted on smelling tires or blocks of wood where all the dogs leave their mark. Morty was on a mission to reach the boat as soon as possible to continue his much needed slumber.