Single Vs Double Reef Line

On yachts where the running rigging is led aft to the cockpit, you will want all the lines led aft to the cockpit. The worst setup is one where the halyard is led aft and the reef lines are left at the mast. Reefing a setup like this would require working the halyard in the cockpit, then run up to the mast to set the reef lines, then run back to the cockpit to tighten the halyard again. In a perfect world, this setup works just as described. In the real world, this setup leads to many trips between the mast and cockpit to carry out a reef. These problems could all be avoided by simply leaving all the lines at the mast or running all the lines back to the cockpit.

In the case of leading lines back to the cockpit, you have two choices with the reefing lines: Single or Double. 

Single or Double refers to how many reef lines are required to reef the sail properly. When reefing a sail, there are two places that need tension: the tack and the clew. With Double Reef Lines, the tack and clew are controlled by separate lines. With Single Reef Lines, the tack and clew are both controlled by a single line.

To properly decide which setup to go with, you need to weigh out the problems with each and find which system you feel more comfortable with. If you enjoy the benefits and don't mind the draw backs, then you have found your ideal setup!

Double Reef Line Setup

Double Reef Line Setup

Double Reef Line Setup Reefed

Double Reef Line Setup Reefed

Double Reef Line Setups allow you to tension the tack and clew from the cockpit, where you also have access to the main halyard when all the lines are led aft. The advantage of a double reef line setup is there is reduced friction, less resistance, and more control of tack and clew tension. 

The reduced friction directly leads to the reduced resistance in working the sail. Each turn a line makes adds friction to the system. If you want to shake a reef out of a sail, you will need to raise the sail by cranking in on the halyard. In a double reef line setup, the reef lines will twist and turn as they make their way from the cockpit to the mast, but then they will only have 2 major twists after that. A turning block on the boom will send the reef line up, and the cringle in the sail will send the reef line back down. Since the reef line only needs to work its way through one cringle, less line is needed to pass through the cringle to raise the sail and equates to less resistance.

Since the reef lines are separate, you are able to properly control the tension in the tack and clew independently. If you feel that the sail is a bit full, you can simply crank harder on the clew reef line to act as an outhaul and pull the sail flatter. 

While less resistance and more control over the sail does sound rather wonderful, double reef line setups do have their draw backs. For starters, you have an extra line to manage. If you are trying to reef in a hurry, you need to:

  1. Lower the main halyard
  2. Crank in on the reef tack line
  3. Crank in on the clew tack line
  4. Crank in on the main halyard

This might not sound that horrible, but most of the times, this is done with a single winch and a clutch bank. This means that you have to wind and unwind the winch drum in a hurry as you switch between lines. If you find that you need a bit more tension on a line, you will have to repeat these steps as you switch between them all.

The other problem with double reef lines is they are double the amount of lines led to the cockpit. If you have a single reef point, you will have 2 reef lines in the cockpit. If you have 3 reef points, you will have 6 reef lines in the cockpit! The cockpit spaghetti can quickly become overwhelming if you do not keep your lines organized and in a situation of panic, the spaghetti confusion can lead to the sail not getting reefed as quickly as it might be desired to have been reefed.

Single Reef Line Setup

Single Reef Line Setup

Single Reef Line Setup Reefed

Single Reef Line Setup Reefed

The alternative to double reef line setups is a single reef line setup. As you can imagine, it's most appealing feature is that it only requires one line to operate. This makes reefing a sail with multiple reef points less confusing. If you have 3 reef points, you will only have 3 reef lines leading to the cockpit! The lack of cockpit spaghetti will make this setup seem more enticing until you start to look at the problems that come with simplicity.

The procedure to reef is simple:

  1. Lower the main halyard
  2. Crank in on the reefing line
  3. Crank in on the main halyard

The first issue is the shared tension on the line. The tack and clew share the reef line, as it makes its journey from the boom to the clew cringle to the clew turning block to the tack turning block to the mast and then through all the twists and turns to get back to the cockpit. The setup can also be run in reverse where the fixed point is near the tack and the line returns to the mast from the end of the boom. Either way, the line runs a very long path with lots of turns resulting in a setup where the same line is supporting the loads of the clew and the tack.

If you feel that the sail is a bit full and you wish to flatten the sail out, you will need to tension the heck out of the line so that it can pull on the clew enough to produce the desired effect. The clew and the tack share the force. Any effort you put in to the reef line, only half the force reaches the clew as the tack is taking the other half.

Since the reef line is running to both points on the sail, the load on the reef line is also significantly increased. With a double reef line setup, your effort is only affecting one part of the sail. With a single reef line setup, any effort you do is going to affect the entire foot of the sail. 

All the twists and turns carried out by the sail will also greatly increase the amount of resistance involved in shaking out a reef. To raise the sail, the reef line will need to make its way through both cringles and that will add a lot of resistance and effort onto the arms of the person grinding the winch.

The last issue involved with single reef line setups is the length of line needed to rig the reefing system. Purchasing the length of line is no the big issues, the real problem is dealing with the line while you sail. Imagine a yacht with a really high reef point, say for a third reef, that is located 20 feet up the luff. The reef line will need to travel from the cockpit to the mast, up the mast, then up the sail to the cringle and back to the boom, and then again at the second cringle. This reef line is going to have to cross a 20 foot span four times!

Aside from all the length of line to get to the mast and to travel the boom, you will have 80 feet of line that needs to be worked to manage that sail. This means that when you go to shake out a reef, 80 feet of line will have to travel through the first cringle and 20 feet through the second cringle. When you go to reef, you will have to pull in 80 feet of line and then store it somewhere in the cockpit! While 80 feet may sound like a lot of line, but it gets worse. If that was the third reef, you will also need to haul in the reef line for the first and second reef line. If you don't the reef lines will lay slack and can fall into the water or get snagged on your deck. Not only will you have to deal with 80 feet for the 3rd reef, but the long length of line of the 1st and 2nd reef. This is how the cockpit spaghetti forms and gets really confusing when the lines are not properly color coded.

While it may sound like both of these systems are flawed in dumping all this line in the cockpit and adding a lot of extra resistance to the system, the truth is they do a great job of bringing the lines back to the cockpit. If you do not feel comfortable when you leave your cockpit, then this type of setup would be ideal for you as you would be able to raise, lower, and reef your mainsail all from the cockpit without setting foot on the deck.

Single and double reef line setups are a favorite among coastal cruisers and racers. Coastal cruisers love them because no one needs to leave the cockpit if the weather turns for the worse. Racers love them because it allows the crew to work the entire boat from a central location where they can easily hear commands. Blue water cruisers don't seem to favor either of these systems as the added resistance, effort, and spaghetti all lead to more points of failure and instead opt for the lines to be left at the mast where resistance is minimized as are failure points.

The final decision comes down to those who are sailing the yacht. All systems have their pros and cons, and finding a system that you enjoy the pros and don't mind the cons is the goal!  

Morty is Out!

Morty went with us to visit Maddie's cousins that were in town. Maddie's cousins are really young so they played with Morty and Morty played with them all day long! 

The kids would run and Morty would chase them, then they would throw his toys for him to fetch. After the kids got tired, they moved inside to play ping pong, and Morty designated himself as the designated ball boy. Any ping pong ball that fell off the table was appropriately and promptly tracked down and captured. Morty would then march back over to the kids with an air of greatness and a ping pong ball in his mouth. 

This continued late into the night, and when we loaded Morty into the car, he checked out! The little corgi that was running all around, all day long, was now sleeping with his head on the arm rest. 

When we arrive at the marina, Morty usually perks up. When I unbuckle my seat belt, Morty jumps around his seat and is ready to run around the parking lot as I make my way to the pier, only to join me as I begin my march down the dock. This time, Morty slept as we entered the parking lot, and flinched his ear when I unbuckled my seat belt. There was no excitement, no jumping, no energy at all. Morty was tuckered out and ready to continue sleeping as soon as we got into the boat. 

As I got out of the car, Morty looked at me with eyes that urged me to carry him to the boat. I denied his offer and he walked slowly and directly to the pier. There was no energy wasted on smelling tires or blocks of wood where all the dogs leave their mark. Morty was on a mission to reach the boat as soon as possible to continue his much needed slumber.

Starting Double Diagonal Planking

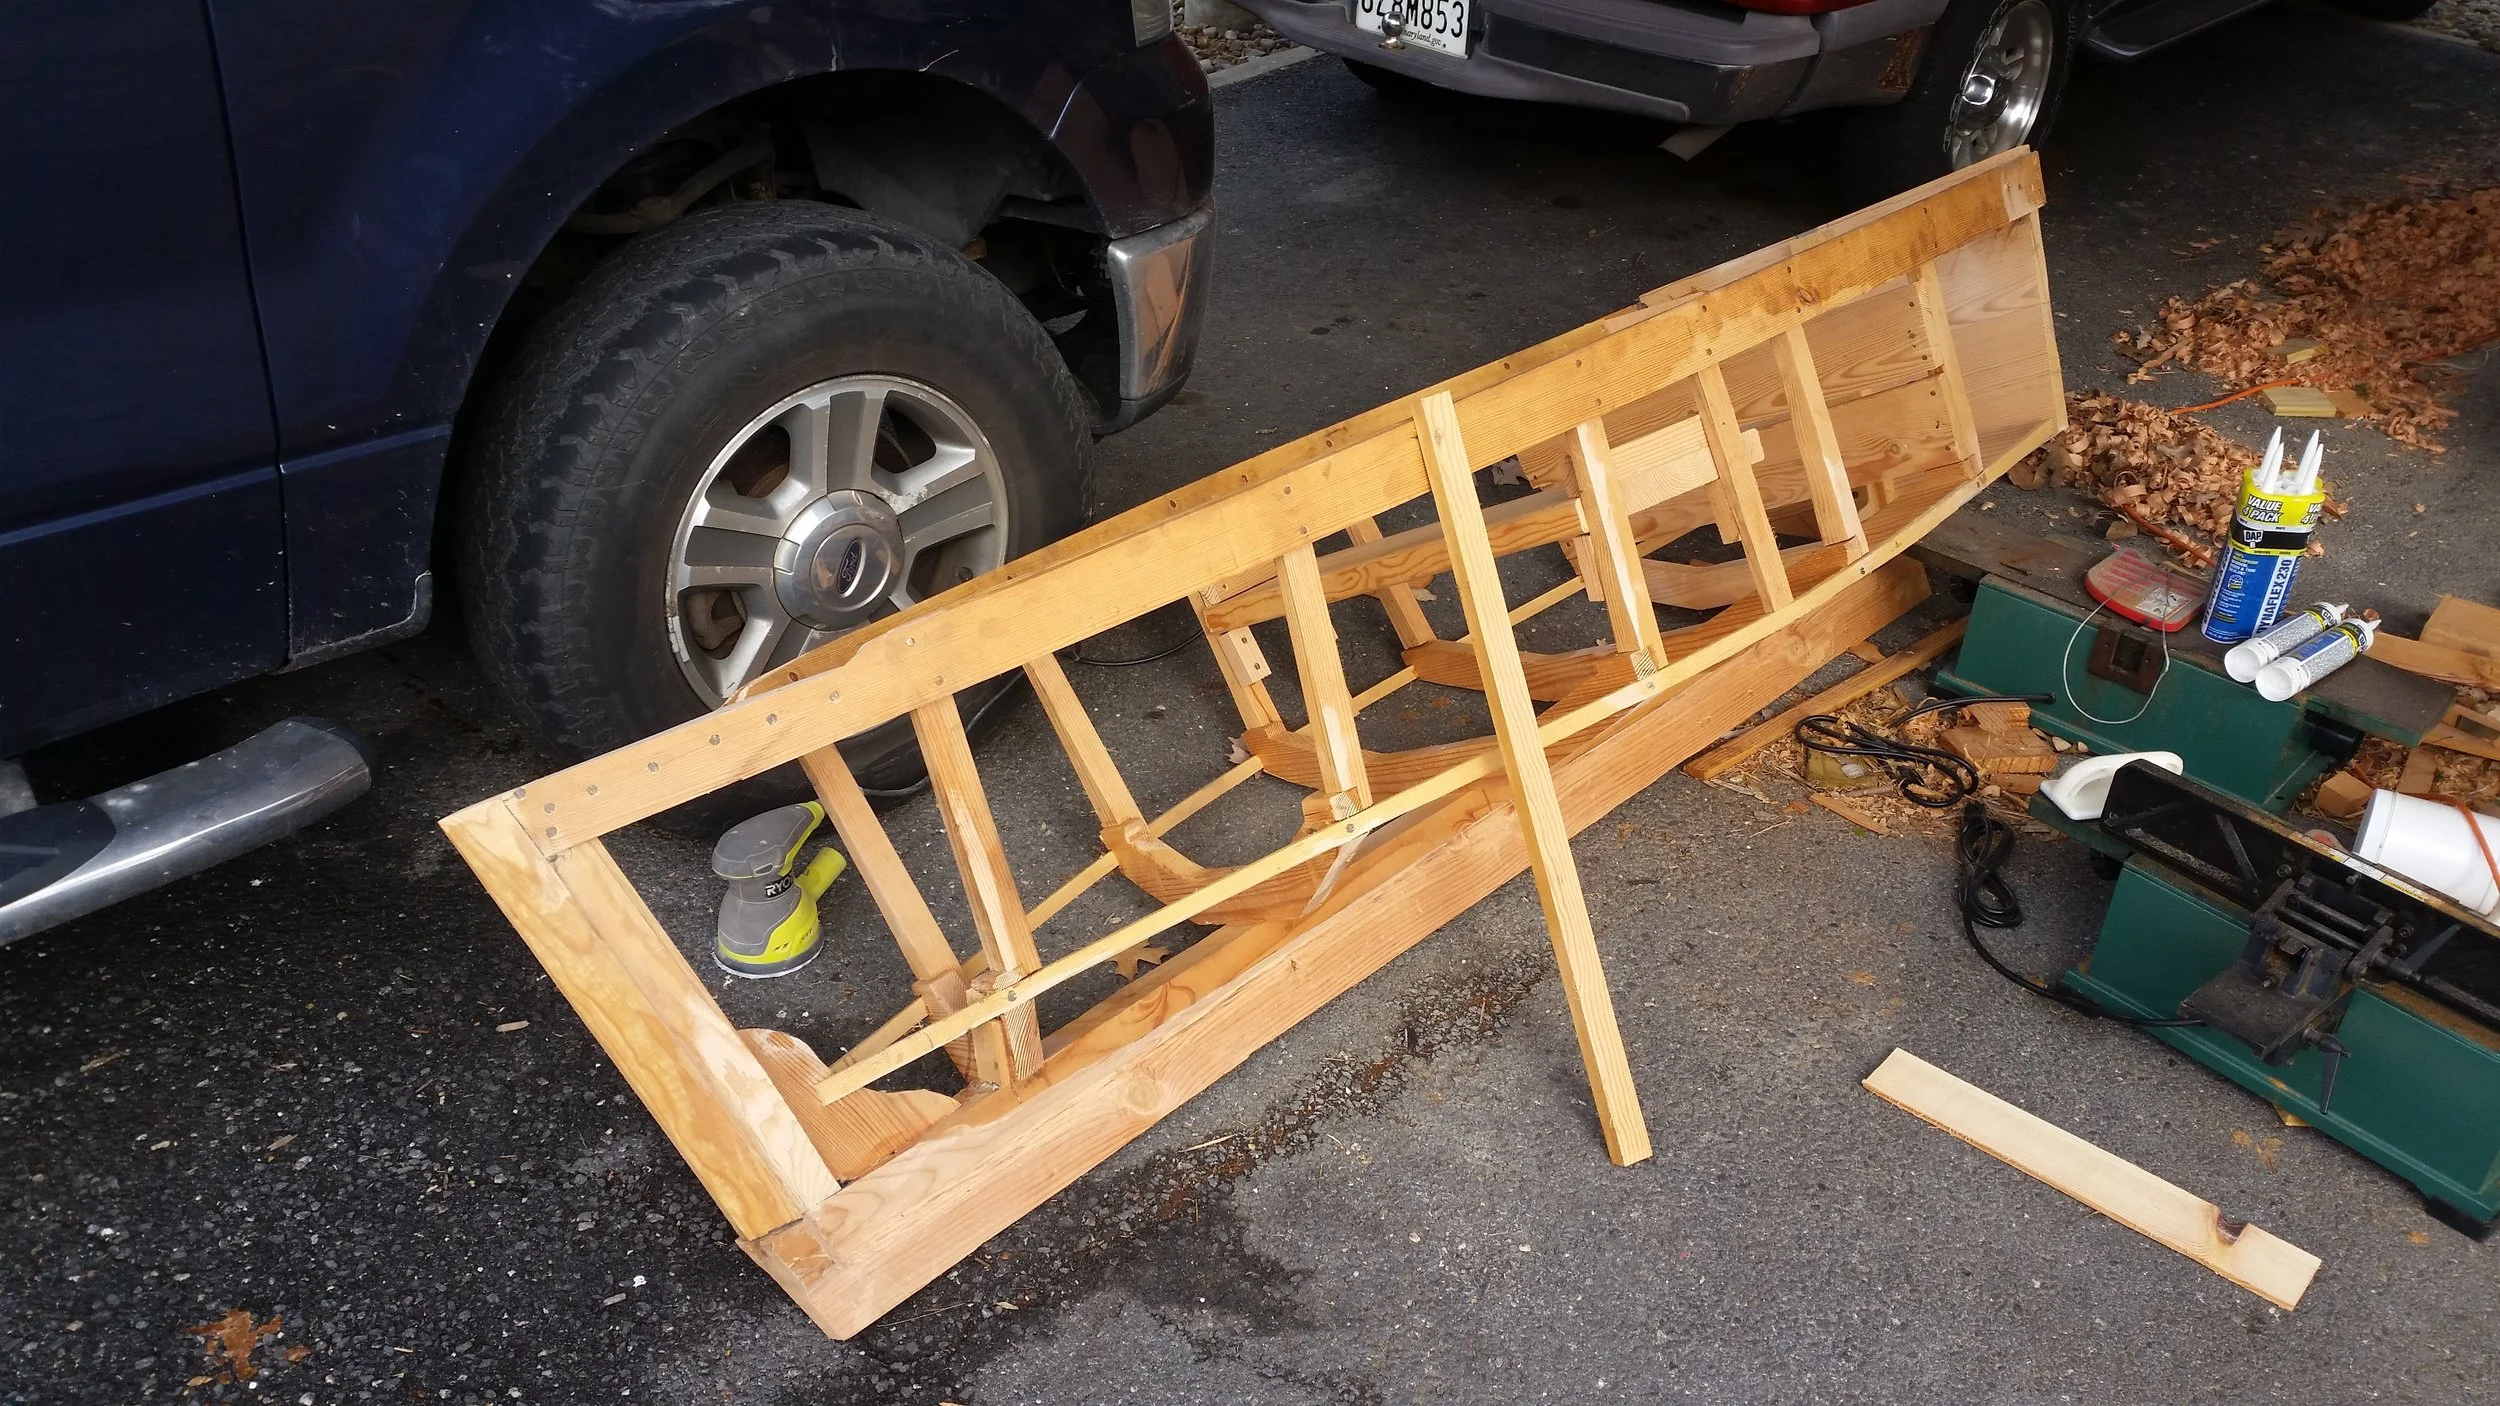
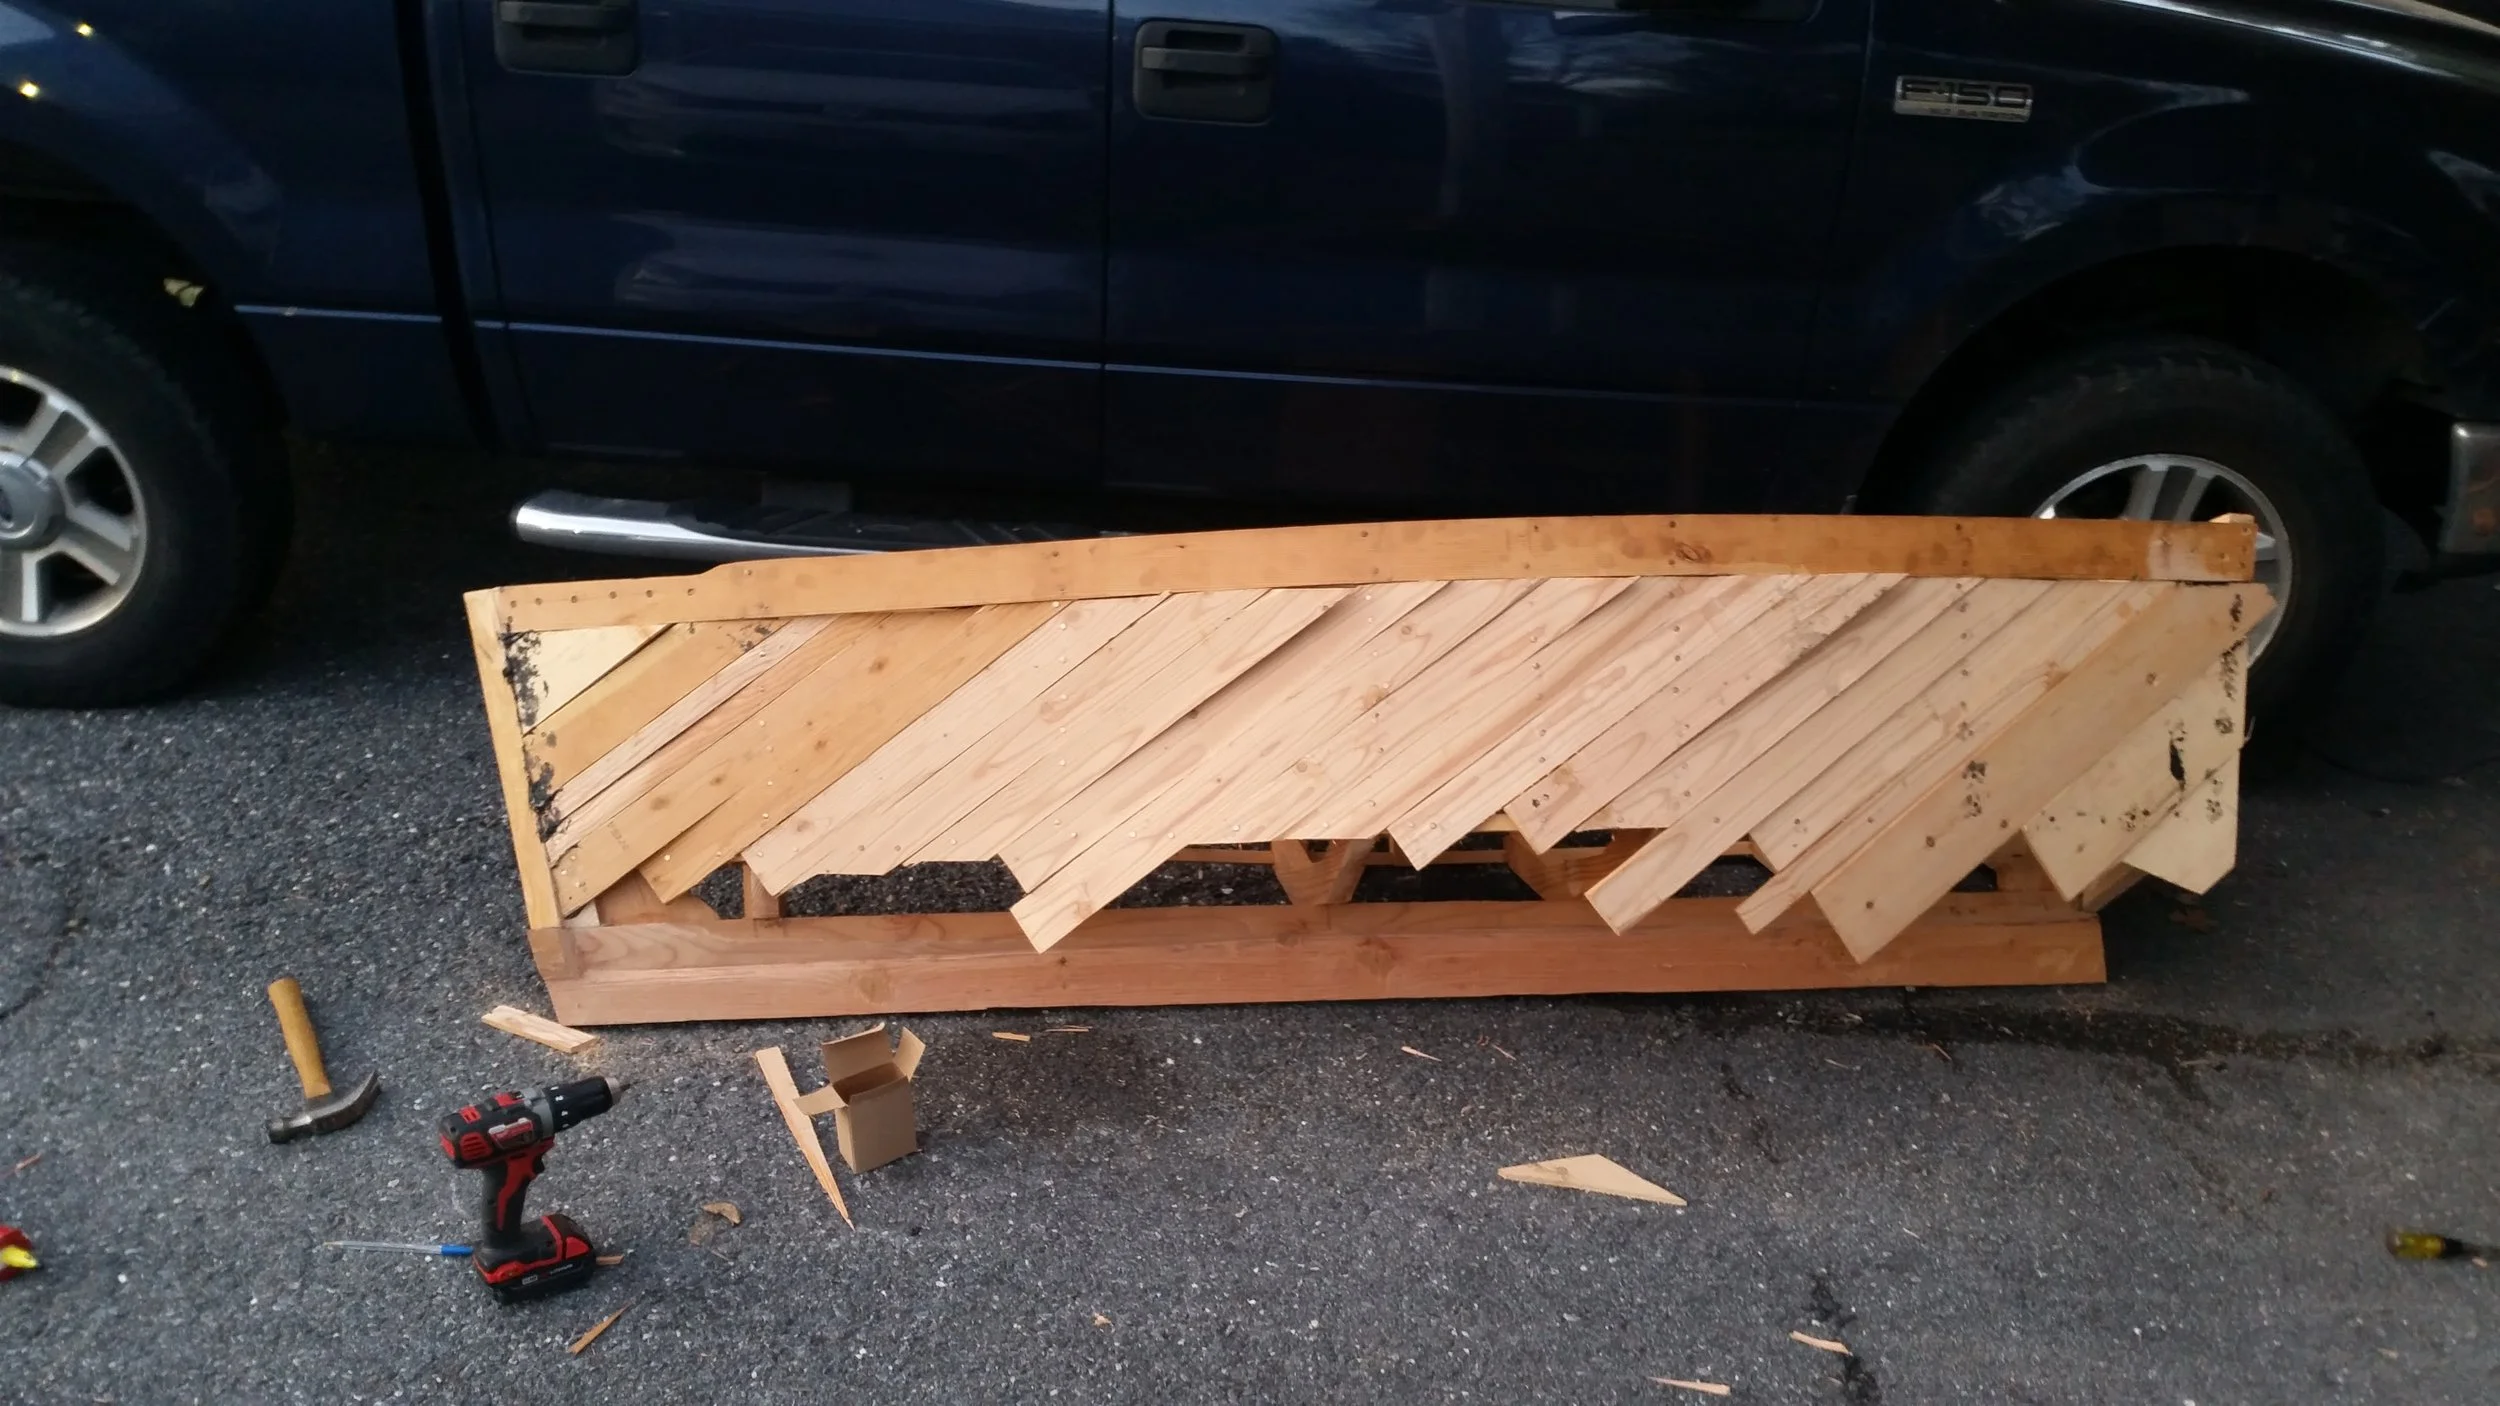
The hull is now ready for planking, all the structural members have been built and finished! Unlike carvel planking where the first strake placed on the hull is the garboard, on double diagonal planking, the first strake placed is the topside transom piece. 

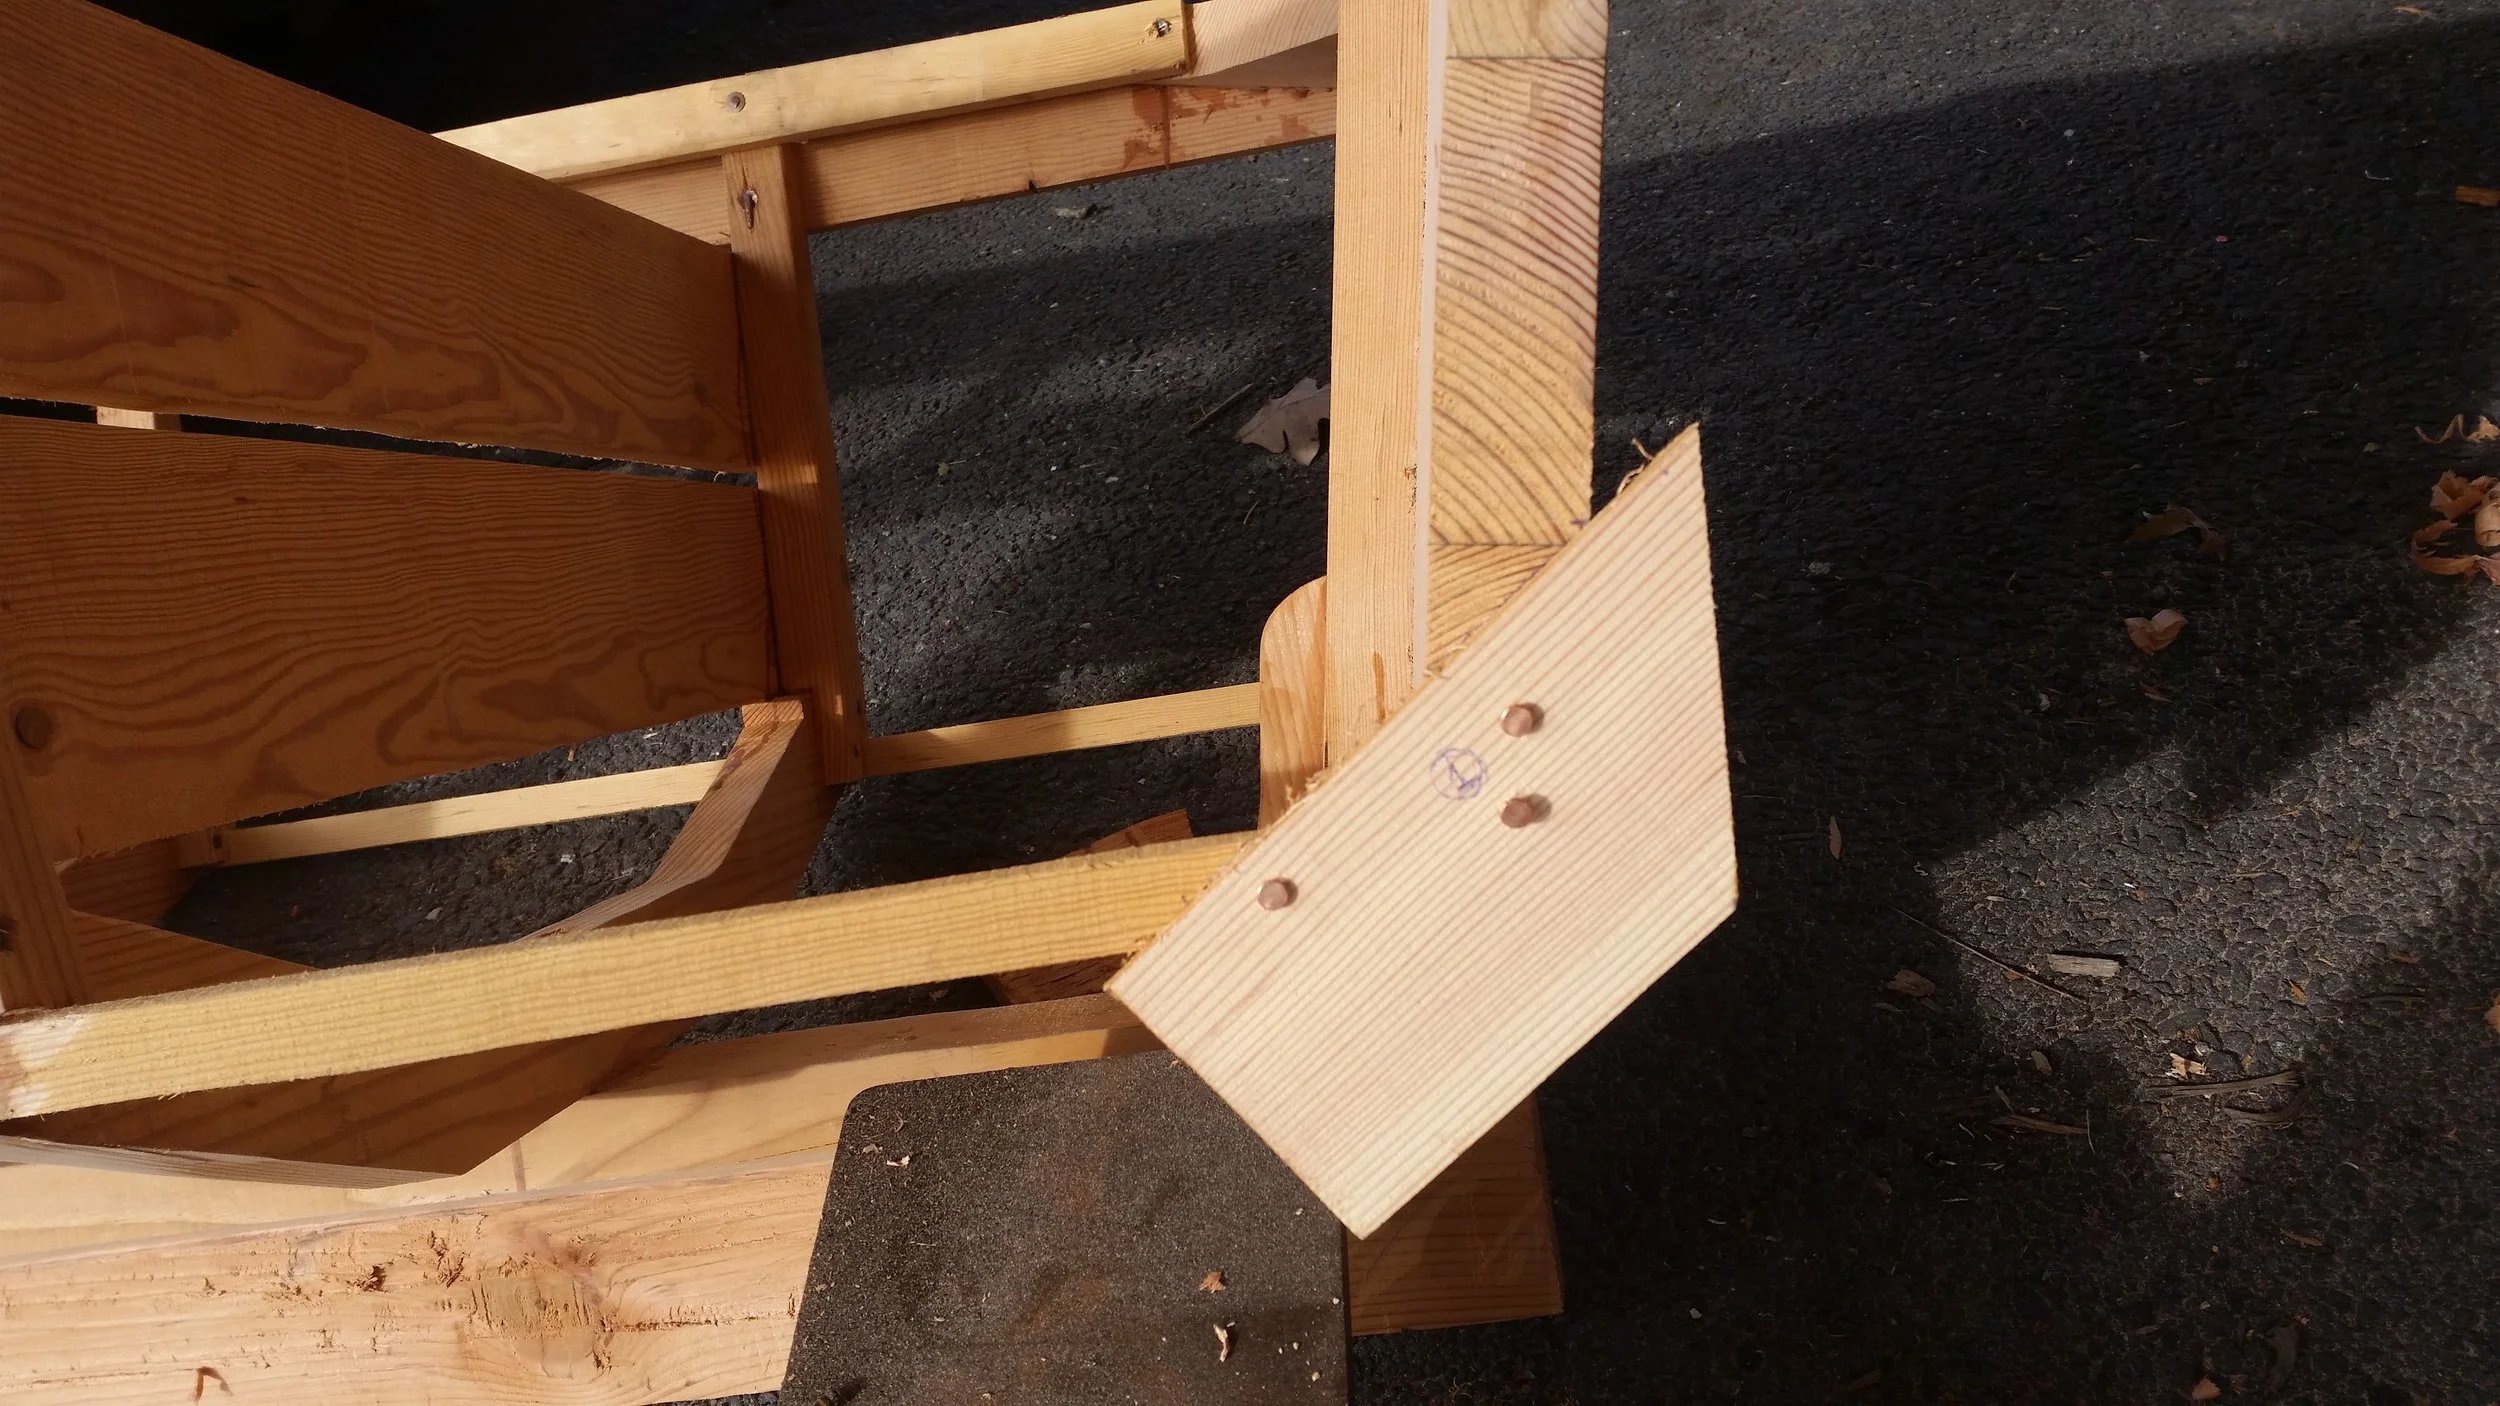
The first piece was dry fitted and held in place by copper nails that were not driven in all the way, facilitating its removal and keeping the holes fresh. This was also done on a very dry and cold day when the wood is as shrunken as possible. As the wood warms and humidity increases, the wood will swell onto the nails and lock them in place!

With the fit verified, bedding compound was placed on the transom edge because this seam will be external and making it water tight is crucial.

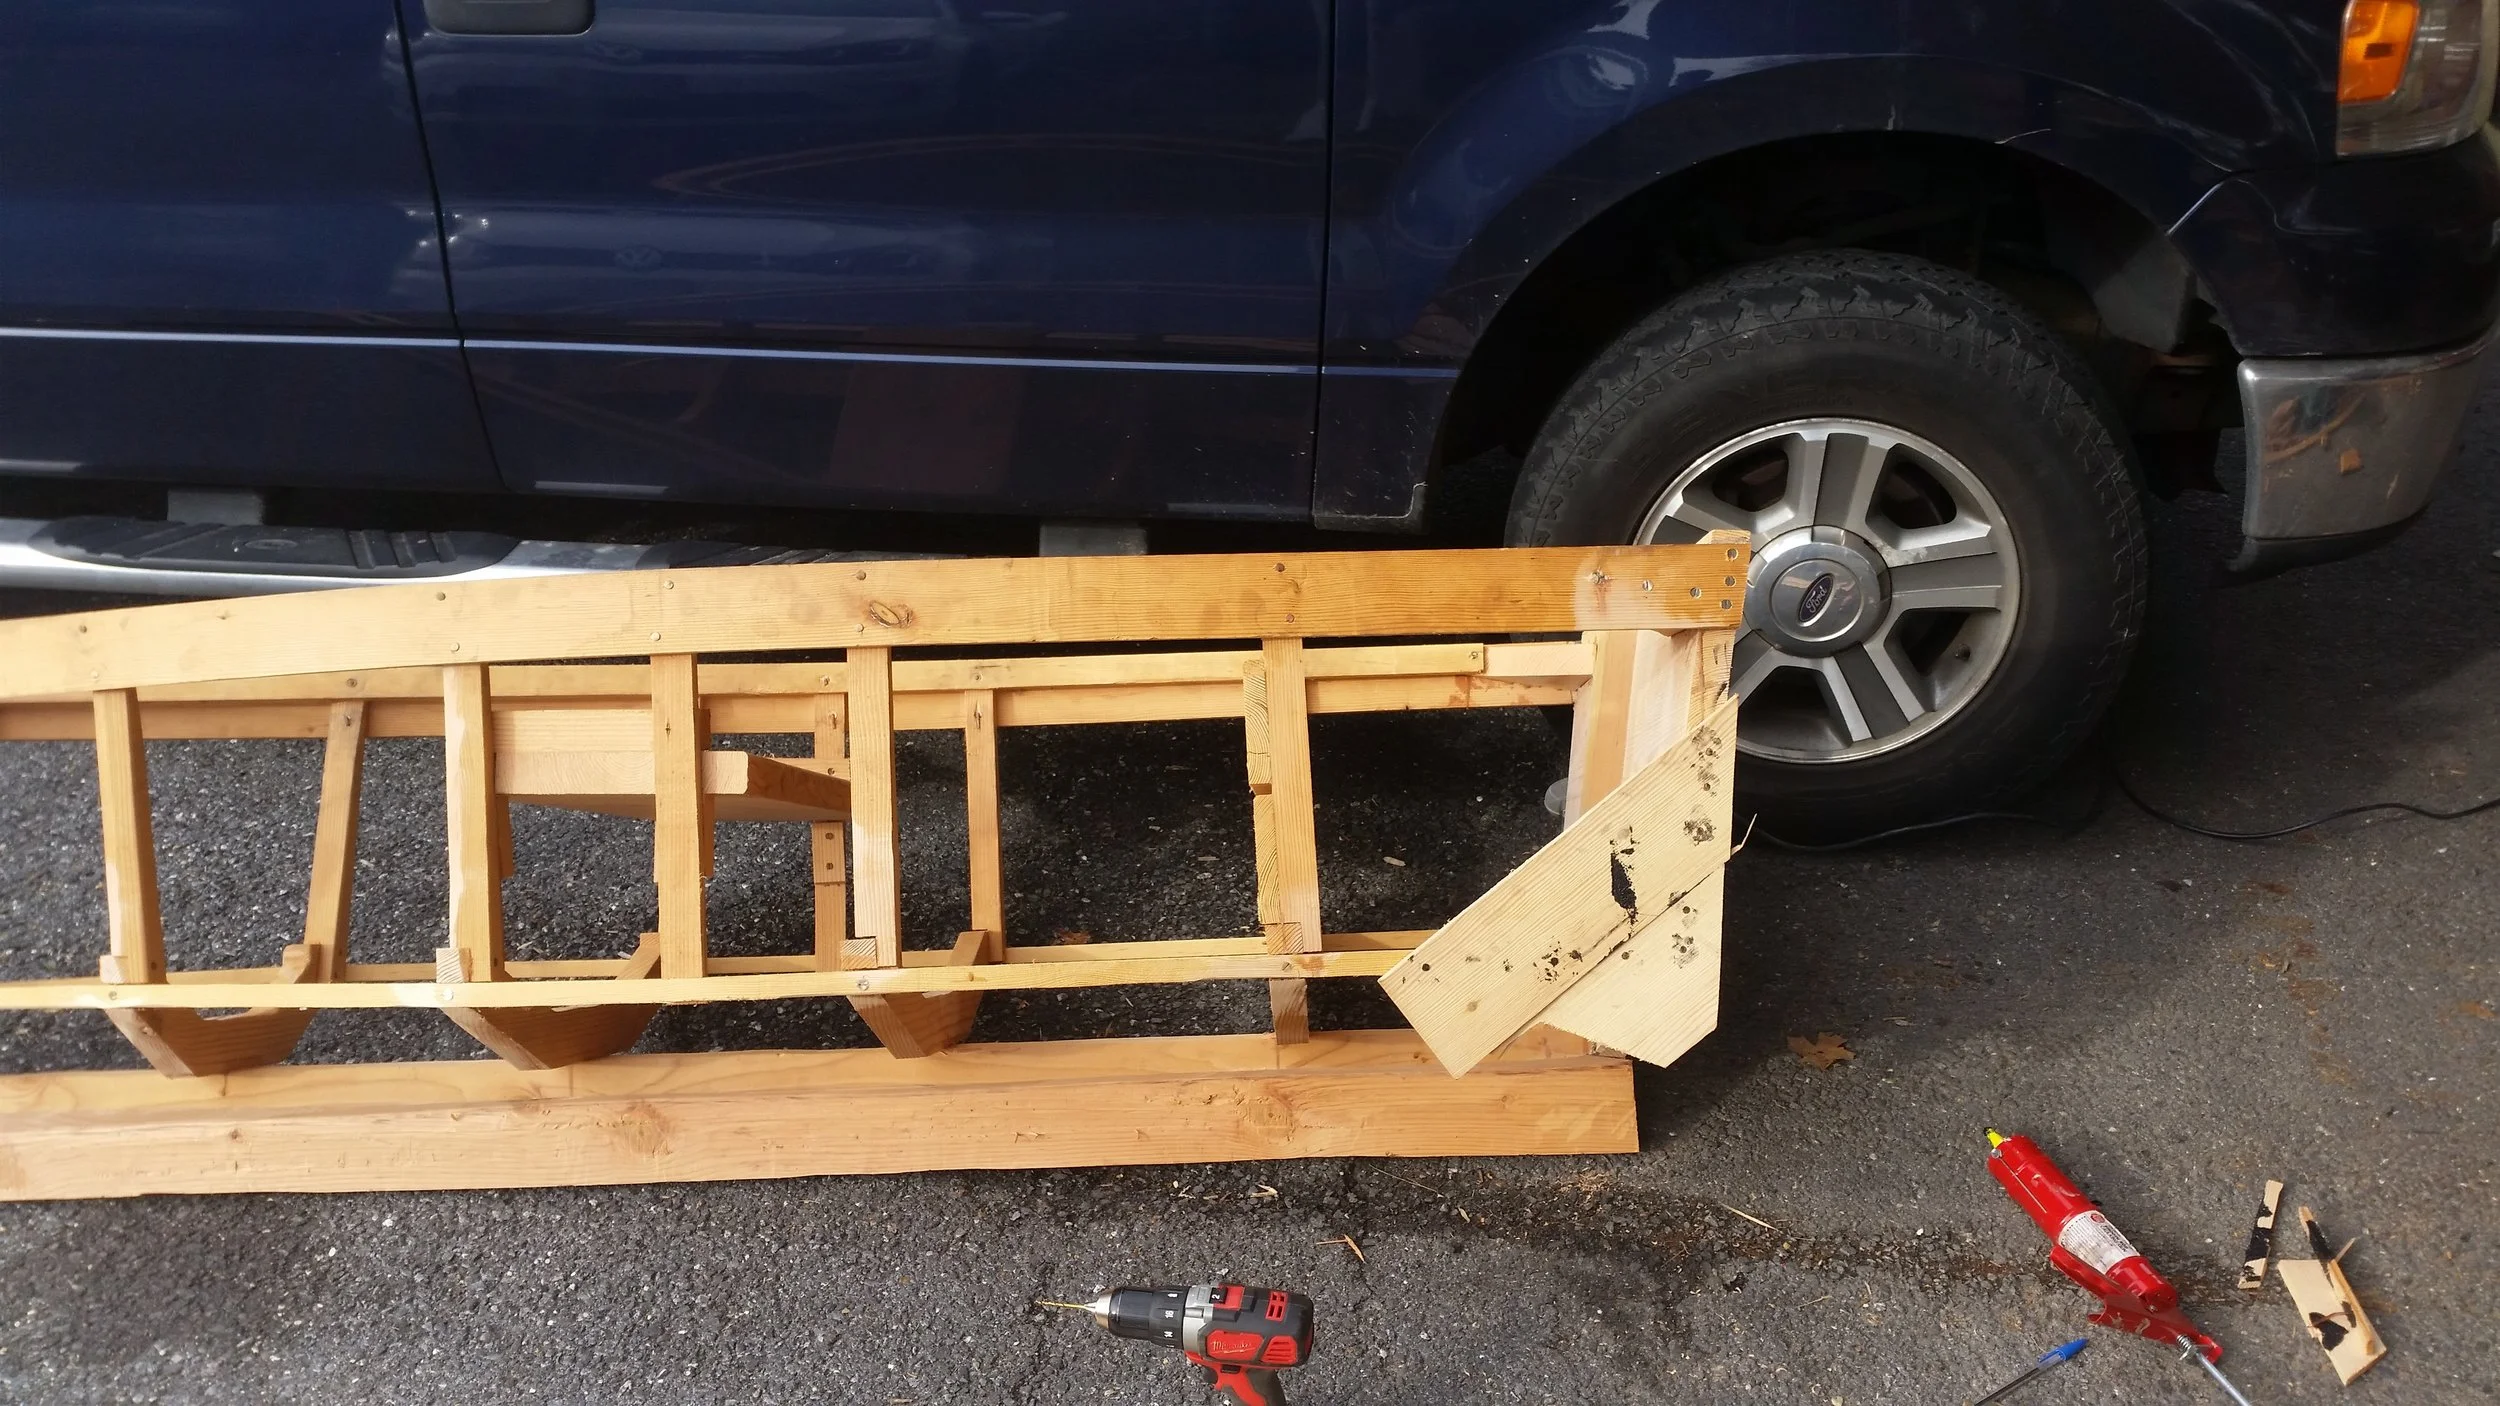
The second piece was also test fitted and then bedded and nailed into place using copper nails. Steel, galvanized or stainless should be avoided on a wooden boat. The wood will hold moisture and cause the galvanized steel to rust forming red rust streaks that will bleed from the holes, while stainless will suffer crevice corrosion and will part internally. Copper and bronze are the preferred material for boat fasteners, though they are overkill for a dinghy.

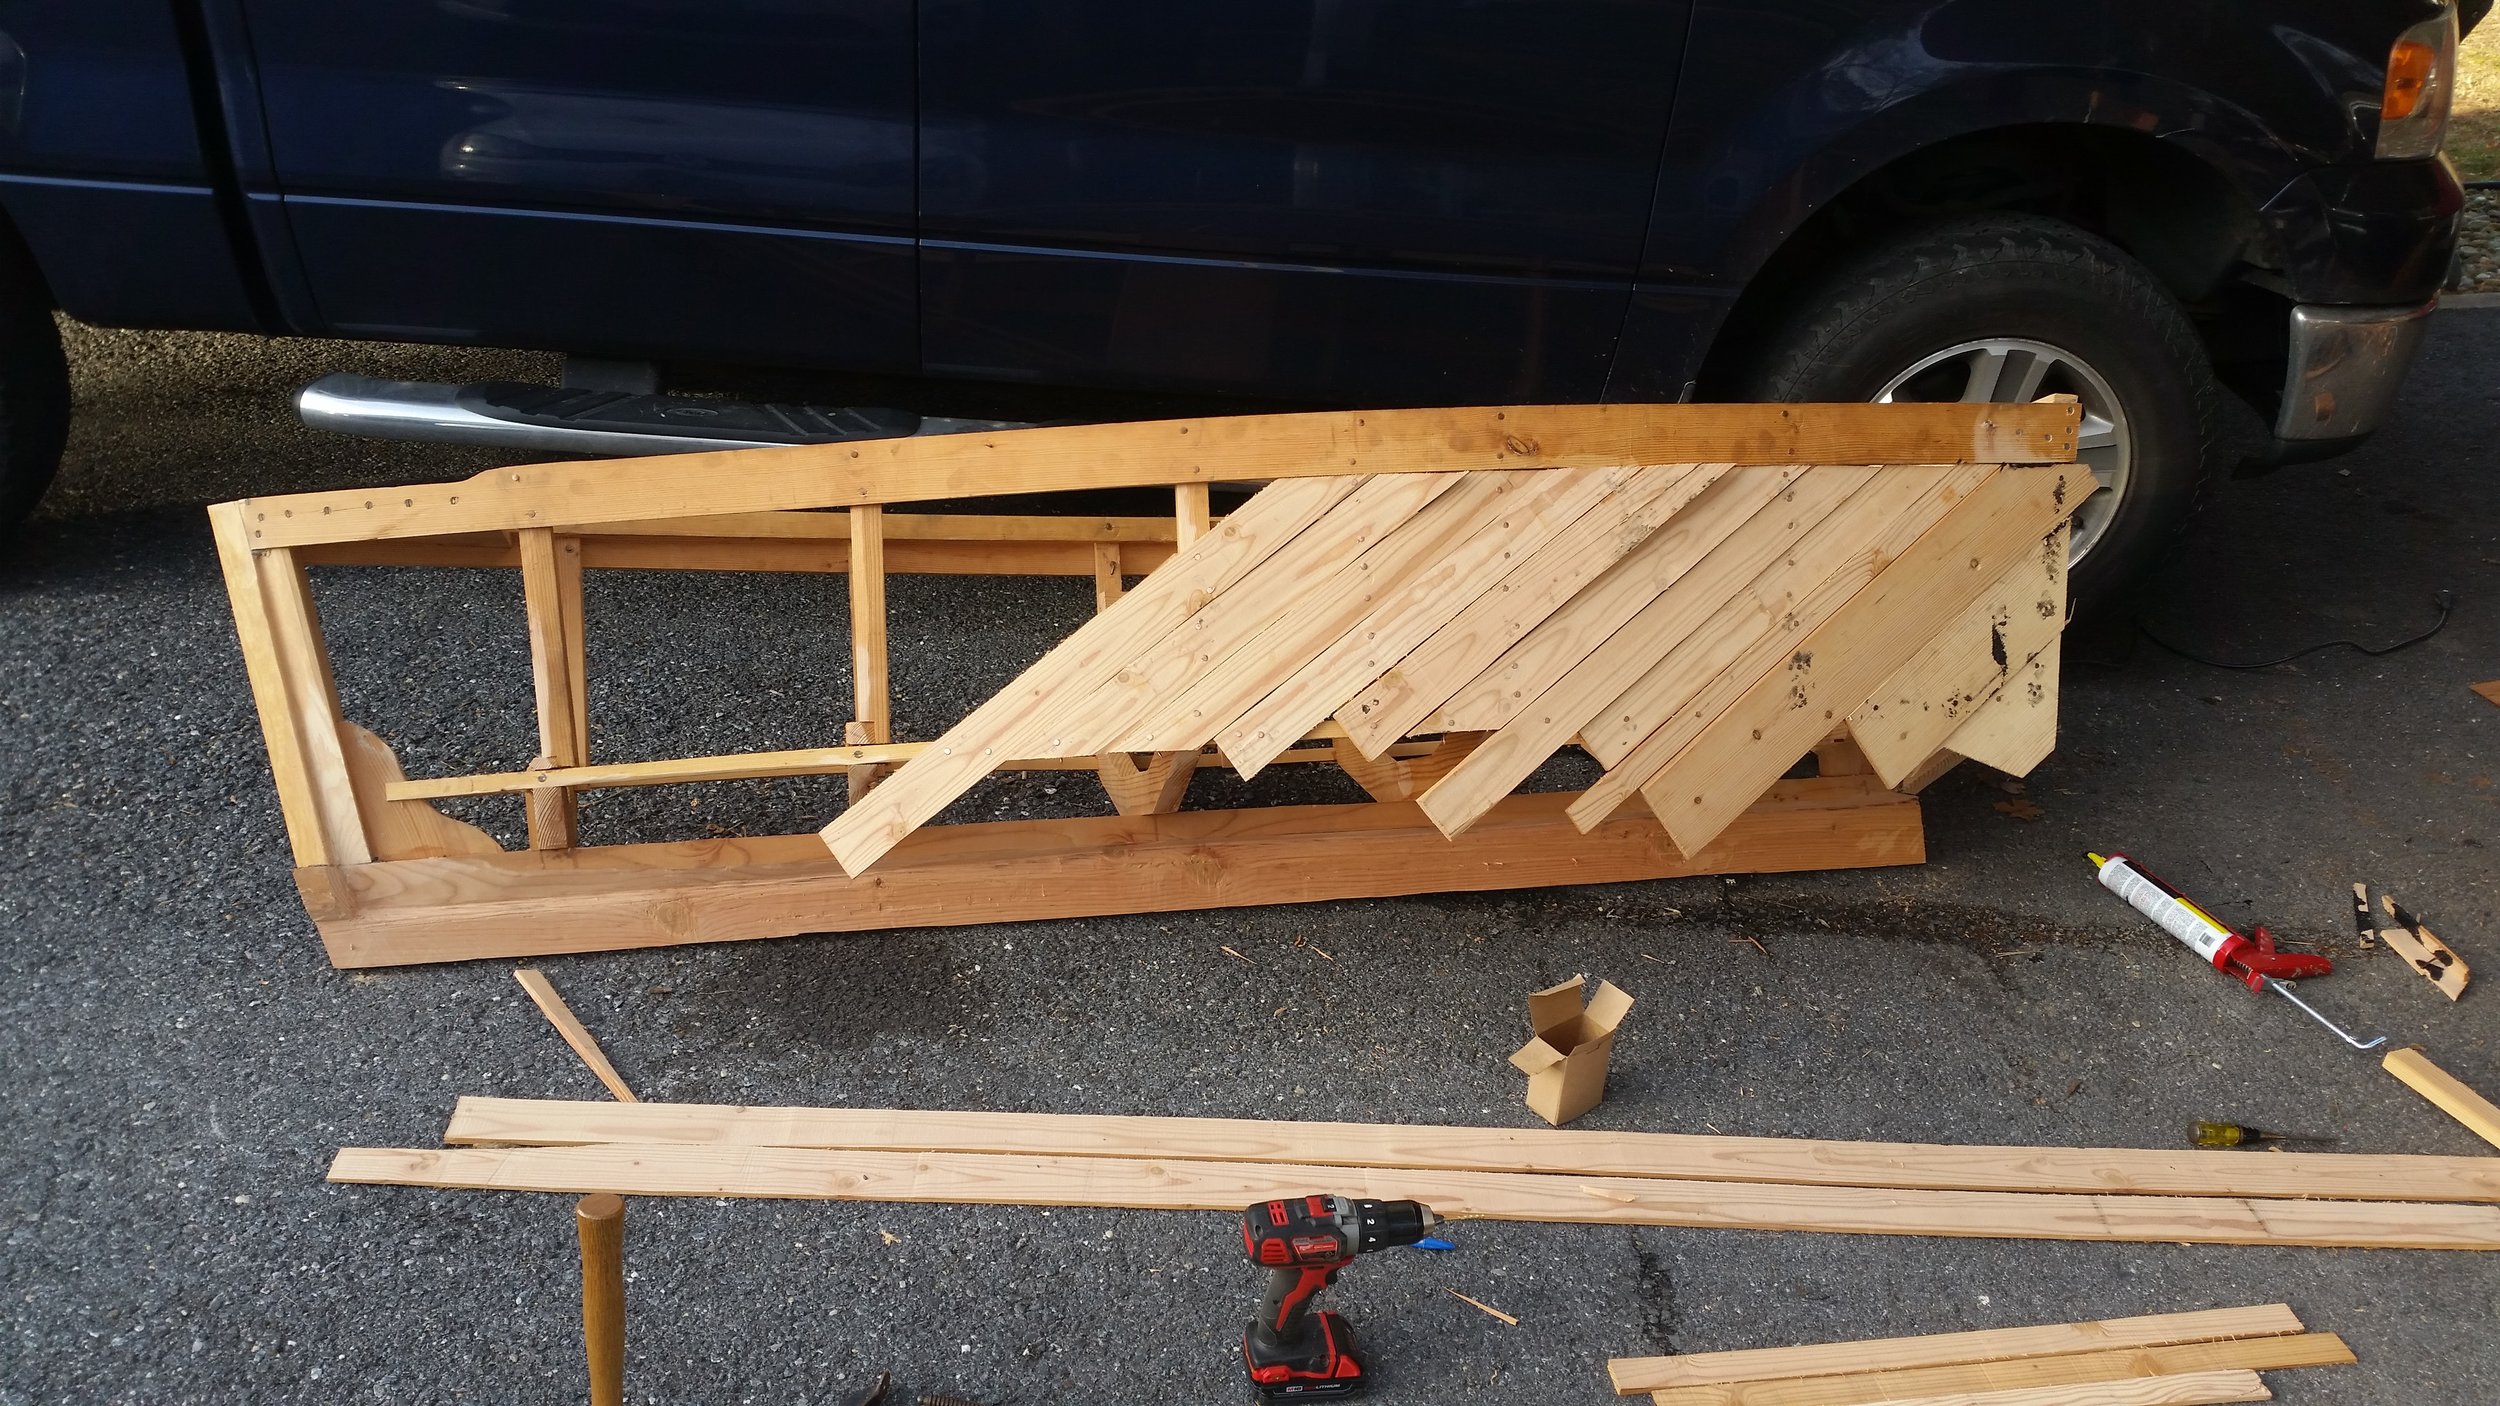
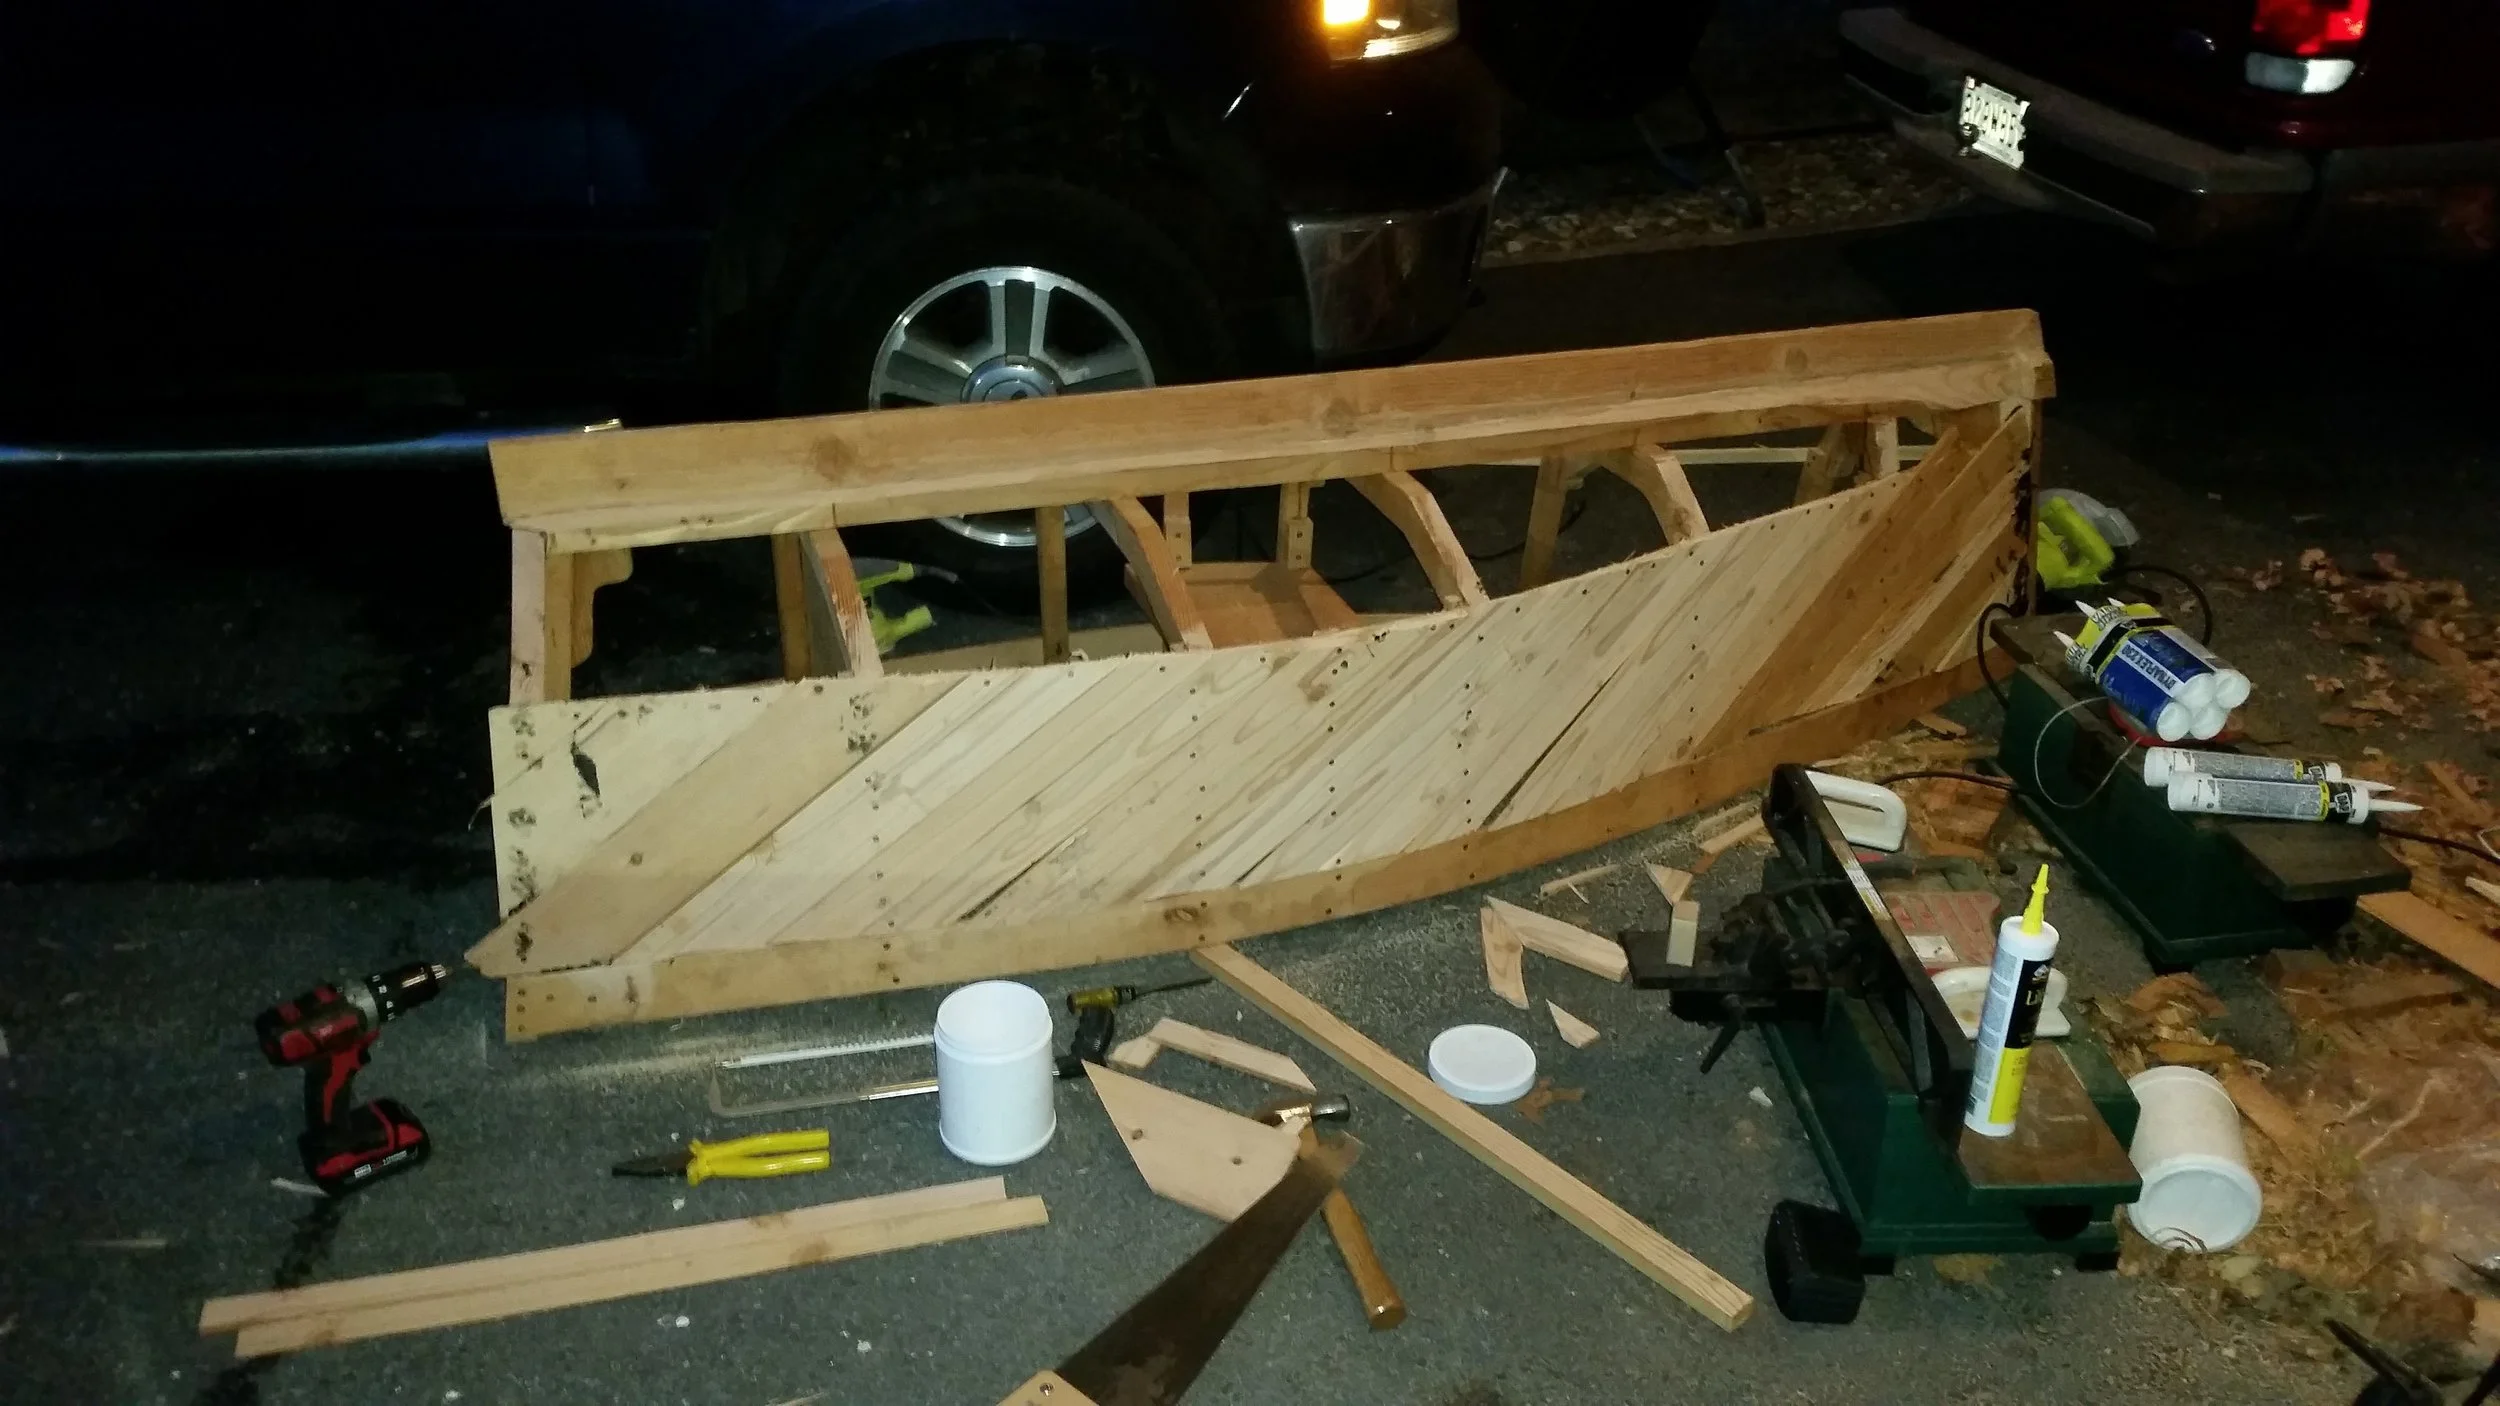
Once the first strake was nailed on and bedded, the rest of the process proceeded very quickly. The strakes that do not contact the transom did not need bedding compound, as they will eventually be completely covered by the second skin.

As the strakes came in contact with the stem, the same method of dry fitting and then bedding the strakes was used. The stem and stern are the only two areas where we are concerned about water intrusion at this point. All the other parts will eventually be covered by other strakes that will shield them from water.

The planks needed to be trimmed to fit under the sheer, but were left overhanging the chine log. This lackadaisical approach made the planking process proceed much faster. Once the entire side was planked, I then went back through and trimmed up the area around the chine.  

The strakes were all cleaned up and the side looks a lot more neatly planked. The strakes that do not start or end on a frame look out of place, as they are not lined up with the rest of the hull, but this is not a problem. When the second layer is fastened, these planks will be drawn up to the outer skin, thus smoothing out the inner skin planks.

The two layers of topside planks will be finished before the bottom planking is done, offering a large faying surface for the bottom and topside planks to meet. The small gaps between the planks are also not a concern, as the bedding compound of the second skin will fill these voids and make the hull skin water tight.

Dyneema Lifelines

Back in February 2015, I installed dyneema lifelines. It has been two years with them in place, and it is time to see how they have been holding up.

The lengths of the lifelines are subject to chafe from sheets rubbing on them while sailing, but with proper block placement, chafe can be reduced if not removed all together. This gives us great peace of mind since we don't have to worry about corrosion nor chafe. But how have the splices been holding up?

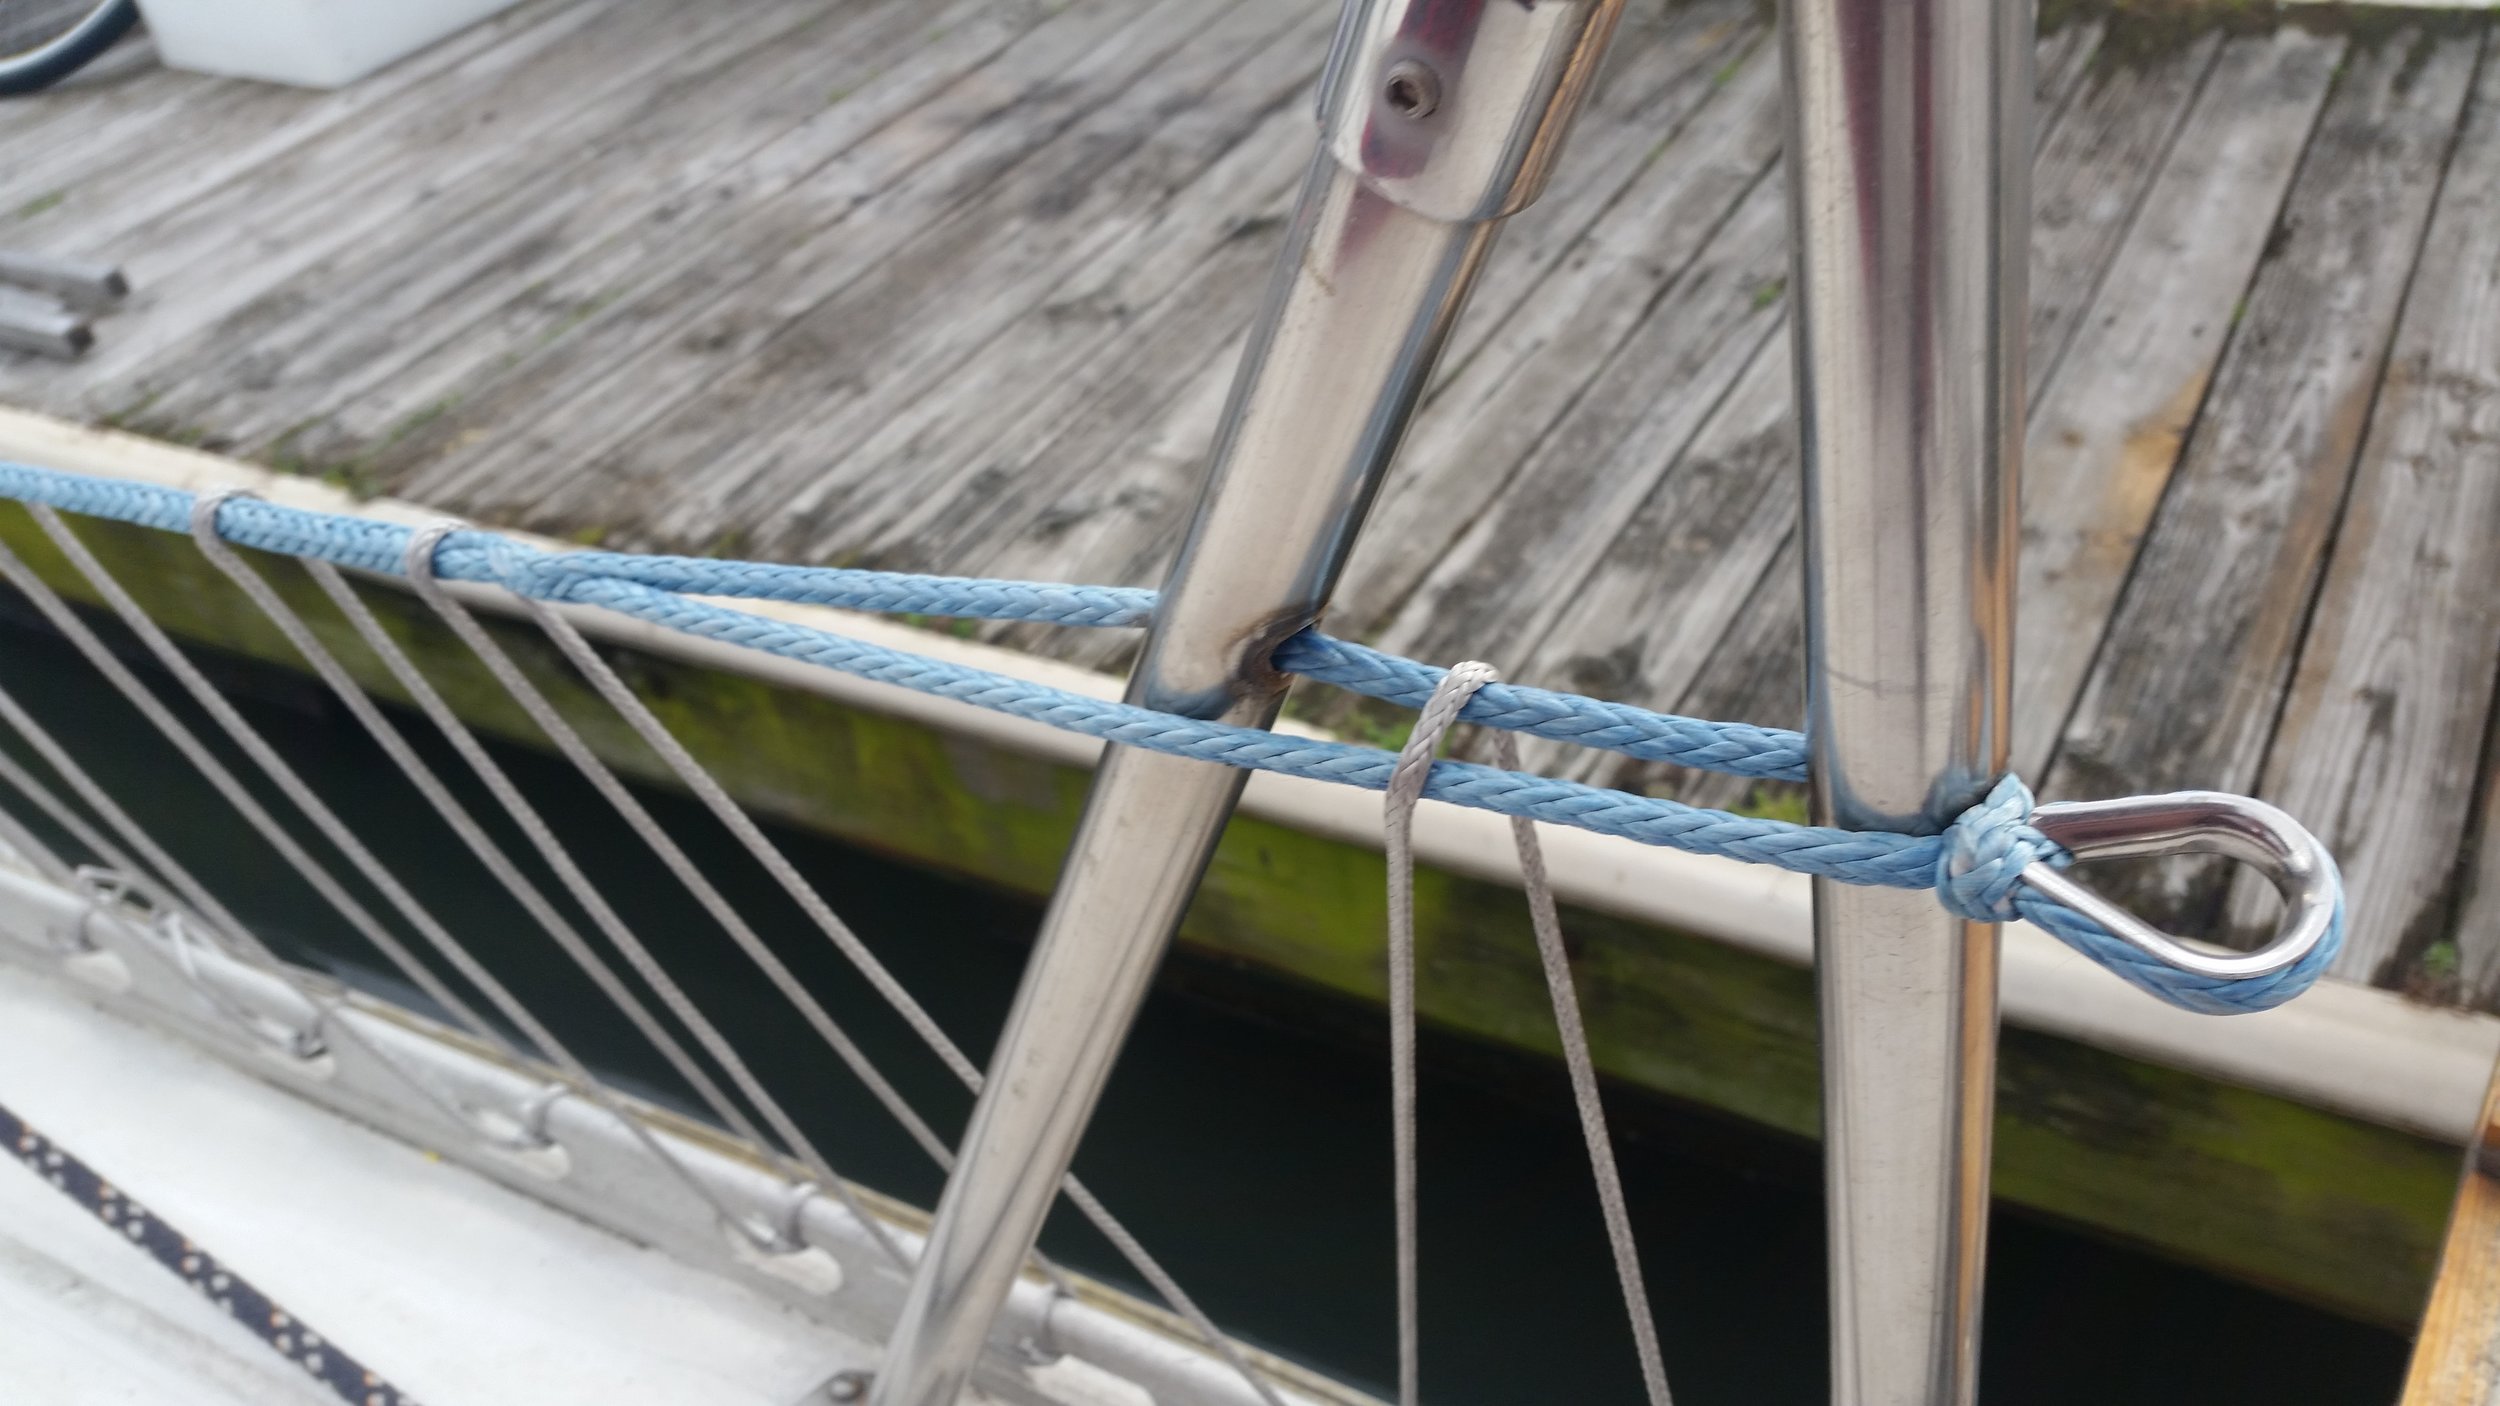
Very well! The ends of the lifelines are finished with a mobius brummel splice, forming a nice locking eye splice that will hold true and strong! This section of the lifeline looks great and the netting wrapped over the lifelines has shown no signs of chafe.

The gate stanchions were spliced rather differently. The spliced lifeline was too large to fit through hole in the stanchion, so the splice was routed along the outside of the stanchion. To allow inspection, the long bury splice was performed a considerable distance from the stanchion. This allows me to loosen the end lashings and pull the lifeline out of the stanchion to inspect. The extra distance is to allow me space to service the lifeline should the need arise. 

By polishing the stanchion's holes previously, there were no sharp points or burs to chafe on the lifelines. This has granted us the joy of no serious chafe after all these years!

With the gate closed, the tension on the lifelines pulls the thimble off the stanchion and straightens everything out. 

The lifelines have served their purpose very well for the past two years. There has been negligible chafe, and no corrosion. The only issue they have demonstrated is more of cosmetic concern: fading. When the lifelines were new, they had a strong electric blue color to them. Over the years, the color has slowly faded to a much more muted blue. 

2015

2015

2017

2017

While the vividness of the blue has subsided through the years, the strength and peace of mind have not. Careful planning to reduce chafe on the lifelines will make strong, durable, and worry free lifelines possible that will last you many years.

Double Diagonal Planking

After some thought, I decided to build the dinghy with double diagonal planking instead of standard carvel planking. The reason is simple, the dinghy will live upside down on the deck where the sun will beat down on it and cause the wood to dry out and shrink. When we decide to go to shore, we would put the dinghy into the water and the seams would leak until the wood swells. Swelling is not a quick process, usually taking several hours to several days to occur. Since the dinghy would never be properly swollen, we would be plagued by a leaking dinghy every time we wanted to use it. This would mean that our feet would get wet when we go to shore for dinner!

The alternative is to plank the hull in plywood, or in double diagonal planking. I am morally opposed to the use of plywood, since you will never find a tree that grows as a 4x8 sheet! The only option left is to plank the hull with double diagonal. 

Double diagonal planking offers the same advantages of plywood, but with better quality wood. Plywood is made by skimming off layers of a spinning tree that are then glued together. As the tree is spun, voids in the tree will become voids in the wood. Plywood allows for large holes to exist in the plys, since the glue that holds them all together will fill in the voids and offer some added strength. The reason I don't like plywood is because of the glues that are used. 

Marine plywood is made with better glues than regular plywood, allowing it to survive in an immersed environment. To pass the quality control test for marine plywood, a sample is repeatedly boiled and then subjected to shear forces. If the glue is weak, the plies will separate as the wood comes unglued. 

My big gripe with plywood came when I used a scrap piece of marine plywood as a cleat in our shower on Wisdom to hold the box I built around the mast (which runs right through our shower). After six months of being in the shower, the plywood started to delaminate! The shower is a wet environment, but the wood is never subjected to "boiling" temperatures or much stress at all. The plywood is screwed to the wall, further supporting the plies. Seeing a piece of marine plywood delaminate in rather mundane circumstances made me have very little faith in plywood as a whole. While this is a personal opinion and an isolated event, it has left a lasting impression on me. With these preconceived notions in mind, I did not want a scrap of plywood in the dinghy! Everything had to be made out of real wood, wood glue (no epoxy), and fasteners. 

Double diagonal planking results in the creation of plywood. The first set of planks are laid down in one direction, while the next set of planks are laid down 90* to the first set. The planks are fastened together and a bedding compound between them fills in any potential voids that may exist. As with plywood, the wood used doesn't need to be perfect, nor very strong. The combination of the planks running in opposite directions will combine to produce a very strong skin made out of better quality wood. 

More so, double diagonal planking can be repaired much more easily than plywood. If a plywood hull rots, that entire sheet of plywood would need to be replaced. With double diagonal, only the rotten plank needs to be replaced. 

Since the planks are laminated in opposing angles with bedding compound between them, there is little chance that water will work its way through the hull as the large bedded faying surfaces will provide a good seal. Polysulfide bedding compound used between the laminates will remain elastic, allowing it to move with boards as they shrink and swell. This will let us place the dinghy in the water and hop into a dry dinghy as we make our way to shore.

The other advantage of double diagonal planking is the planks run in different directions with strength along the direction of their grain. Since the planks are running in different directions, the strength also runs in different directions. Carvel planked hulls will have diagonal strapping cut into the frames to offer a similar benefit because the horizontal planks do not provide this support. The diagonal planks in double diagonal planking do, allowing you to actually use thinner planks to create a thinner skin than with carvel planking.

The biggest downside to double diagonal planking is that it is more time consuming to install. The hull needs to be planked twice, and a lot more bedding compound is needed as well. Bedding compound is rather expensive, but it's hard to put a price on comfort! 

The second biggest downside is when repairs are needed. A rotten strake on a carvel planked hull is simple to repair, simply remove the plank and replace it with a new one. On double diagonal, if a plank on the inside begins to rot, all the outer planks that cover that board need to be removed just to gain access to that board. This adds considerable labor to the process, and the costs go up as well as new bedding compound will be needed to re-bed the entire area that had to be opened up.

In the long run, there is no simple option and no magic bullet. Every choice has its benefits and drawbacks, its just a matter of choosing which option works well for you and your needs. For us, with a dinghy that will live on a deck most of its life drying out and only going in the water for short periods at a time, double diagonal planking fits our needs and we are willing to work with its drawbacks.