Trailer Subfloor

20160403_121553.jpg

The subfloor on the tiny house serves a three purposes:

It connects the tiny house to the trailer
It provides a stable support for the floor that will go over it
It supports the walls that will be built

If the tiny house is not properly attached to the trailer, the whole unit could slide right off the trailer while driving down the highway or during a severe windstorm. 

The ideal way to connect the subfloor to the trailer would be to use bolts and through bolt the whole structure. This would require two people and a lot of time. I am practically building this structure alone, Maddie helps from time to time but is usually not available to help and work as many hours as I am.

The next best option to through bolting the structure would be machine screws through the subfloor and into the metal trailer beneath. I was planning on connecting the units this way until I realized that I don't have a long enough drill bit to go through the 3+ inches of wood, and then the metal frame beneath. This led me to come up with an alternate method of attaching the subfloor to the wood of the trailer

I came to the decision of attaching the subfloor to the trailer floor via a series of many nails and screws. The wood I am attaching to is strong and well attached to the trailer, so this seems to be adequate for the time being.

The floors are going to be one of the last things to go in. I can always change my mind, bite the bullet, and through bolt the whole trailer if I feel uneasy about the attachment.

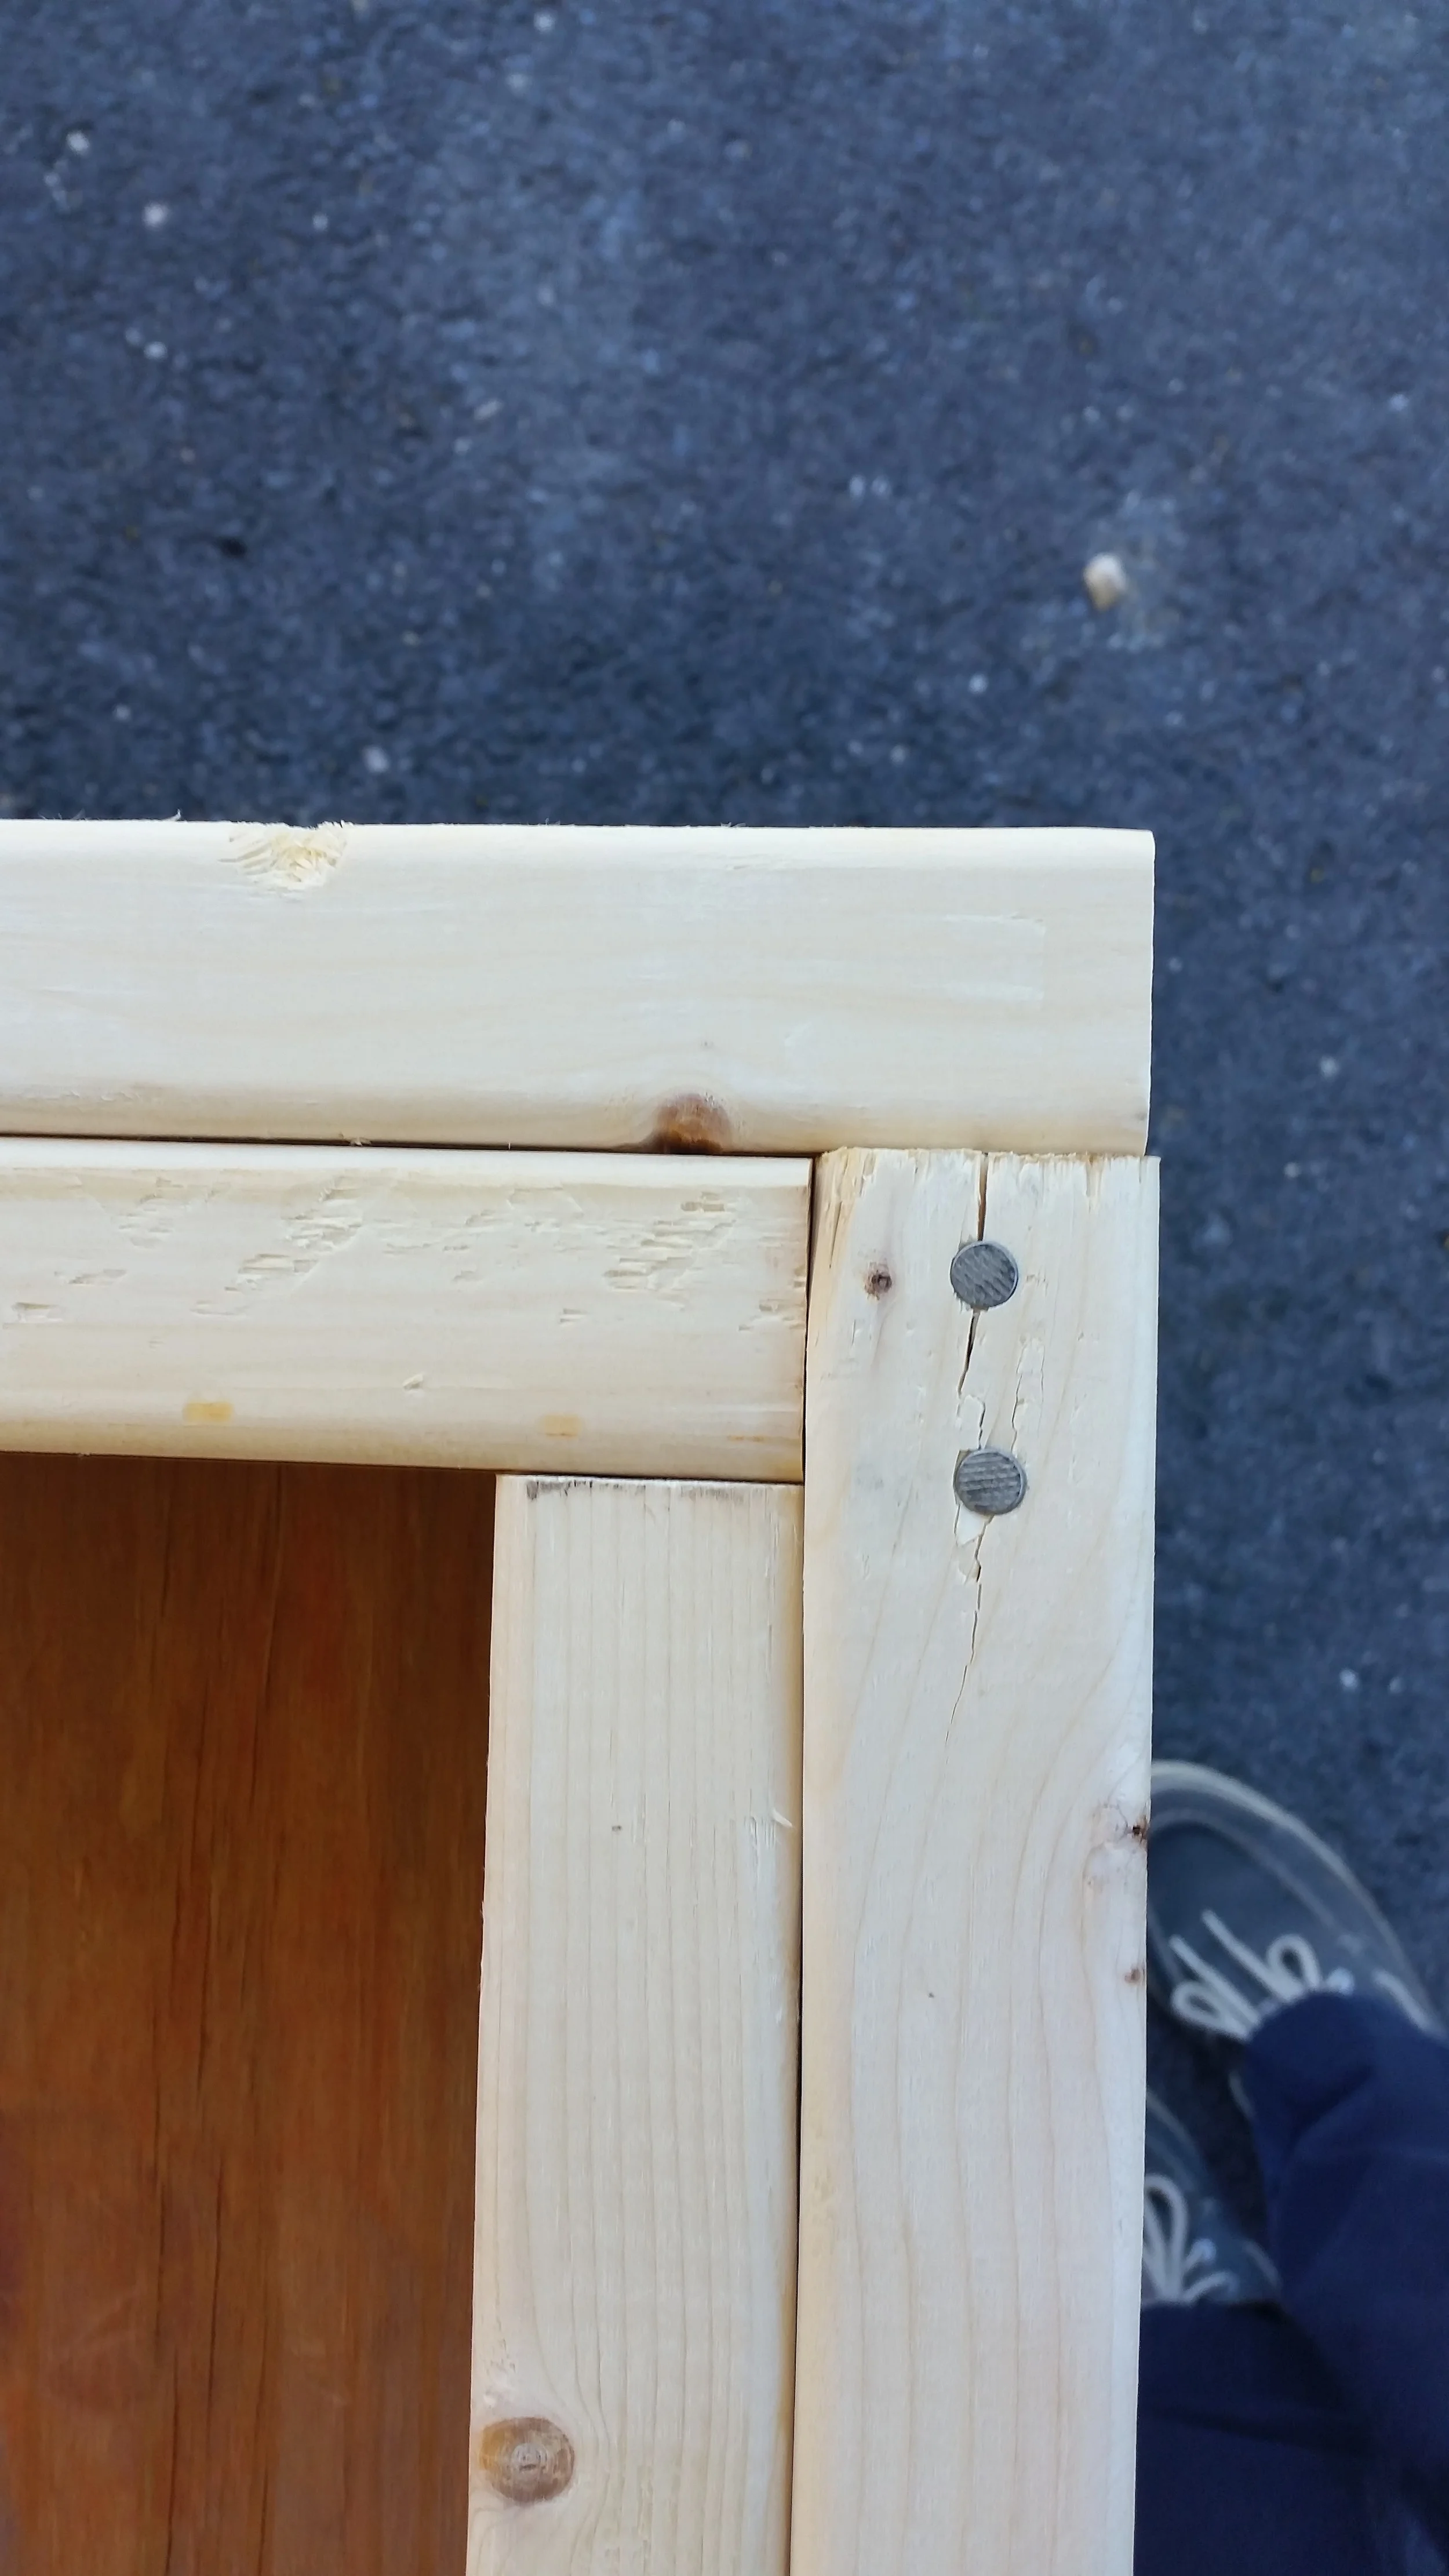
To accommodate the other two purposes, I simply double boarded the perimeter which will provide a wide and stable platform for the wall frames to rest.

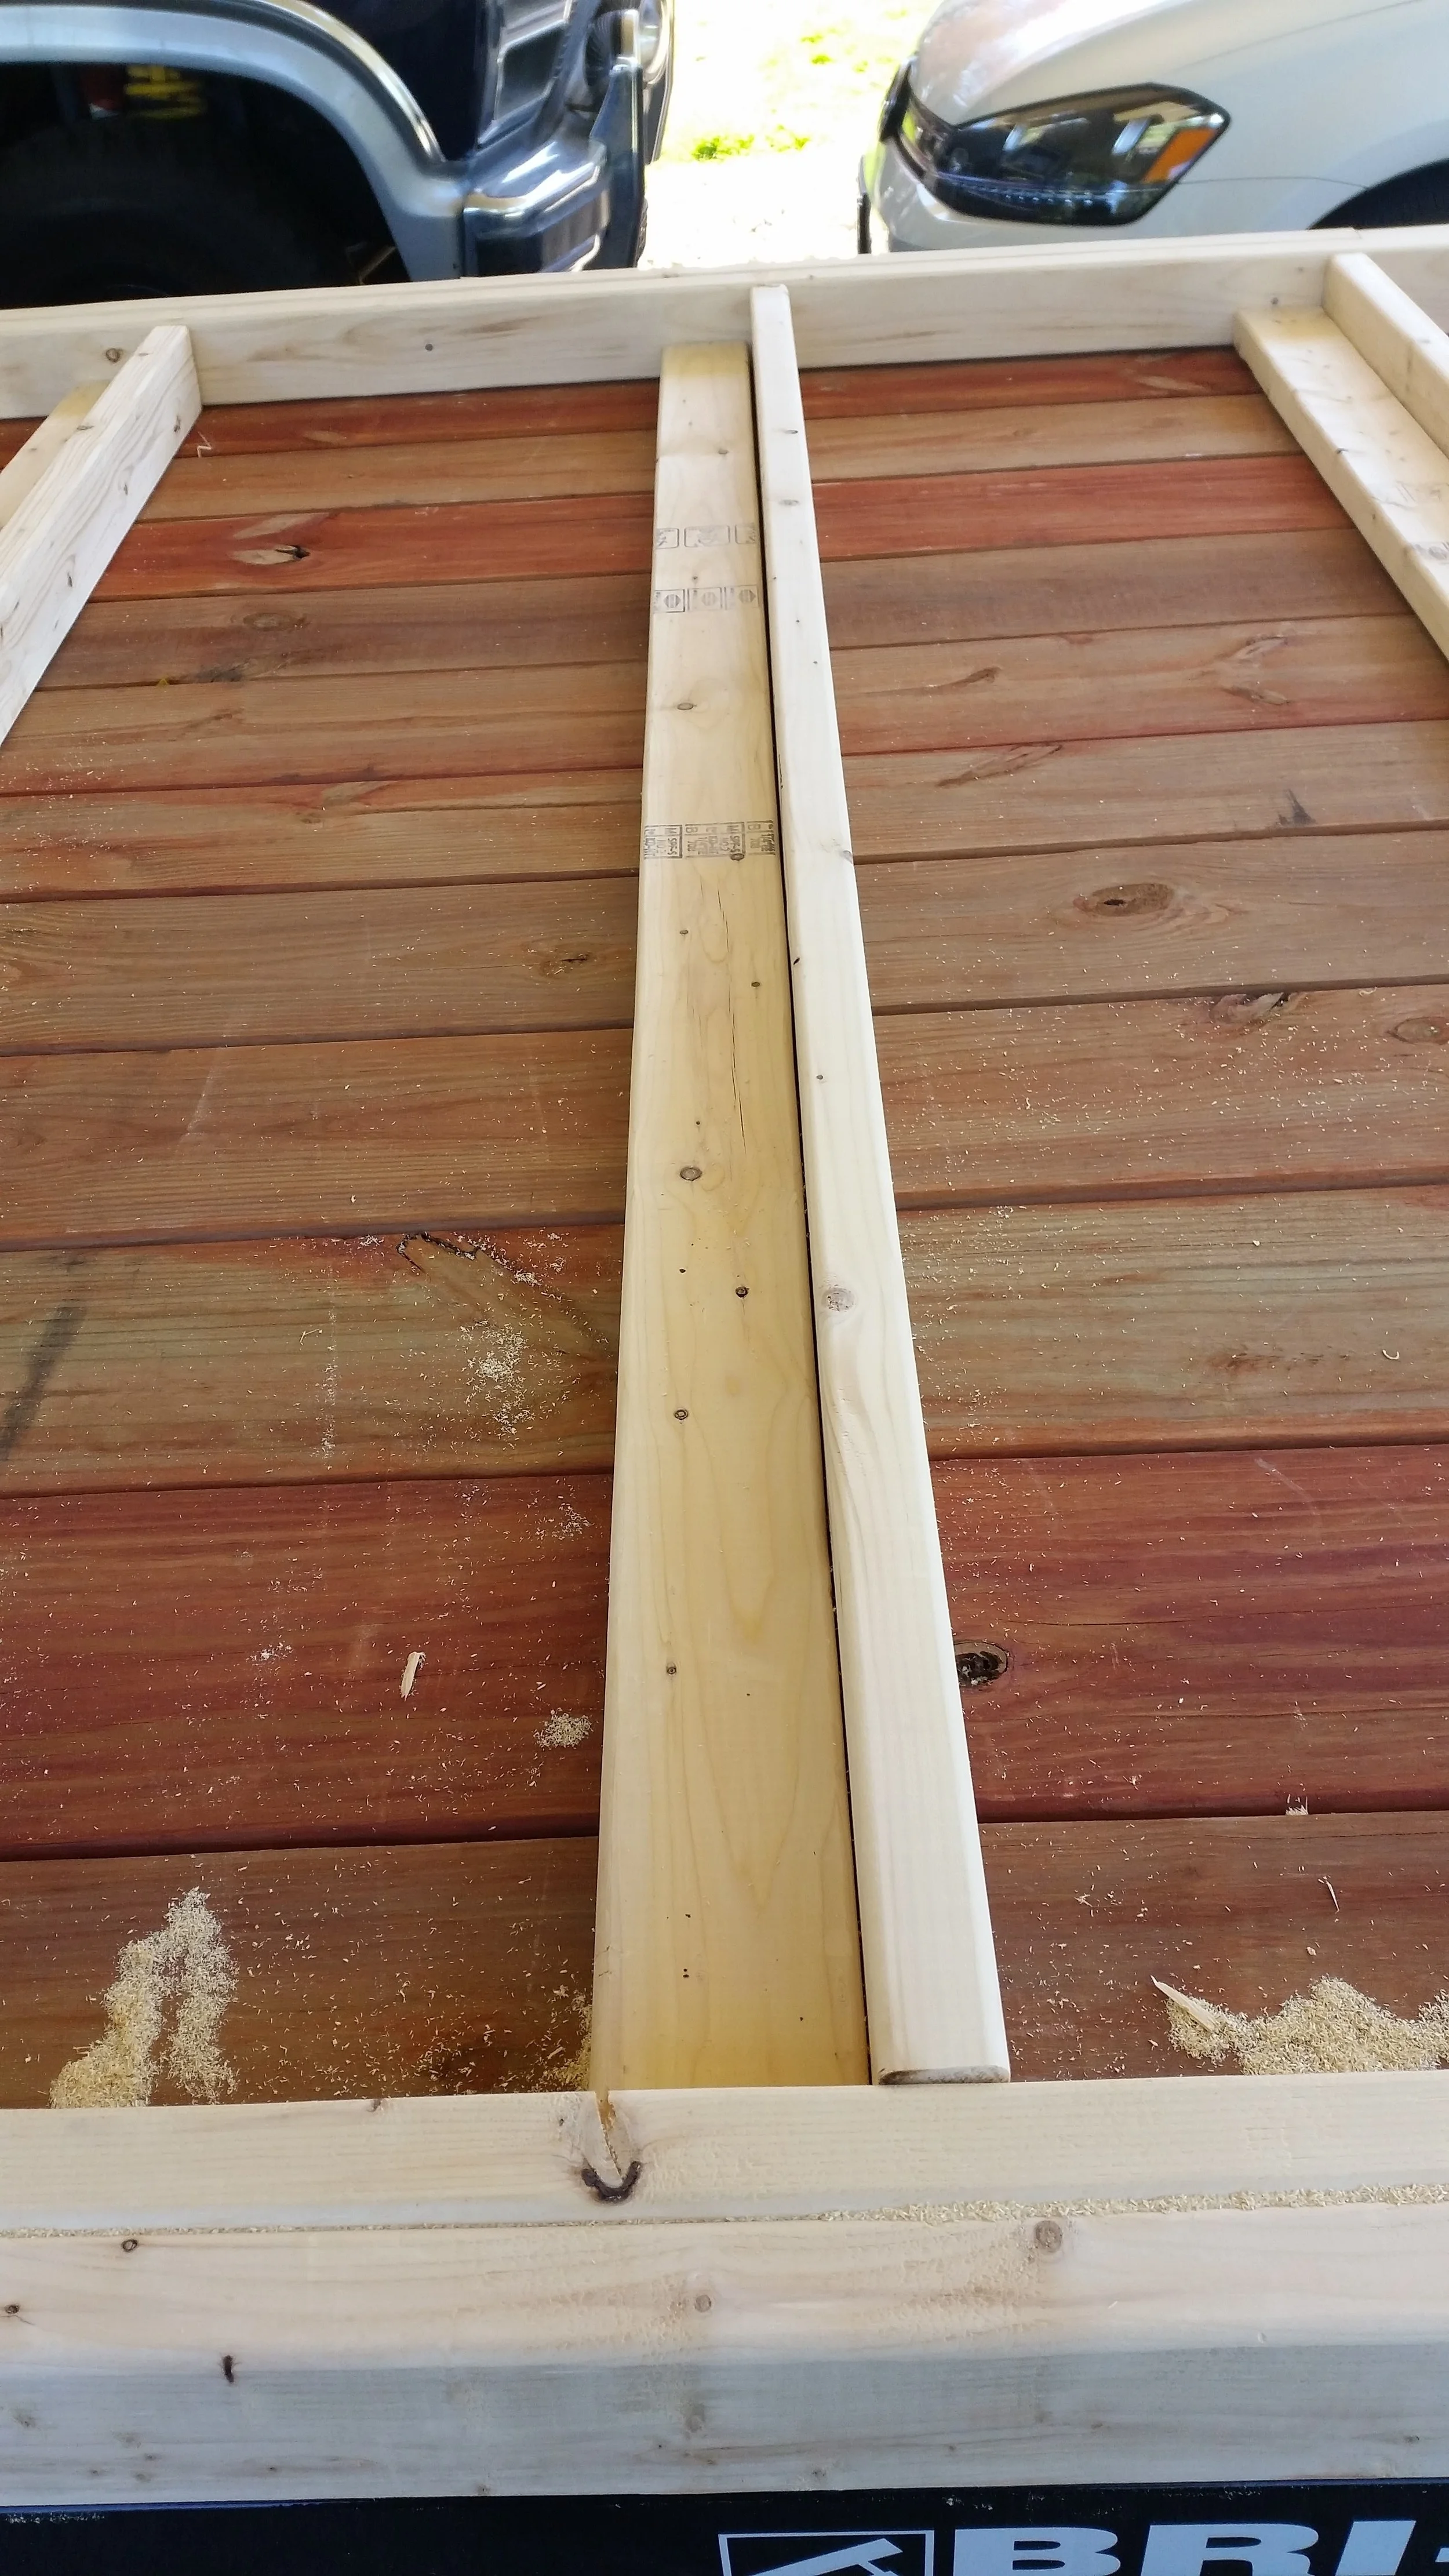
I also set the subfloor 2x4's vertical and horizontal across the middle. The vertical ones are to support the floor, while the horizontal ones are to provide a firm surface to attach the subfloor to the trailer.

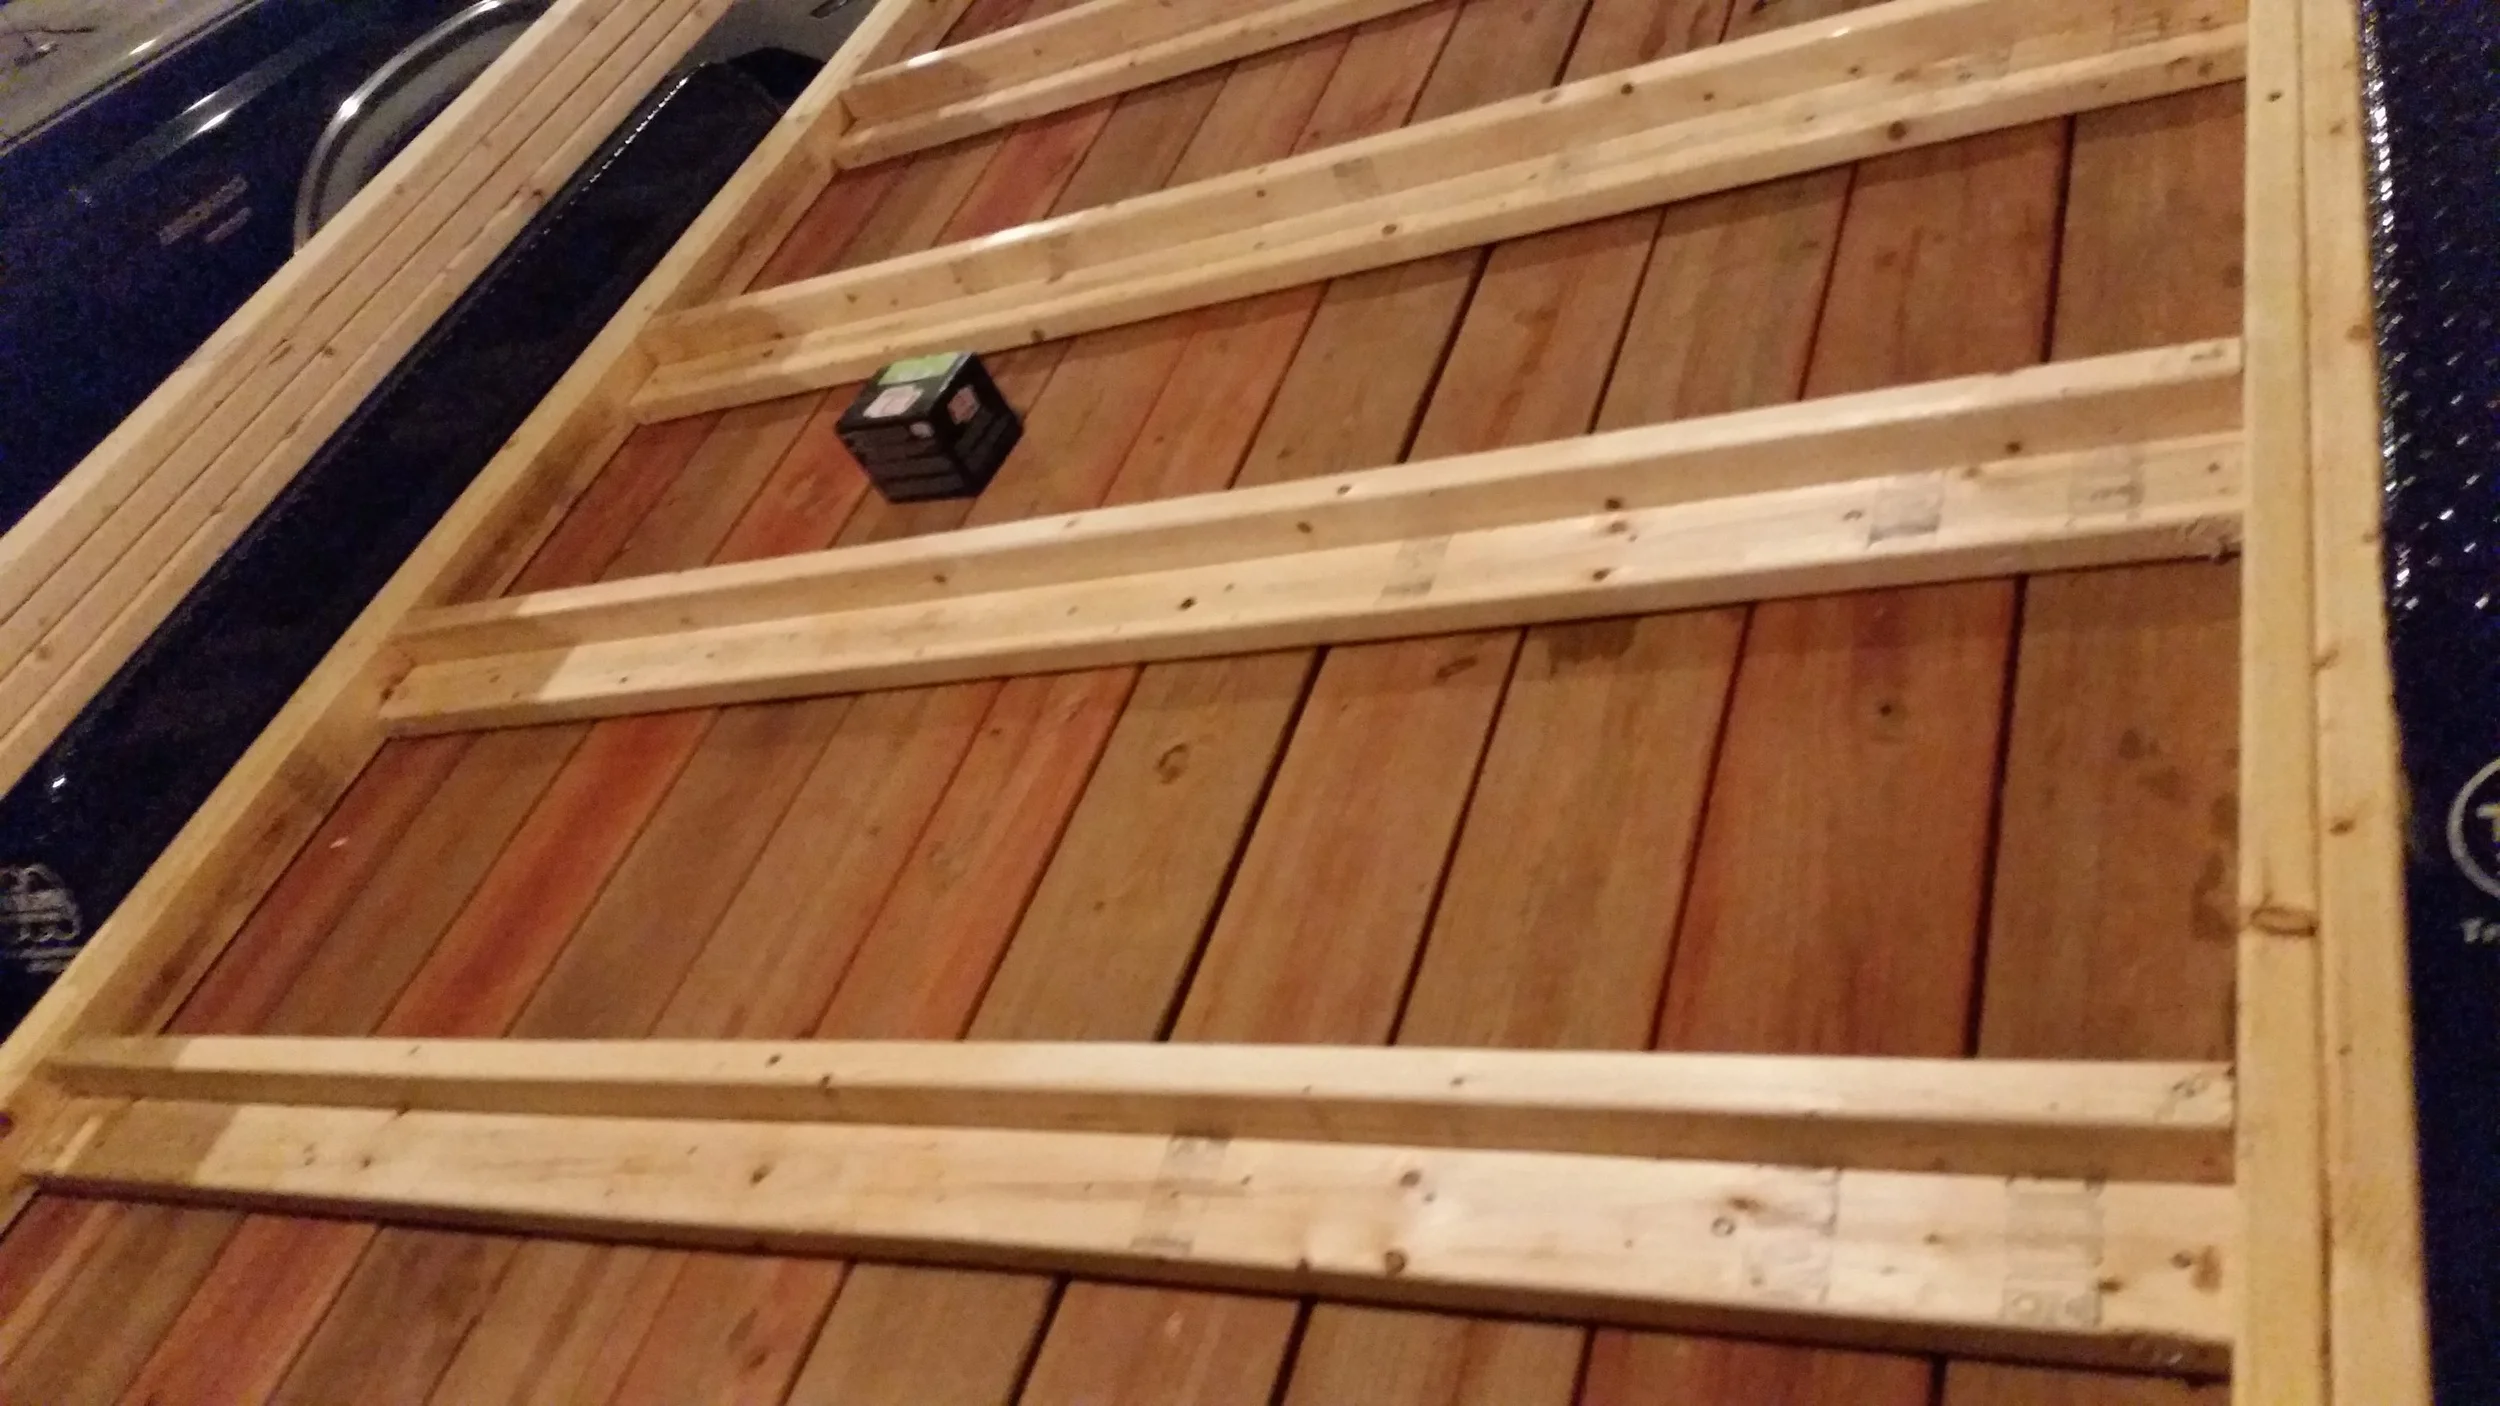
All these pieces of wood tie together to form a rather stable platform which should be able to support the whole house. The whole structure was coated in tung oil to protect it from rain and moisture as construction progresses. 

The next step: Building the walls!

Dyneema End to End Splice

Connecting two pieces of dyneema is a simple task, it simply requires a lot of material to bury and a properly executed taper. The end to end splice consists of a Mobious Brummel splice with tapered buries. 

When I re-rigged Wisdom with synthetic standing rigging, I left the storm stays (inner forestay and check stays) in metal. We were going out into the Atlantic and I had no idea if the synthetic standing rigging with deadeyes would actually work. All the people I spoke to at the time about converting over to synthetics told me that it couldn't be done on a boat this size. I came up with this method, but it was till untested. If we came upon a severe storm, I wanted to know that the mast would stay up! Now that I know it works, I'm replacing the check stays with dyneema.

I originally designed an intricate cascading backstay adjuster which turned out to be unnecessary since it could be easily pulled by hand. Now I made 4 pieces for the backstay cascade out of STS-HSR which I never used. They ended up residing as expensive coils in a locker, waiting for the day they would become useful again. Since the checkstays are not under much tension, I decided that I would splice the scrap pieces together to make a piece that is long enough to reach from deadeye to mast tang.

I thought about ditching these pieces of dyneema, but they cost around $6 per foot or $240 for each stay.So I decided to save some money and use these shorter cut pieces by splicing them together to achieve the length I need.

Since these are going to be stays, I decided to go overboard with the buried sections. 9mm Dyneema needs (9mm x 72) 648mm or 25.5 inches of bury. This measurement usually includes the tapered end. I decided to make 25.5 inches of bury before the 25.5 inches of tapered section. This results in a buried section that is 51 inches long! When done on each side of the splice, this makes 102 inches of buried material. 

20160326_152655.jpg

To begin, simply measure the tails and mark the strands with a marker that way they are easy to find later. I like to mark both strands on the V that I want to pass through. If you only mark one strand, you wont be sure if you are supposed to enter or exit above or below the neighboring weave. This might seem like an insignificant concern, but as a dentist and a perfectionist, being on the wrong side of the weave can alter the measurements by several millimeters. 

I marked the section where the splice will cross, and then again for where the taper is to begin. This leads to a rather long tail, as you can see.

20160326_152856.jpg

Then scruch the line together and pass the first line through the opening.

20160326_153156.jpg

I like to secure this crossing with a pin that way the lines don't move while I'm working.

Now, repeat the process on the other line, creating a mobious brummel splice.

20160326_153548.jpg
20160326_153601.jpg

If you are unsure if you properly executed the splice, push back on the tails, if the splice opens up, you did it right! If it won't open up, then you simply passed one line through the other line twice, creating a very weak splice called the "Long Bury Splice". 

20160326_153736.jpg

Now, pull the tail back and insert the fid into the weave to open passage for the tail that will now be buried inside the other line, securing the splice.

Pull the tail into the weave a sufficient distance to bury the whole tail and now pop it out of the weave. 

20160326_154353.jpg

Pull the tail out until the marks you made to begin the taper show and push a pin through with a dirty paw (heat set dyneema is hard and offers a lot of resistance to a passing needle).

20160326_155220.jpg

Now begin the tapering, this is purely mathematical. Count the number of strand rows from the mark to the end and divide by 12. This will tell you how many strands to skip between tapers. In my case, I trim every 5th strand, resulting in a slow and even taper.

Now work the tapered end back into the rope and be proud of yourself! You just completed one side of an end to end splice! Repeat the same process on the other side and you will have yourself a very secure splice! 

I didn't put in a locking stitch since I went overboard with the length of the tails and will be keeping a close eye on the splice as I take the constructional stretch out of the line. If you want to, a locking stitch will offer more security to the splice.

Alternatives to Reefing

When weather catches you offguard and you don't have time to reef just yet, these are ways to put it off for a moment. They involve using the sails to either spill air or to work against each other to reduce their efficiency.

A Fisherman's Reef is when you ease the mainsheet and sheet in the jib. This will create a bubble in the main that will take away the mains power. This is a very temporary fix that can help to depower the main during a blow. The air that comes off of the jib will blast into the eased main and create a bubble in the luff. This reduces the amount of sail area actually working and sort of accomplishes the goals of reefing temporarily.

Back winding the main is very similar to a Fisherman's Reef, but it doesn't involve easing the main. The over sheeted jib will create a similar bubble to the Fisherman's Reef which will reduce the effective sail area of the main, and depower the sails to a lesser extent than the Fisherman's Reef.

Tightening the topping lift will raise the boom and force a twist into the sail. This will allow you to sheet the sail in close hauled while still maintaining a twist. The twist will spill almost all of the air in the top of the sail which will greatly reduce heeling. The top of the sail can turn into a flag and begin flogging which is damaging to the sailcloth. If the sail begins to flog, a reef should be put in immediately.

Lastly, you can ease the sails and change course onto a run. This will lower the apparent wind speed and make conditions feel somewhat calmer while you put in your reefs. 

You may have noticed that all of these alternatives to reefing simply buy some time when you need to reef, but they all end in putting the reef in. This is because there is no replacement for reefing when it is necessary.

Trim, comfort, and control will be restored once the sails are reefed for the appropriate weather conditions.

Fixing a Burst Hose with Fancy Knots

A squall passed through and caused the boats in the marina to bounce around with the kicked up seas. This is not usually an issue, except that the water hose that I use to fill the tanks snagged on a cleat's horn, ripping the hose open and making it useless.

Some people would replace the entire hose, but the rest of it is just fine! I decided to cut out the torn section and reconnect the good ends using a double barbed fitting. The repair is going to be around ankle high and I didn't want anyone to snag themselves on a hose clamp, so I opted to use a much softer material: Rope!

I tied double constrictor knots over the barb section and pulled it tight by using two sticks with marlin spike hitches. This allowed me to use my full body strength to constrict the knots down, ensuring a leakless junction.

The true test came when I turned on the water and let the hose hold pressure. Not a drop came out of the junction! If you ever find yourself in a situation where a hoseclamp might not e the best choice, consider using a double constrictor knot instead.

Floating Pier vs Fixed Pier

When selecting a marina to stay in, sometimes you are presented with the options of Floating Piers and Fixed Piers. Does it make a significant difference for you? 

Fixed Piers are attached to pilings that are set into the sea floor. The pier is bolted to them and they provide a fixed and rigid surface to attach your boat. In areas with greater tidal variance, this can provide some complications. First of all, your docklines need to allow for the rise and fall of your vessel. Secondly, you will need to jump from your boat to the pier.

Setting your docklines to allow for tidal variations is crucial when tying up to a fixed pier. I have seen boats arrive at high tide and tie up with short lines. The tide went out and the sea level lowered by 4 feet, putting incredible strain on the docklines until the cleats ripped out of the boat. The owners had left for the day so we had to tie their boat to railing and seats to keep it from drifting off. Setting the docklines up in long crossing patters will allow for greater rise and fall of the vessel without putting stress on the lines and cleats.

This is at mid-tide. 

This is at mid-tide. 

The second issue with fixed piers comes when you try to board or leave your yacht. I am 6 feet tall, and I have had trouble getting off the deck of boats at low tide. The pier is set so high up to allow for spring tides that you can't reach the planks to get off your boat at low tide. On the contrary, I have also seen marinas that go underwater during very high tides. This poses many risks. If the power is not turned off, you can be electrocuted from the submerged shore power cables. The other risk comes from drowning; if you step off of the pier by accident (it's underwater so you can't always see it if the water is murky) you could fall in and drown. It is entertaining to see people "walking on water" when the pier is awash! 

As you can see, the pitfalls of a fixed pier all deal with areas where there is a great tidal variance. If you live somewhere where there is minimal tides, then a fixed pier will work wonderfully. If you are somewhere with great tidal variations, consider tying up to a floating pier.

Floating piers rise and fall with the tides and your boat. The pier will always be at the same height relative to your boat, so you don't have to worry about your docklines getting tight. The pier will never be towering overhead or submerged like a fixed pier either. It will always be a comfortable step away from your boat. While floating piers may sound like a magic bullet for docking tidal management, they do have one major pitfall. The floating piers work by rising and falling against fixed pilings. These pilings are very secure and allow the pier to effortlessly slide up and down as the tides rise and fall. The problem lies with the absolute height of the piling. If a storm surge causes the water level to rise higher than the tops of the pilings, the whole marina will be set adrift! For this reason, the pilings extend very far above the normal high tide. Even so, look for chafe marks on pilings in a floating marina; these are marks made during a storm when the water levels were very high. Our home marina in Fells Point has wear marks about 3 feet below the top of the piling. I'm sure that must have been stressful for the liveaboards at that time!

Having tied up to both, I personally love the convenience of a floating pier. When presented with the option, I almost always am willing to pay a little more per foot of docking to not worry about the tides!