To Cross or Not To Cross

When you tie up in a slip, you have the choice to cross the bow and stern lines or to run them straight. There are advantages to crossing in certain situations, but as with everything, there are drawbacks.

The reasons to cross the lines in the slip are to provide a longer line leading from the boat to the dock cleat. This longer line will provide more stretch as well as make tidal variations less sensitive. 

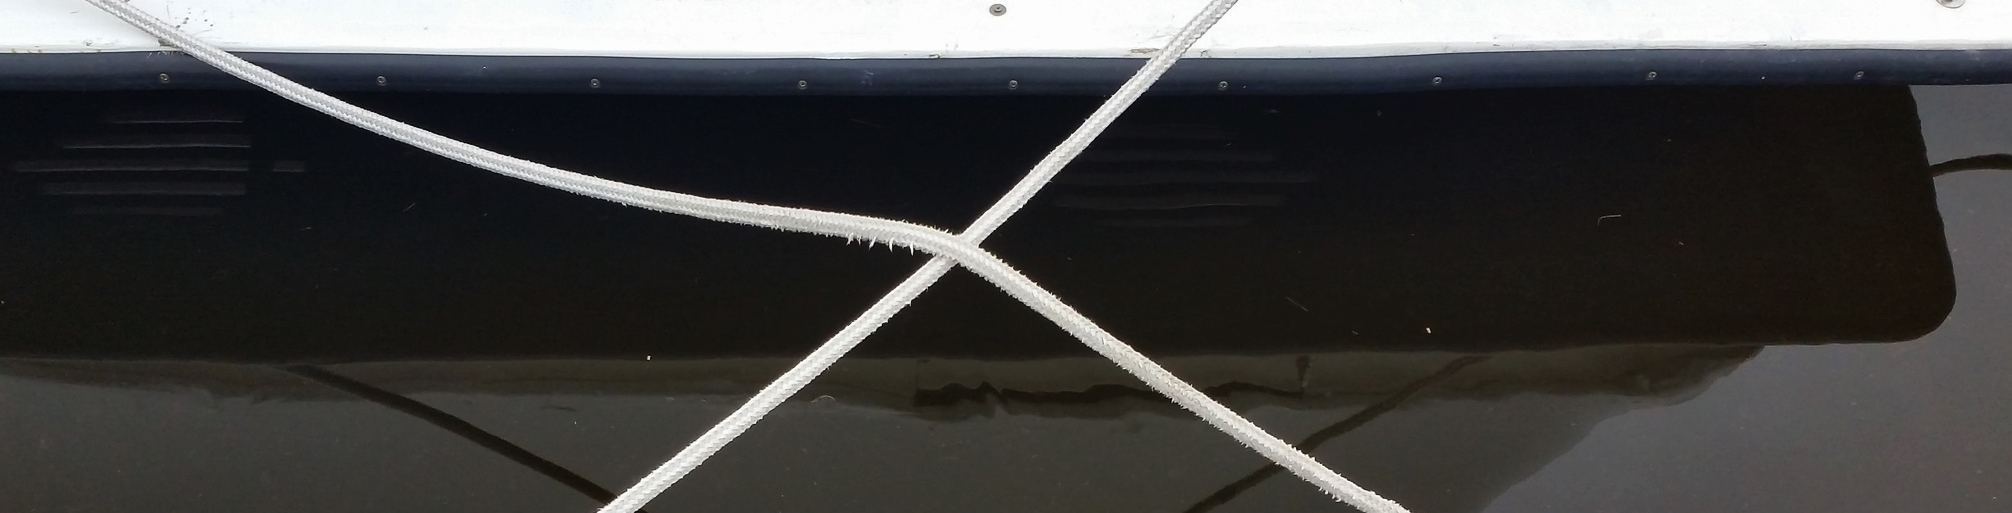
This sounds all well and good, but the problem that follows with crossed dock lines all pertain to chafe. The lines will lay in contact with each other as the boat moves around in the slip, causing the lines to rub against one another. If left unchecked, the lines could eventually chafe through causing the boat to drift into the pier and sustain damage.

The only time when crossed docklines are deemed mandatory are when you are tied up to a fixed pier in an area with a great tidal variation. Crossed docklines will provide the boat with the flexibility to rise and fall with the tide without threatening to rip the cleats out of your hull. Any other situation, crossing the docklines offers no advantage and only invites the issues associated with chafe.

While chafe can be prevented by supplying the lines with chafe covers located at the point of contact, it is best to avoid the problem all together if possible.

When tied to a floating pier, the pier and its cleats will rise and fall with the tide, along with your yacht. Crossed docklines will serve no advantage here.

If you need the additional length of line to help absorb shocks as your vessel moves about in the slip, the correct solution should not be to cross the docklines, but instead to select a dockline that offers more elasticity. I see people with all sorts of contraptions to offer elasticity in their double braid docklines, when the truth is they should use stretchier Three Strand Nylon which will offer all the stretch they would need. 

Next time you tie up to a pier, look at the situation before you cross your docklines. If you need to, then do it. If you don't actually need to, avoid crossing your lines and avoid all the problems of chafe that are associated with it. 

Tiny House Trailer!

Maddie paints in a "creative" way, which results in paint going everywhere. When she paints on the boat, she has to be much more careful and clean up any paint droplets before they dry on the interior wood.  Her primary studio is at her parents house, which is rather far for her to drive everyday. Since she wants to paint more freely and I don't want the interior of Wisdom to be painted, we decided to make a studio closer to home. The solution: Tiny House on a trailer!

I picked it up from the distributor in Pennsylvania, and trucked it back to my parents yard to begin construction.

It's an 18 foot utility trailer with a flush deck that will provide a flat platform for us to build from there. At the moment we are still deciding on the final floor plans, drawing out designs in chalk and walking through the imaginary layouts. Maddie wants lots of light through big windows and a lofted bed, and I want straight forward construction.

While I have never built a land based structure before, the construction plans look to me like an upside down hard chine boat. The peak of the roof is the keel, the roof and walls are the frames with the siding being equivalent to the planking. 

Once it is completed, Maddie will have a studio that we can keep wherever we want since it's on wheels!

Treasure in the Trash Pile

While looking around Bacon Sails, I stumbled upon an old Edson Bilge Pump for $95! These pumps will flow 1 gallon per stroke and sell for over $1000 new. The cost of the bronze fittings, hoses, boards, and hardware will still come in much cheaper than a new pump.

It was sitting in a bucket off in the corner, waiting for someone to bring it back to life. 

While cleaning all the bronze castings, I decided that the old stainless steel fasteners were not worth saving. I have no idea how old this pump is, but the stainless steel fasteners are horribly corroded! If there was any doubt about the longevity of stainless vs bronze, it can be put to rest now!

I decided to use use new stainless steel bolts instead of rods as hinge points for the pump mechanism. I made sure the bolts would rest on the shank and not the threads to prevent any additional wear. I also used lock nuts on the bolts to keep them secure while still keeping the whole system loose.

The problem is the old stainless steel rod that was in there has succumbed to the effects of severe crevice corrosion and broke off in the holes, preventing any new rod from acting as a pivot point.

To get the corroded segments of stainless steel out, I used my dental drill with a carbide bur. This weakened the metal and allowed it to collapse, similar to sectioning a tooth during an extraction. Then it could be removed easily by driving a push rod through the hole and pushing the corroded remnants out.

It burned through a few burs, but in the end, I was able to extract the corroded remnants of the pivot pin. 

The new hinge pin is the bolt's shank. This will provide a smooth surface for the lever to pivot on. I will cut the excess threads off the bolt, just after the nut to tidy things up.

The rebuild will continue with the fabrication of the wooden base for the pump!

When to Reef

When should you reef your sails? This is a common question with no definitive answer. Some common guidelines used for determining when to reef are:

A set windspeed
The first sighting of a whitecap
The approach of storm clouds on the horizon
First sight of rain
Crew comfort
Preparing to Heave-to
Gut feeling

Many sailors put in reefs at arbitrarily set wind speeds. A common guideline is to put the first reef in at 15 knots, and the second reef at 20 knots of wind speed. From this guideline, you can then determine when you want to reef. If you feel fine at 15 knots, keep the sails up a little longer. When you finally decide you wanted to reef, look at the wind speed; next time reef a few knots sooner than the current windspeed.

On Wisdom, we put the first reef in at 20 knots, and the second reef at 27 knots. We also drop the Jib at 20 knots, and fly the staysail all the way through to really high wind speeds.

On Windpuff, we have no instruments, so we reef at the first sign of whitecap or approaching storm cloud. Reefing based on whitecaps is a good indicator, as they tend to form in response to building wind conditions. I like to reef at the first sight of a storm cloud because I prefer to go forward to the mast in calm weather and await the winds with reduced sails instead of being caught off guard.

Rain on the horizon usually accompanies an approaching squall with high winds. The dark curtain approaching your boat is an excellent signal to put the reefs in. The only thing worse than putting in reefs during high winds is being pelted with stinging water droplets!

On a completely different note that does not involve weather or storms is crew comfort. If you have a frightful person on board, you may have to put in a reef to keep them calm. I have taken friends sailing and they panic when we heel over, leading me to put in 2 reefs in winds of 12 knots. We hardly moved, but the boat did not heel. With time, they became more confident that the boat will not flip over and allowed me to shake out the reefs one at a time. Eventually we were sailing along under full sail at hull speed and everyone had a good time! If I had told them to tough it out and hold onto the heeling hull, they would have been traumatized and probably never gone sailing again. While crew comfort is not related to weather conditions or sail trim, it is a valuable indicator for when to reef.

One last reason to reef the sails is when you are preparing to heave to for the night. The weather may be calm and the seas tranquil, but they might change during the night. By reefing the sails all the way down before heaving to, you can sleep comfortably and confidently through the night!

The least scientific method (which is also my go to method) is sail trim. When the wind builds, we ease the sheets to control the amount of heeling. When the leech begins to flutter because the sail has been eased too far and we are still heeled over, we typically put in a reef. This allows us to trim the sail perfectly once again and maintain the keel in a more efficient orientation. If the wind eases up and we loose speed, we wait 15-30 minutes before we shake the reef out (in case it was simply a lull in the wind, we wait to make sure the wind doesn't pick up again and catch us over-canvassed).

When do you typically put in your reefs?

Solar Panels

Modern conveniences require electricity to keep them running. GPS, AIS, Radios, Fridges, they all need a steady flow of energy to keep them going. Batteries do a wonderful job of storing all of this electricity, but after a while they will begin to run down and the conveniences will stop working. To keep the flow of energy up, many cruisers will run their engines a few hours each day to replenish the batteries charge. What if you don't want to run your engine that often, or if you don't have an engine to run at all?

This is where alternative energy sources come into play. Three major players in the alternative game are Solar, Wind, and Hydro (water). They all have their advantages and disadvantages, but today we will talk about solar.

Solar is a wonderful system that converts the suns radiation into electricity. This means that you can quietly charge up all of your electrical needs while the sun is shining. There are no moving parts to break, and no noise from the process of energy collection. They quietly collect energy while you are sailing, just as effectively as they can when you are anchored in a quiet and protected creek.

The thought of charging your batteries while anchored in a secluded area may sound like a dream come true, but there are some drawbacks to this technology. If you have dense cloud cover, you are not going to produce any electricity. At night there is also going to be no energy production. To overcome the pitfall of consecutive cloudy days providing no electricity, a properly sized house battery bank is necessary.

Deciding how many panels to install is entirely dependent on need and space available. You can calculate how many amps you need in a day to make sure that your solar array will provide sufficient power to run all of these systems, then you need to figure out where to put them all. Catamarans have plenty of available real estate, but monohulls may find space to be very limited. Ultimately, the final decision will come down to "how many panels can you fit" instead of "how many panels do you need".

Factors that affect your ability to mount solar panels come in two varieties: Shading and damaging. Shading from sails, sheets, and spars will reduce the power output from the solar panels. For this reason, it is best to place them in a location that will receive full sun at all times. 

The second danger to solar panels is from damaging blows. If a sail begins to flog, the sheets will whip around violently. A constant barrage of whippings from a sheet will shatter a solar panel in no time! This means that anywhere between the sheet block and the sail should be avoided. 

Another danger that falls into the damaging category is wave and wind action. If the solar panels are mounted to the bow rail, they could be swept off or shattered by the force of a breaking wave. Not to mention, they could act as a sail on the tip of the bow producing dangerous lee helm!

After careful consideration, the only place we could mount them on Wisdom was on the sides of the stern rail. The drifter sheets attach close to the stern, ruling out the lifelines running forward, a panel in the shrouds would snag and cut the sails, and the future wind steering device will take up the whole stern. The only place we had available is a small section of the stern rail!

I cut out a template of a 50W panel (22in x 27in) and a 100W panel (41in x 27in) from a cardboard box. Then I placed the templates around the boat to see where they would fit best. This made it easy to hold in place without the expense of purchasing the wrong size. The 100W panels were way too big for the space available, so we were limited by space to two 50W panels. 

This will provide 100W and 5.5 amps during peak sunlight hours. Over 8 hours, we would add 44 amp hours to our battery bank! Hopefully that will be enough or we will have to get really creative to fit more panels on board.

Now we know what size of panel and where to place them, but how do we keep them safe? The plan is for them to hang off the sides like wings, this will make them the first thing to break in a close encounter with a piling or sea wall. To protect them, the plan is to mount them with the ability to fold the panels down. This will make the panels flush with the stern rail and protected behind the rub strake.

That's the idea on how they will work and mount, now we have to figure out how to make these thoughts a reality!