Running Rigging

Dyneema Lifelines

Back in February 2015, I installed dyneema lifelines. It has been two years with them in place, and it is time to see how they have been holding up.

The lengths of the lifelines are subject to chafe from sheets rubbing on them while sailing, but with proper block placement, chafe can be reduced if not removed all together. This gives us great peace of mind since we don't have to worry about corrosion nor chafe. But how have the splices been holding up?

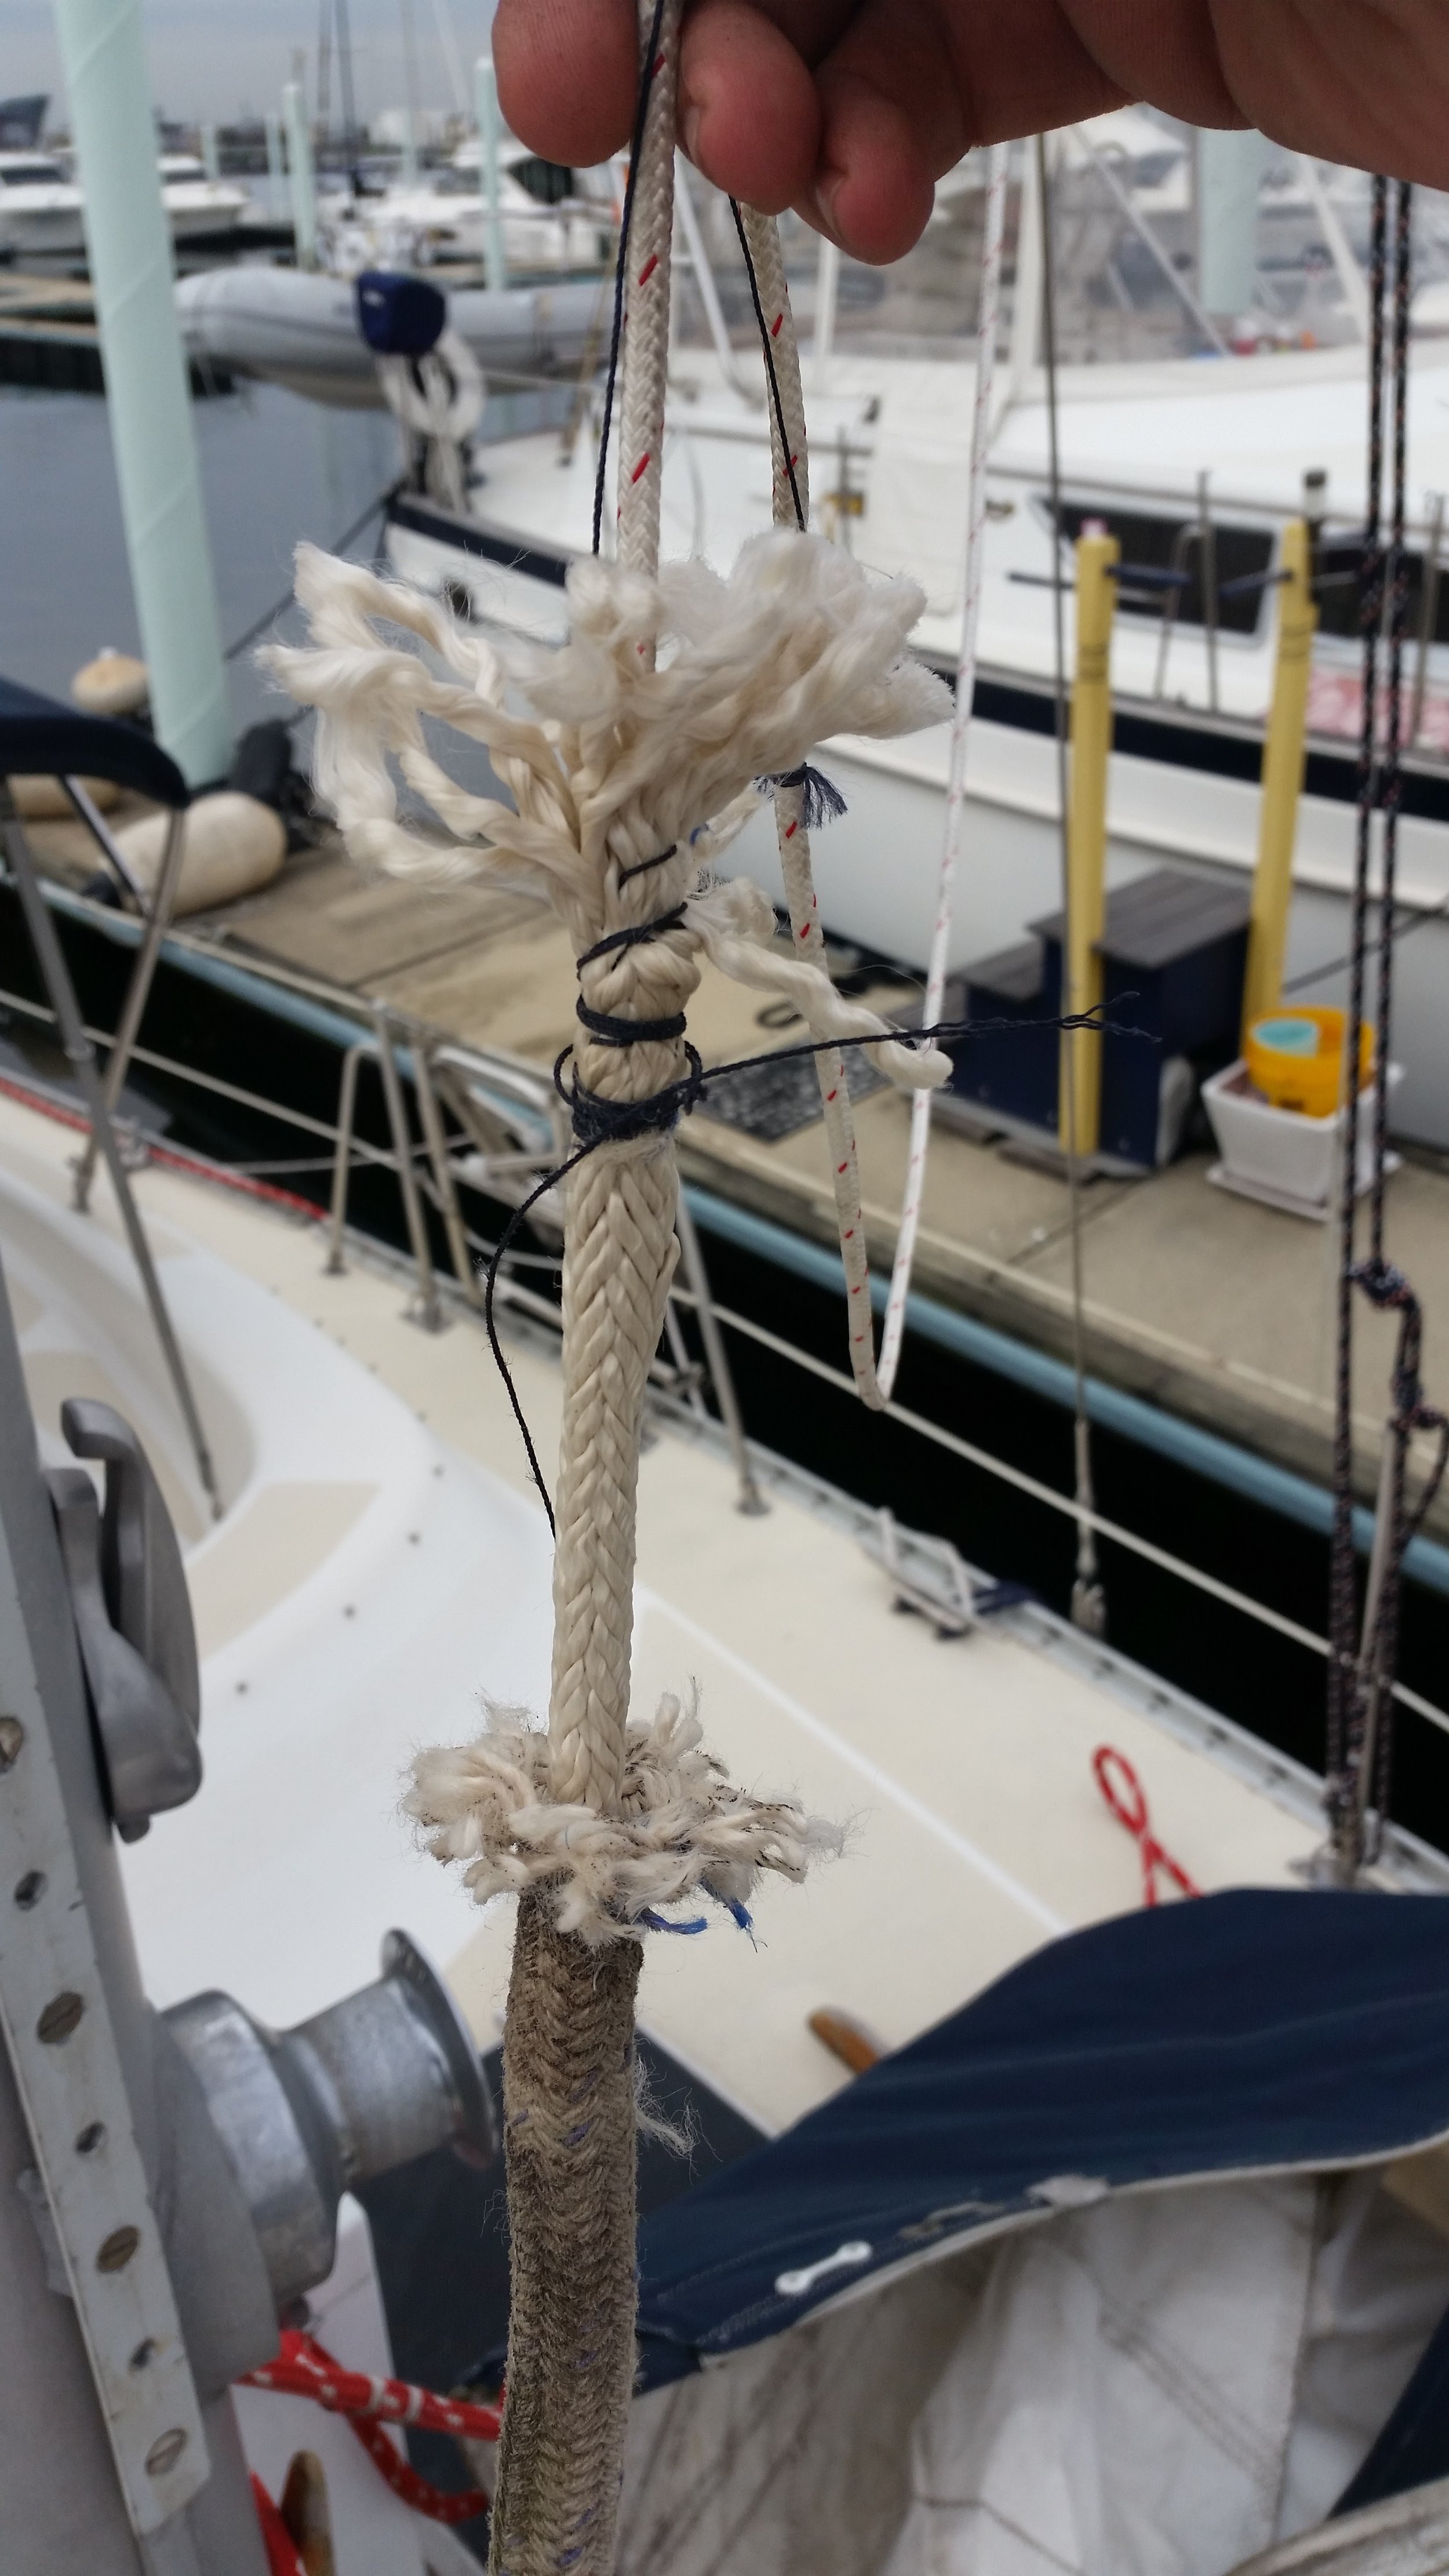
Very well! The ends of the lifelines are finished with a mobius brummel splice, forming a nice locking eye splice that will hold true and strong! This section of the lifeline looks great and the netting wrapped over the lifelines has shown no signs of chafe.

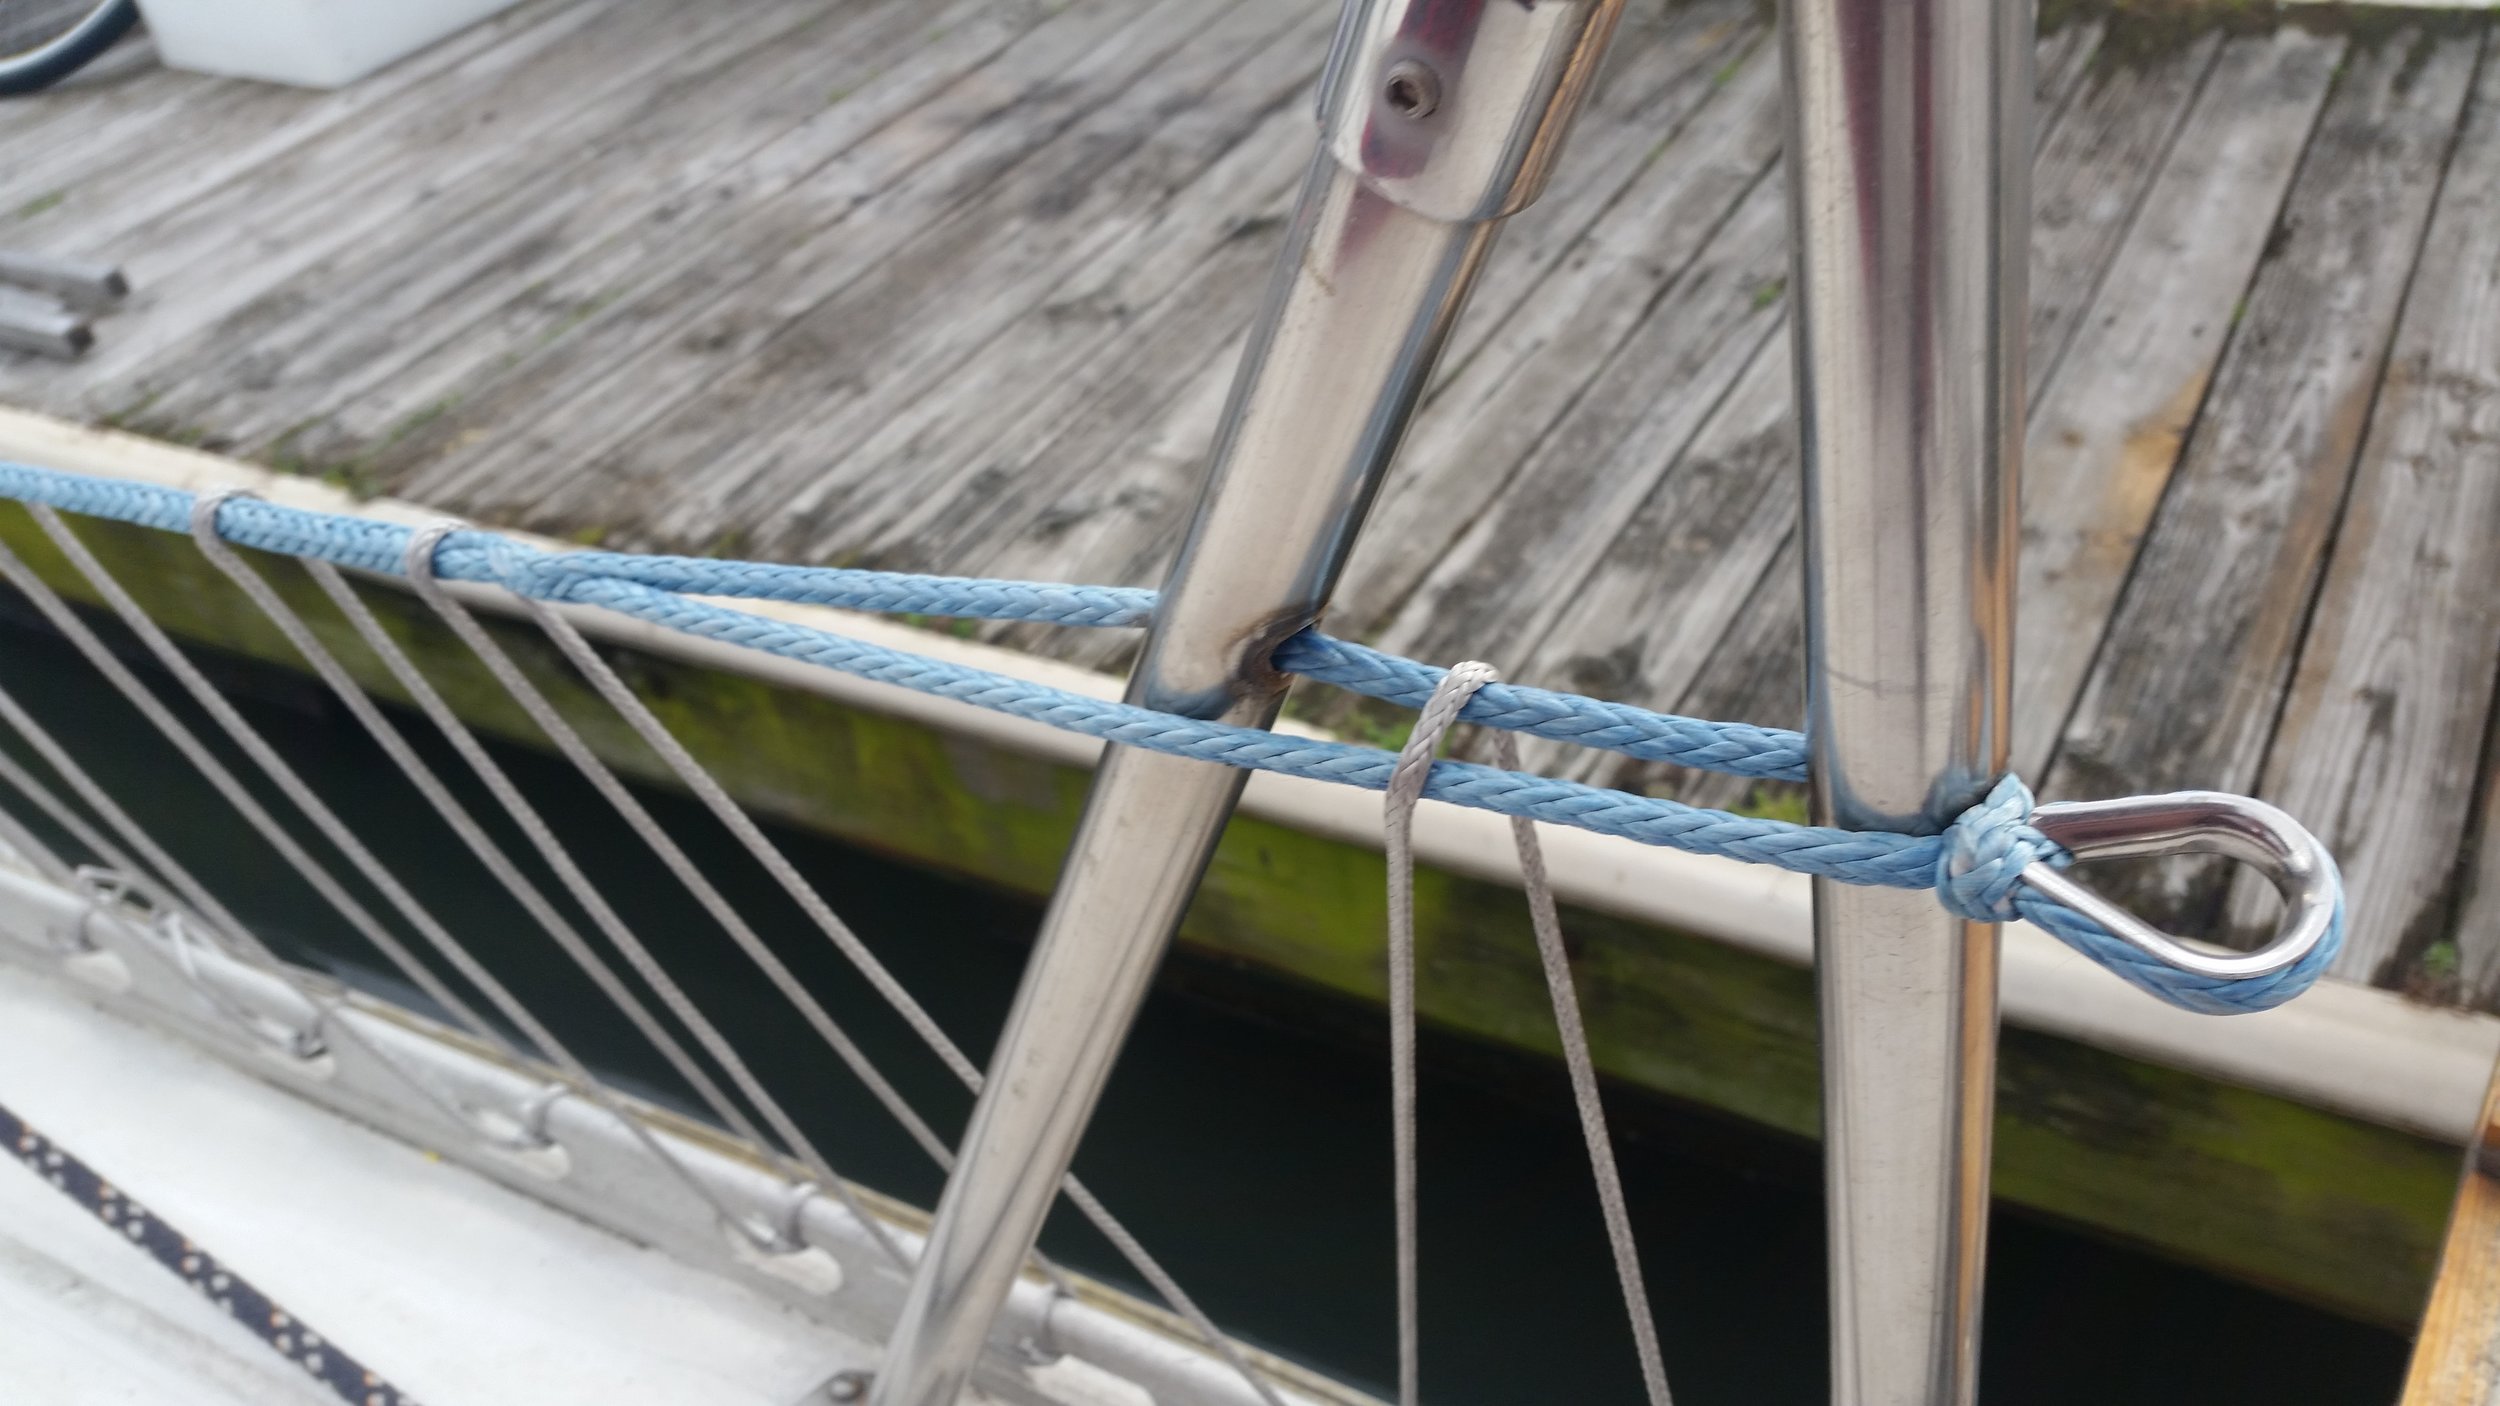
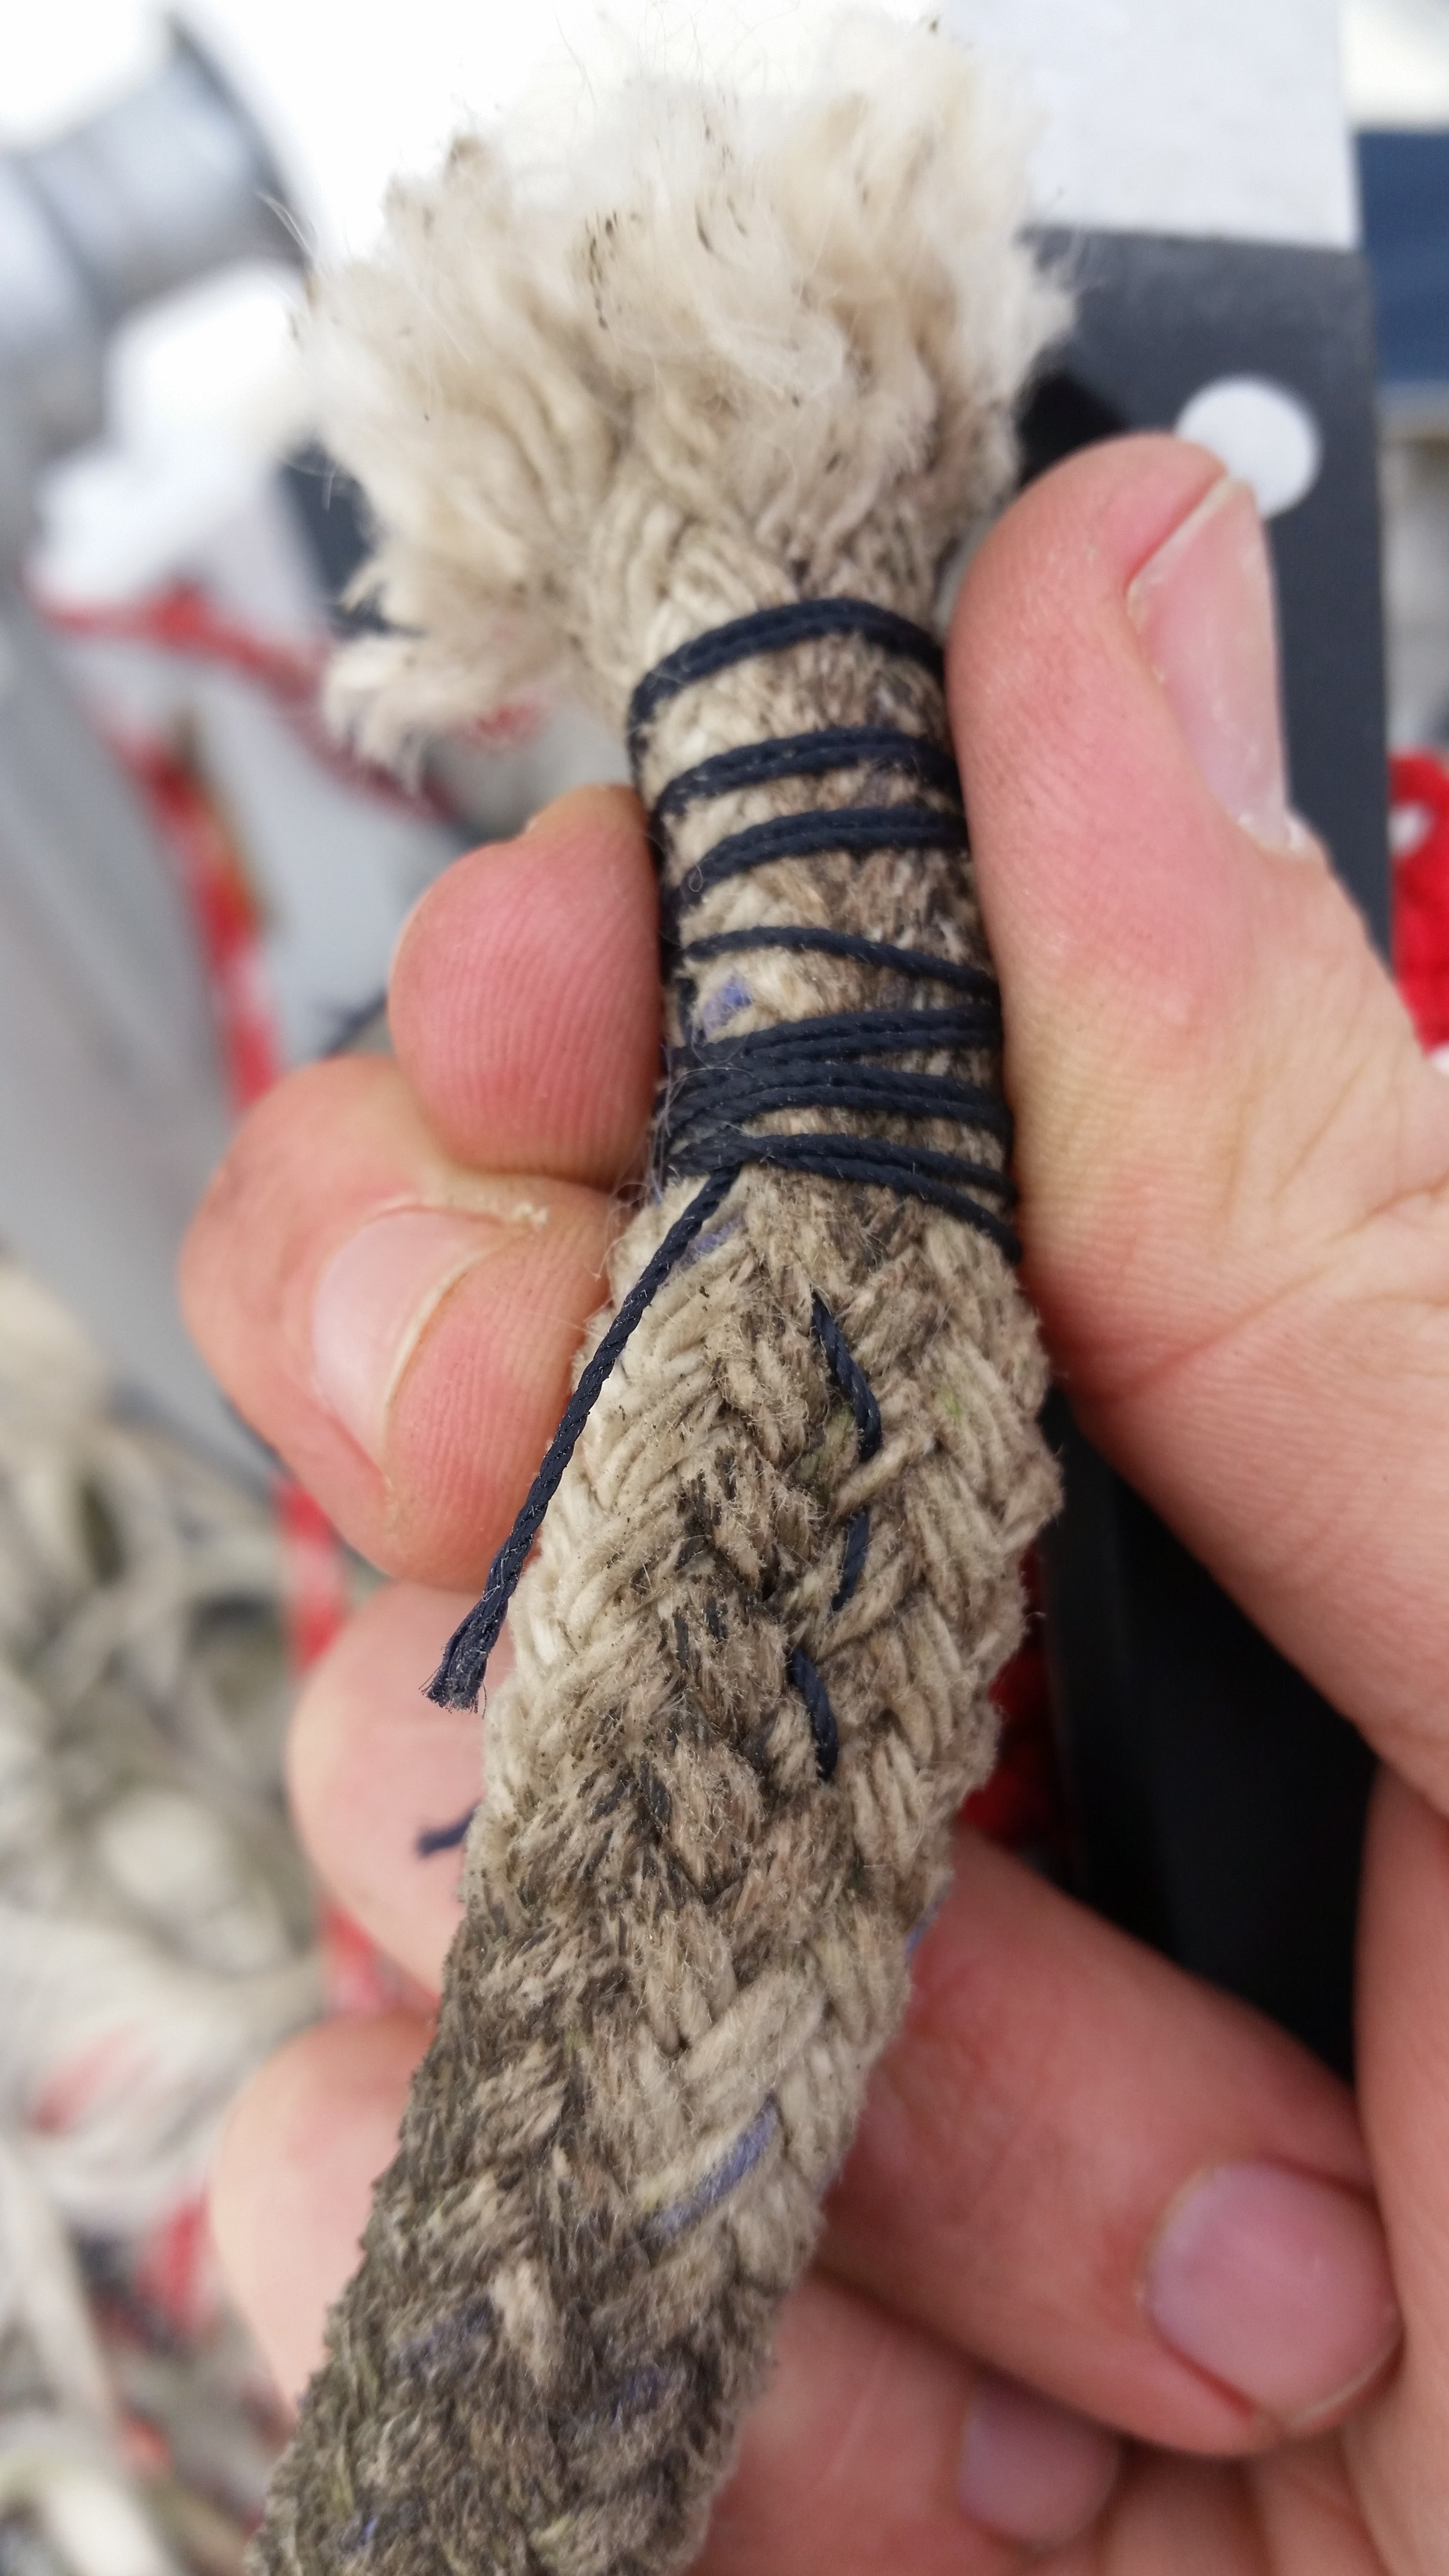
The gate stanchions were spliced rather differently. The spliced lifeline was too large to fit through hole in the stanchion, so the splice was routed along the outside of the stanchion. To allow inspection, the long bury splice was performed a considerable distance from the stanchion. This allows me to loosen the end lashings and pull the lifeline out of the stanchion to inspect. The extra distance is to allow me space to service the lifeline should the need arise. 

By polishing the stanchion's holes previously, there were no sharp points or burs to chafe on the lifelines. This has granted us the joy of no serious chafe after all these years!

With the gate closed, the tension on the lifelines pulls the thimble off the stanchion and straightens everything out. 

The lifelines have served their purpose very well for the past two years. There has been negligible chafe, and no corrosion. The only issue they have demonstrated is more of cosmetic concern: fading. When the lifelines were new, they had a strong electric blue color to them. Over the years, the color has slowly faded to a much more muted blue. 

2015

2015

2017

2017

While the vividness of the blue has subsided through the years, the strength and peace of mind have not. Careful planning to reduce chafe on the lifelines will make strong, durable, and worry free lifelines possible that will last you many years.

Reusing a Shackle, Halyard Eye Splice

Your current halyard shackle may be working just fine when your halyard needs to be retired. Reusing your current shackle will save on the cost of replacing your halyard.

While this shackle may look rather old and worn, the owner of this yacht trusted it and wanted to reuse it on his new halyard.

The most important thing to remember when splicing your shackle to the new halyard is to remember to slide the shackle onto the line before you make the eye splice in the halyard!

In this example, we are going to use 10mm VPC from New England Ropes. The first step is to pull the core out of the cover. Be sure to insert a needle through the rope just next to the area where you pulled the core out to avoid the line from scooting around.

At this point, the simple straight forward-ness of a Double Braid Class II eye splice ends.

The cover is fed into the core and then tapered gradually to reduce any hard steps that could result in stress points on the halyard when under load. At this point, the core and cover trade places and the cover is fed into the core and the core becomes the cover.

With the cover inside the core and tapered gradually, it is time to complete the splice. Further down the line, you want to pull the core out of the line. You want to pull out plenty of core to allow easier work while splicing. Also, be sure the slide the shackle onto the tail, all the way up to the loop that you pulled out.

The splice will be as big as the span between the cover entering the core and the beginning of the loop. The use of needles through the line will prevent the line from scrunching up in the area of the eye.

Instead of tape, I simply whipped the end of the core and inserted it into the back of the fid and fed it through the loop.

The eye splice is now formed and all that is left to do is taper the tail and feed the loop back into the cover.

Tapering is performed the same way it would be carried out on single braid dyneema. The only difference in tapering the core and tapering single braid dyneema is the VPC core is much softer in your hands compared to dyneema.

With the bury section tapered, be sure to pull the section all the way through the core, ensuring that the area where the cover enters the core now enters the loop as well. With the tail buried all the way in, pull on the scrunched loop to bury the entire tail completely. 

Once the tail is buried into the loop, you need to milk the loop back into the cover. I like to tie the line to a winch or mooring cleat and pull hard on the eye splice and let the cover swallow the core back up. At the very end, you will have triple thickness (Cover, Core, and Core) line entering the cover designed for single thickness. This basically means that you need to pull really hard in forceful snaps to get the last bit of loop to be swallowed up by the cover. 

Once the eye splice is complete, you need to whip the splice to lock it in place. You must use a needle and whipping thread driven through the cover and core to lock the splice in place. The whipping does help to make the splice look prettier, but it also serves as a structural lock to hold everything in place.

Replacing your Halyard

Replacing your old halyards is a crucial part of maintaining your running rigging.

This halyard was originally white with blue flecks. The owner wanted to reuse the same snap shackle. 

Replacing your halyard is very easy. The steps are simple and easy to carry out.

  1. Tie a messenger line to the lazy end of the halyard
  2. Pull the halyard (and messenger line) through the mast and out the mast head shiv.
  3. Tie the messenger line to the lazy end of the new halyard
  4. Pull the new halyard back through the mast head shiv and through the mast

That's all you need to do to install a new halyard! If your old halyard is looking worn, don't hesitate to remove it and replace it.

The most important thing in this process is to properly secure your messenger line to the end of the halyard so that they don't separate part way through the replacement.

The messenger line is stitched to the core and the cover is sewn to the end, allowing us to pull it back out if needed. This makes a very secure and fair connection that wont bind on anything inside the mast during the process.

Complexity

When selecting a cruising yacht, you might think that bigger is better! Bigger boat means more space which means more room and more comfort, it's a no brainer. The problem is, as the size of the yacht increases, so does the complexity of everything on board.

At the 2016 Annapolis Sailboat Show, I boarded a 70 foot Hylas which the owners had purchased the previous year to go cruising. The owners then became ill and are no longer able to cruise due to health issues.

The yacht is certainly outfitted for ease of handling. All the winches in the cockpit are electronic, meaning you don't need to grind a winch handle but rather just push a button. This makes sail trimming very easy, as you simply need to coordinate which button to push next.

At this point, a 70 foot yacht is sounding pretty good! The yacht is so large it feels like a condominium apartment with sails and a keel! Then you start to look at the little details that begin to shine through. 

The headsails are both roller furling, which keeps the deck clear and makes reducing sail as easy as pushing a button. The thing is these headsails are so big that a regular furling line would not be able to power the furler. Instead, the furlers are powered by hydraulic fluid which is powered by a central hydraulic pump. Should a problem develop in the hydraulic system, a manual winch backup is present at the furler. That is not the place I would want to need to go with that massive headsail flogging around!

The other striking leap in complexity came when I inspected the traveler and mainsheet system. Most travelers have a pulley system that leads to a cam cleat where it is locked off. If you need to adjust the traveler's position, all you need to do is grab the line and pull it in. The traveler can be pulled in by hand with a bit of force, but nothing drastic. On this 70 foot yacht, the traveler has its own dedicated winch!

The winch is a subtle way of telling you that the sail is so large and forceful that you need a winch to adjust the traveler. Now imagine jibing that massive sail in a safe and controlled manner? I'm sure it can be done but it will require a lot of winches and planning to execute in a safe and predictable manner.

While it may seem like a dream to cruise on the biggest yacht possible, keep in mind that the size of the rigging and complexity of the systems increases exponentially with the size of the yacht. As the complexity increases, so does the headache of maintaining all of these systems, as breakdowns will occur and the more you have, the more you have to break.

The moral of the story is go on the smallest comfortable-boat you can and go while you are young and healthy!

Roller Furling Halyard Clutter

Roller furling is wonderful! At the end of the day, you can roll up your sails and be done with them! There are no sails to flake and bag, and the sheets are carried up to the clew where they can be kept clear of the deck. The deck of a sailboat with roller furling can be quickly transformed from a sailboat to a private escape in just a few short moments!

While roller furling does provide a clear deck, the clutter is typically transferred to the mast. The halyards of the roller furling sails are coiled up and hung from any available winch or cleat horn. The clean crisp mast soon becomes a rope storage area! These coils will soon collect dirt from the air and rain and begin to look less attractive as time passes. Worst yet is the fact that these halyards will not be touched for a long time, as the sails are raised once per season! Soon these coiled lines will become stiff and unwieldy. 

This system works beautifully to maintain the clean look of a roller furling yacht. The halyards are merely small lines that run the needed length and terminate with an eye splice. When the sail is removed, a messenger line can be attached to the halyard and the sail can be lowered as the halyard runs into the mast. When the sail is going to be re-installed, the messenger line will feed the halyard through the shiv, mast, and out the side of the mast where it can be tensioned. 

The cars on the mast allow easy tensioning of the halyards as well. Once the eye splice has exited the mast, the loop can be installed on the car and another line can be attached to the bottom of the car. The lower line can be set up on a winch to achieve the desired luff tension. Once the ideal setup is reached, the car can be locked off and the tensioning line removed. This leaves you with a very clean and crisp look at your mast to match the clean and clear look of the deck.

It can be argued that this setup will not allow you to adjust your luff tension as easily, but lets be honest about who would want this setup! I am certain that someone who wants this look is not concerned about moving the draft fore or aft in the sail to adjust the angle of attach of the luff of the sail while beating or reaching. They simply want a cleaner deck with less clutter and more open space, and this delivers exactly that while still providing the necessary equipment to properly tune the sails.