Life Aboard

Water Maker, How Should You Think of Them?

Water makers are touted as a great safety feature because they can give you unlimited fresh water! Then thing is, a watermaker represents “potential” gallons, and not realized gallons.

There are many factors that need to be in place for a water maker to produce fresh water. It needs a clean water supply, it needs a power source, and it needs to be in working order. If any of these factors are missing, the unit will fail to produce fresh water for you!

Water makers are great, as long as you use them properly. This doesn’t correspond with proper operation, but proper mentality.

Water makers are capable of producing fresh water, but that doesn’t mean that you “have” the fresh water yet, just that you “could have” the fresh water.

It is important to have all the water you will need for your passage on the boat and in tanks before you leave a safe harbor. A water maker can be used to keep the tanks full, but shouldn’t be used in the water calculations of water capacity on the boat.

When sailing a long distance, it is important to calculate the “Miles to Empty” that you have. Basically, divide the number of miles you have left to go by the number of gallons you have.
For example, if you are sailing 1000 miles and carry 100 gallons, then you have to sail 10 miles for ever gallon of water you consume to make it there on empty. If you are sailing slowly, then be very sparring with your water usage. If you are sailing much faster than anticipated and soon going to arrive, maybe take that shower you have been thinking about.

By doing this simple calculation, you can make sure that you will have enough water to safely make a passage. Adding a water maker simply gives you the ability to keep your tanks full on the way, which means that your 1000 miles on 100 gallons will become 900 miles on 100 gallons, and later on, 500 miles on 100 gallons. As you get closer and closer to the destination with a full tank, you can be more liberal in your water usage. This is the luxury that a water maker brings, not the thought that you carry unlimited gallons of fresh water.

Finding Mystery Rot and What to Do

Wood in a marine environment will eventually rot. Choosing rot resistant species will prolong the process, but eventually, it will succumb to the effects of decay. 

Rotten wood is soft, moist, and squishy. When you prod it with a metal probe, the probe will sink into it without resistance. When you tap on it with a hammer, it will not make a bang sound like sound wood would, instead it will make a dull thud. Rotten wood in cosmetic structures like cabinets and interior joinery is unsightly, but rot in structural members is devastating to the structural integrity of your yacht.  

FullSizeRender.jpg

When you find rotten wood, what should you do? Should you cover it up and ignore it? Should you sell the boat?  Should you fix it yourself?

Well all of these question’s answers depend on how you comfortable you are at working on your own boat. If you are willing to take on the restoration of this rotted section, then have at it! If you are tired of boats and all the time they consume, then now would be a good time to sell (but you might get a lot more for the boat if the rot is fixed first).  

Rot is not that big of a problem when it comes to repairing. All the wood has been removed for you! The big picture here is you are going to remove the bad and replace it with new. The decay process of wood is very much like the decay process in teeth, and being a dentist, treating rot is a part of my job. 

When you look at wood, just like with teeth, you will have two types of wood: damaged and ok. Ok wood looks new. It is dry, feels normal, and sounds solid when tapped on. Damaged wood will be wet, look dark, and can be further subjugated into two more categories: Infected and Affected.

Infected wood is rotten and disgusting. It will resemble mulch in the way it just falls apart. It will be wet and make a thud sound when you tap on it, as it is no longer solid. Rotten wood can be removed by scraping with a metal instrument, as the weak remains will just fall apart and come out in pieces. 

Affected wood is simply close to the infected wood, but it doesn’t need to be removed. Sometimes, keeping a bit of wood structure will make your life so much easier. Think about it, if you have some rot in a bulkhead, you don’t need to replace the entire bulkhead, just the rotten portion and scarf in a replacement piece. Affected wood is the transition between the infected and the normal wood. It will be stained, wet, possibly slimy, but it will sound solid when percussed and will not hole when struck with a screwdriver tip. This wood just needs to dry, be wiped down with bleach, and given some time to restore itself before the new wood can be scarfed to it. 

FullSizeRender.jpg

To assess the damage, it is best to sand away any paint that way the full extent of the area can be assessed. They say the first three rules of surgery are:
1. Access
2. Access
3. Access

You need to see what you are working on to figure out how you want to fix the problem. The rotten section is the void of a hole. From there, the affected wood is located somewhere in the transition between the good wood and the infected wood. The problem is, this bulkhead is made up of two layers of 3/4” plywood, so access to the underlaying layer is only attainable by removing the top layer first. 

You can see the large section of wood that has been cut to reveal the underlaying bulkhead plywood. When you have access, you want to treat the wood the wood as you would a cancer in a biopsy: cut everything you suspect and leave only clean margins. With the wood, if your cut section has signs of rot still left behind, cut it back a bit further.  

When you don’t have such liberal access, you will have to be a bit more judicious in your selection of what comes out and what gets to stay. The wood in front of the mast was too close to the mast to get the saw in there, so I was forced to use a drill (dentist joke) to remove the rot. A 1/2” drill bit will do wonders at ripping all the rotten wood out of the plywood, and won’t be able to easily drill into the good wood you want to leave behind.  

When you are removing the rotted wood, it pays to keep in mind that you will need to rebuild next. Severely rotted wood is actually easier to replace because the tabbing on the hull will be left intact. All you need to do is measure the size of the wood that once occupied that space and have it milled. Then you can glue it back in place with gobs of thickened epoxy that has been smooshed into the tabbing. When the wood is partially decayed, it can pose a challenge as you can’t get it to come out as easily. 

If you have a single sheet of rotted wood, consider scarfing in a replacement piece that is held in place with thickened epoxy, followed by a few layers of fiberglass to help tab it all into place. If you have laminated layers of plywood, like in this case, you can simply cut the access hole a bit larger than the deep layer. Now, the deep layer will be glued to the remnants as well as to the access hole’s board, and the access hole’s board will be glued to the deep layers remnants. This stepped approach gives you plenty of surface area to glue everything together while still giving you the ability to put everything back together in a structurally sound method. 

When rebuilding, it is always important to look at the cause of the rot and figure out how to prevent it from happening again. Frame heads are notorious for holding water if they are not beveled towards the midline of the hull. This bulkhead abutted the shower and had no protection from the water that seeped into the wood for decades. 

Figuring out the cause will then let you plan the solution so that the future you or the next generation won’t have to carry out this same repair. 

Controlling Weather Helm while on a Run

Weather helm is a phenomenon where the force on the sails wants to turn the yacht up and into the wind. This is caused by having the Center of Effort (CE) of a sail aft of the Center of Lateral Resistance (CLR) of the underwater profile. Balancing the sails is simply the act of playing around with the CE to get it to be directly in line with the CLR. ​

If the CE is ahead of the CLR, the boat will have lee helm and will want to turn downwind. If the CE is aft of the CLR, the boat will have weather helm and will want to turn upwind. Only when the CE and CLR are directly over each other will the sailboat be balanced and sail straight, not venturing upwind or downwind.​

Balancing the sails is not the same as trimming the sails for maximum performance. A lot of time, you will need to have your sail working at less than peak performance to properly balance out the whole setup. This is easy when you are sailing on a beam reach, where all the forces acting on the yacht are coming from the side, but what about on a run?​

To be on a run, you need to ease your mainsail all the way out so that it can act as a large drag to the apparent wind and be pulled along, likewise pulling your yacht along with it.​ Here is where it gets tricky.

FullSizeRender.jpg

As you ease your sail out, the CE of the sail will not only move forward, which will help give you lee helm and pull your yacht downwind, but it will also move the CE laterally and outboard. This long and very powerful lever arm, also known as your boom, will act on the mast and try to turn your yacht opposite of the direction you have eased the sail. In this case, with the boom eased to port, the force on the sail will try to turn the yacht to starboard. This may feel and act like weather helm, but it is not caused by the aft movement of the CE, instead it is caused by the leverage of the mainsail held out by the boom.

The further outboard the clew of the sail is, the longer the lever arm is that is acting on the yacht, and more leverage the sail will have to turn the yacht in the opposite direction. 

Your options here are simple, either you can move the clew further in or not ease the sail as far. Moving the clew inboard is effective at reducing this torquing. This can be achieved by either reefing the sail or simply not easing the clew past the beam of the boat. Obviously, these options seem counterintuitive as the apparent wind while on a run is less than the true wind; more sail would seem logical!

Instead of reefing, and dealing with the boom on a run, an alternative is to raise the trysail. 

IMG_2737.JPG

The trysail has no boom, so the foot will curl more easily when the sail is eased. As you ease the sail, the clew will tend to move directly forward from the sheeting point, and as such will stay inboard of the beam of the yacht. 

The sail is also smaller but when eased will fill up and provide a great amount of drive downwind. Since the sail will curl up, the majority of the sail will be right along the mast, in the middle of the rig, further keeping the CE close to the midline of the yacht. 

Being a small sail, it also won’t block the wind from reaching your headsail. This will increase the headsails effectiveness which will then aid in keeping the bow of the ship pointed downwind.  

IMG_2265.JPG

Having a trysail up on a wonderful day may not seem intuitive, but it really does help take out the weather helm while sailing downwind. This will balance your sailplan and let your yacht sail more balanced towards your downwind destination.

Wood Rot

The head refit began as an elective procedure. We felt the space in the head was used inefficiently, and so we wanted to make better use of that space. We began by tearing out the cabinets and some small rotten corners were noted on the cabinet itself, but nothing structural. 

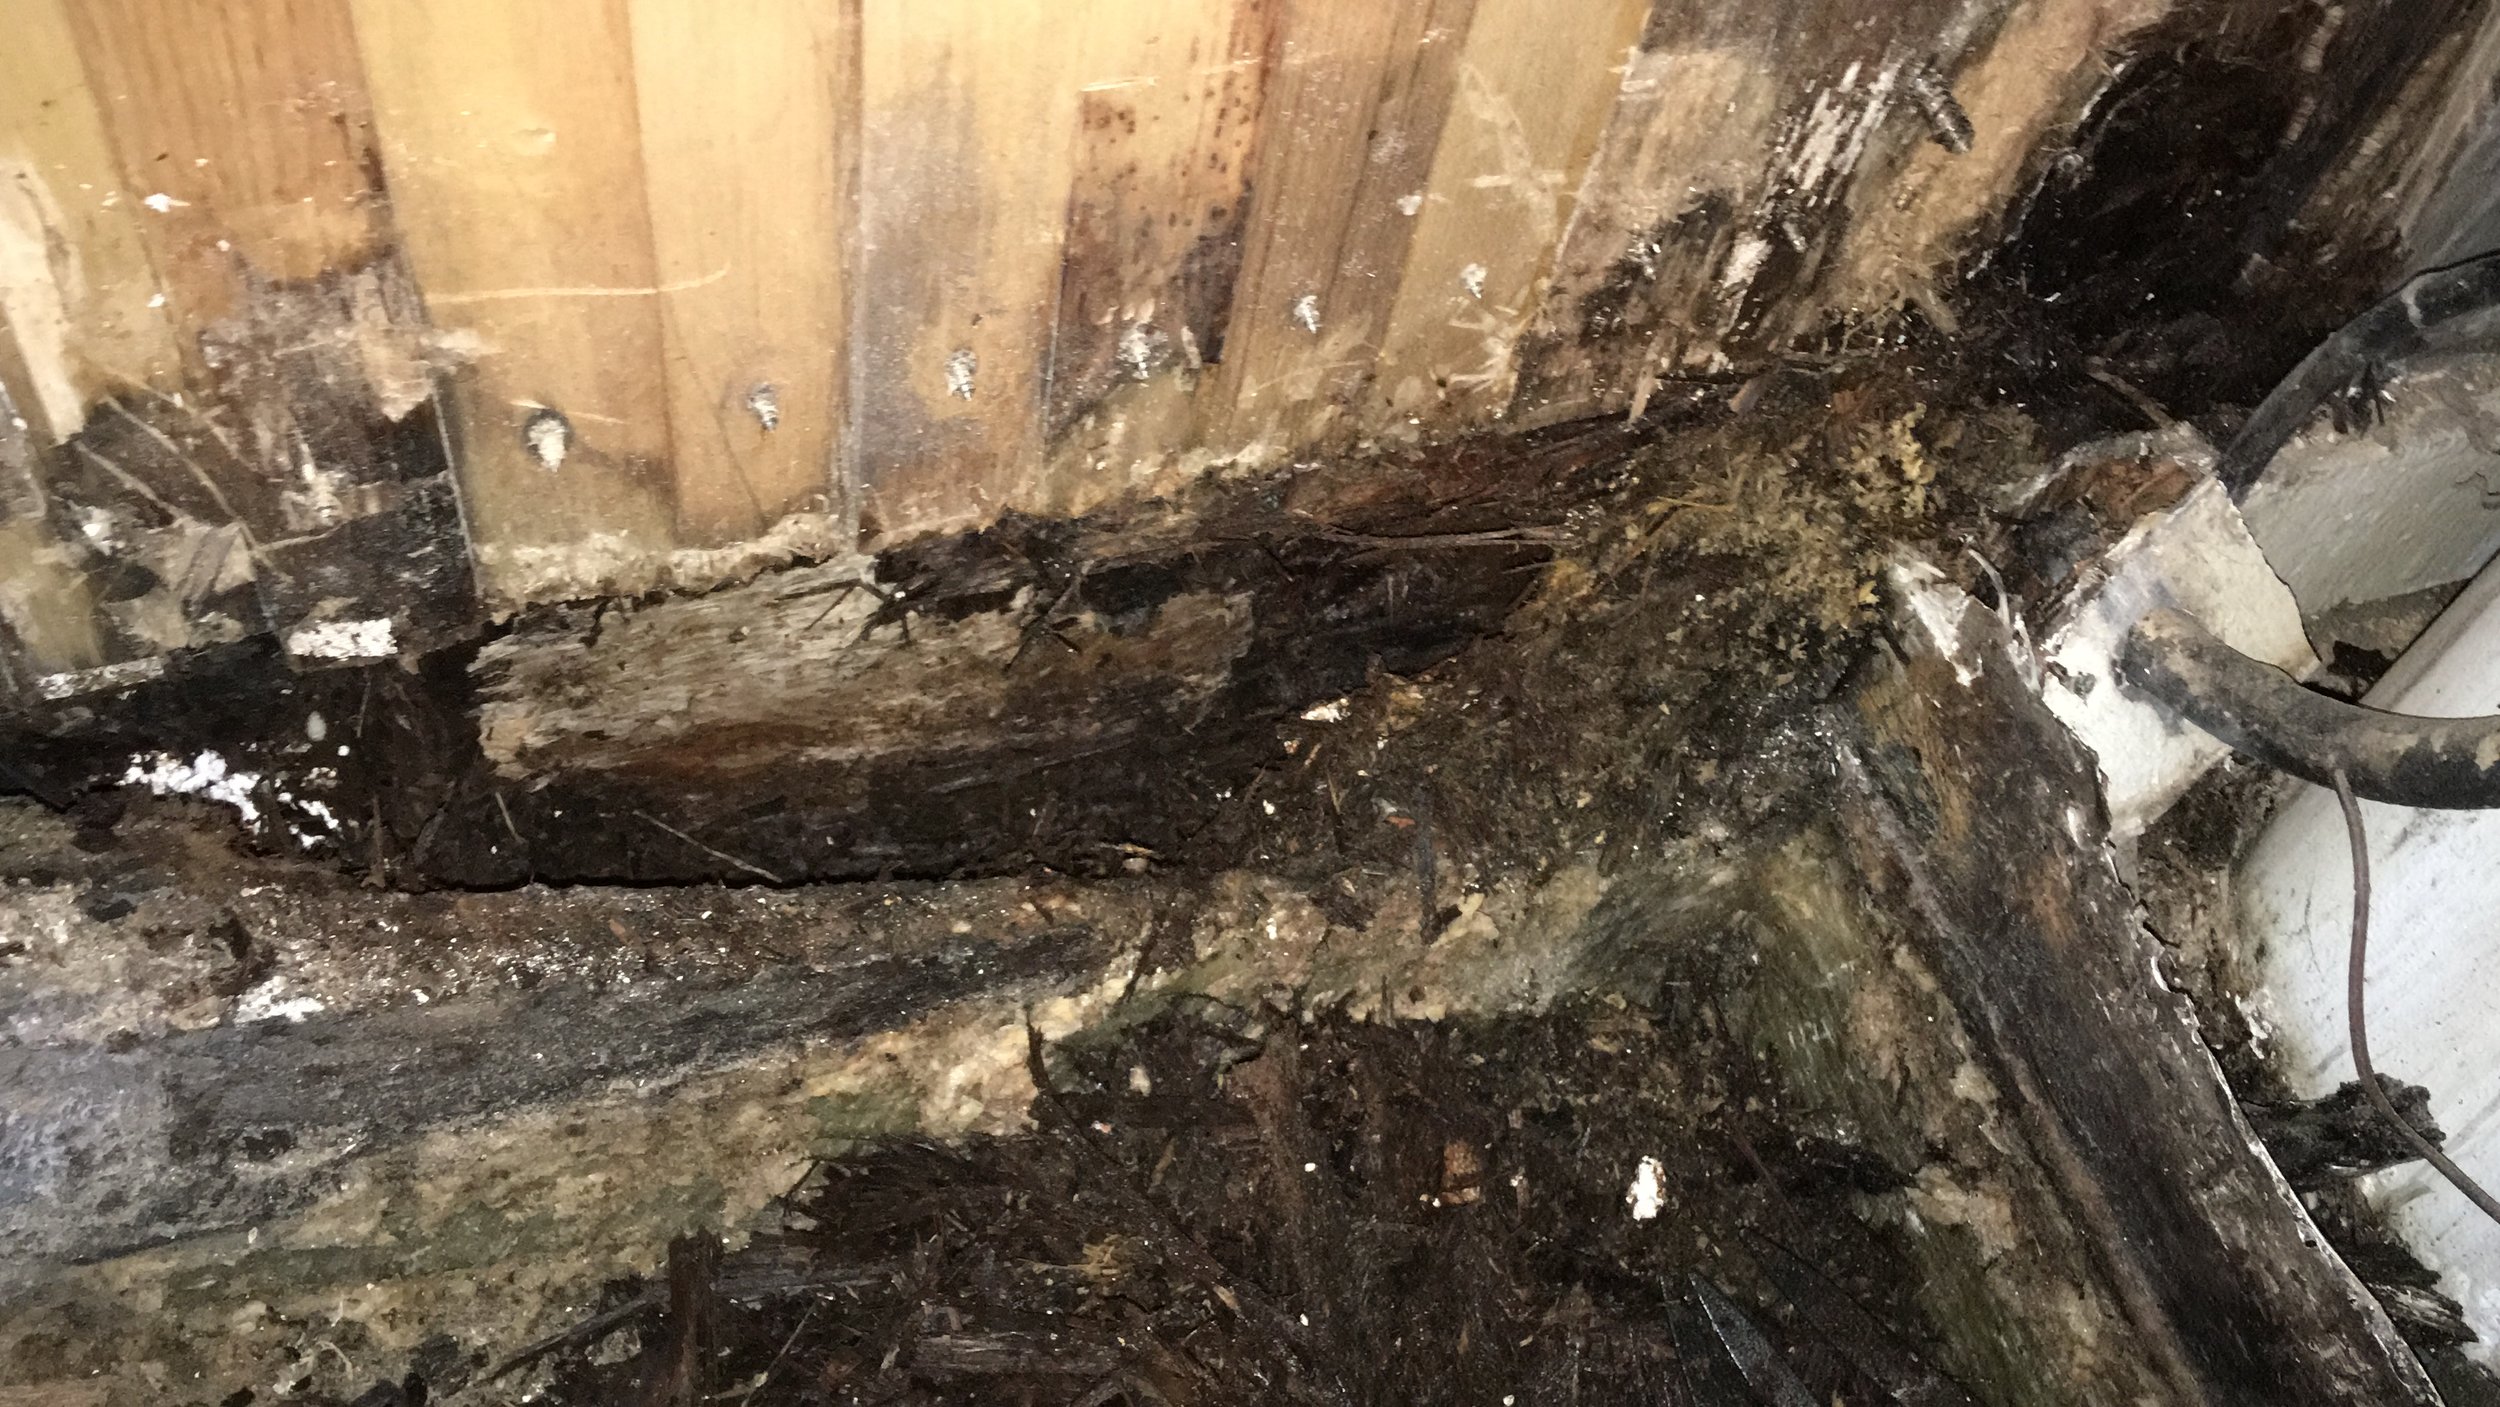
Then I removed the old shower floor, and this is what I found! 

FullSizeRender.jpg

Under the shower was foam, to take up the dead space. The foam was sprayed in between the floors and keel so that water would not collect in there under the shower. The problem with this plan is: water will always find a way!

The foam quickly became a dry sponge that yearned for the moisture above it, and as small bits of water crept past the bedding compound used to hold the shower floor in place, the foam would soak it up and hold it there forever! 

Fast forward a few decades and you have waterlogged plywood that has never dried out. It rotted away to mulch!  The floors under the shower are completely gone, only the fiberglass tabbing that held them to the hull remains!

Where the bulkhead came down to meet the shower also rotted away completely. The bulkhead is two sheets of 3/4 inch plywood, and the entire bottom section rotted away.  

To access the rot, I first sanded away the paint so I could see how far up the wood was discolored. Then I took a small circular saw and cut a 3/4” deep cut to remove the afflicted wood. 

FullSizeRender.jpg

With the bulkhead cut back to healthy and unaffected wood, I was then left with the vertical finishing boards of the salon. The entire lower portion of the bulkhead had rotted away because it was abutting the shower floor. 

IMG_3791.JPG

The rotten wood, which had turned into mulch was simply removed by scooping it up and throwing it out. With all the wet and rotten wood out of there, the remaining wood will be left open to dry for the next month. 

IMG_3790.JPG

What looks like mulch is actually the remains of the bottom of the bulkhead. This wood will need to be replaced in a more sound manner that way this issue doesn’t repeat itself in a few more decades. 

At the moment, I am debating whether to replace the lost bulkhead material with close cell foam or with new plywood. Either way, the new head will be fully glassed to the walls so that the entire thing is a fiberglass shell that won’t leak water into the timbers of this old boat. 

Butcher Block Galley Countertops

While on the hard in Terceira, we decided to take care of some boat projects that we had been toying with tackling “someday”. First was repaint the whole boat, second was refit the head, third is refit the galley, and fourth is re-finish the entire inside of the boat (a lot of varnish to do this one). 

The boat is being painted, the head is under deconstruction, so it’s time to get the wood for the galley! 

FullSizeRender.jpg

The plan is to replace the Formica and plywood countertops with edge grain mahogany butcher block. In the Azores, the prices all seem rediculously low, which is what spurred our desire to tackle the refit here, even though our visa to be there and work on the boat only grants us 90 days in a 180 day period. 

FullSizeRender.jpg

Oddly enough, there is no logging on the island, and all their wood is imported from Africa. As a result, wonderful African hardwoods are readily available at a very low price! We ended up paying €250 for all of this wood, including the delivery and milling! 

Sadly, the quality of the woodworking on the island does not match the quality of the wood that they import, so finding the right kind of wood glue for the project proved impossible. I want to use Titebond III because it is waterproof and permanent. I have used it before in the construction of Tooth II, and those seams had zero leaks! 

When I asked around for wood glue, I was offered Elmers Glue and local wood glue that specifically said “temporary holding, not for items that will get moist”. When I told them I need something that is waterproof, they offered me Silicone. I promptly left that establishment and began to worry about what all wooden construction on the island was glued together with!

I looked into special ordering a proper wood glue but the cost of delivery and limited time left on this visa proved to be too much. So, the wood for the galley will remain on the cabin sole until we January, when we return and begin the reconstruction phase of the refit.