Cruising

Reading Isobars

Isobars are the little lines on weather charts that tell you what the barometric pressure is across the landscape. Isobars are the demarcation line where the pressure will be the same along its entire length. 

Wind travels along the length of the isobar, and the closer the isobars are, the stronger the wind will be. Wind travels counter clockwise around low pressure systems and clockwise around high pressure systems. This means that the wind wil travel to the left or to the right along the length of your isobar depending on the location of the high or low pressure systems around it. 

While wind speed is estimated based on the proximity of one isobar to another, there are subtle variations based on line curvature. We have all had those days when they forecasted wind but it was dead calm, or they forecasted light winds and you needed to reef all the way down! What happened?! 

The answer is simple, the isobar curved in your area and altered the wind speeds. If an isobar curves inward, creating a point that the wind will whip around, the winds will be faster. If the isobar curves outward, creating a divot in itself, the winds will calm down as the transit this area and give you much calmer winds than expected. 

IMG_2126.PNG

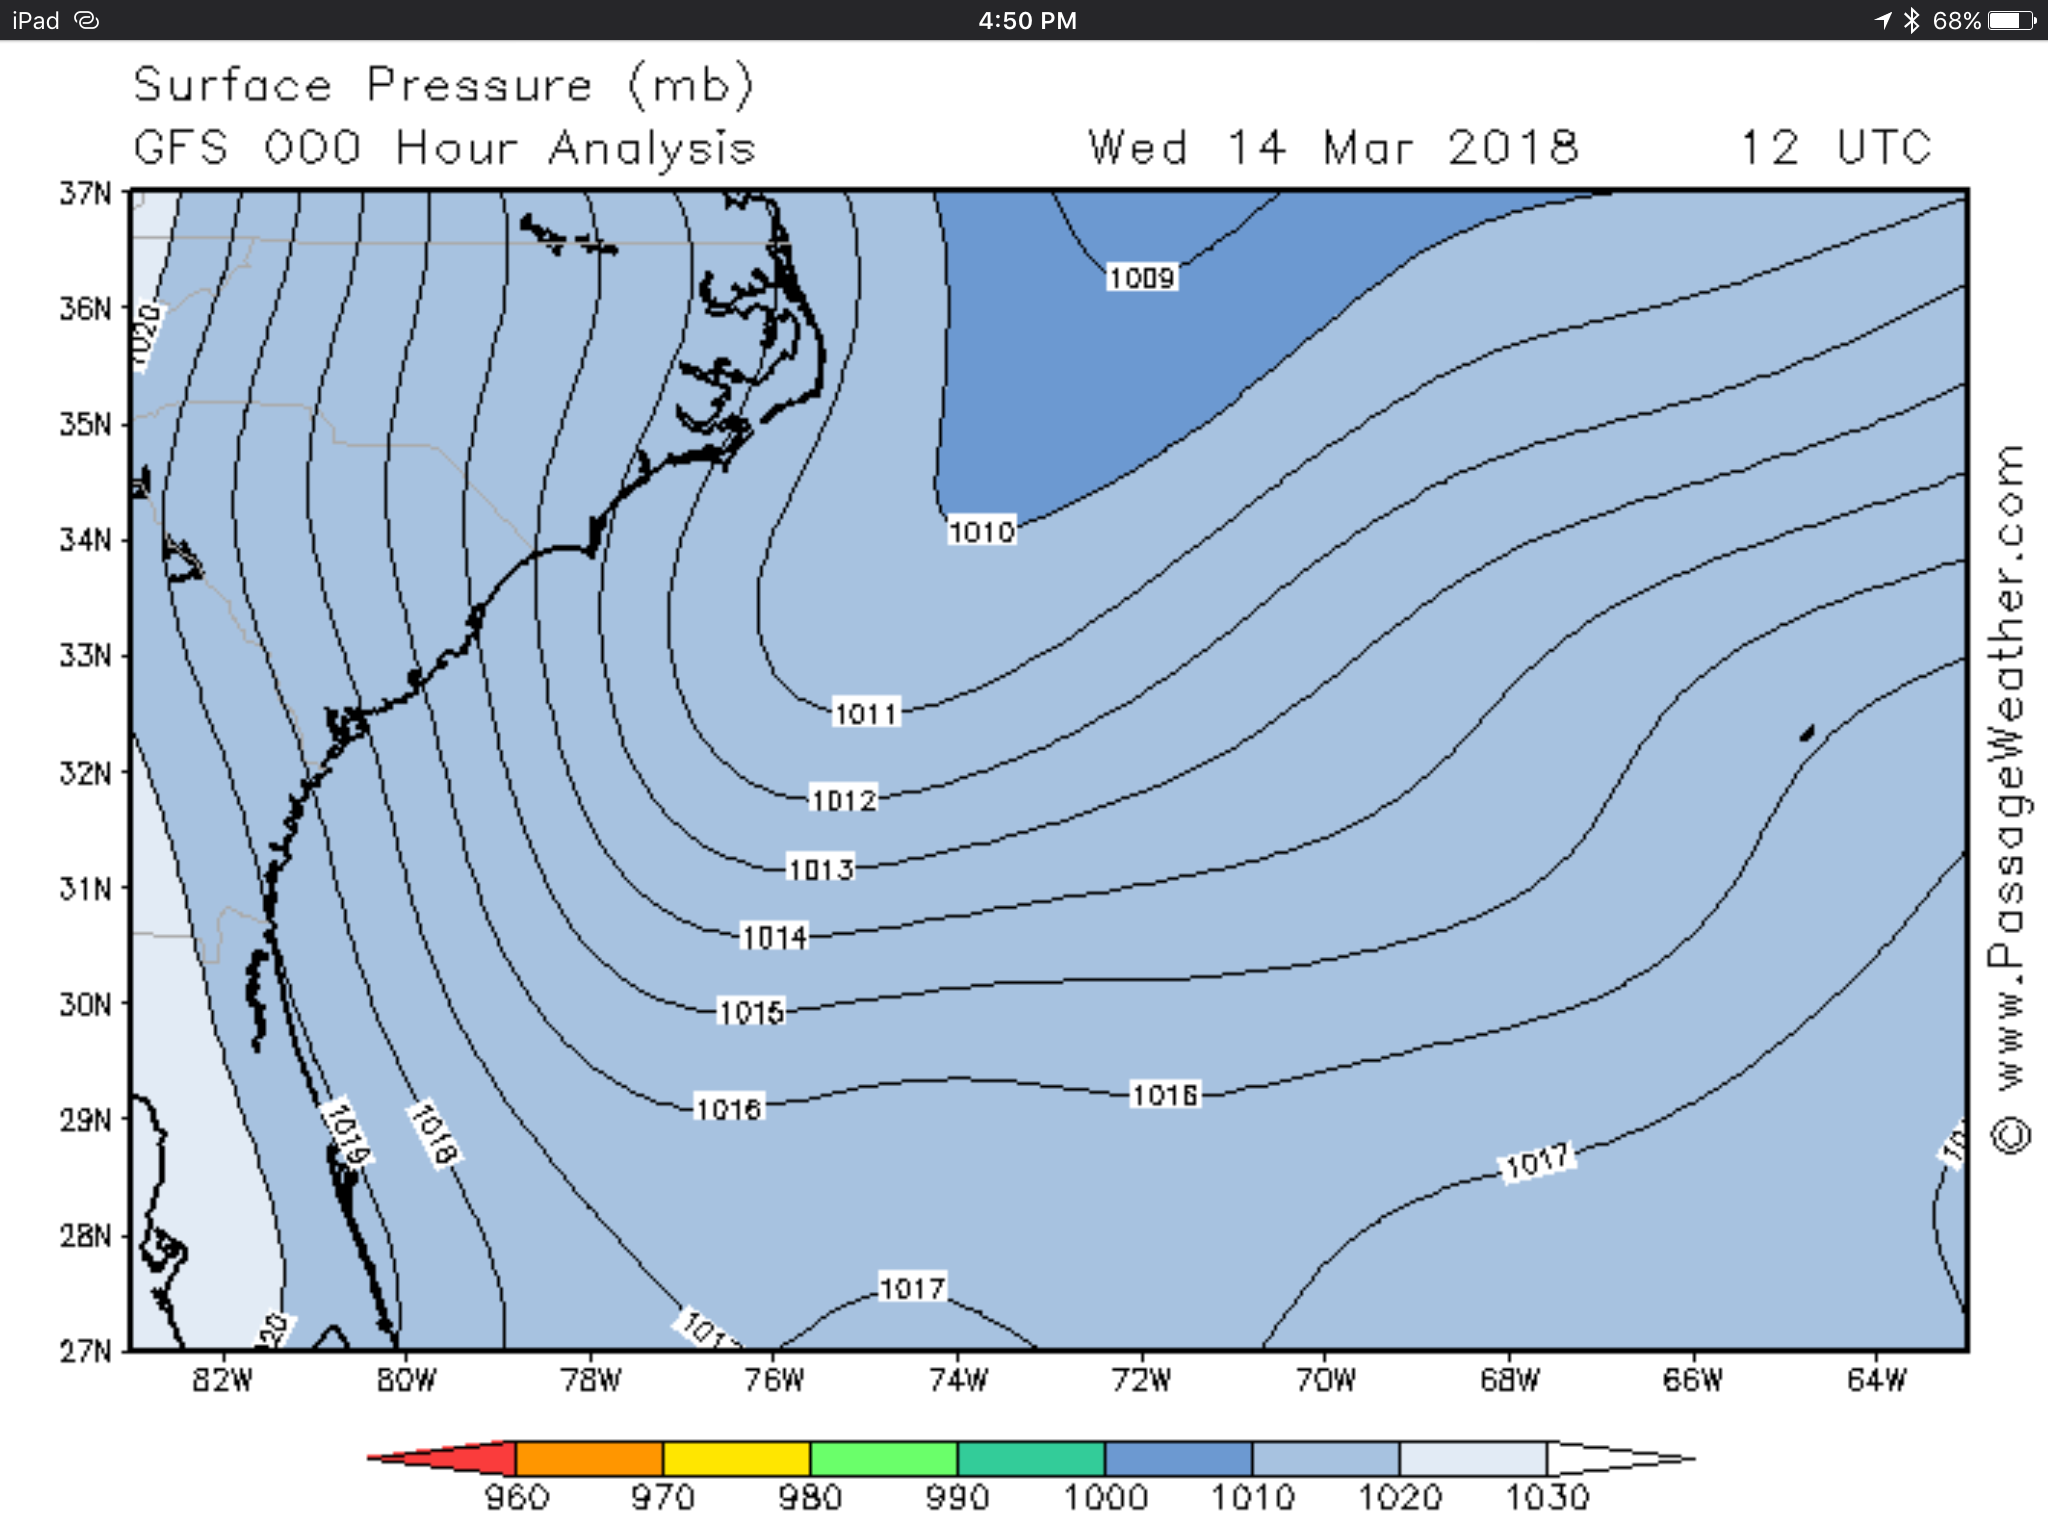
These isobars are extremely spaced out. There is considerable distance between each millibar of air pressure. This would tell you that the winds will be light in the entire area. Since the top of the screen has a low pressure center, you know that the winds will be moving counter clockwise or from left to right on this map. On the bottom left, you can see a high pressure area, so its winds will move clockwise or from left to right on this map. 

Now, the 1010 line makes a pronounced point, so the winds in this area can be expected to be rather higher than the surrounding areas. The 1017 line at the very bottom near 75W makes an outward turn, so the winds here can be expected to be even slower than the surrounding areas. 

IMG_2127.PNG

Looking at the windbarb map, we can see that the winds near the point of the 1010 line are stronger, and the winds just above 75W are rather slow. 

IMG_2123.PNG

Looking at a global map of the Atlantic Ocean, you can see a high pressure system in the middle of the ocean and two low pressure systems at the top corners. 

The high pressure system in the middle is called the Azores High, and is a famous pressure system that remains constant through most of the year. This will generate a clockwise rotation of wind around it. 

Each low pressure system in the top corners will generate a counter clockwise rotation of wind. 

The intensity of the wind will be caused by a few factors. First the high pressure area has widely spaced isobars, so the winds here will be light. The low pressure areas have very close isobars and a very drastic change in pressure from outside to inside. This will generate a very powerful wind as you approach these areas. 

The second thing affecting the wind speeds will be the curvature of the isobars. The high has relatively long and straight isobars, so the winds will be rather consistent. The low pressure systems have very tight curves, especially towards the centers. This will amplify the speed of the wind and create an insane storm! 

IMG_2124.PNG

You can see the high pressure area is rather calm while the points and the centers of the low pressure systems are very intense.  

Learning to read the isobars will allow you to better interpret weather data received offshore via weather fax where the image is not always clear and the graphical display leaves much to be desired. 

IMG_2128.PNG

The quality of the image depends on the quality of your signal and receiver. If the unit is not perfectly tuned, the image will be skewed. If you don't like the way your image looks, too bad! The next transmission is in 6 hours for you to try again! 

Learning to read weather maps and isobars will be an invaluable skill when cruising and you are forced to be your own weather forecaster. 

Sailing a Cold Front

A cold front, also referred to as a "storm" is a powerful wind that will reverse the prevailing winds. If your destination is upwind of the prevailing winds, a cold front is your ticket to thee fast lane!

A cold front always rotates clockwise with its winds, meaning that you can plan what direction the winds will be flowing by looking at a weather chart.  

Now, the intensity of a cold front will vary and you obviously don't want to head out in the face of a major storm! Looking at the closeness of the isobars will give you a clue as to how intense the winds will be. If the isobars are stacked closer together, you can bet on some pretty extreme wind! If the bars are spaced well, the winds will be lighter.  

As a cold front approaches, you want to plan on leaving as the 1020mb line approaches. This will give you good winds and a nice passage as you make your trek with the winds. 

With your passage planning, it is important to keep in mind the sea state. Waves form because of the winds. The stronger the winds, the taller the seas. Mature waves, however, need a lot of distance and some deep water to form. If the winds are blowing off the shore and onto the water, the fetch wil be less and so will the height of the waves. The other aspect to keep in mind is the water depth. If the water is shallow, waves will crest and break long before they reach their mature height.  

In winds of 30 knots, mature waves can be around 20 feet tall, but if you are in water of 30-60 feet in depth, the waves will top out at around 6-8 feet in height. This will give you the power of the wind without the uncomfortable motion of a tall sea state.  

The duration of a cold front will vary, so it is important to study all available inlets between you and your destination. This way, if the weather becomes something you do not want to endure, you can sneak into the next available inlet and escape. Also, if the winds shift or the cold front passes over you before you get to your destination, you will know where you need to go to wait for the next favorable front to continue your downwind sleigh ride!

Ocean Passage Planning

When you want to go from one place to the next, you might find that the shortest is across the ocean. If you are sailing, the quickest way across will be when the wind is blowing well and in the direction you are going. 

If there is no wind, you will have no power with your sails. If the wind is on your bow, you will have to beat into the wind and waves as you tack towards your desitnation, easily sailing 2 to 3 times the distance between the two points.  

Picking when to go based on the weather will give you the perfect conditions to make your way there quickly and easily.

If you are planning to go in the direction of the prevailing winds, then you will find it easy to choose. Since you are going with the prevailing winds, most of the days will be blowing in the right direction. This means that you will have plenty of times to choose from! Simply picking a day that has fair winds will give you ideal conditions. 

If you are planning to go in the opposite direction of the prevailing winds, then you will have to wait for a cold front to come through and reverse the winds. This will blow you to your destination, but the days are not as frequent. 

Cold fronts come through periodically, and can vary in intensity. Obviously, you don't want to go out in front of a very powerful cold front, but you also don't want to head out on a very weak one that won't be able to push you along. 

It is important to keep in mind that cold fronts are also called "storms" by other people, so be prepared for those kinds of conditions. 

We have sallied from Charelston, SC to Ferdinandina, FL moving along quickly under storm sails, and again from Ferdinandina, FL to Fort Pierce, FL thanks to strong cold fronts. 

There were small craft advisories, and we were only flying the trysail and staysail, yet we were doing 5-6 knots most of the time with periods of 8-10 knots! The ride was rough and intense, but we did manage to cover two days worth of sailing in a single day!  

We worked hard, slept little, and sailed fast. Once we arrived at our next inlet, we were able to pull in and go to sleep for the whole day!  

Keeping an Interior Work Area Clean

Woodworking projects are notorious for creating a mess. Wood shavings and saw dust will fall everywhere and migrate far from the work area! There is a simple trick to keep the mess contained and not impede on the project itself.

IMG_2118.JPG

The trick is to work in an area with no breeze, so that any dust or shavings will fall vertically, then place a moist paper towel under the work site. The wood shavings and saw dust will fall on the moist paper towel and stick to it! This will let you work away without fear, and have a single piece of paper to fold up with the mess. The paper can be folded up to contain the issue and disposed of easily. 

This trick works well for wood, but it also works well with metal (though I would personally make it a wider area of paper towel). Next time you have a project, enjoy being able to fix it quickly and clean up even quicker! 

Wooden Doors Not Closing

Wood on a boat is subject to a lot of dimensional changes in size as humidity and temperatures change the moisture content of the wood. Wooden doors are going to swell and shrink as the air in the boat becomes moist or dry. 

The doors in our table (where we store our linens) are rather large, so a small percentage in dimensional change will equate to some significant movement in the wood. 

IMG_2114.JPG

These doors used to close easily, but after a rather most winter, the wood swelled slightly, but caused the doors edge to migrate a few millimeters. Now the doors overlap instead of closing. The solution will be to trim the wood at an angle to allow the latches to meet and the doors to close.

IMG_2122.JPG

Using a block plane, I was able to slowly and carefully bevel the edge of the door to allow the edge to pass the latch and the doors to close effortlessly.

IMG_2118.JPG

With the wood trimmed off and the doors closing easily, the fresh wood was then given a few coats of varnish to seal it up and protect it from future moisture. Varnish doesn't make wood waterproof, but it does help. Varnished wood is sealed up and fed well with the oils and resins in the varnish. This creates a barrier to keep the moisture out, or at least slow the ingress of moisture.  

With some simple hand tools, the problem of a non closing door can be fixed and cruising life can continue on without a hitch! 

IMG_2115.JPG