Sailing a Cold Front

A cold front, also referred to as a "storm" is a powerful wind that will reverse the prevailing winds. If your destination is upwind of the prevailing winds, a cold front is your ticket to thee fast lane!

A cold front always rotates clockwise with its winds, meaning that you can plan what direction the winds will be flowing by looking at a weather chart.  

Now, the intensity of a cold front will vary and you obviously don't want to head out in the face of a major storm! Looking at the closeness of the isobars will give you a clue as to how intense the winds will be. If the isobars are stacked closer together, you can bet on some pretty extreme wind! If the bars are spaced well, the winds will be lighter.  

As a cold front approaches, you want to plan on leaving as the 1020mb line approaches. This will give you good winds and a nice passage as you make your trek with the winds. 

With your passage planning, it is important to keep in mind the sea state. Waves form because of the winds. The stronger the winds, the taller the seas. Mature waves, however, need a lot of distance and some deep water to form. If the winds are blowing off the shore and onto the water, the fetch wil be less and so will the height of the waves. The other aspect to keep in mind is the water depth. If the water is shallow, waves will crest and break long before they reach their mature height.  

In winds of 30 knots, mature waves can be around 20 feet tall, but if you are in water of 30-60 feet in depth, the waves will top out at around 6-8 feet in height. This will give you the power of the wind without the uncomfortable motion of a tall sea state.  

The duration of a cold front will vary, so it is important to study all available inlets between you and your destination. This way, if the weather becomes something you do not want to endure, you can sneak into the next available inlet and escape. Also, if the winds shift or the cold front passes over you before you get to your destination, you will know where you need to go to wait for the next favorable front to continue your downwind sleigh ride!
Ocean Passage Planning

When you want to go from one place to the next, you might find that the shortest is across the ocean. If you are sailing, the quickest way across will be when the wind is blowing well and in the direction you are going. 

If there is no wind, you will have no power with your sails. If the wind is on your bow, you will have to beat into the wind and waves as you tack towards your desitnation, easily sailing 2 to 3 times the distance between the two points.  

Picking when to go based on the weather will give you the perfect conditions to make your way there quickly and easily.

If you are planning to go in the direction of the prevailing winds, then you will find it easy to choose. Since you are going with the prevailing winds, most of the days will be blowing in the right direction. This means that you will have plenty of times to choose from! Simply picking a day that has fair winds will give you ideal conditions. 

If you are planning to go in the opposite direction of the prevailing winds, then you will have to wait for a cold front to come through and reverse the winds. This will blow you to your destination, but the days are not as frequent. 

Cold fronts come through periodically, and can vary in intensity. Obviously, you don't want to go out in front of a very powerful cold front, but you also don't want to head out on a very weak one that won't be able to push you along. 

It is important to keep in mind that cold fronts are also called "storms" by other people, so be prepared for those kinds of conditions. 

We have sallied from Charelston, SC to Ferdinandina, FL moving along quickly under storm sails, and again from Ferdinandina, FL to Fort Pierce, FL thanks to strong cold fronts. 

There were small craft advisories, and we were only flying the trysail and staysail, yet we were doing 5-6 knots most of the time with periods of 8-10 knots! The ride was rough and intense, but we did manage to cover two days worth of sailing in a single day!  

We worked hard, slept little, and sailed fast. Once we arrived at our next inlet, we were able to pull in and go to sleep for the whole day!  

An Alternative Method to Tensioning Synthetic Standing Rigging

While passing through Carolina Beach, I met a fellow cruiser who had rigged his previous boat with synthetic standing rigging. He has since sold his ketch and moved onto a gorgeous wooden motor yacht. We got talking and he told me his innovative and wonderful method of tensioning his synthetic standing rigging. 

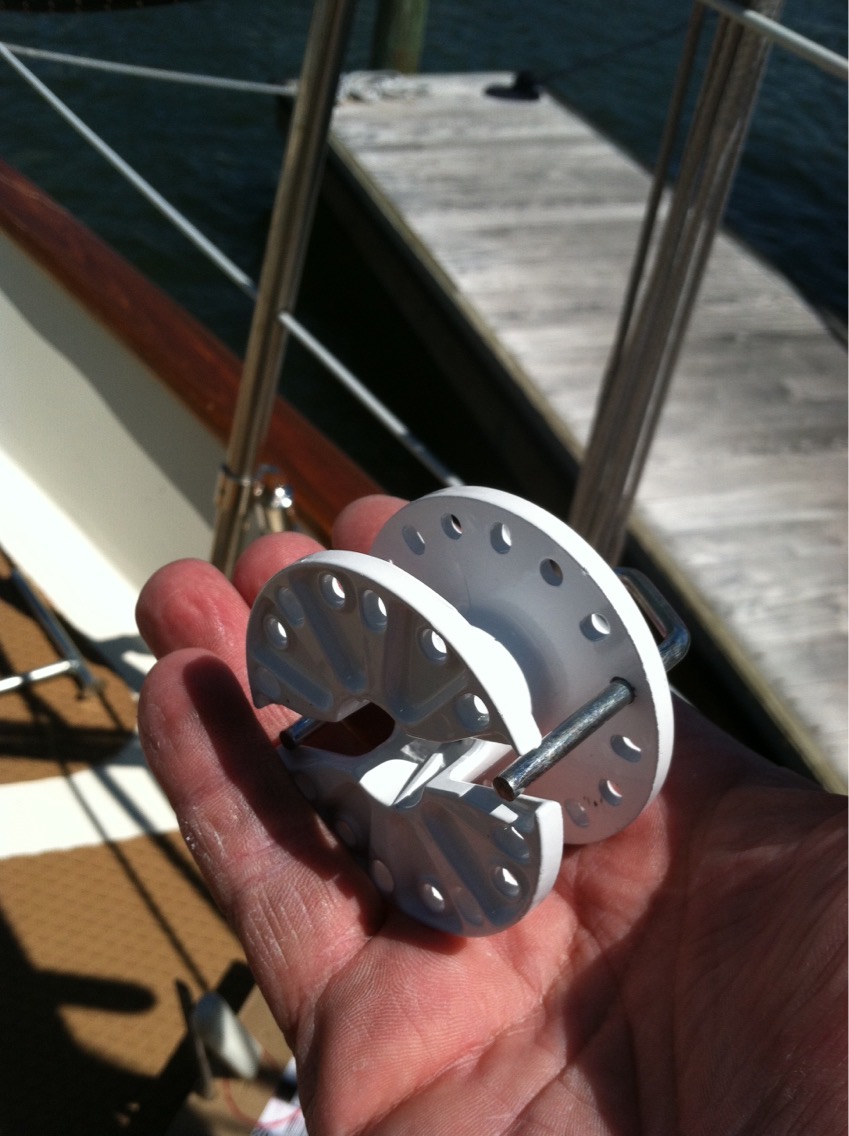
Instead of setting up a complicated pulley system that leads to a deck winch, he simply took a different tool and made his life easier. He used an electric fence wire tensioner. These tensioners cost him around $2 and are made of plastic. (http://www.kencove.com/fence/Wire+Tighteners_detail_SSDR.php) They lasted him a few years and were innexpensive enough to simply replace when the sun weakened them.

IMG_2131.JPG

The only caveat to this system is that you need a special tool that is used to tighten the wires with these devices. The tool has a square end that inserts into the device and has long handles on it. The handles are long enough that he felt it easy to tension his standing rigging without over exerting himself.

IMG_2132.JPG

To tension his rigging, he would tighten the lashings by hand as much as he could and then tie them off. He then slipped the plastic tensioner onto one of the lashings and set it in the slot that is cut for a wire to pass through. 

IMG_2138.PNG

With the tensioner slipped over the lashing, he would then insert the tool and begin winding the lashing around the tensioner. This system is genius because it uses a massive leverage advantage to collect the lashing line and generate the tension needed. This not only makes it easy to setup the rigging, but also quick to adjust the standing rigging as all you need to do is insert the tool and spin it as needed! 

IMG_2133.JPG

Once the tension needed is achieved, a simple pin is inserted to hold everything in place. The pin prevents the tensioner from spinning and unspooling, holding your rigging in place! There are no knots to tie or pulley systems to setup. Simply insert the tool into the key hole and spin until its perfect! 

Yes, the tensioner is made out of plastic and dies after a few years, but the unit costs around $2 and is easy and cost effective to replace when compared to all the time that it will take to tension your standing rigging using the Shroud Frapping Knot.  

If you are considering switching to synthetic standing rigging but concerned that the Shroud Frapping Knot is too complicated for you to learn, this is an easy alternative that achieves the same result of a properly tuned rig with much less involvement and effort. 

Blog Browsing

After much request, I have finally created a page that should help you to browse over the blog topics and find areas of interest to you, with improved ease.

Yes, the search button is nice, but you need to know what topic you want to read about in order to type it in and find the blog posts. But what if you don't know what you're looking for and simply want to browse? Well now you can!

All you need to do is visit this page (https://www.riggingdoctor.com/blog-index/) and it will show you the most important tags and categories of the page. You can simply scan the list to see if there are any topics you want to read more about. When you find a topic, a simple click will take you to a long list of posts on that specific topic!

Keeping an Interior Work Area Clean

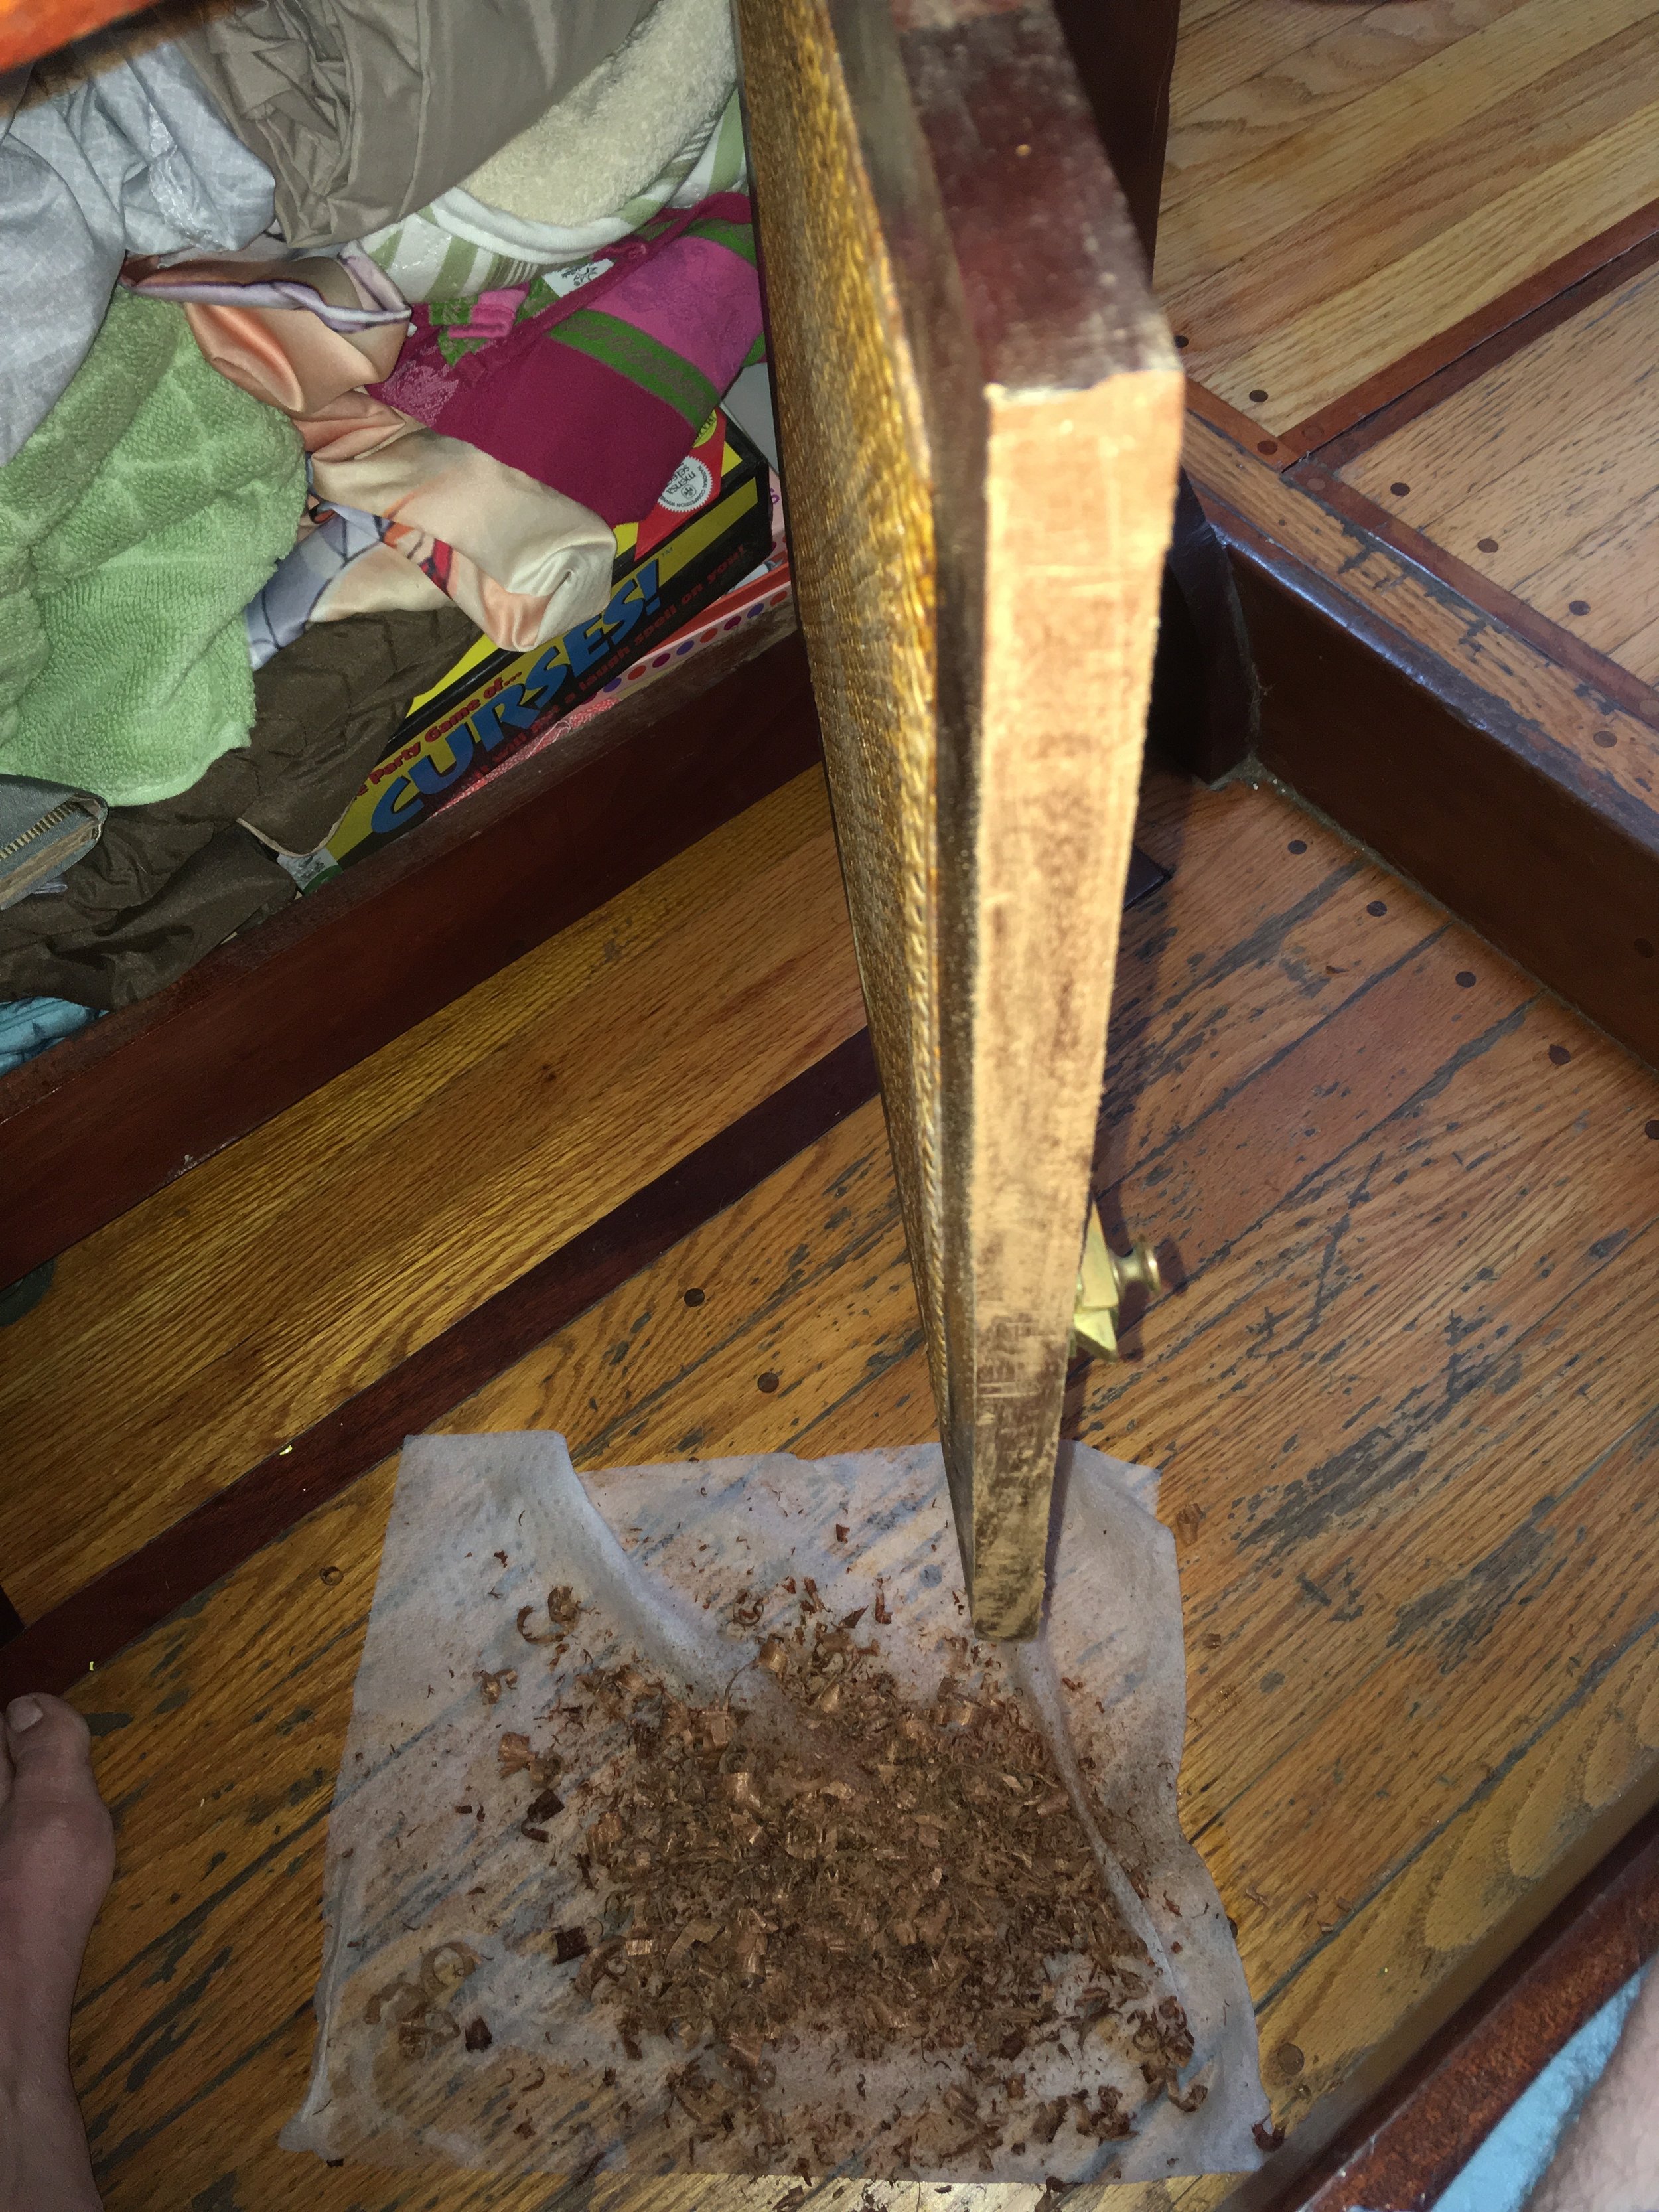
Woodworking projects are notorious for creating a mess. Wood shavings and saw dust will fall everywhere and migrate far from the work area! There is a simple trick to keep the mess contained and not impede on the project itself.

IMG_2118.JPG

The trick is to work in an area with no breeze, so that any dust or shavings will fall vertically, then place a moist paper towel under the work site. The wood shavings and saw dust will fall on the moist paper towel and stick to it! This will let you work away without fear, and have a single piece of paper to fold up with the mess. The paper can be folded up to contain the issue and disposed of easily. 

This trick works well for wood, but it also works well with metal (though I would personally make it a wider area of paper towel). Next time you have a project, enjoy being able to fix it quickly and clean up even quicker!