Weight Distribution in Light Displacement Yachts

Light displacement yachts are much more sensitive to weight distribution, as any portion of weight in the hull represents a greater percent of the total displacement of the hull. This means that a light displacement yacht will alter its trim in the water faster than a heavy displacement hull because the same mass represents a greater amount of the total displacement.

Boats in their most basic sense are fancy buckets. As you fill the bucket, the bucket becomes heavier and displaces more water to remain floating. A lighter bucket would be analogous to a light displacement yacht, while a heavier bucket would be analogous to a heavy displacement yacht. If you have 90 pounds in the bucket and you add 10 pounds more, the bucket now weights 100 pounds and that last weight accounts for 10% of the total displacement of the yacht. If you too that same 10 pound weight and added it to a 990 pound bucket, the heavy bucket would now weight 1,000 pounds and the last weight would only account for 1% of the total displacement of the yacht.

The positioning of this weight is much more critical in the light bucket, as the weight accounts for 10% of the total displacement. If it were set far to one side of the bucket, the whole thing would tip in the water! In the case of the heavy bucket, where the weight only accounts for 1% of the total displacement, the positioning of the weight is much less critical. The weight can be located pretty much anywhere in the bucket and it won't shift the bucket very much in the water because it is such an insignificant part of the entire mass.
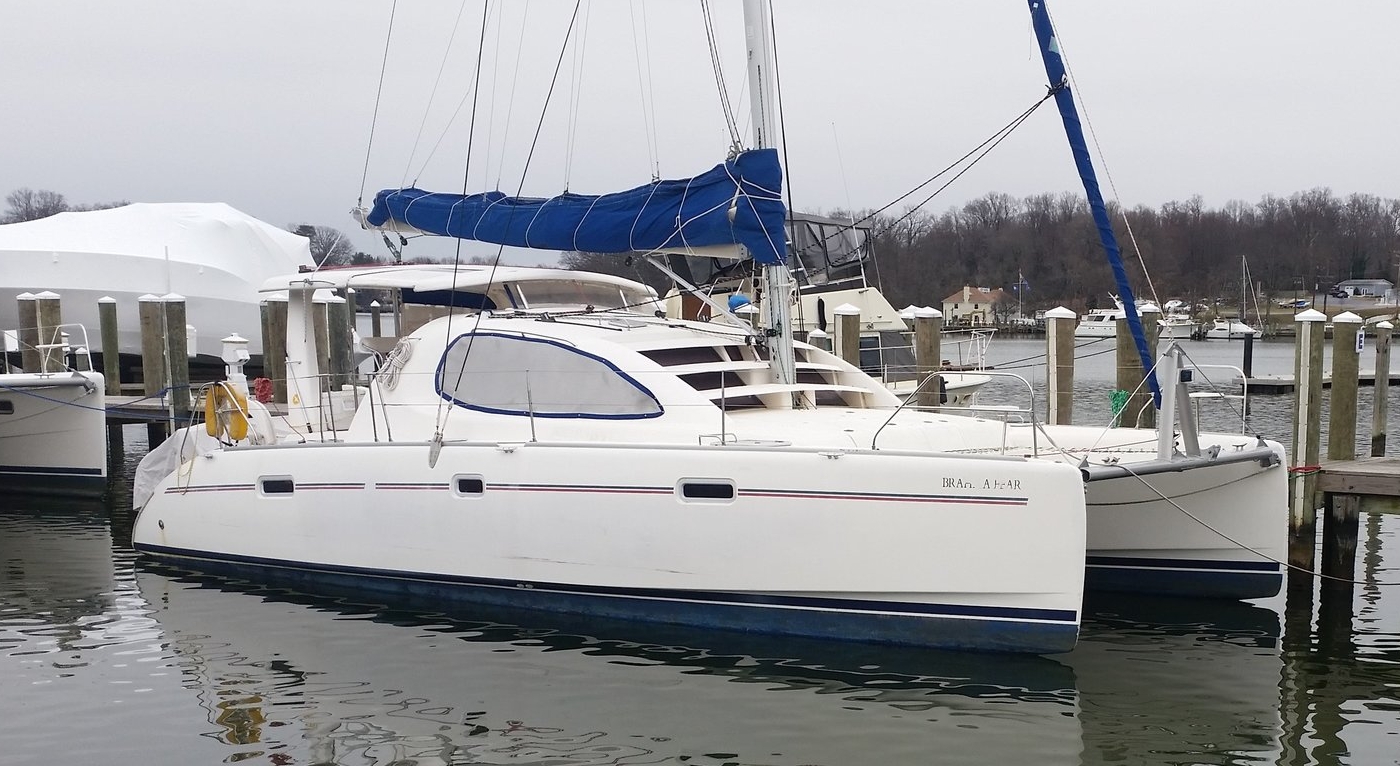
This catamaran has too much weight aft, which has resulted in the entire yacht being tipped back! The sterns are squatted into the water while the bows are completely clear of the water, you can even see light between the bow and the water.

This may seem harmless, but it could have drastic effects on the safety and performance of the yacht. As the sterns squat, any through hulls that are supposed to be high above the waterline are now closer to the waters surface. Many yachts sink in the winter when snow accumulates on the deck and pushes the boat a few inches into the water. Through hulls that are leaking and located above the waterline are now submerged and water begins to flow into the hull, sinking the boat in the slip.

The other issue is the rudders are now located deeper than you thought, and if you are passing through some shallow water, they may hit bottom and be damaged. 

Lastly, squatting the stern will tip the mast aft and increase the effects of weather helm. This will significantly degrade performance as the boat fights to turn into the wind instead of gliding along the pressure difference between the air and water.

It is very important to maintain proper weight distribution and trim of your yacht, especially if you have a light displacement boat.

Galley Net

When I bought Wisdom, she had a pressurized alcohol stove and oven in the galley. This is the equivalent to having a time bomb with no visible countdown. At some point, you know the thing will blow up in flames but you don't know when.

To alleviate my concern about burning Wisdom to the waterline, I quickly removed the stove and oven and replaced it with a simple alcohol and electric stove top. The space underneath the stove, where the oven used to be, is now available to be used as storage! More storage is always welcome, but there is one caveat: no fiddle.

When the boat heels over while sailing, anything in this space is liable to slide out of the storage area and onto the cabin sole. The space is lined with stainless steel, so the surface is pretty slick! I found myself using non-skid pads under particular items that lived in this space, such as the toaster, while other items were simply relocated to a safer place before sailing.

This quickly grew old until I found that the woven basket from IKEA didn't seem to slide too easily on the stainless steel. This opened up a whole new world of storage, as I could put galley and grilling items in this basket; this kept them close to where they were needed without the risk of them flying across the cabin when I heeled over.

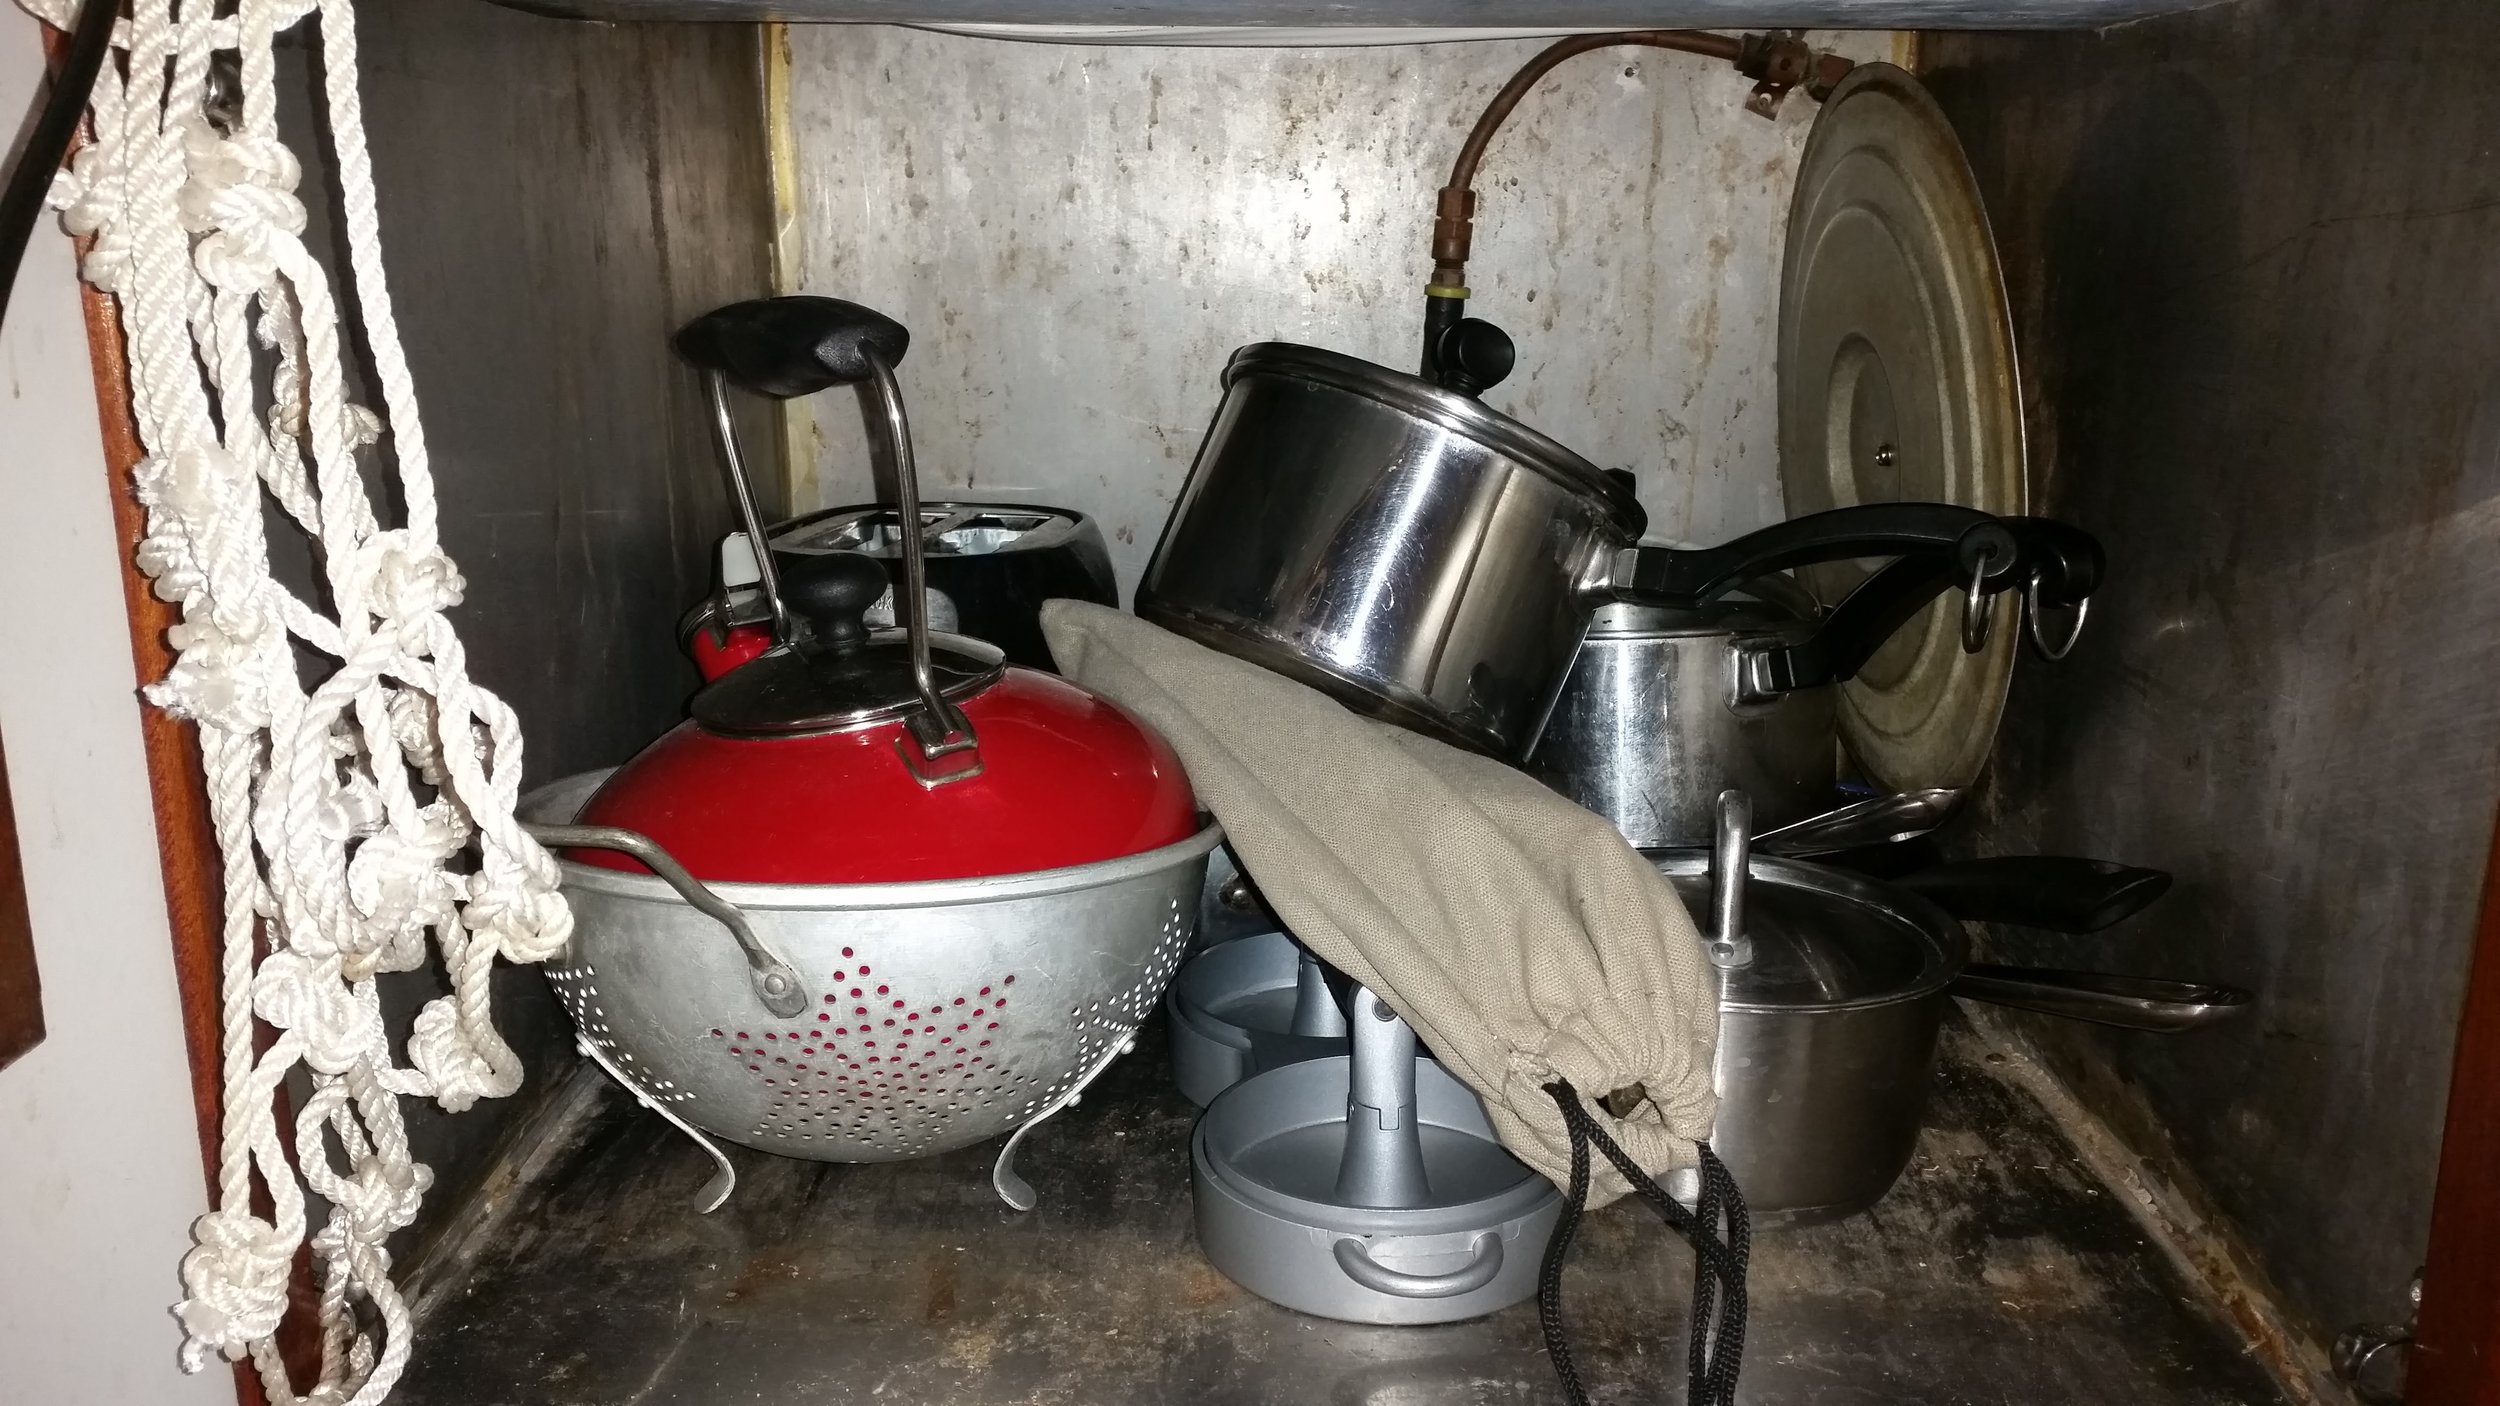
For four years, life was simple. The toaster and the basket lived under the stove where the oven used to be. The basket was not the most efficient use of space for this area, and it also limited the size of what could be kept under there. Maddie got tired of us storing the pots and pans in the salon, when we had all that space available under the stove. She asked me to make a way to store these items below the stove where they are needed and to free up storage space in the salon. Her wish is my command!

I screwed small padeyes to the sides of the box, through the stainless steel plate (drilling through stainless steel is a real pain) and then attached an upper and lower section of rope. One end of the rope was spliced into an eye splice while the other end had a simple back splice. The line is tied to a bronze pelican hook, affording us the ability to open the netting in a hurry without much fuss yet still being able to adjust the tension of the net to fit the contents that we cram into it.

With the upper and lower lines set in place, it was time to begin making the net. I tied long lengths of line to the upper line with double constrictor knots. These knots will hold the lines in place without slipping while allowing me to ability to easily position them wherever I desire.

The lines were then hanging from the upper line, looking like a giant mess! I took the lines and tied zeppelin bend knots in them, forming the netting. Zeppelin bend knots are wonderful bend knots because the tails will exit the knot 90 degrees from where they entered. This means that when you tie the knot, the result will be an X. Having many X's set close together will form the net that will keep all our stored items in this area and not flying around the cabin.

A net is technically formed, though it looks like a real mess with all the tails hanging around. Maddie poked her head in to see how it was coming along at this point and she asked: "Can you make it look nice?" It did look like a mess at this point. Making quick work with a rigging knife, it quickly transformed into this:

Now that the net was in place and installed, it was time to get rid of that basket and stuff all our pots and pans into this space.

When we want to pull out a pot, all we need to do is unclip the net and retrieve what we need. Since it is all open and stainless steel, we also have to ability to store pots and pans after washing them before they dry completely without fear of wood rotting inside the cabinetry.

Like anything on a boat, it is all a work in progress. It will be interesting how this space beneath the stove evolves in its use as we sail and cruise.

Sailing is a Dream

Some days, everything works perfectly and sailing feels like a dream come true. Here we were returning to Baltimore after a 10 day cruise through the Chesapeake. The wind was strong and steady, allowing us to broad reach our way into the harbor while making good time without much work involved.

Storing the Cans

Maddie and I have chosen to use rice, beans, and canned meat as our emergency provisions. We will carry fresh foods that have a short shelf life on board. If we find ourselves at sea without land and running low on perishables, we will not need to worry as we have plenty of canned foods to keep us going.

We currently have 97 cans of beans, 24 cans of Vienna Sausages, and 16 cans of lentil soup stowed in this one locker. As you can see, there is still space for more cans, and we will continue to collect canned food through the winter. 

A less obvious but equally important choice when organizing the cans is to orient them vertically or horizontally. We chose horizontal for this locker because it is a more stable orientation that allows easier recovery of the desired can. If the cans were oriented vertically, the labels would be harder to read and removing the wanted can would be an complicated task. 

In a vertical orientation, the can needs to be lifted clear of all other cans, making it difficult to locate and retrieve a lower level can if they are stacked. With one can missing, the other cans will begin to tip and shift as they try to fill the void. This can cause the cans to bang into each other and dent, as well as make small holes which can lead to botulism poisoning.

In a horizontal orientation, the cans can be easily removed from any where in the locker because they are laying flat and won't need to be lifted as far. I can also stack the cans closer to the top of the locker as less space is needed in the removal. As cans are removed, other cans will roll into the space and settle, but they will be stable and organized once there. Best of all, the labels are easier to read in this orientation, making it easy to find the right can.

Right now, we are not moving much, so it is safe to stack the cans in tall columns next to empty sections. While cruising, we will not organize the cans in such a method. The cans will be re-organized to keep them all level with one another and minimize any risk of damaging our precious food stores.

This is only one of many lockers on board Wisdom that we plan to fill to the top with canned goods, allowing us to worry less about food and focus more on our destinations while cruising.

On another note, the choice of lockers for these massive can stores is based on the boats list. Our yacht tends to list a bit to starboard, so we are loading all the cans into the port lockers in an attempt to help level the vessel and correct this trim discrepancy.  The cans are being located as far to the port side as possible and their weight will help balance things out.

Propeller Nuts

The propeller fits onto the tapered shaft tip and is tightened into place by two nuts that thread onto the end of the propeller shaft. One nut is small, the other nut is big. This brings up the question of which order should the nuts be placed?

You could either place the big one on first, tighten it all the way, and then place and tighten the smaller one. Or you could place the smaller one first and tighten it all the way, and then place and tighten the bigger one. So many options on such a tiny part of the boat that is instantly forgotten the moment the boat goes into the water.

20170219_110240.jpg

The proper order is the small nut first and the big nut second.

When you tighten the small nut against the propeller, the force of the propeller is then pushed onto the threads of the nut and shaft. When you tighten the big nut, the lateral pressure from the small nut is transferred to the big nut which has more threads and transmits the force more evenly to the threads of the shaft tip.

The reason to have two nuts is simple, when they are tightened against each other, they will apply lateral pressure away from each other and seize to the threads that they are pushing against. When the two nuts are tightened into each other, they will not come loose as the entire assembly spins furiously without any inspection. As a safety precaution, the end of the shaft will have a cotter pin just in case the nuts come loose. A loose propeller is a problem that can quickly be remedied. A lost propeller is an expensive problem that is not easy to fix when out at sea!

Next time you are on the hard, take a look at the nuts at the end of the propeller shaft and make sure that the small one is next to the propeller, followed by the big one.