Climbing the Mast: Questionable Halyard Splice

When you climb the mast, your entire life is hanging by a single rope: the halyard. If there is any failure in the halyard, you will fall. This will result in either serious injury or death! It is wise to only climb a mast on a halyard that you think can support your weight. If you have any questions about the halyards ability to support your weight, don't use it!

The halyard on this yacht was in good condition but the splice was a bit questionable. If you attach your gantline to the shackle, always verify that the splice is in proper condition. You can't see inside the eye splice, but you can feel inside. Feeling the eye splice will let you note any discrepancies in the core and cover. W

When feeling this eye splice, the core seemed to disappear right as it entered the eye. It felt like if the eye splice was performed by cutting the core and only burying the cover. There is no way I would trust my life to such a cheap shortcut!

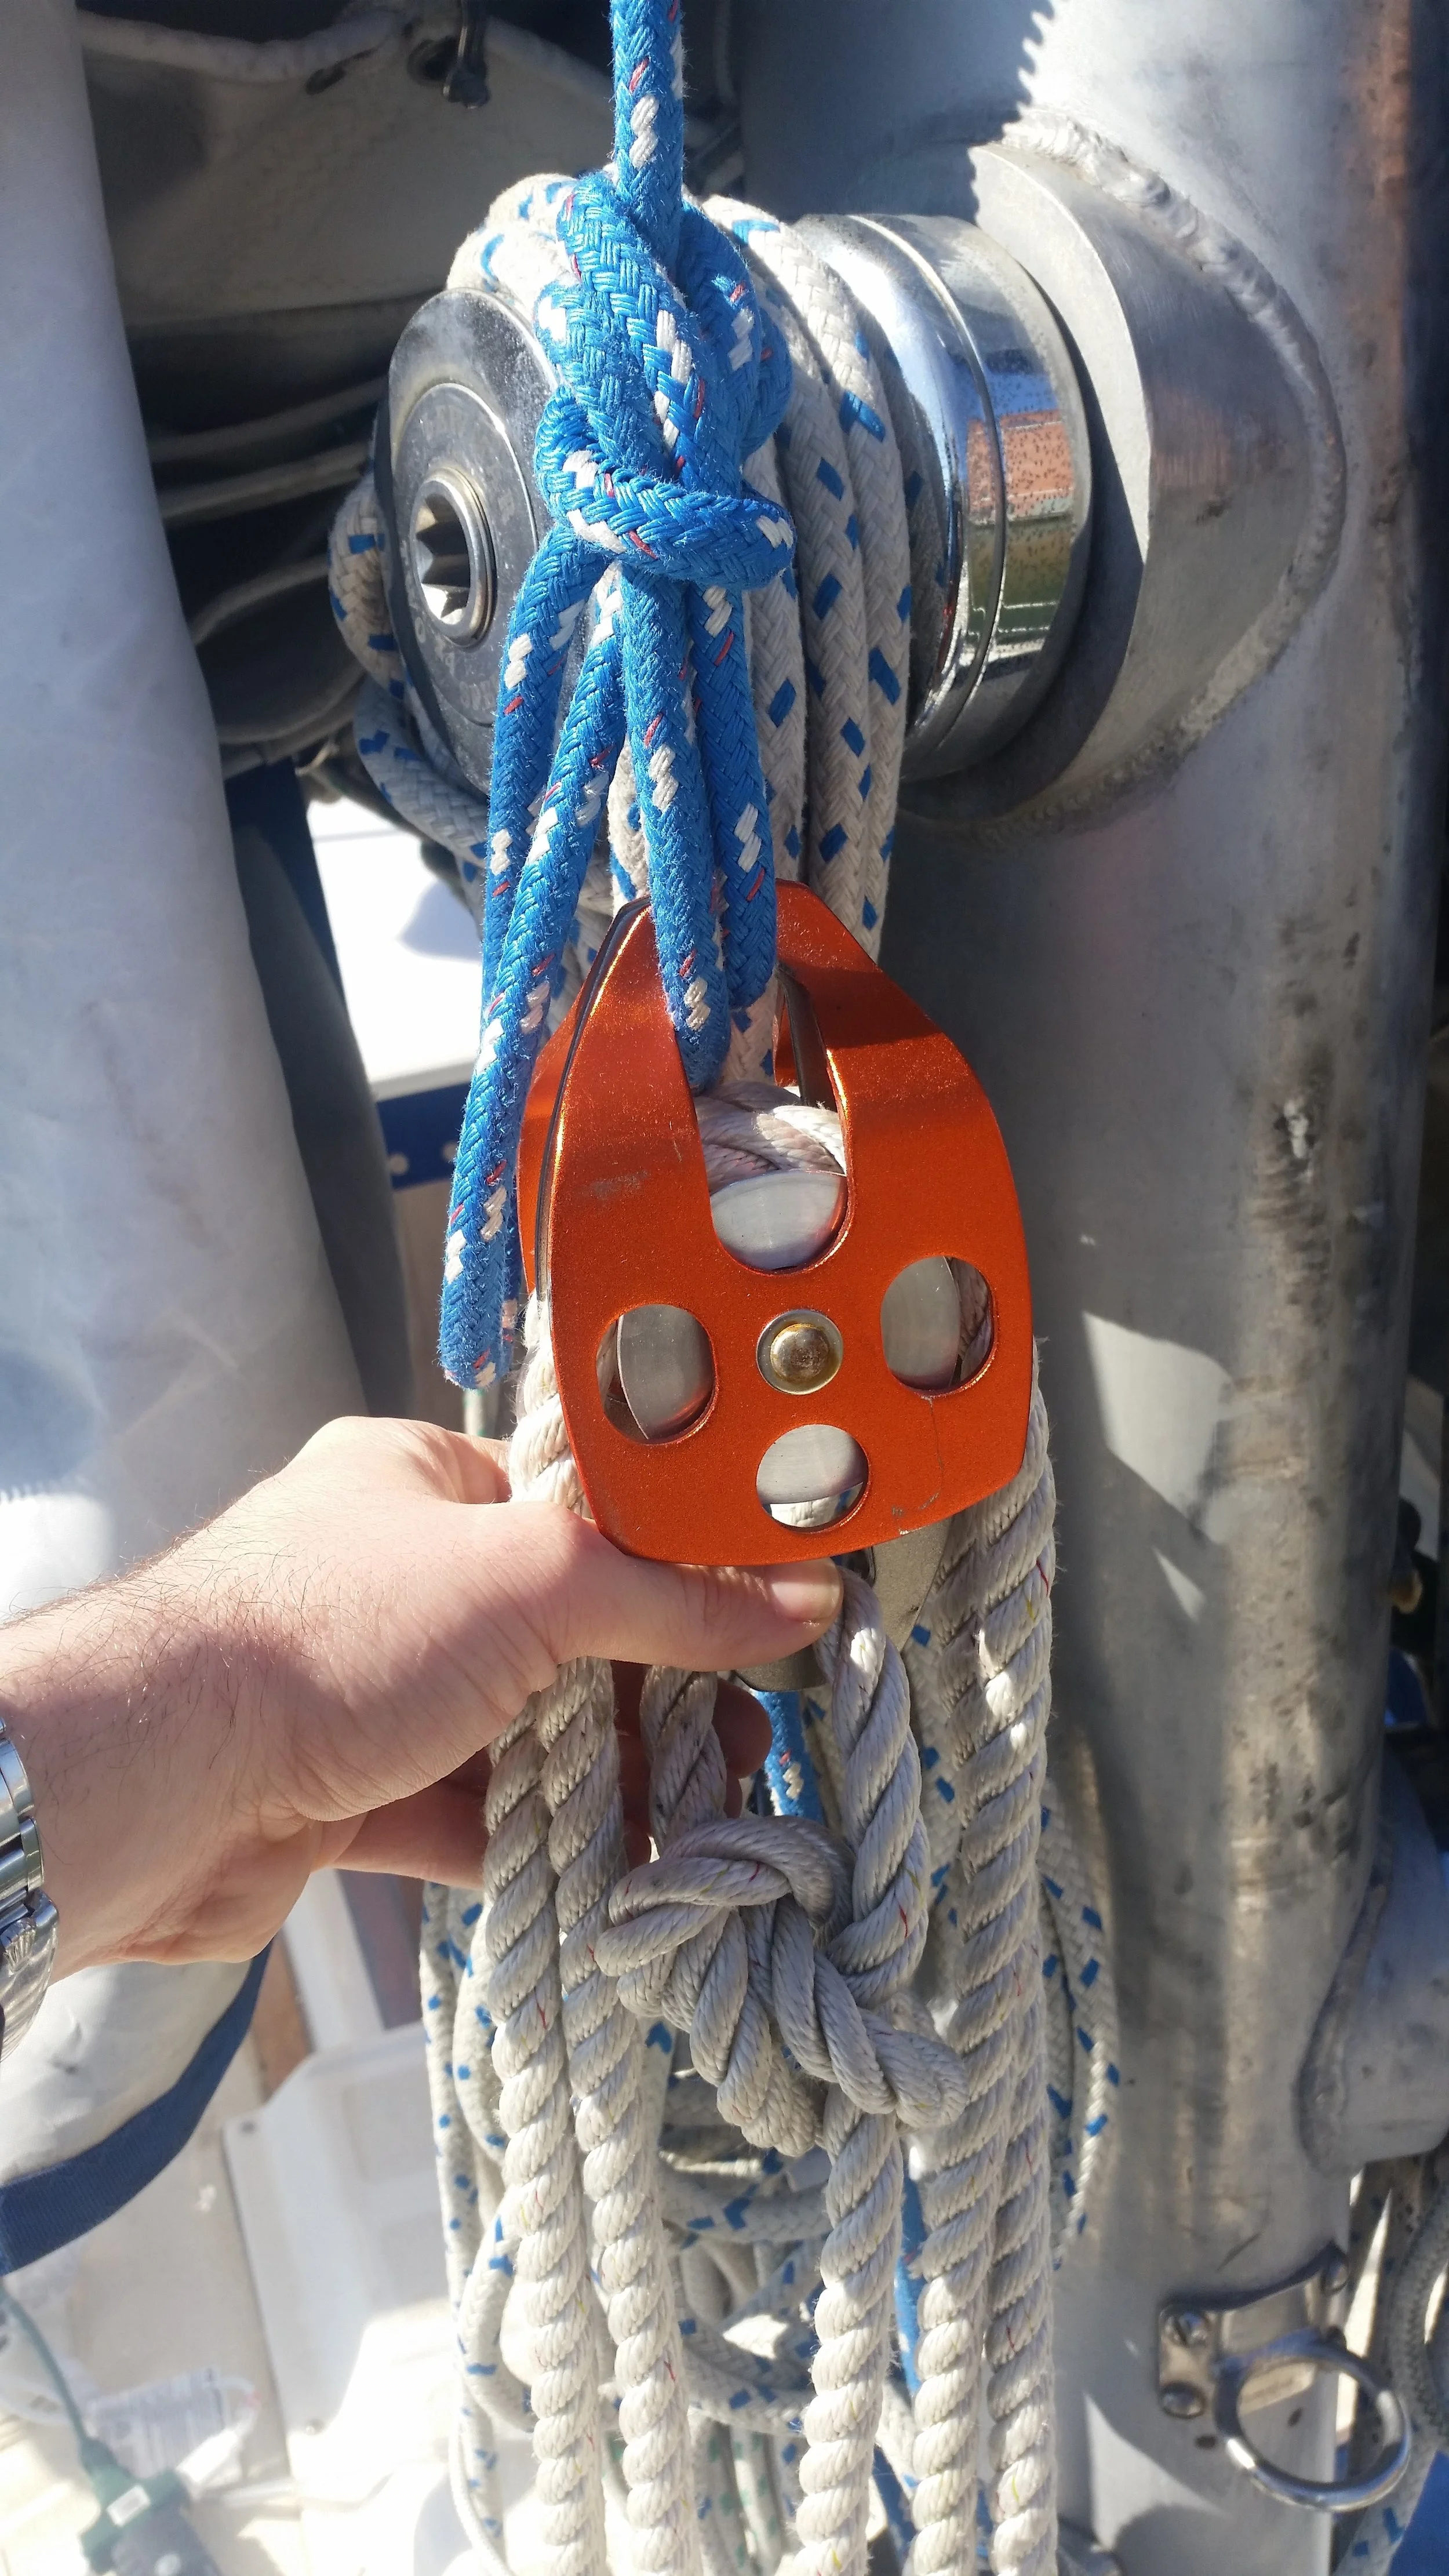
The rest of the halyard seemed to be in good enough condition and of sufficient strength to hold my weight, so I simply tied the halyard to the top block of my gantline. I couldn't fit the shackle through the slot on the block, so instead I tied a bowline in a bight. The end with the shackle simply hangs and dangles aside while the knot securely connects the block to the halyard.

If you don't feel safe with a piece of equipment, don't rest your life on it! Find a way to only support your life by the components that you feel are strong enough to bet your life that they will hold well. If you can not assemble a safe method to raise yourself up the mast with the reliable components, do not climb the mast! 

I personally climb my own mast using the shackle because I did the splice and buried plenty of tail into the splice. On other peoples masts, I typically tie a knot onto the top block of the gantline because their splices look weak or inadequate. If you have a weak splice on your own yacht, do consider replacing the splice (or halyard entirely) with one that is strong enough to support your life.

Rainwater Tank

With the deck plates installed, the next item on the list was to install the water tank that will hold all of this glorious fresh water that has fallen from the sky and onto our tiny sailboat in the big blue ocean. Pretty much all the space in the boat is currently occupied as storage or tankage. There isn't really much space left to stash a large watertank, or is there?

The battery box for the electric motor was installed where the old diesel motor used to live. A platform was made for the batteries to rest on, but there was still a space under this battery box that went unnoticed. A small access hatch was made to grant access to this tiny cavern and to the bilge beneath the new electric motor, but no plans existed for this space and it remained empty for many years.

Making this space a water tank would be very difficult as there is little access to do work and I would loose access to the bottom of the electric motor. This would make the yearly maintenance where I grease two zerts fittings rather tricky to carry out. If I can't make the whole space a water tank, what if I put a water tank into the space?

The thought of stuffing a flexible water tank down through the hole and into the void seemed to be the easiest method of converting this lost space into a valuable resource container.

When this space was converted from motor holder to battery box, no efforts were taken to smooth the sides or clean it up. After a few years, this is what the location has become: a dusty dirty place where sharp fibers poke out waiting for a new flexible tank to puncture.

I contemplated the idea of grinding everything smooth and fairing up the surfaces. I could lay down new cloth and apply a smooth coat of epoxy to turn this roving bumpland into an ice skating rink! Then I realized that I would have to do all of this through a 6x10 access hatch.

On to Plan B! Stuff a bunch of thick fabric into the hole to line the edges and make everything feel smooth and soft. I used the felt I had leftover from when I made the hanging garden on the stern to line the walls. This felt is made out of recycled water bottles, so it won't rot in the dark and eventually moist environment of the bilge. I know water will get between the tank and the hull at some point and this felt will sit in that damp sandwich for a long time! Choosing a rot resistant cloth will make my life so much easier in the years to come.

The flexible watertank I used is by Plastimo. This is their 100L model which will fill up the space beneath the batteries. There are two sides to connect the inlet and outlet on the tank. Be sure that the inlet is on the top and the outlet is on the bottom (this is per the manufacturers recommendation).

With everything ready and in place, it is time to fold up the tank and stuff it through the little hole. Once inside the hole, the tank can then be unfolded, oriented, and laid out flat. 

The tank is in position, filling up most of the space available. I don't think we will be able to fit 100L of water into the tank because of the space constraints, but we will be able to carry as much water in there as we would have if we decided to build in a rigid water tank.

You may notice the batman tape on the small outlet hose. This is to fight chafe in the darkest of alleyways. I was worried that the hose clamp would dig into and cut the fabric of the water tank, causing it to fail us prematurely. Over the hose clamp, I tied a double constrictor knot. This knot pulled the tongue of the hose clamp down flush with the surface of the hose, making the whole assembly feel much smoother. The line also helped to soften any sharp edges of the hose clamp. To make sure that the line doesn't budge as we slosh around in the open ocean, I wrapped the whole thing in duct tape. Now the dark knight will protect our water tank against the injustices of chafe!

The next step will be getting the water to the tank and out of the tank.

Trimming the First Layer of Bottom Planks

The bedding compound between the bottom planking and the dinghy has fully cured, allowing me to get in there with a small circular saw and trim up the overhangs. 

The planks are trimmed to fit flush against the keel into the rabbet, but they are allowed to overhang the chine without regard for reason. After the bedding compound is cured, the planks can all be cut off a little proud but still close to the actual chine.

This makes it so much easier to work, as I don't have to worry about being perfect while I'm planking. Once everything is cured and set, I can treat all the planks as one giant piece of wood and work it all together. This allows me to cut, plane, and sand the entire portion of the hull into a fair and smooth surface. Best of all, I don't have to worry about coming up short on either side since I'm working with a longer than needed plank.

Now that the chine is roughly  trimmed, the knife edge bow is much more pronounced. The entire purpose of this setup is to reduce the amount of wave slap that we experience while rowing Tooth II. Since I have trouble with "middle ground", I made the bow of this boat a knife that will slice through waves instead of the standard flat bottom that is common on a tiny dinghy of this size.

Saltwater Plumbing

To get your seawater into the galley sink, you need to do some modifications to your current plumbing. The seawater enters through a through-hull fitting and seacock. Rather than drilling a new hole in the hull for your galley sink, why not simply tie into an existing seacock? 

There are important points to look for in a seacock to tie into: Current use and location.

Choosing a seacock is an important part of the process and will affect everything else that will follow. The water to the galley sink will be siphoned off from whatever was already using that through-hull. Through-hulls are sized appropriately to the device that they are feeding, so in a sense you will be stealing needed water away from another part of the boat. It is a good idea to pick a through-hull that is used when the galley sink will not be used. A safe choice is the air conditioners through-hull. When you are in a marina, you will be plugged in and running the air conditioner but you will also have access to fresh water and will not be using the saltwater for the galley. When you are sailing, the air conditioner will be off (because you are away from shore power) so the galley sink will have full authority over the water coming in the through hull fitting.

The next criteria location. Boats are typically setup with seacocks on both sides of the hull. It is good practice to set the discharge seacocks on one side of the hull and the intake seacocks on the other side of the hull. You want to make sure that the seacock you choose for the saltwater plumbing is on the opposite side of all your discharges. The worst thing you could have is the galley intake be located aft of the shower, galley, or toilet discharge. Shower discharge would bring in all the body soil and soapy water. Galley discharge would, in effect, recycle the water you are using to wash your dishes. Toilet discharge is absolutely disgusting and should be self explanatory!

When looking for a suitable seacock to tie into, you know you need one that is on the opposite side of all your discharges. The next criteria is how high the seacock is on the bilge. If the through-hull fitting is just below the waterline, it will come out of the water as soon as the yacht heels over. A through-hull that is lower in the bilge and closer to the keel will stay submerged for longer as you heel over and sail, thus allowing you continued use on either tack.

With the seacock selected, it is now time to tee in the waterline. The best way to tee in is to use bronze fittings. I assembled this setup using a bronze tee with bronze barb fittings for the hose I am teeing into, and a ball valve to the saltwater plumbing. I like to orient the lever of the valve so that any accidental hitting will result in the valve closing instead of opening. In our case, open is up and vertical; should anything bump into it, the valve will turn horizontal and close off.

The tee should be connected after the strainer that way any debris is filtered out before it reaches the pump. It is a good idea to double clamp all raw water fittings located below the waterline. If you notice, I double clamped the barbs of the tee, but I only single clamped the hose leading to the pump. This is because the tee is always exposed to the ocean pressure when the seacock is open, regardless of if I am using the seawater plumbing. When not in use, the valve is closed, so if the hose were to slip off the barb fitting, it would not cause a leak.

While sailing, the seacock is closed, so there is no concern of water leaking. The seawater plumbing is only needed for dishes, which occur around meal times. At these times, the seacock is opened and saltwater will reach the tee. After cooking, the dishes are cleaned with seawater, then the seacock is closed until the next meal. While in port, the valve is shut since the water in harbors is rather disgusting but the air conditioner needs flowing water, hence the double clamps on the tee, but not the valve.

Saltwater Open

Saltwater Open

Hot Water Open

Hot Water Open

From the tee, the saltwater hose leads to a small electric water pump mounted along the way, then to the next valving station. This station is where the magic happens! Sea water enters from the left, hot water enters from the right. In port, the sea water valve is closed (down position) and the hot water valve is open. Out at sea, the hot water valve is closed and the seawater valve is opened. If anything bumps into the valves, it will simply close the valve (instead of accidentally opening them). 

At the bottom of the valving is the waterline that feeds all the boats hot water faucets. This means that in port, we have Hot and Cold water in the galley faucet. Out at sea, we have Salt and Fresh water in the galley.

Rain Water Collector

Wisdom has its fresh water tanks set up in an ideal way for ocean sailing. While this is the safest way to store your water, it is not to say the easiest way.

There are eight tanks with no plumbing to the outside of the boat. To fill the tanks, a hose needs to be taken to each tank and filled through the inspection port. The vent to the tanks are also inside the hull. Internal vents prevent the risk of saltwater working its way into the tank during heavy seas. Safe fresh water is nice, but if you overfill your water tank, water will begin to pour out of the vent into your storage lockers or out the top of the tank. Either way, the inside of the boat is soaked and you now have a large mess to clean up. 

Safe and secure segmented water storage is nice while ocean cruising, but it makes it rather hard to fill up the tanks when water presents itself. Most people picture water presenting itself in the form of a hose at a fuel dock, but it can also present itself in other forms. My favorite is when it comes in the form of rain which pours down on the deck in bountiful quantities.

Since the deck is the largest area of the boat that is always available to collect rain water, I figured it would be a great place to start our rain collections. I first identified the lowest place on the deck and began working. On our boat, the lowest point is right between the primary winch and mainsheet winch.

This area of the deck pools water after every rain storm, causing the paint to deteriorate faster in the form of a spiderweb of flaking paint. The small chips are the result of us storing hard and heavy items on the side decks such as chains and anchors. Over the years, they have taken their toll on the deck paint in this area as it lived neglected under a layer of city dirt that builds on the boat from the polluted air. The constant standing water and chemicals in the air have quickly damaged the paint in this part of the deck, offering further evidence that this is the lowest point on the deck and the ideal location for the rain water collectors.

There is a slight lip in the deck as it approaches the toe rail, and water collects equally in both of these points. I decided that the best way to make use of the deck topography would be to place the deck fill plate over the ridge of the deck so that water from either area will flow into it and into the rain water tank.

To allow the deck fill plate to collect water from both regions, it would need to be recessed lower than the deck, this way water would flow into it during a rain storm. To get everything lined up properly, the deck fill was placed over the region of interest upside down and used as a guide for the hole saw. Just like when placing a dental implant into the jaw bone, angulation is crucial! The holesaw was drilled down into the thick deck until the shallowest part of the saw was buried to the depth of the deck fill plate.

20170122_114055.jpg

With the perimeter hole cut, there was a constant depth available to the hole that simply needed to be trimmed away. For this, I used a reamer and slowly but surely expanded the central hole to outer perimeter.

After a while, the perimeter was reamed out to the appropriate depth so that the deck fill plate would lay flat. The central hole was left in place so that all the dust would remain on the deck where I could easily vacuum it up instead of falling down into the underlying locker. After all the reaming was finished, I then took a smaller hole saw and removed the central portion.

At this point, the deck fill plate could be test fitted to make sure that it laid flat and below the level of the deck so that water would flow into it.

Once the fit was established, I sanded all the edges of the hole so that it would be easier on our feet if we ended up standing in there. Copious amounts of 3M 4200 was used as bedding compound and the deck fill plate was screwed into place. The excess bedding compound was wiped off and cleaned up using acetone. 

Yes, there is way too much bedding compound in use on this deck fitting, but this is my boat and it will spend the majority of its working life under a small layer of water and I don't want my deck to leak! I made sure that 4200 oozed out of the screw holes and all around the deck plate flange. I then smoothed the bedding compound to be flush with the surrounding deck so that water will flow better and dirt won't get trapped on it as easily. When I repaint the deck, the exposed fiberglass will be properly covered and protected from UV radiation. In the meantime, these exposed areas of fiberglass live under the protection of the cockpit shrink wrap.

The other side of the deck was much easier to do since I had the hang of it by then and the resulting hole was much smoother and cleaner.

With the deck fill plates on both sides of the deck, we can collect rain water from passing storms. As we see the rain approaching, we can quickly scrub the deck to clean it of any dirt or debris that may be present. Then allow the first few minutes of rain to wash away any residual scuzz that needs to be swept overboard. Then we can open the fill plates and let the rain water rush down the hole and into a bladder tank that will be located down in the keel. 

The plan is simple: collect the rain water in the bladder tank and test if out to make sure we like the quality of the water. If it is good, we can pump it into our water tanks. If we don't like it, we can either pump it out or use it for washing clothes and bathing. If the water is not up to snuff, we don't have to worry about it contaminating the rest of our water supply, and it will only be relocated if it is up to our standards. As we add it to the regular tanks, we will be treating the rain water with chemicals to kill anything that might be present in the water.

Having two deck fills will allow us to favor which side we wish to collect rain water from. If we are sailing, the leeward side is going to be devoid of rain water since it will slide right off the deck and will also be closer to sea level making it riskier to open that deck fill. The windward side of the deck will be relatively flat, so water will be sent to this low spot. As long as the seas are not splashing up on deck, we will be able to collect our water as it falls from the sky!