
Bit Brace

When you think of driving a screw into wood, the tools that come to mind are probably a screw driver or a drill with a bit attached to it. These are certainly the modern choices to drive screws home, but there is a reason the old methods hang around.

Bronze screws are softer than galvanized steel and much softer than stainless steel screws. Steel screws can be driven in with an undersized bit with ease and at little risk to galling the head. For this reason, people tend to use whatever size screwdriver fits into the slot.
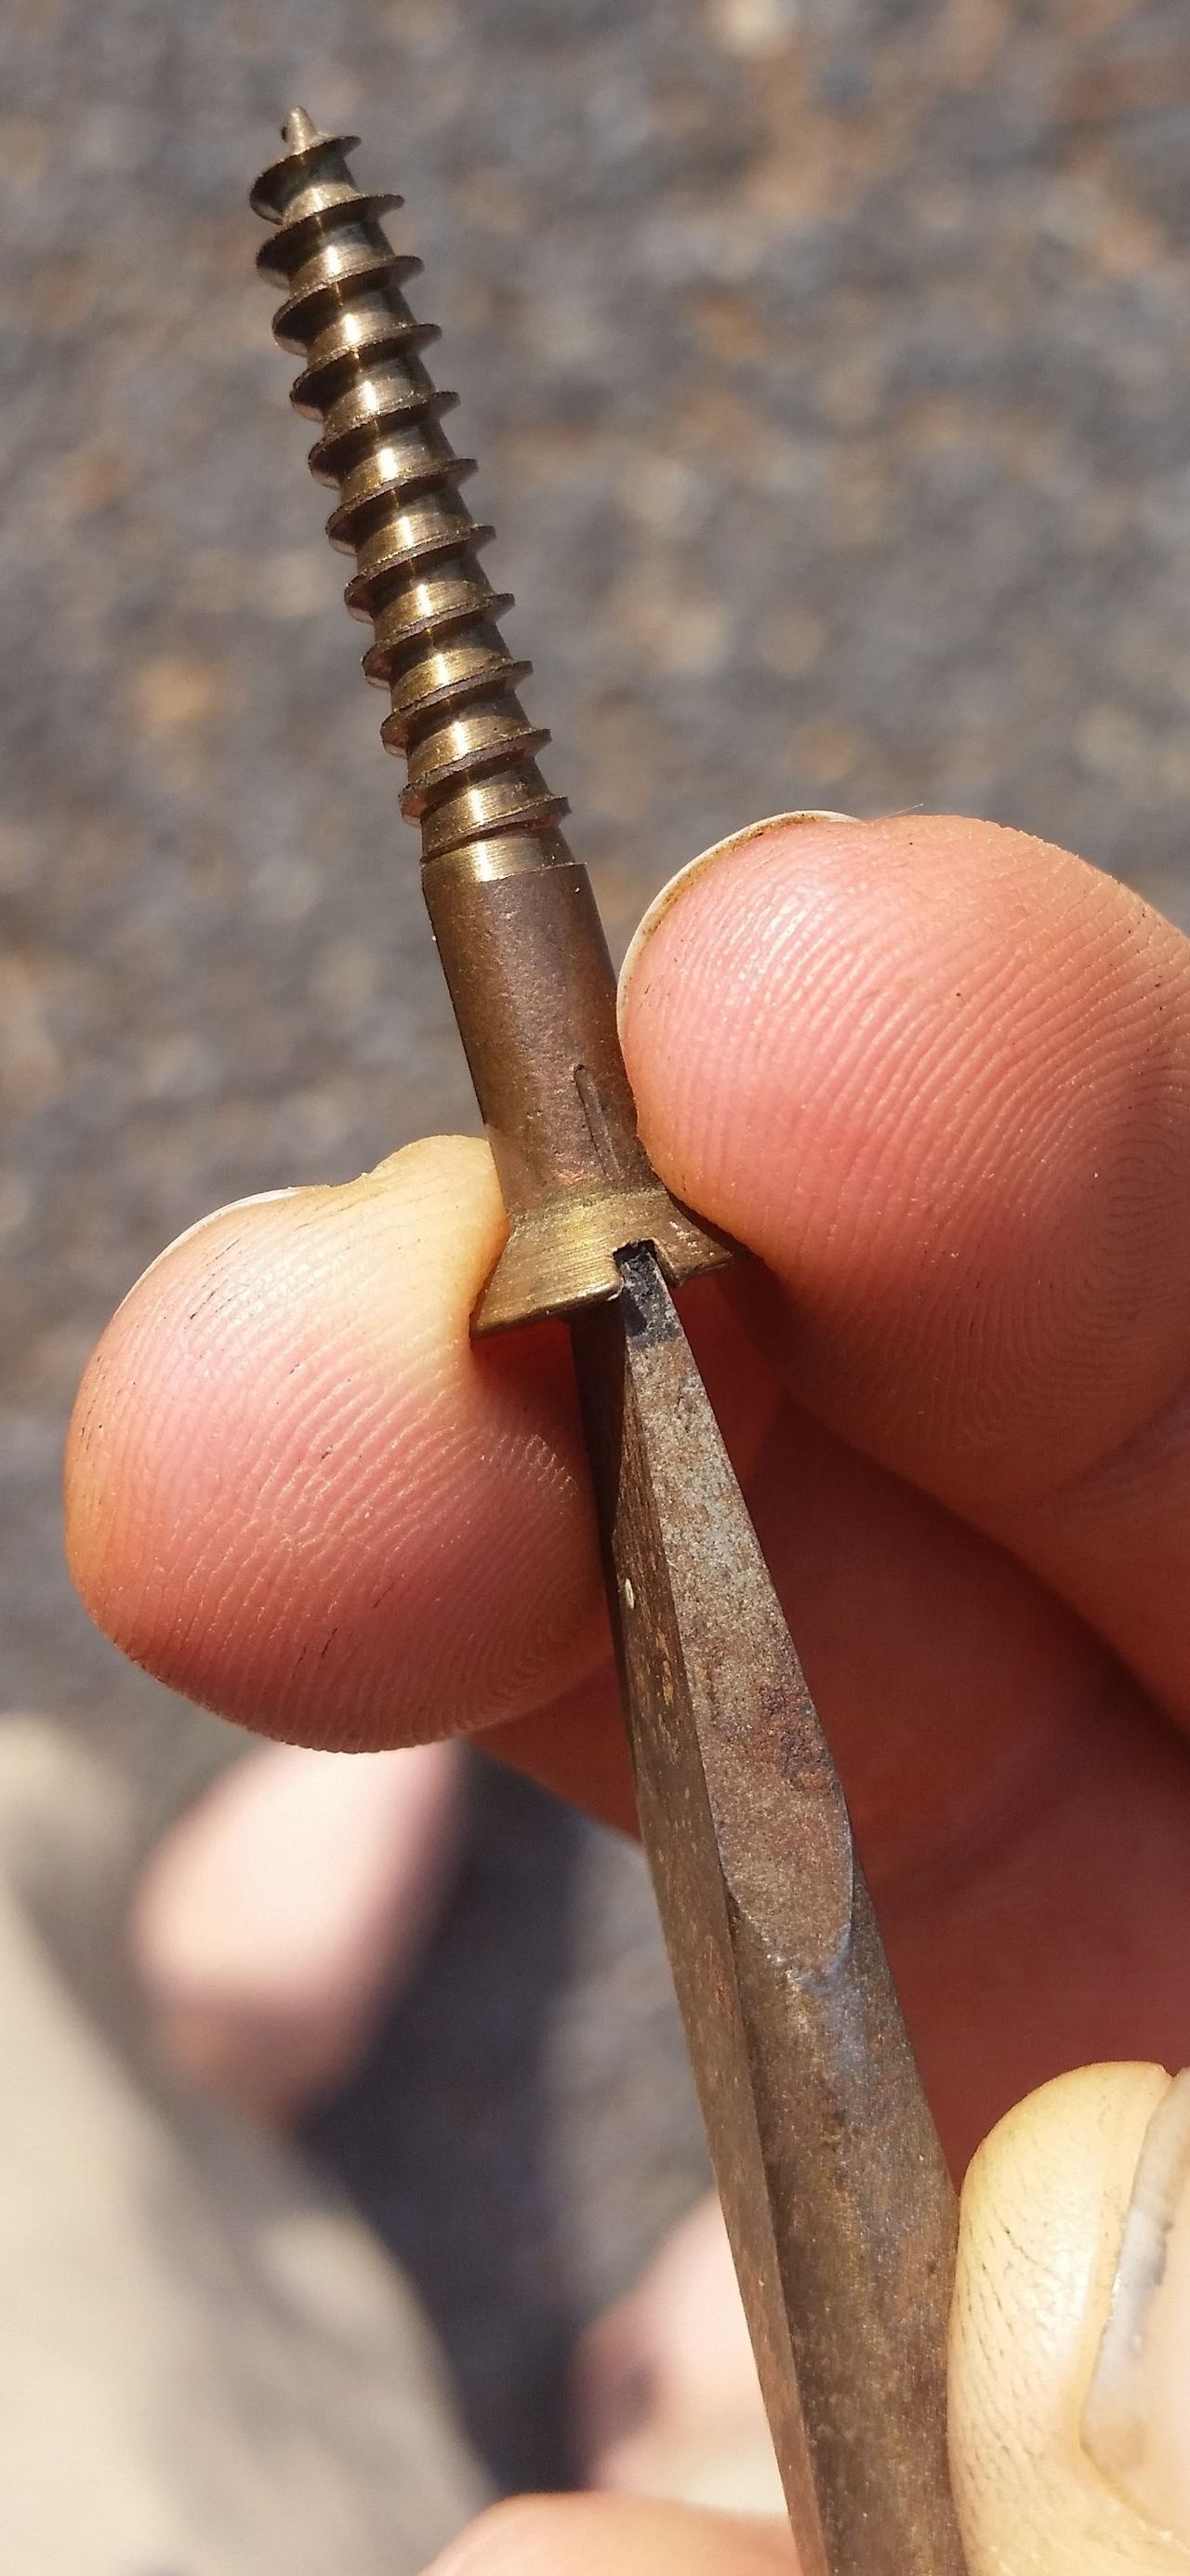
If you use a smaller than adequate screw driver on a bronze screw, you will quickly slip out of the slot and gall up the threads. If the screw driver is too big and doesn't sit into the bottom of the slot, the same will occur. Once the slot has been galled, the sides of the slot will be rounded and it will be even easier for the driver to slip out again, further galling up the head. To avoid any of these problems, you need to make sure that the screw driver reaches the bottom of the slot and there is no gap or void between the bit and the head. If the bit fills the slot perfectly, it will power the screw all the way home without issue. If there is any discrepancy in the fit, it will slip out and gall up the head.

Stainless steel is starting to sound better and better, isn't it? While stainless steel is a wonderful material, it has its time and place to be used. When stainless steel is in an oxygen deprived environment (such as deep inside a plank) the corrosion inhibiting properties of the stainless steel are compromised and crevice corrosion can wreck havoc on the metal. The screw can literally corrode in half and greatly reduce its holding power. Bronze on the other hand does not suffer this same fate, and is the superior fastener material for use on a boat.

Now that we have explained why we will put up with a softer metal that is more prone to galling while being driven in, it is time to look at how we can drive these screws into place.

Most drill bits that can be inserted into a power drill are much too small for a large bronze screw. The next issue comes from the amount of power that an electric drill can produce. It can spin the bit so fast that it will jump out of the slot and gall up the threads as you begin. If you can manage to run the drill at a slower speed and control the rate at which the screw goes into the wood, you may think you are in the clear! The increasing resistance on the sides of the screw's threads will compound and the screw will stop advancing as the drill continues to spin, slipping out of the slot and galling your head. After a lot of effort, the galled up screw will finally get driven home, but the head looks horrible and you may be rather embarrassed if the screw will remain visible.

The next option is the more labor intensive screw driver. The screw driver is a hand driven tool that provides a bit of leverage to allow you to drive the screw home. A screw driver is actually a lever in disguise! The handle of the screw driver has a larger radius than the head of the screw. The radius of the handle is your lever arm, so a thicker handled screw driver will provide more leverage than a skinny handled screw driver. As you can imagine, the leverage offered by this tool is rather low, but more sizes of the screw driver are readily available allowing you to find one that fits the screw you are working correctly.
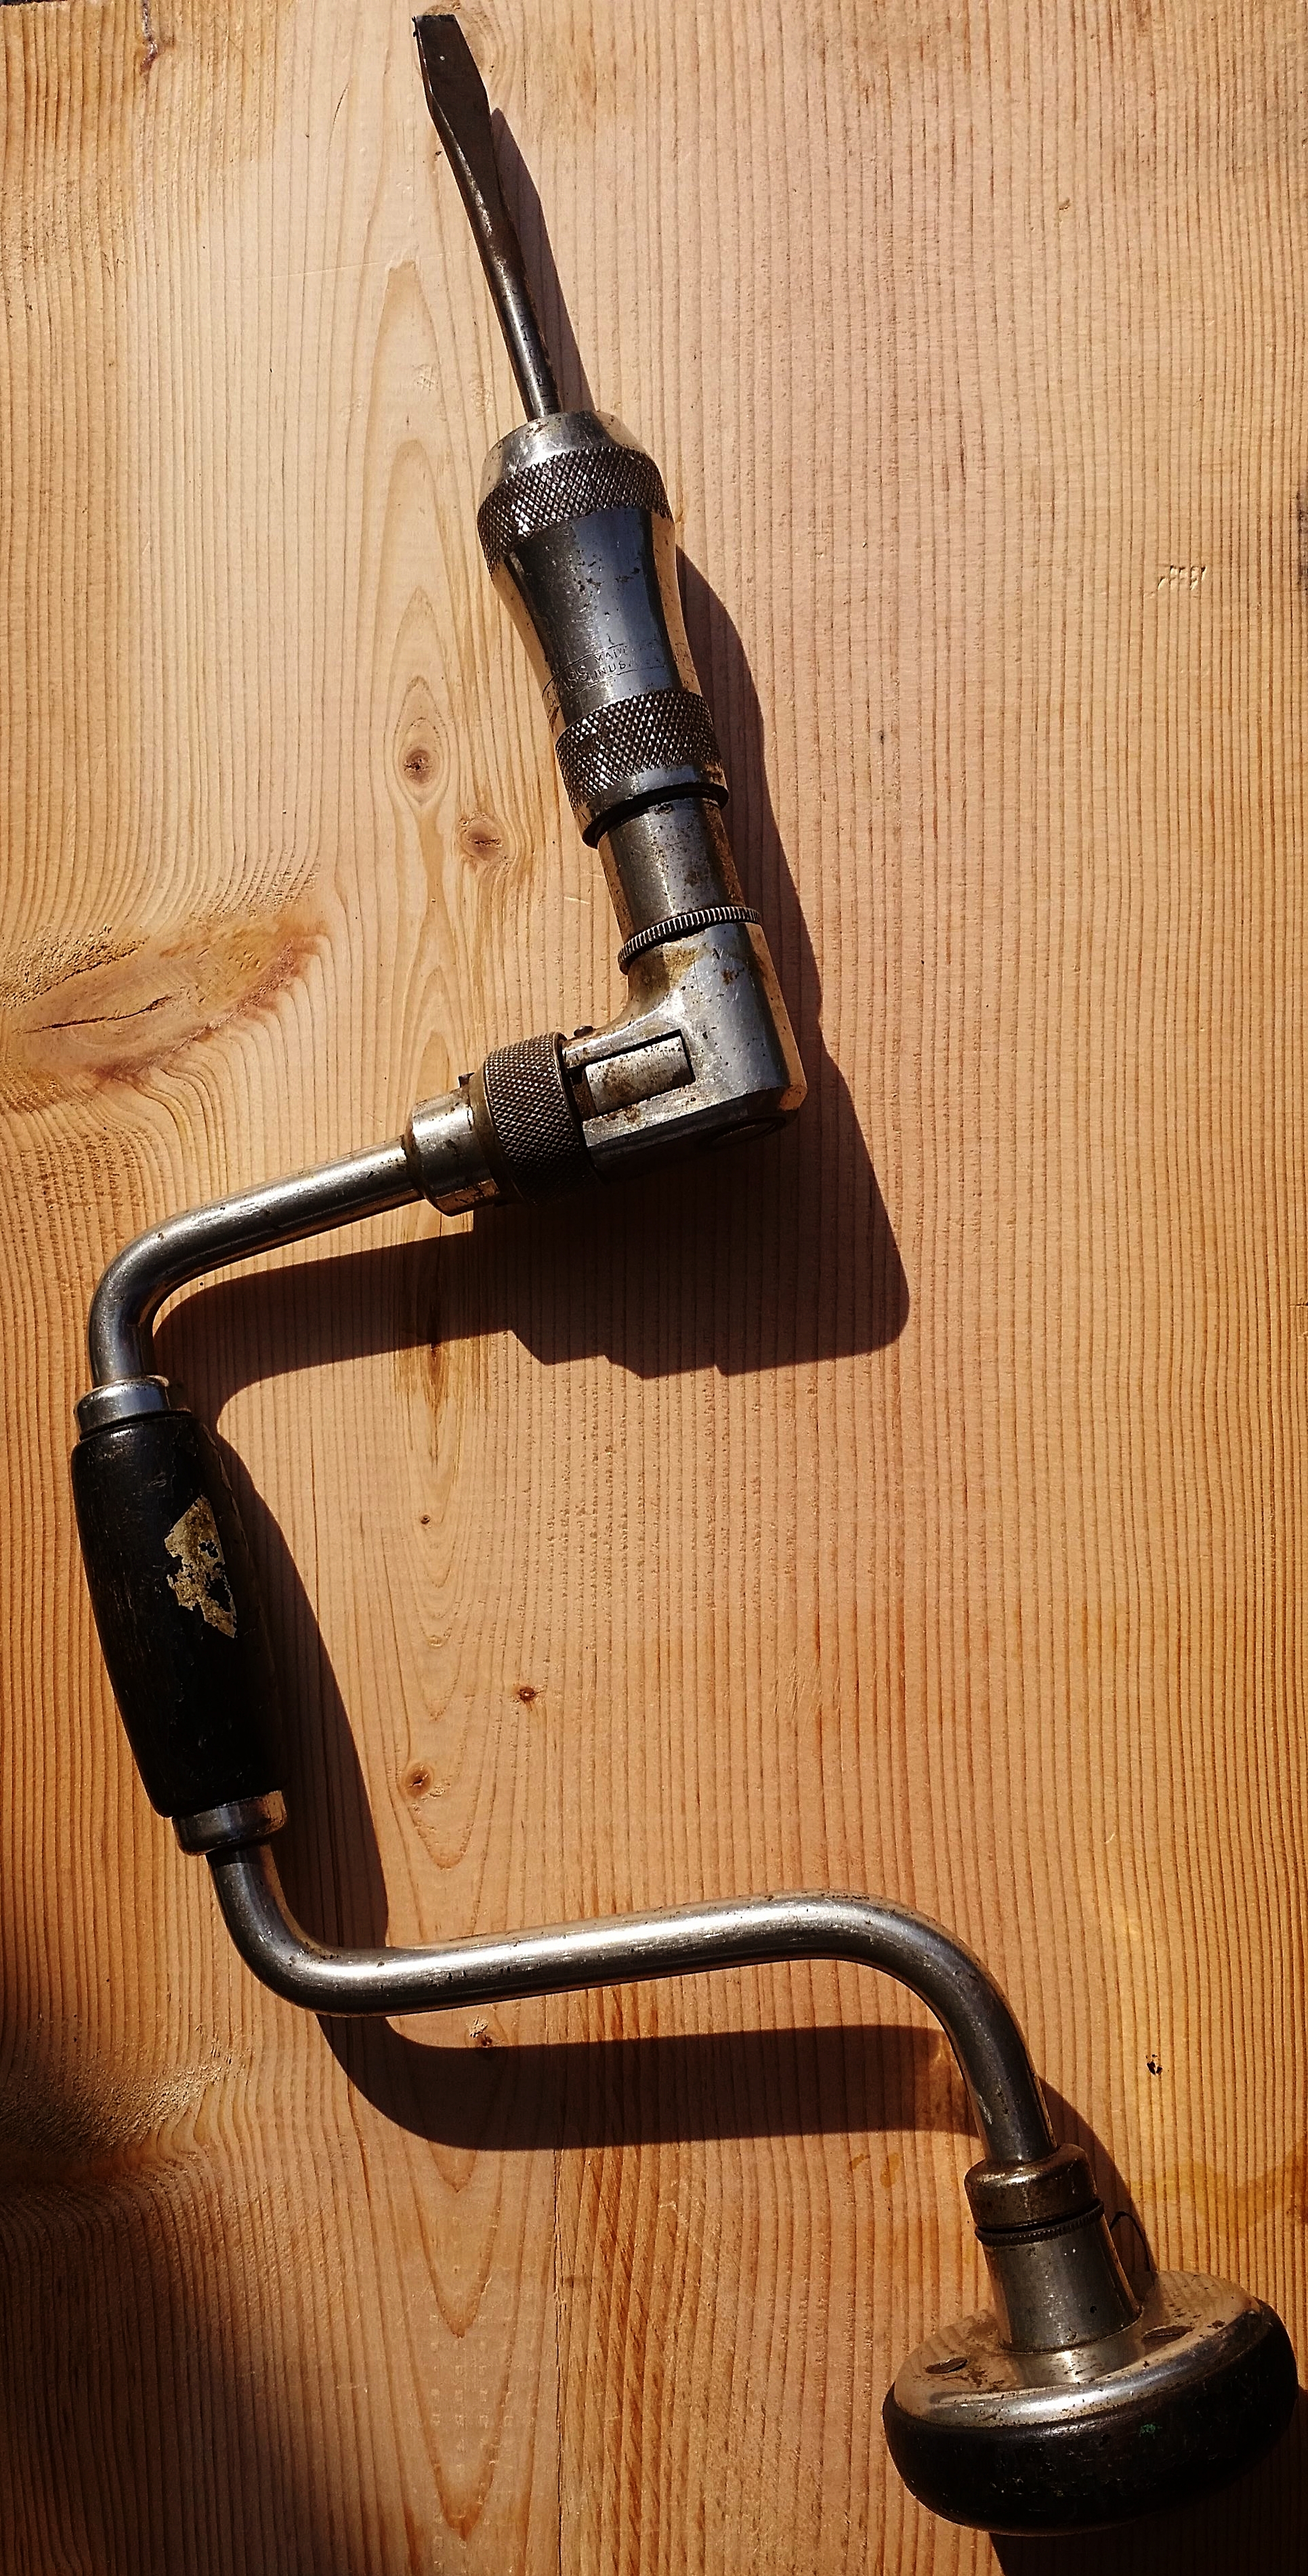
A bit brace is a very old style of tool that offers you the fit of a screw driver in combination with incredible torque and control only available in a hand powered tool. The offset lever adds incredible amounts of leverage to spin the screw while you can maintain constant pressure on the pad to keep the bit driven deep into the screw head. A bit brace may not seem as glamorous as a fancy and colorful electric drill, but it does perform with utmost reliability.

The bit can be set to ratchet, allowing it to be used in close quarters; or it can be fixed, allowing you the ease of driving something in and back out without the need to change any settings. The speed of the bit brace is dictated by the speed you move it, and the force on the screw is very apparent to you. Very light finger pressure can drive a screw in, and any changes in force will be quickly registered by the operator. This can alert you to push harder on the pad to keep the bit from slipping out of the head before the slot becomes galled.

If you have little resistance, it can drive a screw home quickly as a fast turns are possible and easy to carry out with this tool. If the resistance on the screw begins to compound, you can start to put more force on the bit brace and force it in or just as easily retrieve the screw and drill a slightly larger pilot hole for it to follow.

The last and most important feature of a bit brace is its ability to function without electricity. Plug in drills are great as long as you have access to an outlet. Cordless drills offer the freedom of mobility without a tether to an outlet, but an invisible tether is still present. As the drill is used, the batteries will run down and need to be recharged. These batteries require access to an outlet, meaning that you can prolong your visits to an electrical distribution point, but you are in no way free from the restraints of electricity. Lastly, the marine environment is a harsh world for electronics, so an on board power drill will eventually succumb to the deteriorating effects of corrosion. A bit brace does not run on electricity, as it is powered by the users hands and arms. If there is no sign of electricity, the bit brace continues on without a worry! Being made of metal, the bit brace is not immune to the marine environment. It can still rust and corrode, but proper care can deflect these deleterious effects and keep a bit brace looking as good as any other tool that is older than your grandfather! There are few moving parts on a bit brace, and these parts can be maintained with proper oiling and cleaning. If the bit brace were to act up, simple disassembly and cleaning can usually resolve any issue. These tools have been around for a long time, and they have survived into the present due to their reliability and usefulness.

The finesse and reliability of the bit brace make it is an invaluable tool to have and use while building a boat or carrying out repairs while living aboard and cruising.

Sailing Buddies

The Sailing Buddies are those special people willing to donate to our cruising fund. Members are responsible for helping to keep us afloat so that we may write blogs and record videos during our lengthy time at sea.    

Though we plan on working as often as we can along the way, there will be countries that do not allow this. Contributions from Sailing Buddies allow us to pay for food, maintenance, and fees while we are traveling in these countries.

Joining the sailing buddies also brings you closer to the action! When we are sailing, the lack of wifi will cause a significant delay between writing and posting. There will be a new post every morning at 9am EST, but some posts will have been written prior to the actual posting date.  Posts will be scheduled far out in advance before we leave each destination to make up for the travel time between ports when we will not have internet access.  Our website will therefore show you where we have been, but not our current location.    

When you join the Sailing Buddies, however, you will be granted access to the locked part of the website where you can see a live map of where we are at each moment.  Higher ranks will even give you the ability to correspond with Wisdom directly from anywhere in the world! This gives you the opportunity to ask us questions and suggest new places for us to visit.   

The password to the locked part of the website will reset each month. When a password resets, we will inform those in the higher ranks what the new password is. 

You will receive your new password instantly when you complete the donation through Squarespace or Patreon, even if we do not currently have access to wifi. Once you have gained the password, you will have full access to the locked portion of the website for the allotted time that your rank allows! (Scroll down below rank descriptions for important information about becoming a Sailing Buddy.)

The different ranks are as follows:

Buy me a drink!

For $7 you get the password to the locked part of the site until the password is reset. The password resets monthly, but you don't know what day it will occur. It is a bit of a gamble since the password could reset tomorrow! That $7 goes directly towards buying us dinner ashore and we thank you very much for our meal! 

  • You can view the live tracking map.
  • Your name will appear under Buy Me A Drink!

Sailing Buddy

For $10, you get access to the locked part of the site for a full month. If the password resets within your month, you will receive the new password to complete that month of access. With this, you will have access to the live tracking map where you can watch as we voyage the ocean for an entire month! 

  • You get access to the locked part of the website for 1 month. 
  • You can view the live tracking map.
  • Your name will appear under Sailing Buddy.

Skipper

For $125, you get access to the locked part of the site for 3 months! We will send you the new password for 3 months, each time it resets. Your very generous donation will help us sail further, especially in countries where we are not allowed to work. Your donation will go directly into the cruising fund which will feed us and keep us going while we work to bring you new and exciting stories.

  • You get access to the locked part of the website for 3 months.
  • You can view the live tracking map.
  • Your name will appear under Skipper.

Captain

For $250, you get access to the locked part of the site for 6 months! Each time the password resets, we will email you the new one so that you won't miss a thing as we venture off over the horizon. You will also get to correspond with us while we are out at sea and sailing the ocean! Your very generous donation will help cover the costs of our monthly expenses which will let us spend more time sailing and working to bring you stories instead of attempting to find odd jobs as we cruise.

  • You get access to the locked part of the website for 6 months.
  • You can view the live tracking map.
  • You can message us on Wisdom while we are sailing and cruising.
  • Your name will appear under Captain.

Admiral

For $500, you get almost everything! You will gain access to the locked part of the website for a full year which will let you track us as we voyage all over the place! You will also get to message us while we are sailing, and you will get a post card from us from each country we visit. That's right, each time we make landfall in a new country we will send you a cool postcard! This is a great way to see different stamps of the world as they arrive in your mailbox.

  • You get access to the locked part of the website for 12 months.
  • You can view the live tracking map.
  • You can message us on Wisdom while we are sailing and cruising
  • You will receive a postcard from each country we visit.
  • Your name will appear under Admiral.

Morty's Best Friend

For $1,000, you get it all; even Morty's friendship! You will get everything that all the other ranks get, plus the ability to come spend a day on Wisdom in any port that we are visiting. Your password will never expire and you will get it all!

  • You get access to the locked part of the website forever!
  • You can view the live tracking map forever!
  • You can message us on Wisdom while we are sailing and cruising forever!
  • You will receive a postcard from each country we visit.
  • You can come spend a day on Wisdom in any port that we are visiting.
  • Your name will appear under Morty's Best Friend.

When joining the Sailing Buddies, you will be asked for your name, email address, and for (Admiral and Morty's Best Friend) your mailing address. Please don't feel obligated to provide us this information, it is completely optional. The reason we ask for this information is:

  • We need your name to properly thank you by placing your name in its appropriate rank.
  • We need your email to send you the new password when the password resets.
  • We need your mailing address to send you your postcards as we venture out and explore new lands.

Another way to help us out is to support us on Patreon where you can join the ranks of the Sailing Buddies by pledging a certain amount per month. If you subscribe through Patreon, the password will appear as a post visible only to those who have a rank of Skipper or higher. Your name will also be listed with all the other sailing buddies at the bottom of the webpages.


Last Window

The big windows are a handful to manage alone. This meant that I needed to find a time that work with someone else who was willing to lift a heavy window onto the house multiple times as we get the fit perfect. As you can imagine, it took a while for that golden time to come to be.

My father helped me with the large window on the door side of the tiny house while the other side remained with a large hole and no window. The side remained windowless as I installed all the siding and even began the trim work. Then, there came a day when Maddie, my wife, was available to help with installing the window.

With the other window installed, the outside is looking much more complete and the inside is looking more like a home!

Installing the window was not difficult, nor time consuming, but the window was bulky and having two people made it proceed much quicker and easier than if I tried to struggle alone.

Fitting the Sheer to the Stem

The sheer runs the length of the dinghy, from stem to stern, and provides a lot of rigidity and strength to the hull. At the stern, it attaches to the side of the transom, at the stem, it fits neatly into the rabbet to form a watertight seal. Before any of this perfect fitting begins, the sheer looks more like an oversized board that runs out past the stem and stern, ready to be cut to length.

The shelf clamps will also end a bit short of the stem, as they will end up being cut back even further to fit the breast hook at the heel of the stem. The sheers are pressed tightly up against the stem and the rabbet line is transcribed onto the planks. A very careful cut is made using a fine toothed miter saw that will not wander as it cuts to trim the plank to size. I prefer to saw with the kerf just to the outside of the line drawn as it is easier to shave off a bit of endgrain as compared to trying to add to it. 

A tight fit is preferred as it will form a tighter seal and prevent any water from slipping through the joint and into the hull. While the sheer should hopefully never be submerged (because we would be having bigger problems at that point) it is a good idea to make all the topside planks watertight. 

The sheer on the starboard side is a bit low on the stem as compared to the port sheer, but this will all be trimmed up when the bow is finished. At this point, the sheers are screwed into place with copious amounts of polysulfide bedding compound to completely seal up the connection. 

At this point, the sheer is now connected at the bow and stern, bedded and fastened with polysulfide and bronze screws. The dinghy is starting to take shape and look more "boaty".

Upgrading the House Battery Bank

Our old house battery bank consisted of three Group 31 AGM batteries. This gave us 315 amp hours (but only 157.5 hours are usable). The house bank is only 6 months old and yet we noticed that the voltage would drop to 10.9V when the fridge would kick on. As soon as the fridge would turn off, the voltage would return to 13.5V.

The fridge will cause a drop in voltage when the compressor turns on, but the voltage sag should not be that extreme. This motivated me to renew the electrical connections to the batteries. The cables were in good shape, but the terminals left much to be desired.

The corroded terminals were creating too much resistance and not allowing the electricity to flow out of the batteries and into the system. I also found an old Sammy feather down in the battery compartment that I took out for good measure.

When the voltage would drop on the electrical system, I put volt meter leads directly onto the poles and the batteries were not dropping down to the 10.9V of the rest of the boat, they actually remained around 12.4V! This confirmed my suspicion that the battery terminals were shot and needed to be replaced.

I replaced them with shinny new terminals and cleaned up the ends of the battery cables. I also added two more Group 31 AGM batteries to the house bank for good measure. This brings our electrical storage up to 525 amp hours (262.5 usable amp hours)!

When adding new batteries, the concern of mixing battery ages always comes up. Being how the old batteries were only 6 months old and relatively new by those standards, I was less concerned with the mixing. To prevent any potential problems though, we grouped the three old batteries on Bank 2, and the two new batteries on Bank 1. 

Now the five house batteries are organized into their two banks while keeping the new and old batteries separate. With the new terminals (and extra amp hours) the voltage sag has been much less prominent when the fridge kicks in, keeping our electrical needs met in comfort.

You might be wondering why I never changed those old terminals when I replaced the house batteries, and the reason was laziness. They still went over the terminal poles and the insides were cleaned with a wire brush. When the battery cables were connected, the lights turned on in the boat and I was satisfied with having electricity flowing through our boats wires. It wasn't until the fridge issue caused the poor connections to become a more pressing concern. 

If we didn't have a fridge, the old terminals would have remained in place for many more years because they looked like crap but still worked enough to power the running and interior lights.