Prop Walk Test

Your yacht is floating in her slip, securely tied to the pier and ready to go sailing. You need to reverse you yacht out of the slip, but which way will she walk?

A very simple test to see which way and how severely your yacht will walk is to put the boat in reverse under full throttle and evaluate the prop wash. 

The side with more prop wash will be the side you walk away from. If you see prop wash on your port side, you will walk to starboard. If you see prop wash on your starboard side, you will walk to port.

While most of the factors that compound to create prop walk are beyond your control right before you go sailing, one key factor is: engine speed.

Hello, World!

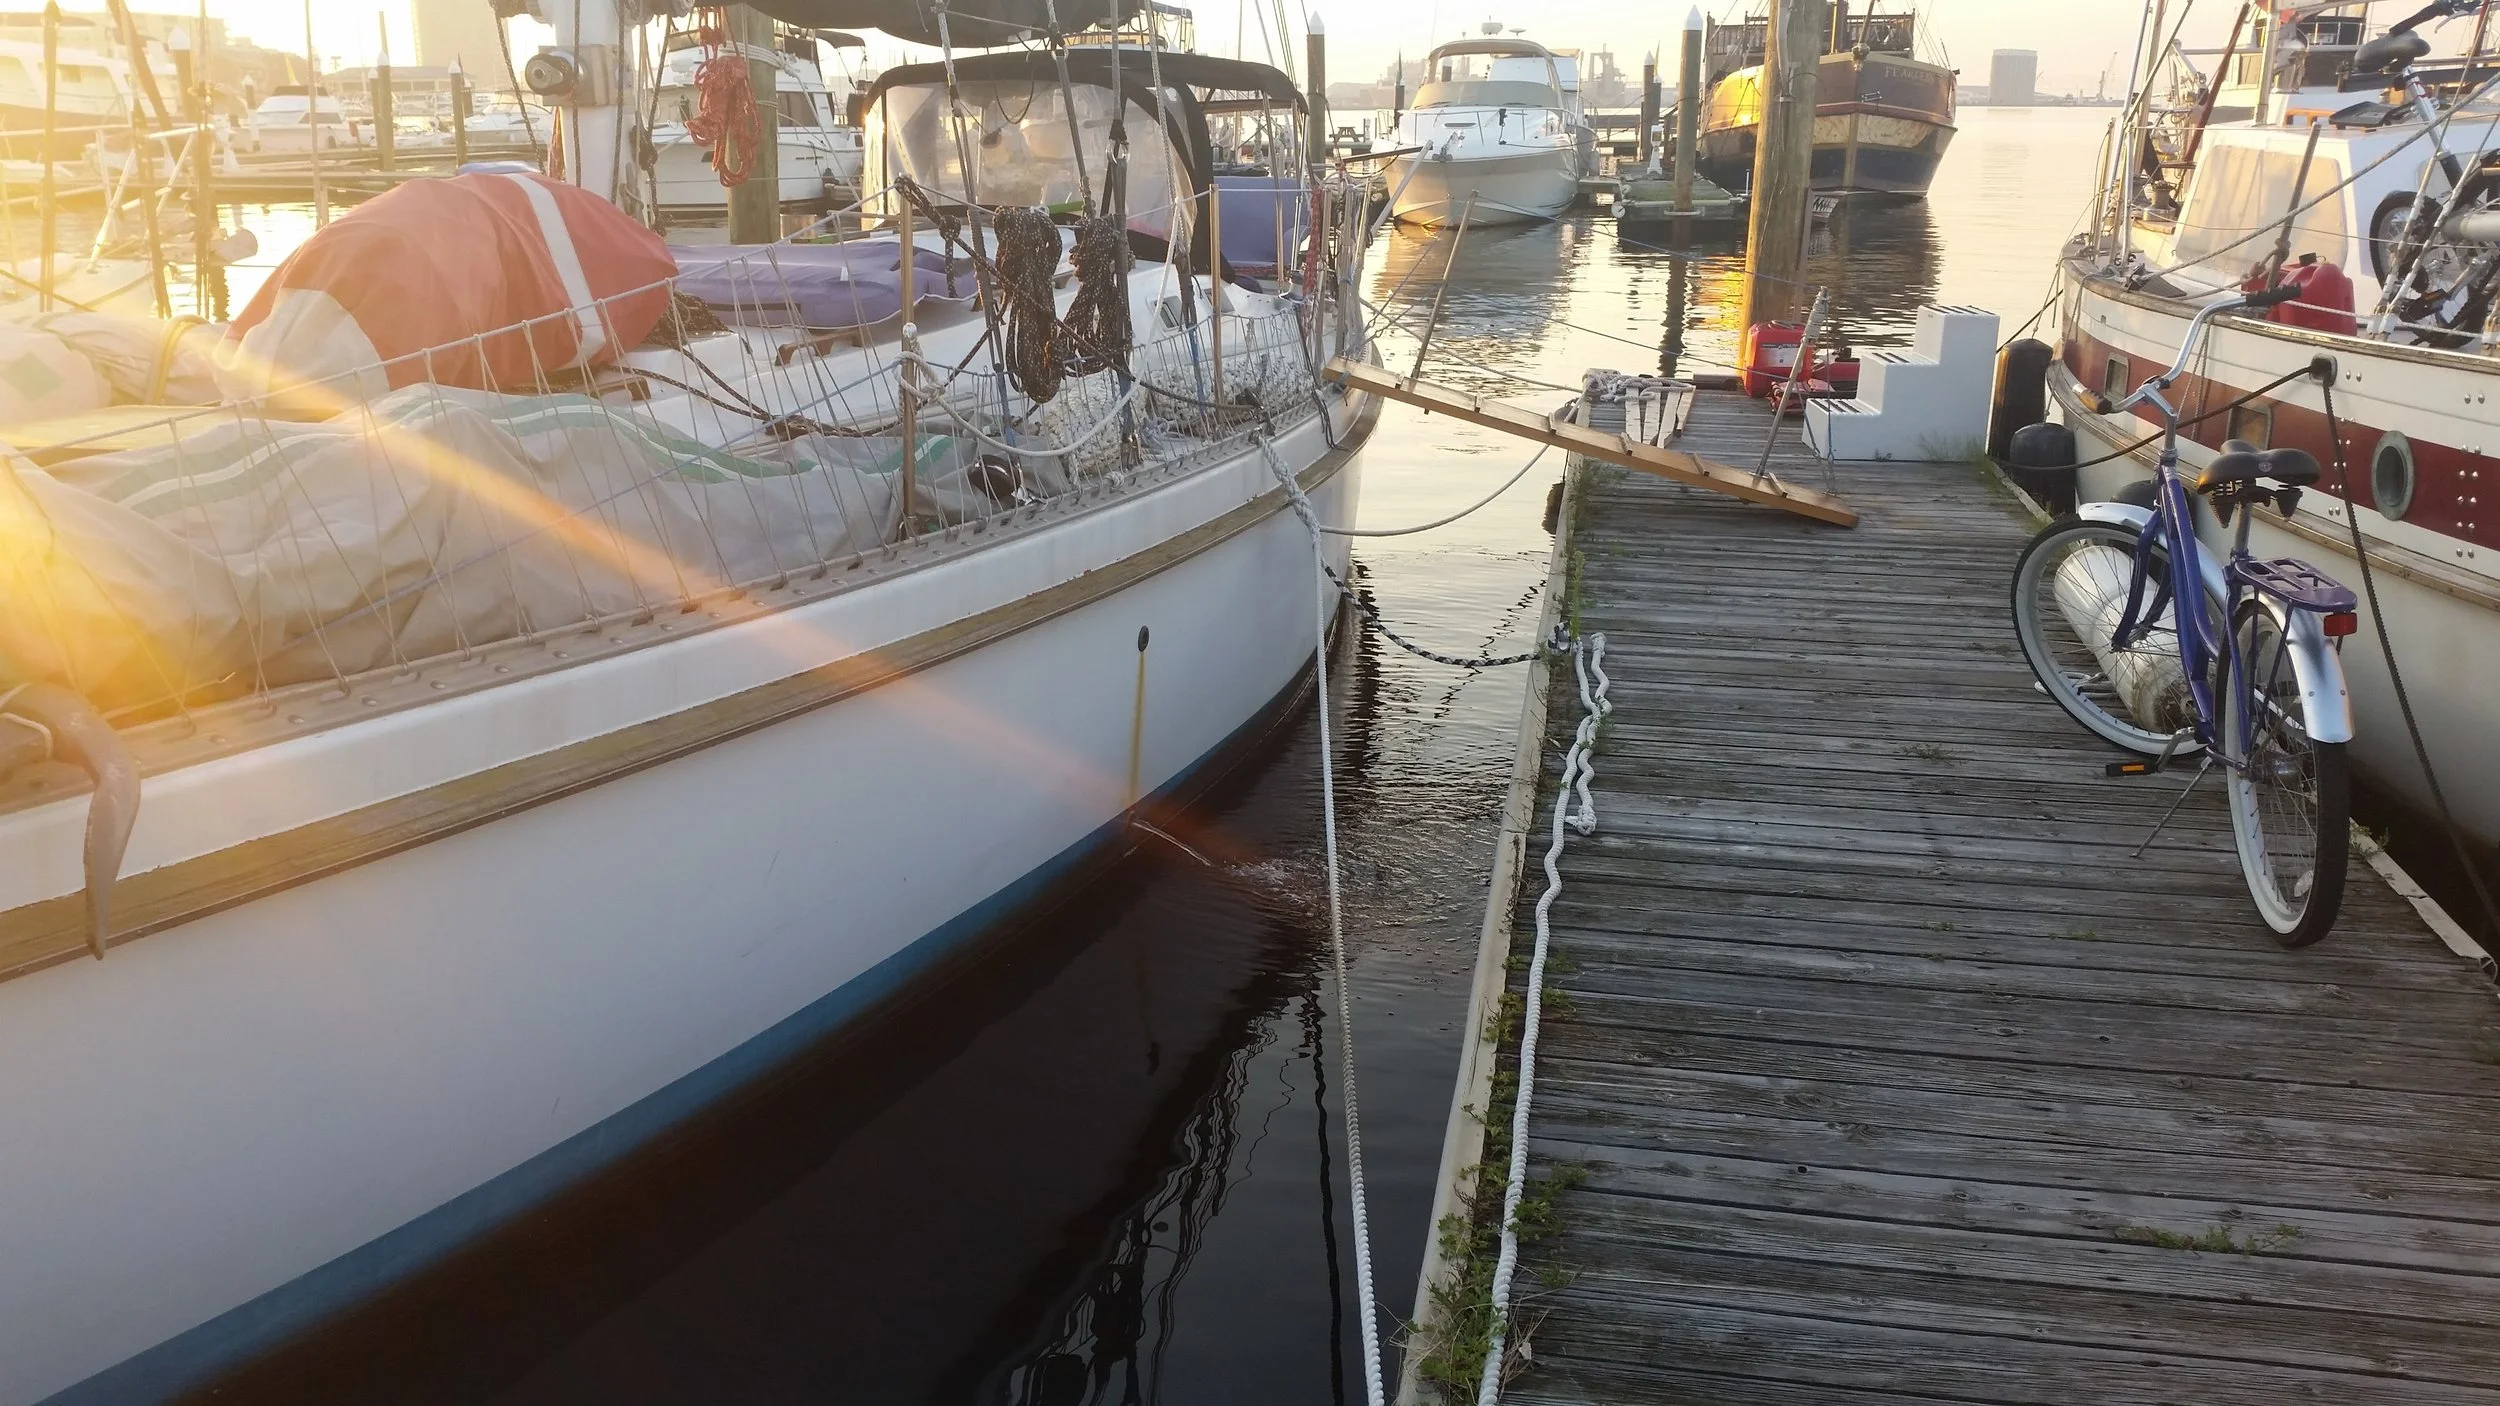
With the engine off, there is no prop wash and the water around the boat will be still.
With a little bit of throttle, the engine is consuming 32.1 amps and the propeller is spinning at 697 RPM. There is very little prop wash on either side, as there is little thrust being produced. 

Hello, World!

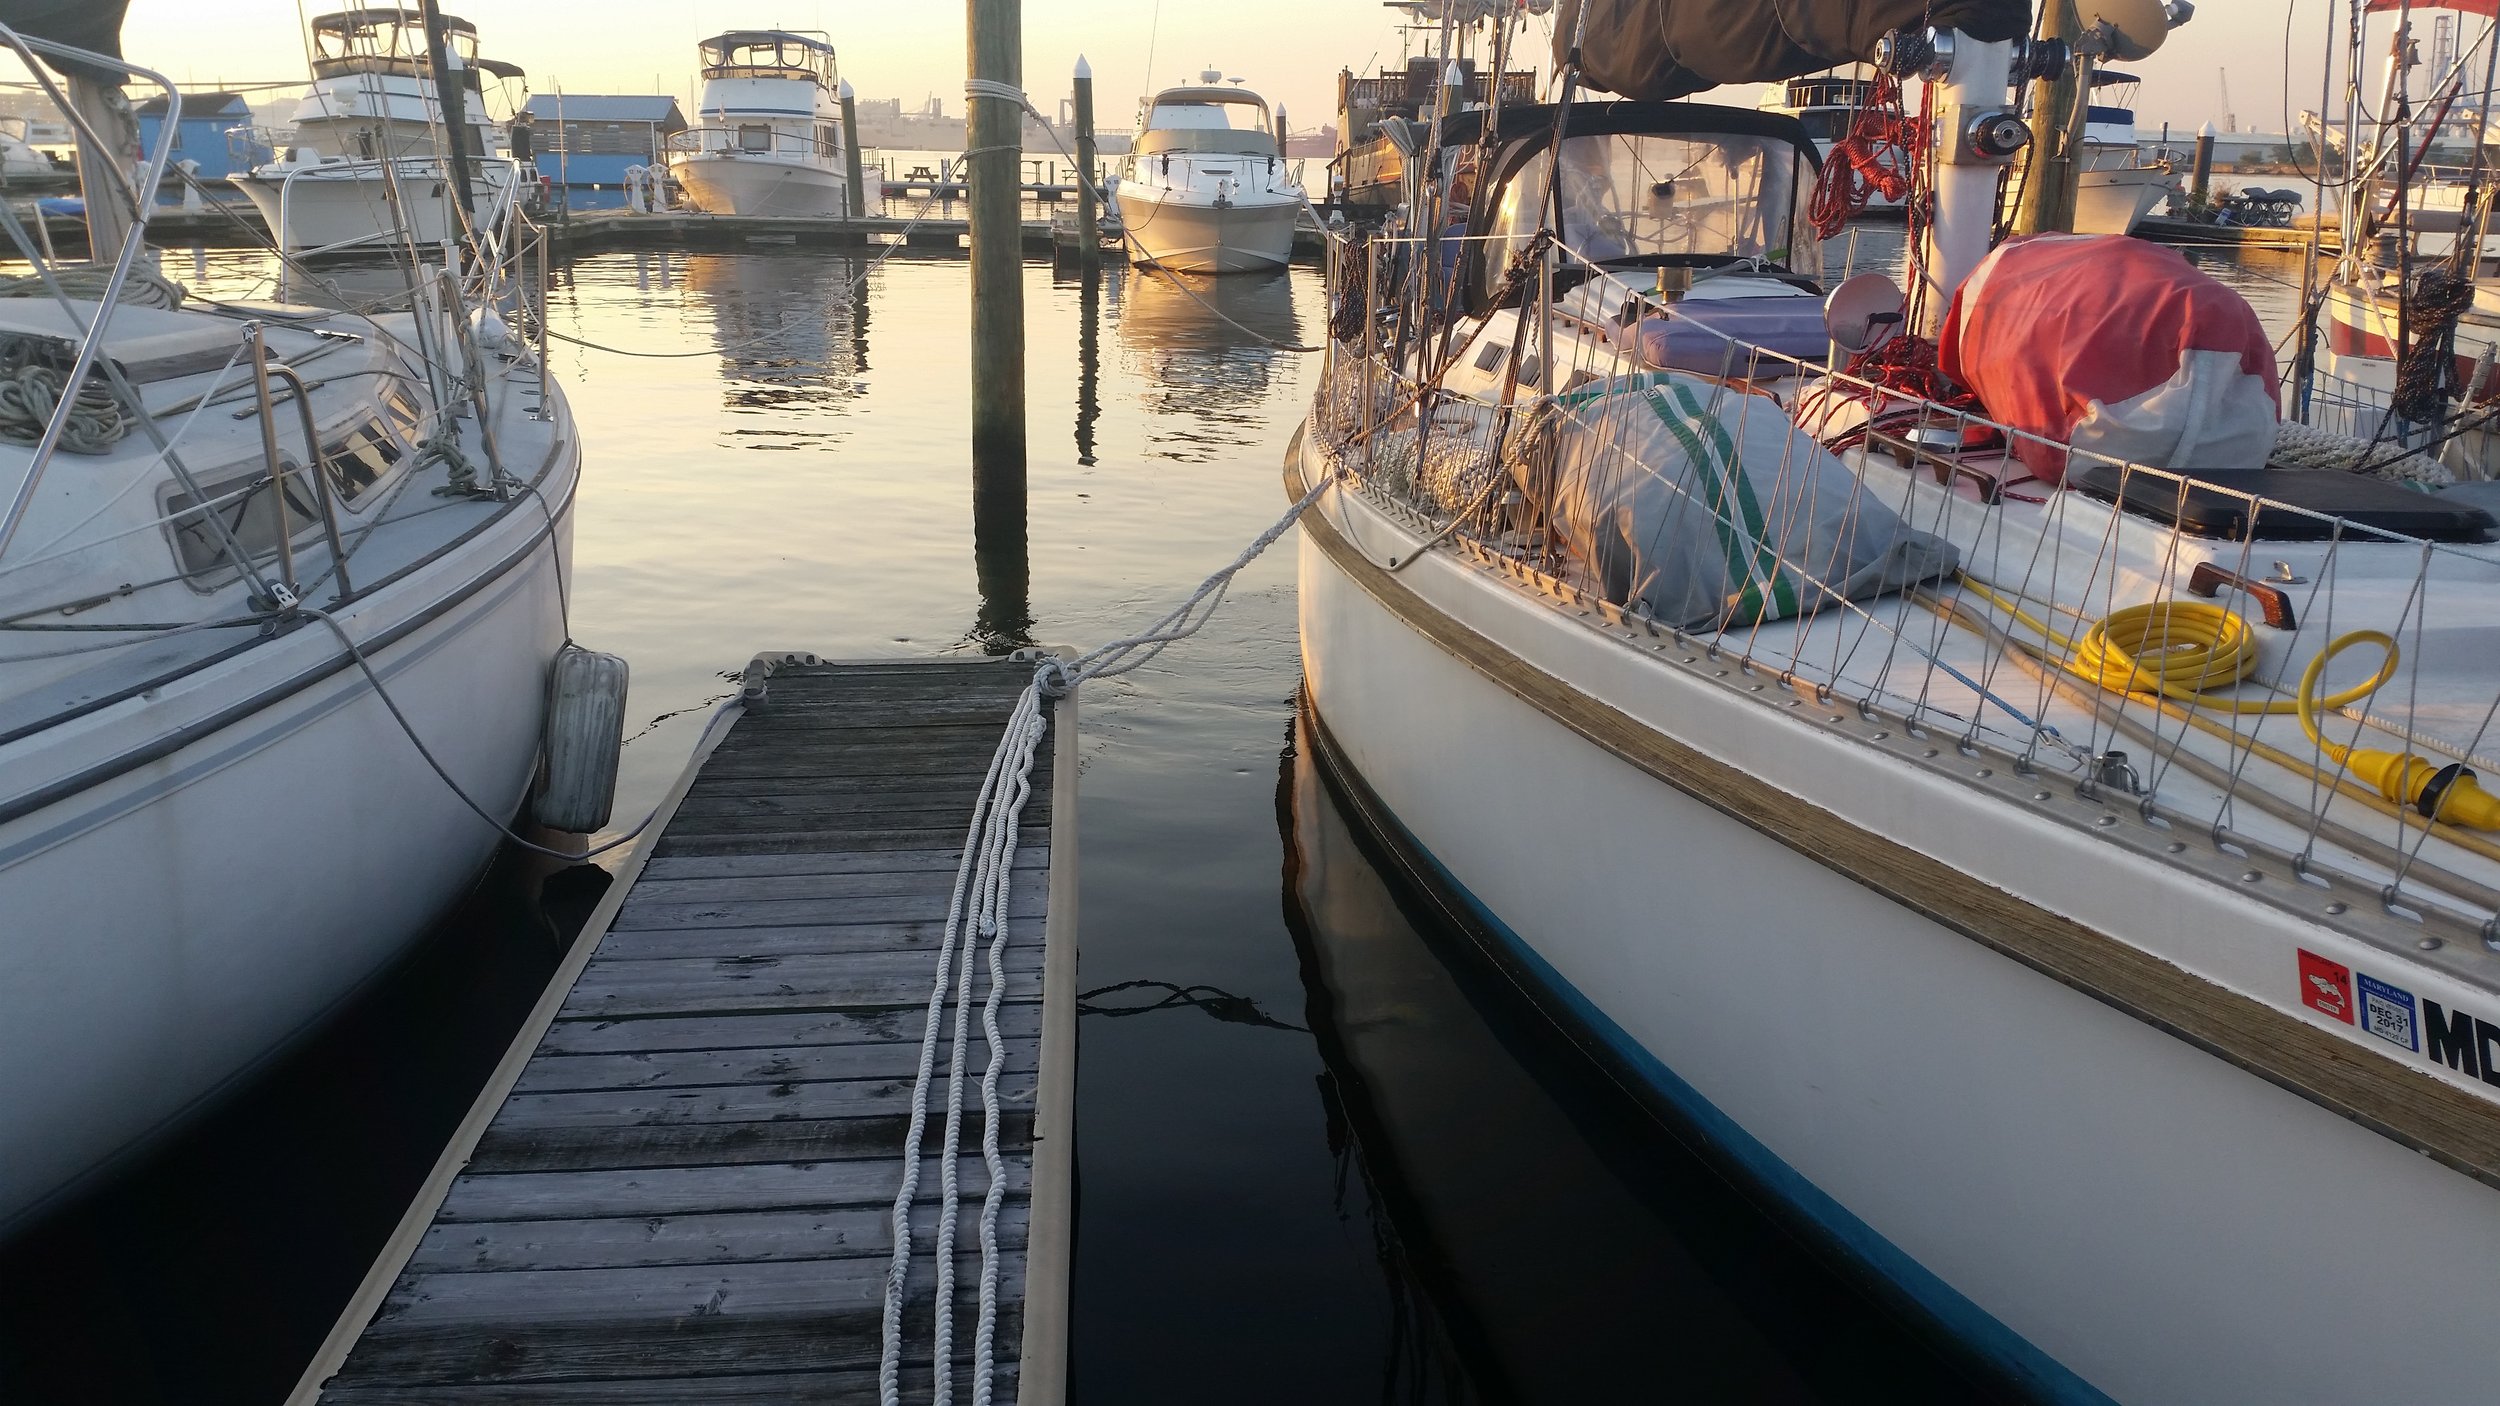
With the engine drawing 61.2 amps, and the propeller spinning at 889 RPM, there is considerably more prop wash and prop walk. You can see from this picture looking at the bow how the docklines are holding the boat steady as well as the difference in the amounts of prop wash on each side of the boat. The port side is very disturbed, while the starboard side is very calm. This illustrates why the boat will walk to starboard.

With the engine drawing 89.4 amps, and the propeller spinning at 1012 RPM, the prop wash is considerably strong on the port side and only beginning to disturb the water on the starboard side.

Hello, World!

With the engine drawing 178 amps, and the propeller spinning at 1255 RPM, we are creating considerable trust and prop wash on the port side.There is a very slight amount of prop wash showing up on the starboard side.
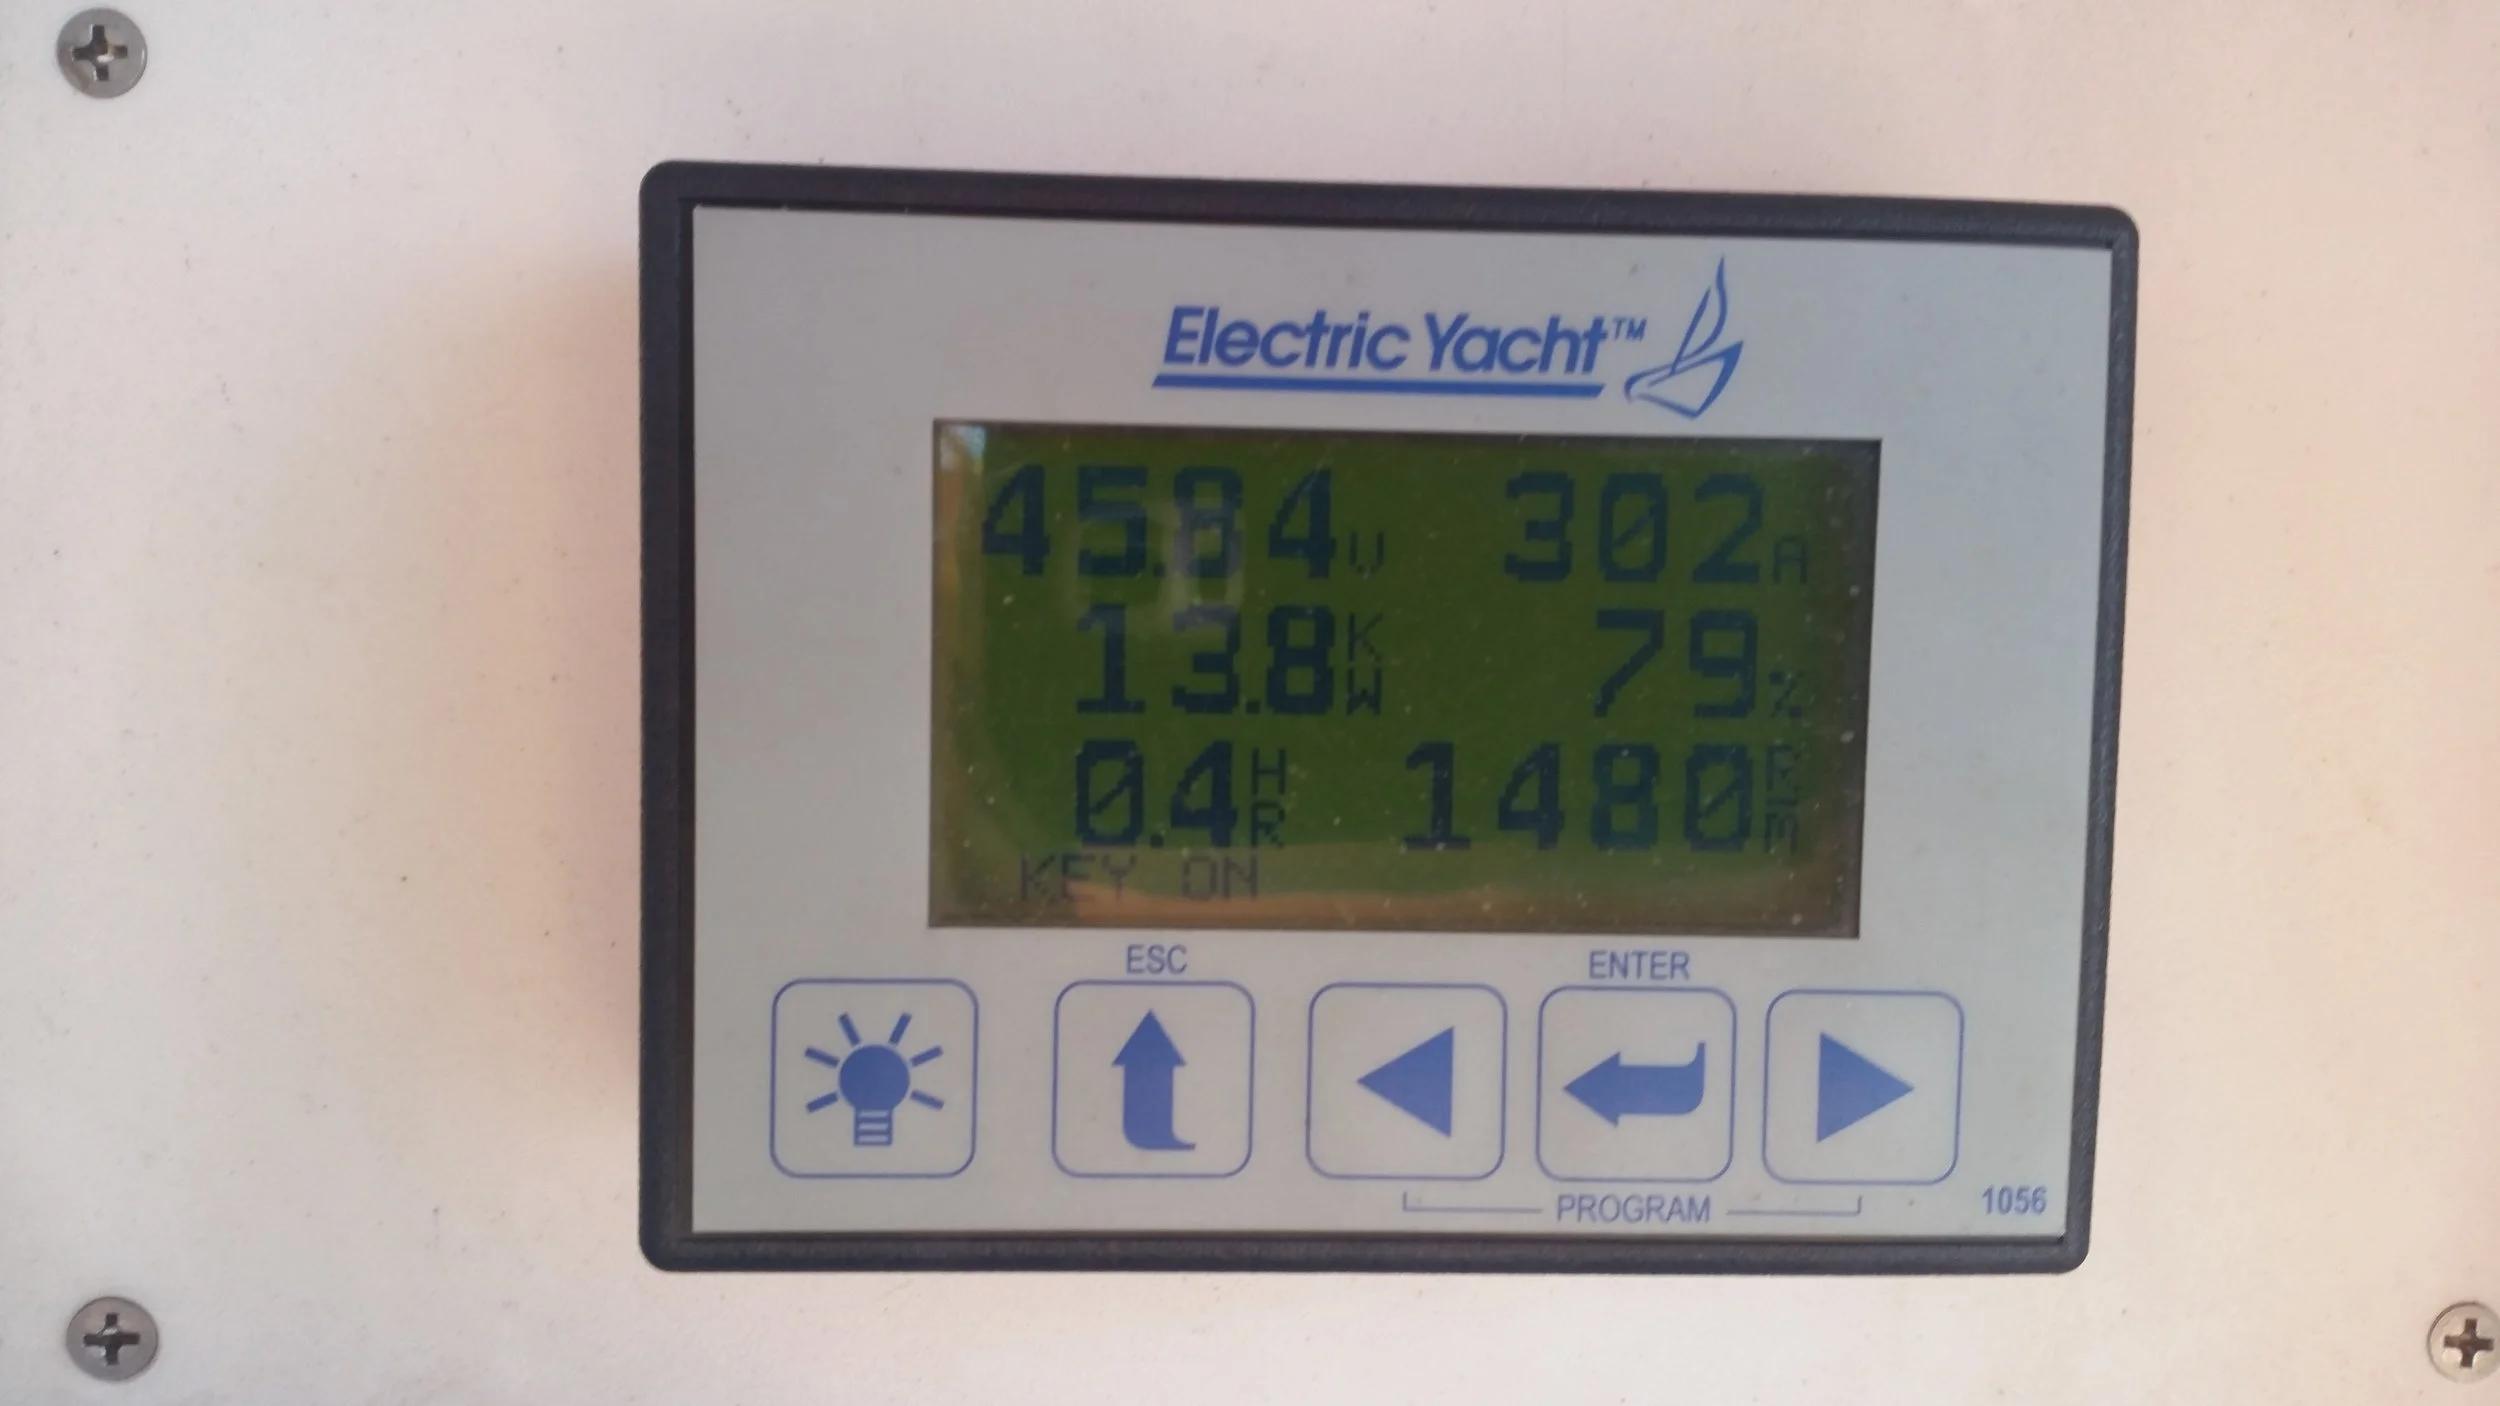
The final test was performed at full throttle, with the electric motor drawing 302 amps, and spinning the propeller 1480 RPM. At this pace, our very small battery bank will only last for 0.4 hours, or 24 minutes, which illustrates why we sail everywhere instead of motoring everywhere. With a larger battery bank and a generator, we could have a significantly longer range under power, but we chose a simpler and less costly installation and opted for a small battery bank with a full suit of sails.

Hello, World!
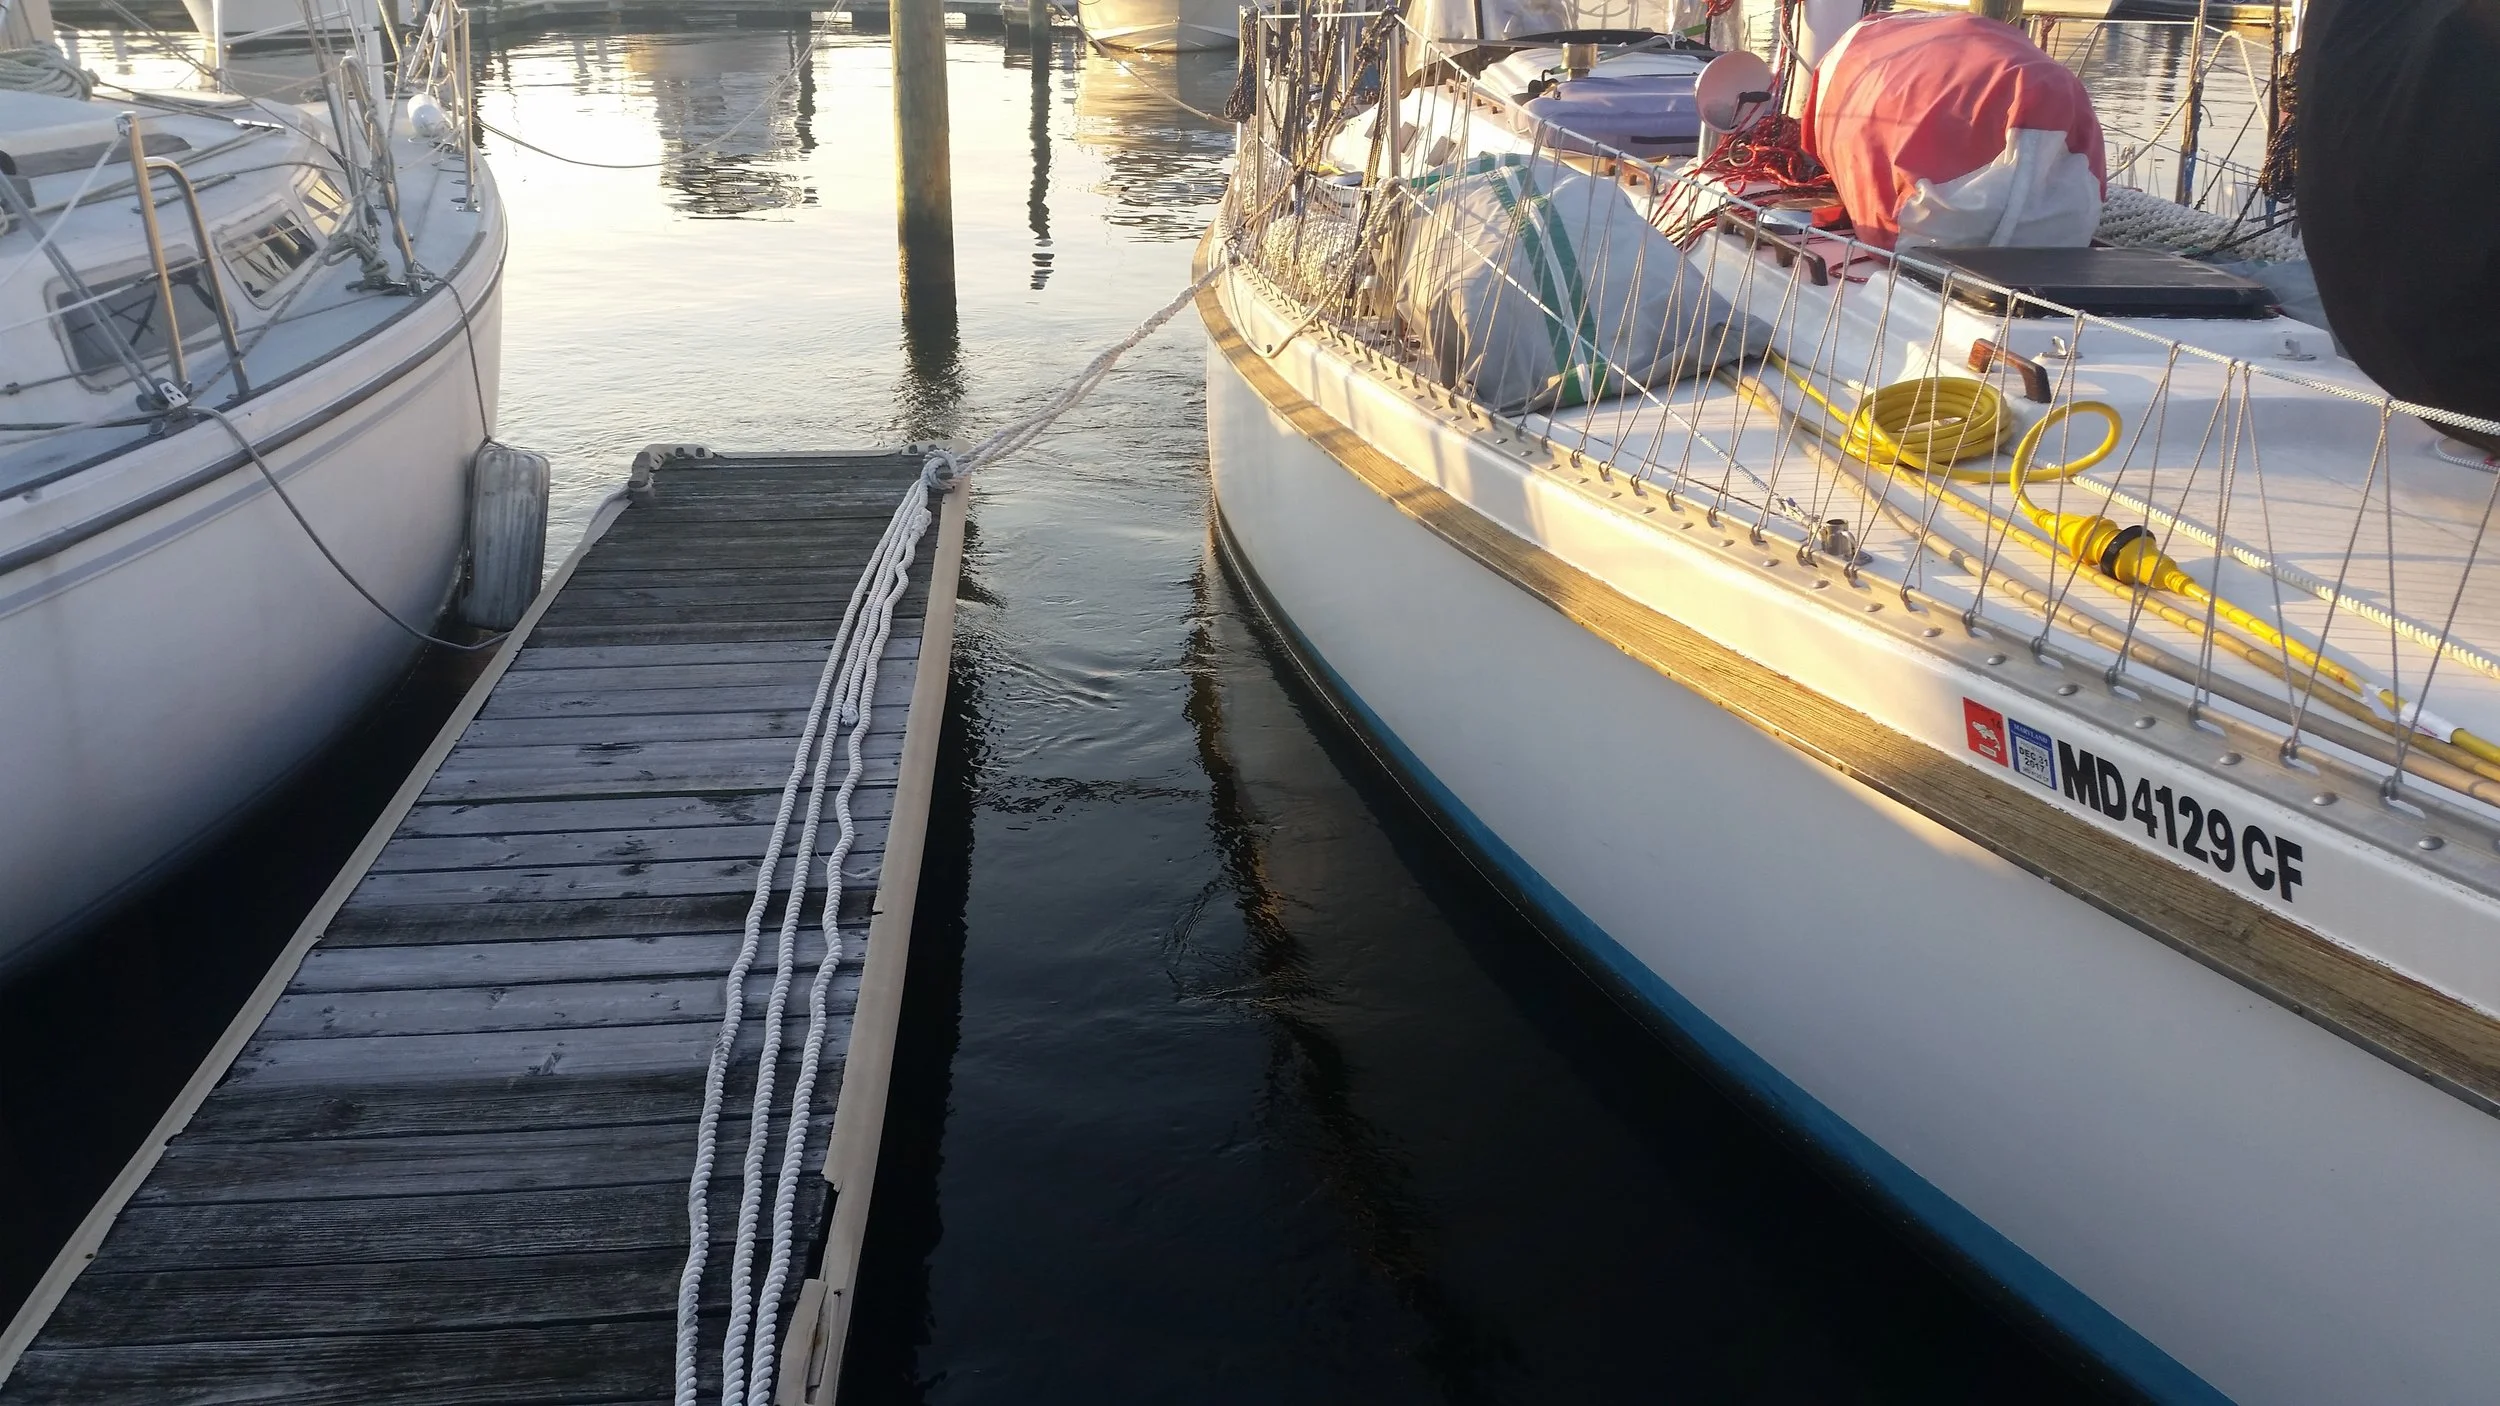
At full throttle astern, the prop wash on the starboard side is starting to be more evident, but nowhere near the level of disturbed water on the port side. Under full throttle, the boat will walk to starboard as all of the thrust is being directed towards the port side of the hull.

As the RPMs increase so does the bias in the in thrust, leading to an increase in prop walk to one side while moving astern.
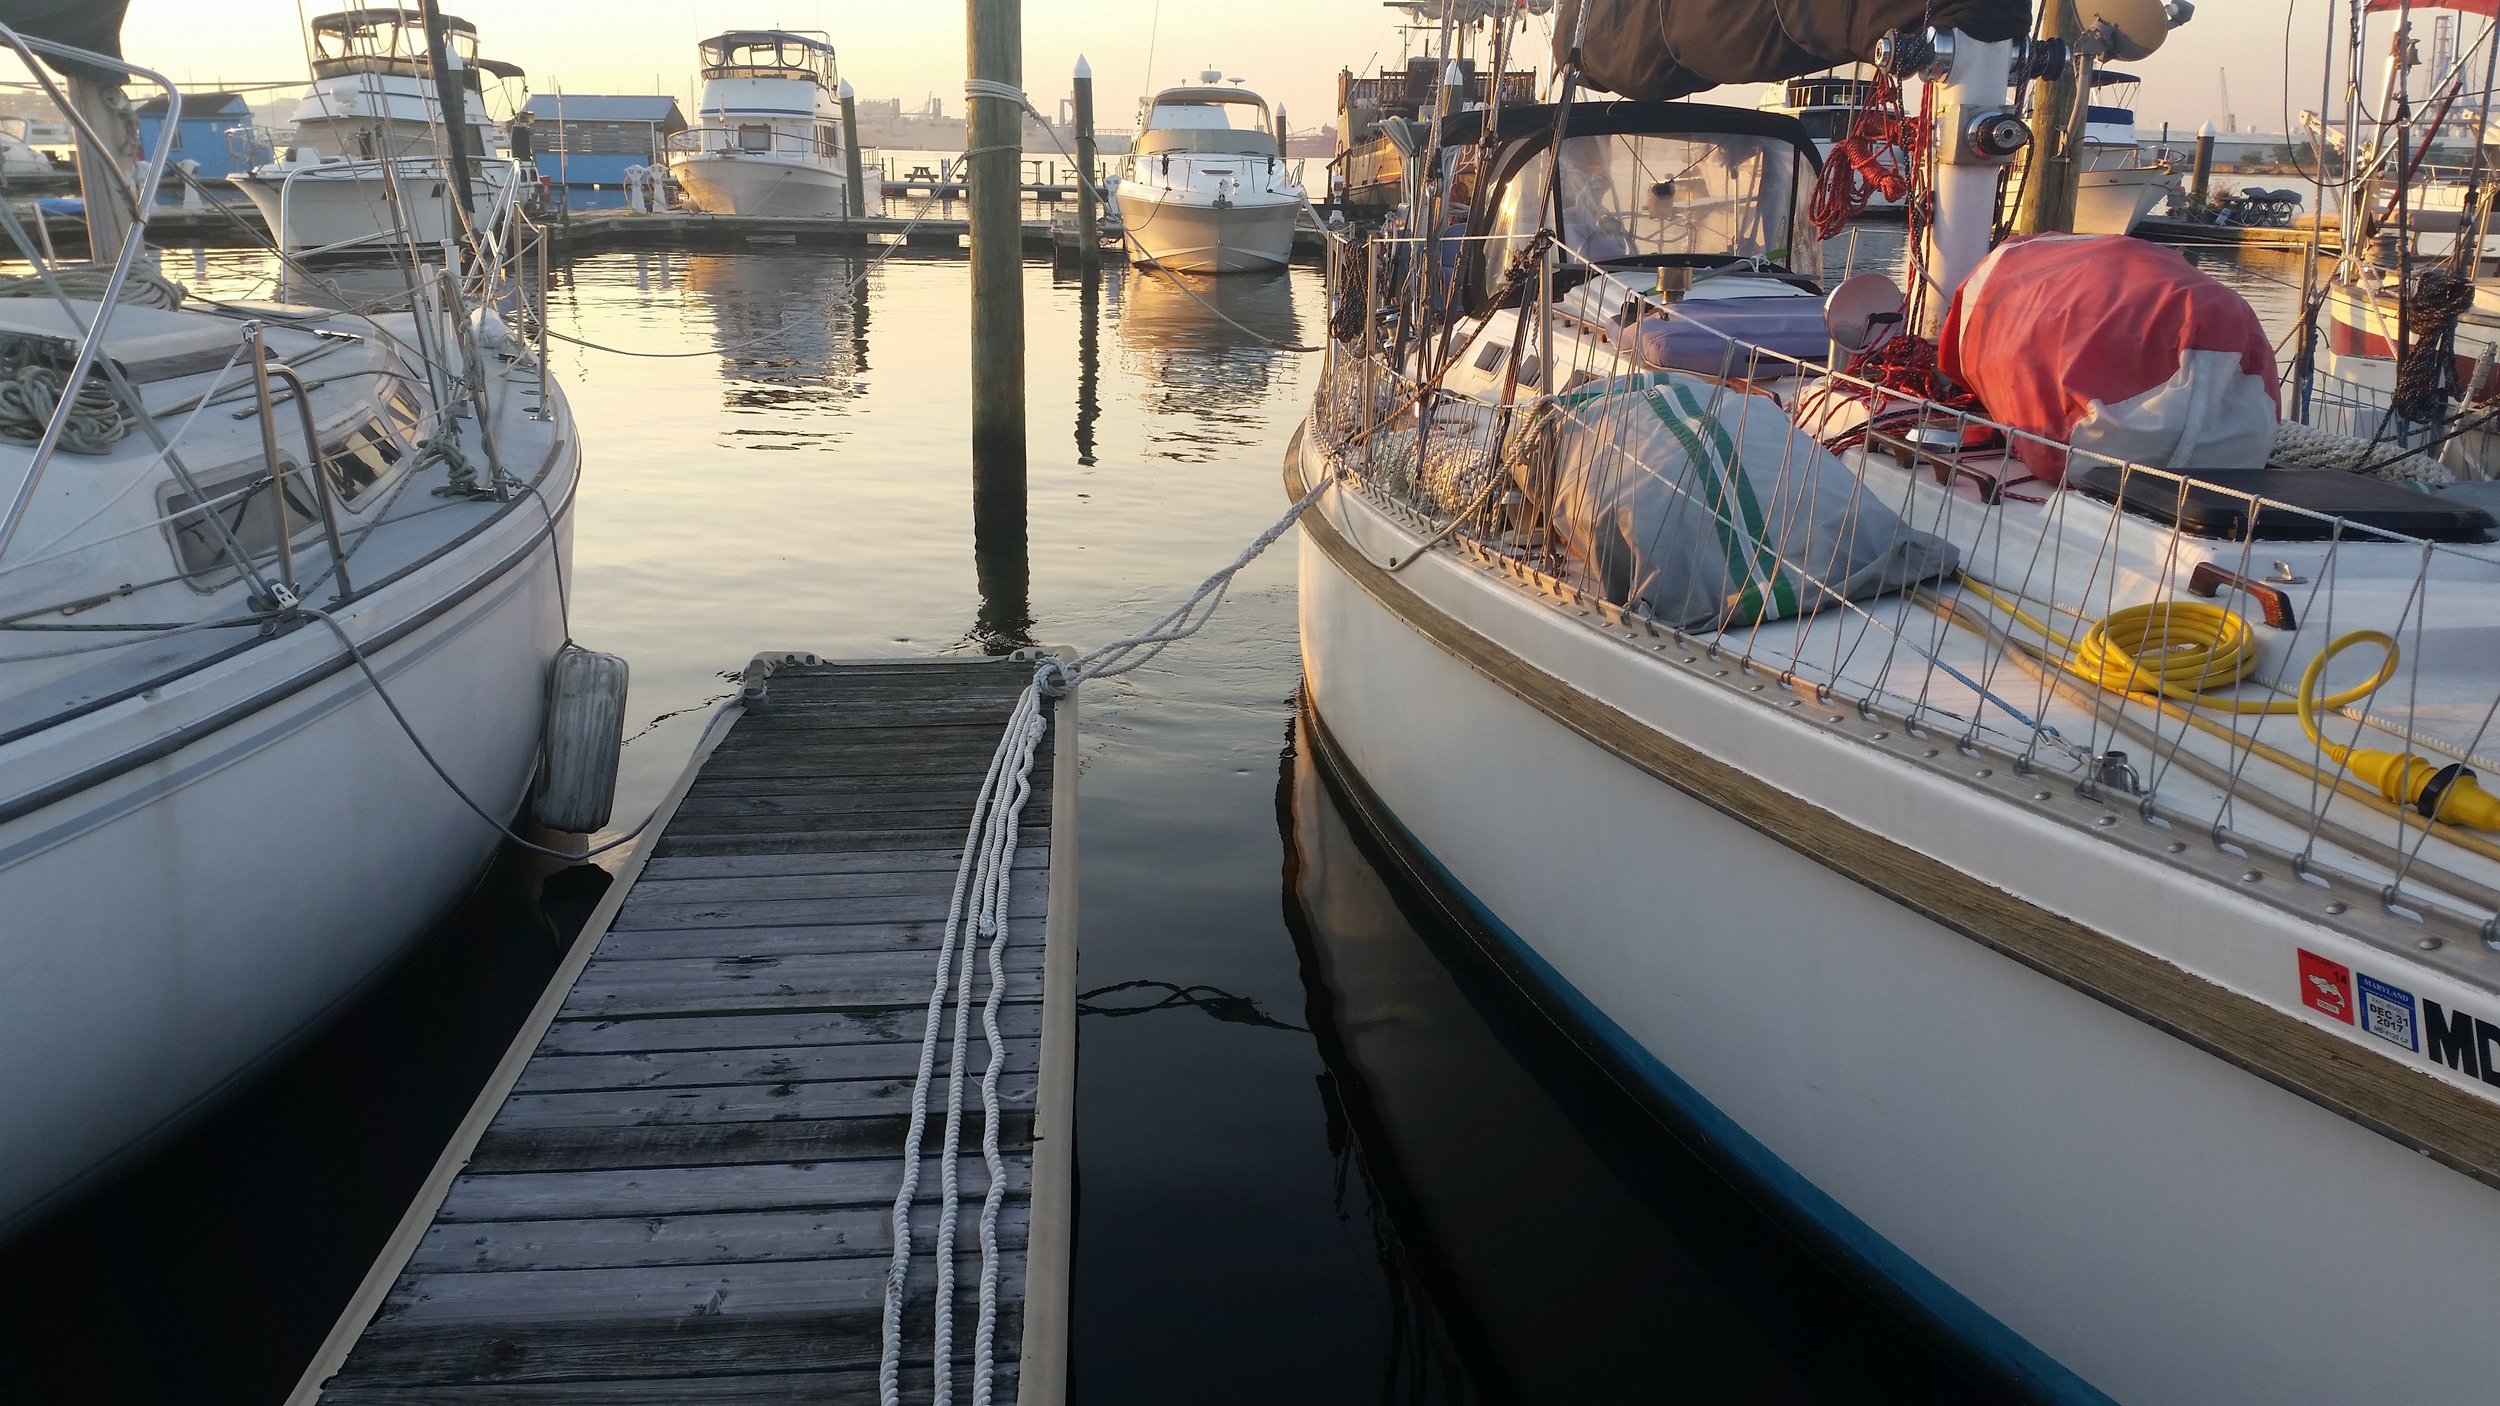
Light Throttle
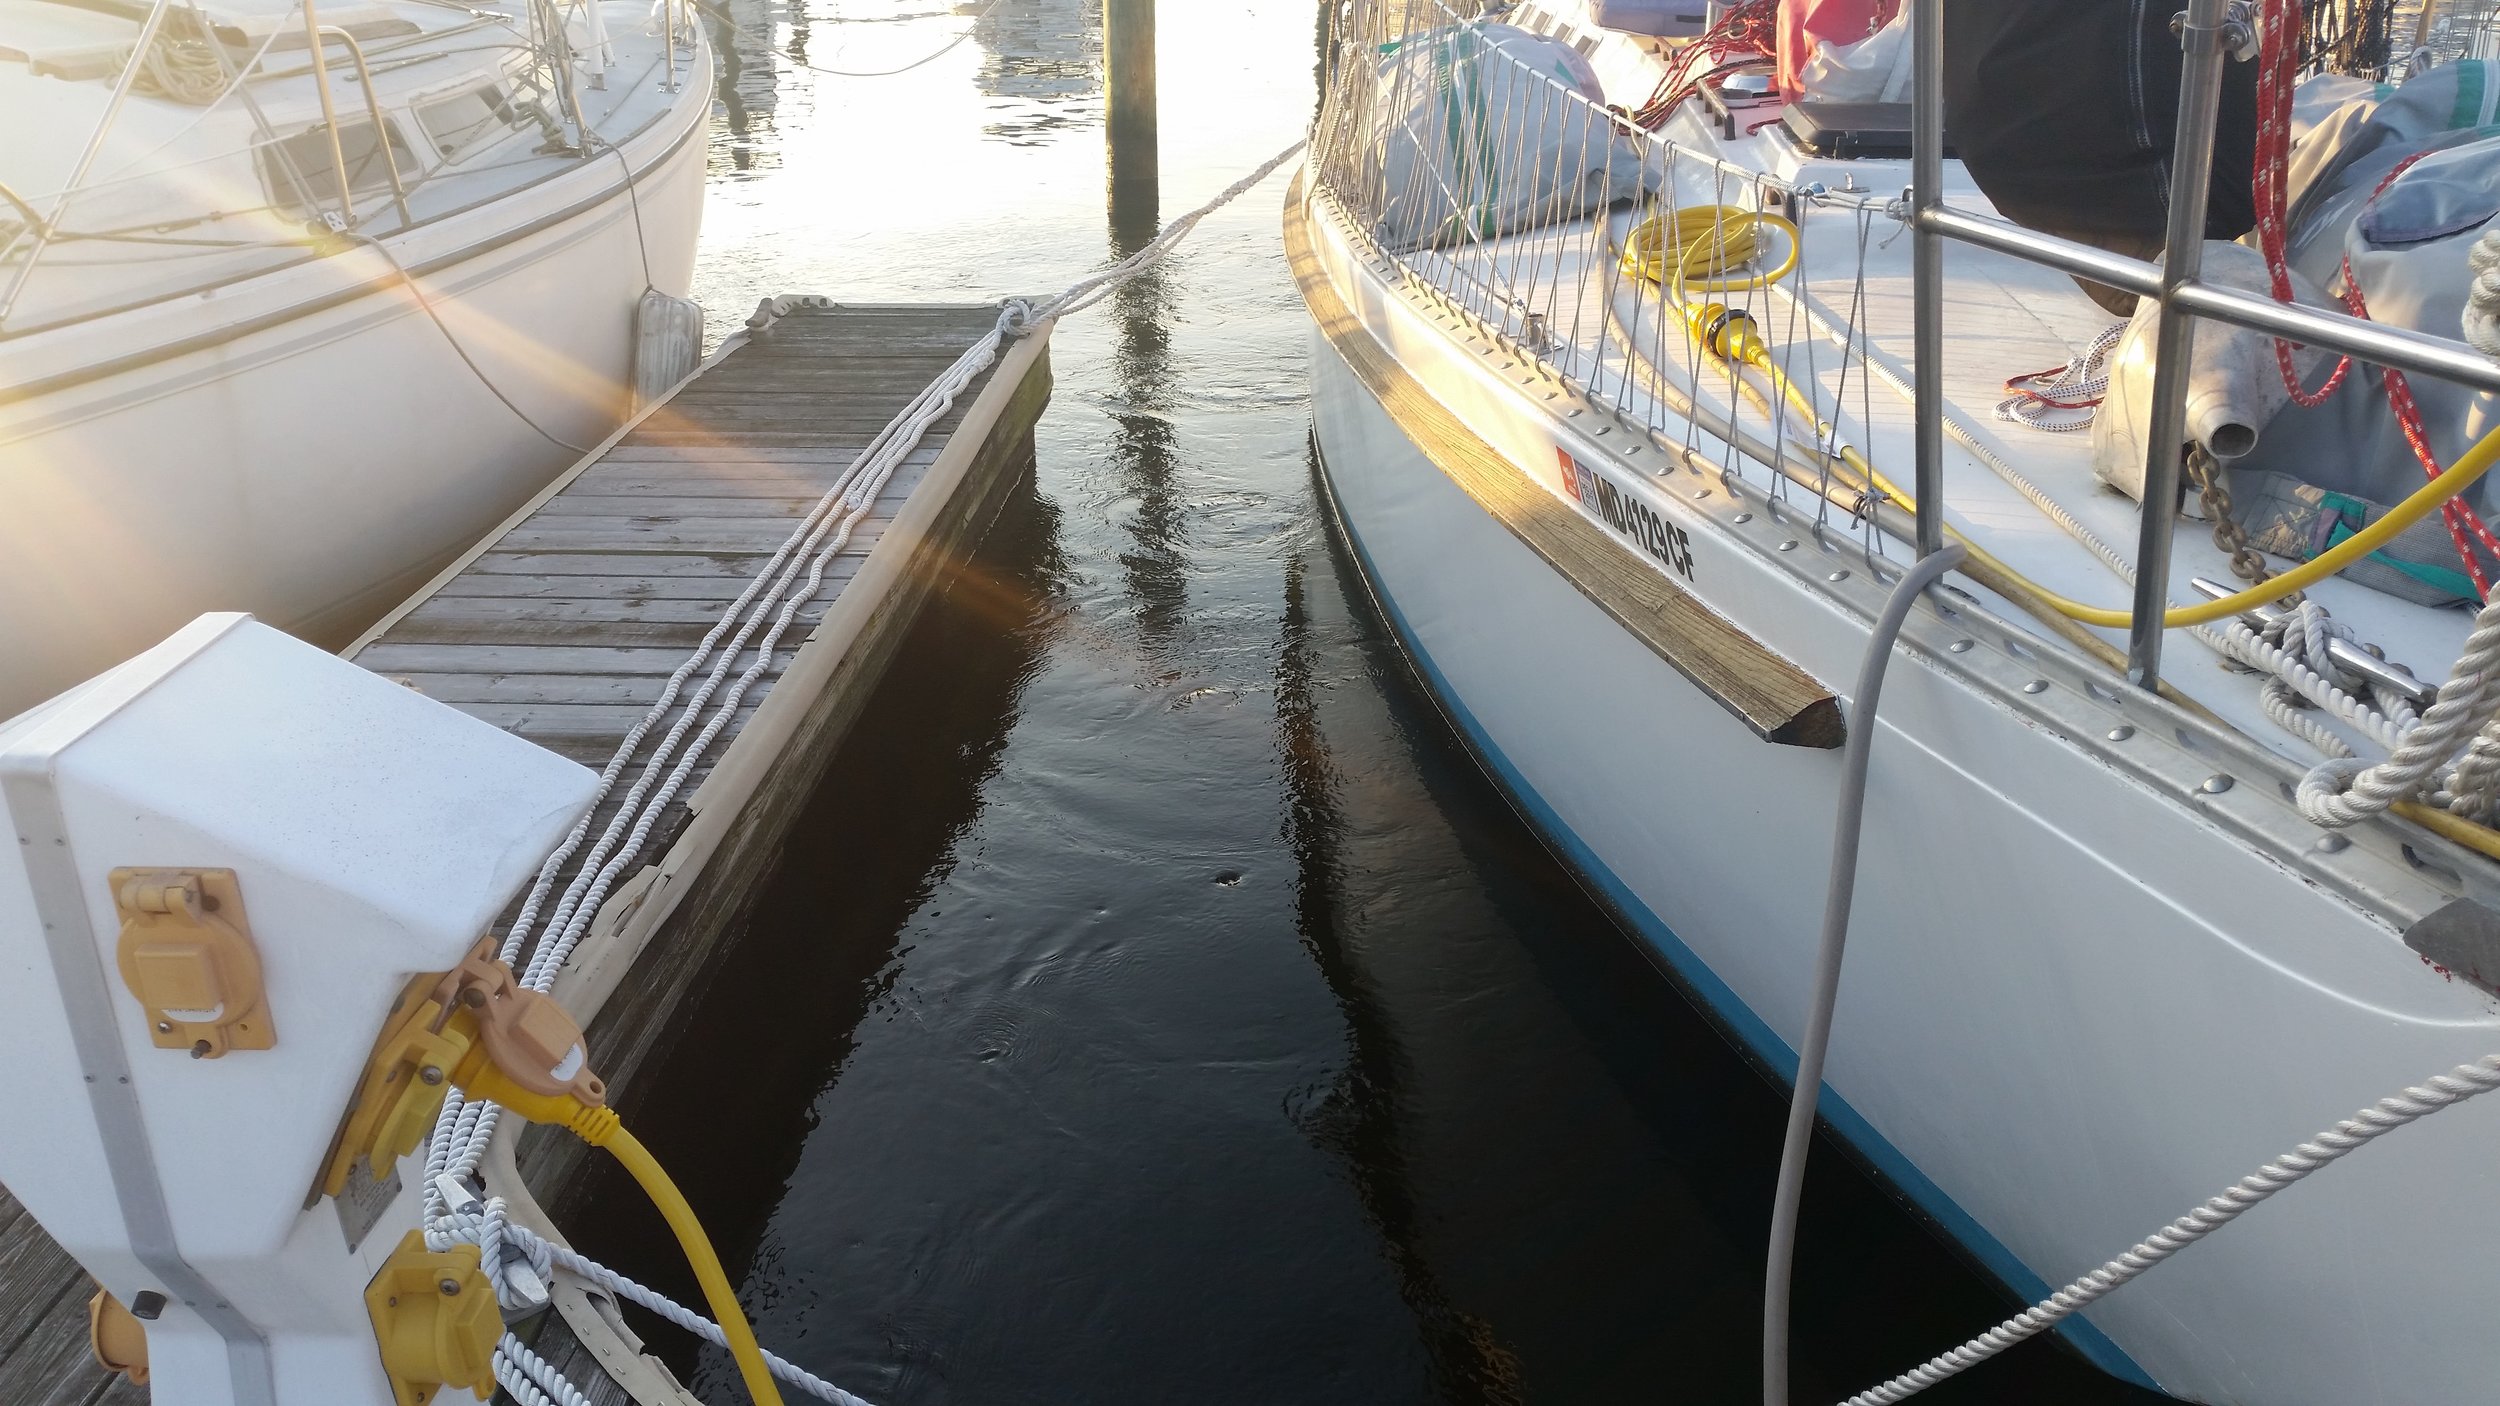
Light Throttle

Full Throttle

Full Throttle

The prop wash on the side the boat walks towards in reverse is about the same under light and full throttle.

Light Throttle
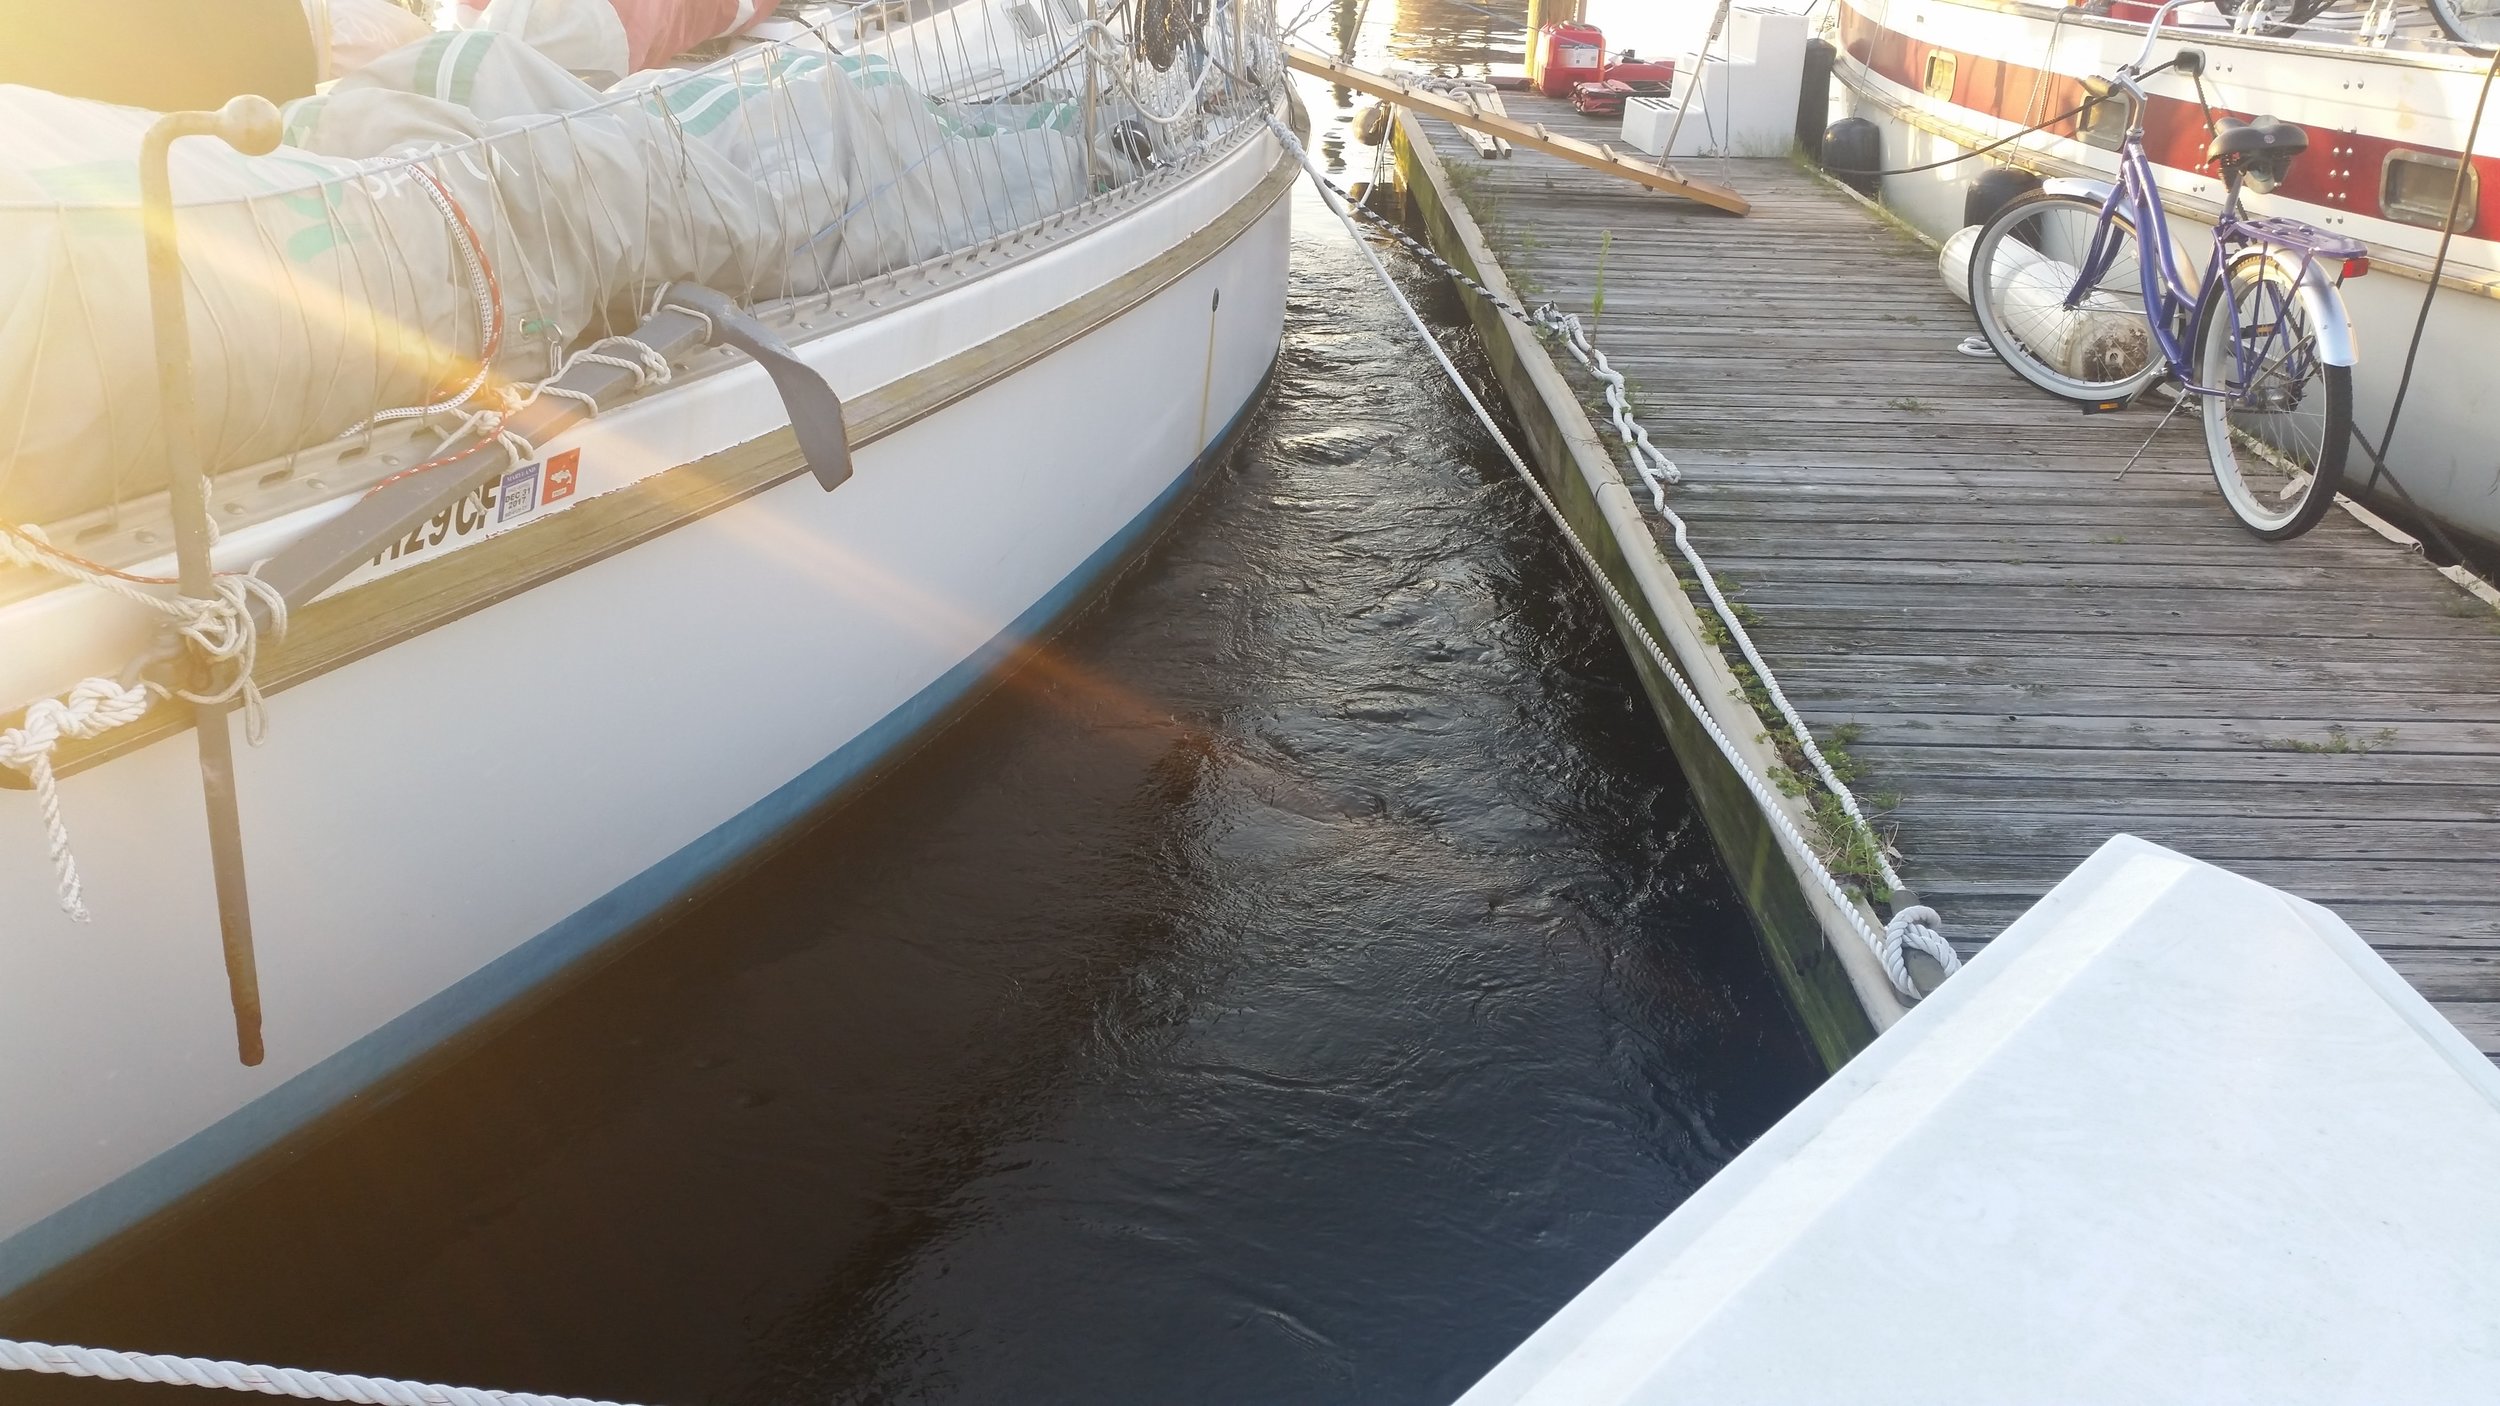
Light Throttle

Full Throttle

Full Throttle

On the contrary, the prop wash on the side the boat walks away from in reverse is vastly different. Under light throttle, the prop wash is very light and can be somewhat combated by the opposing sides prop wash. Under full throttle, the prop is very powerful and will push the boat over, causing the phenomenon known as prop walk.

Next time you need to reverse into a slip, try using a light amount of throttle. If you are reversing out of the slip and have significant prop walk, maybe you should consider walking the boat out of the slip by hand and then motoring away once clear of the slip.
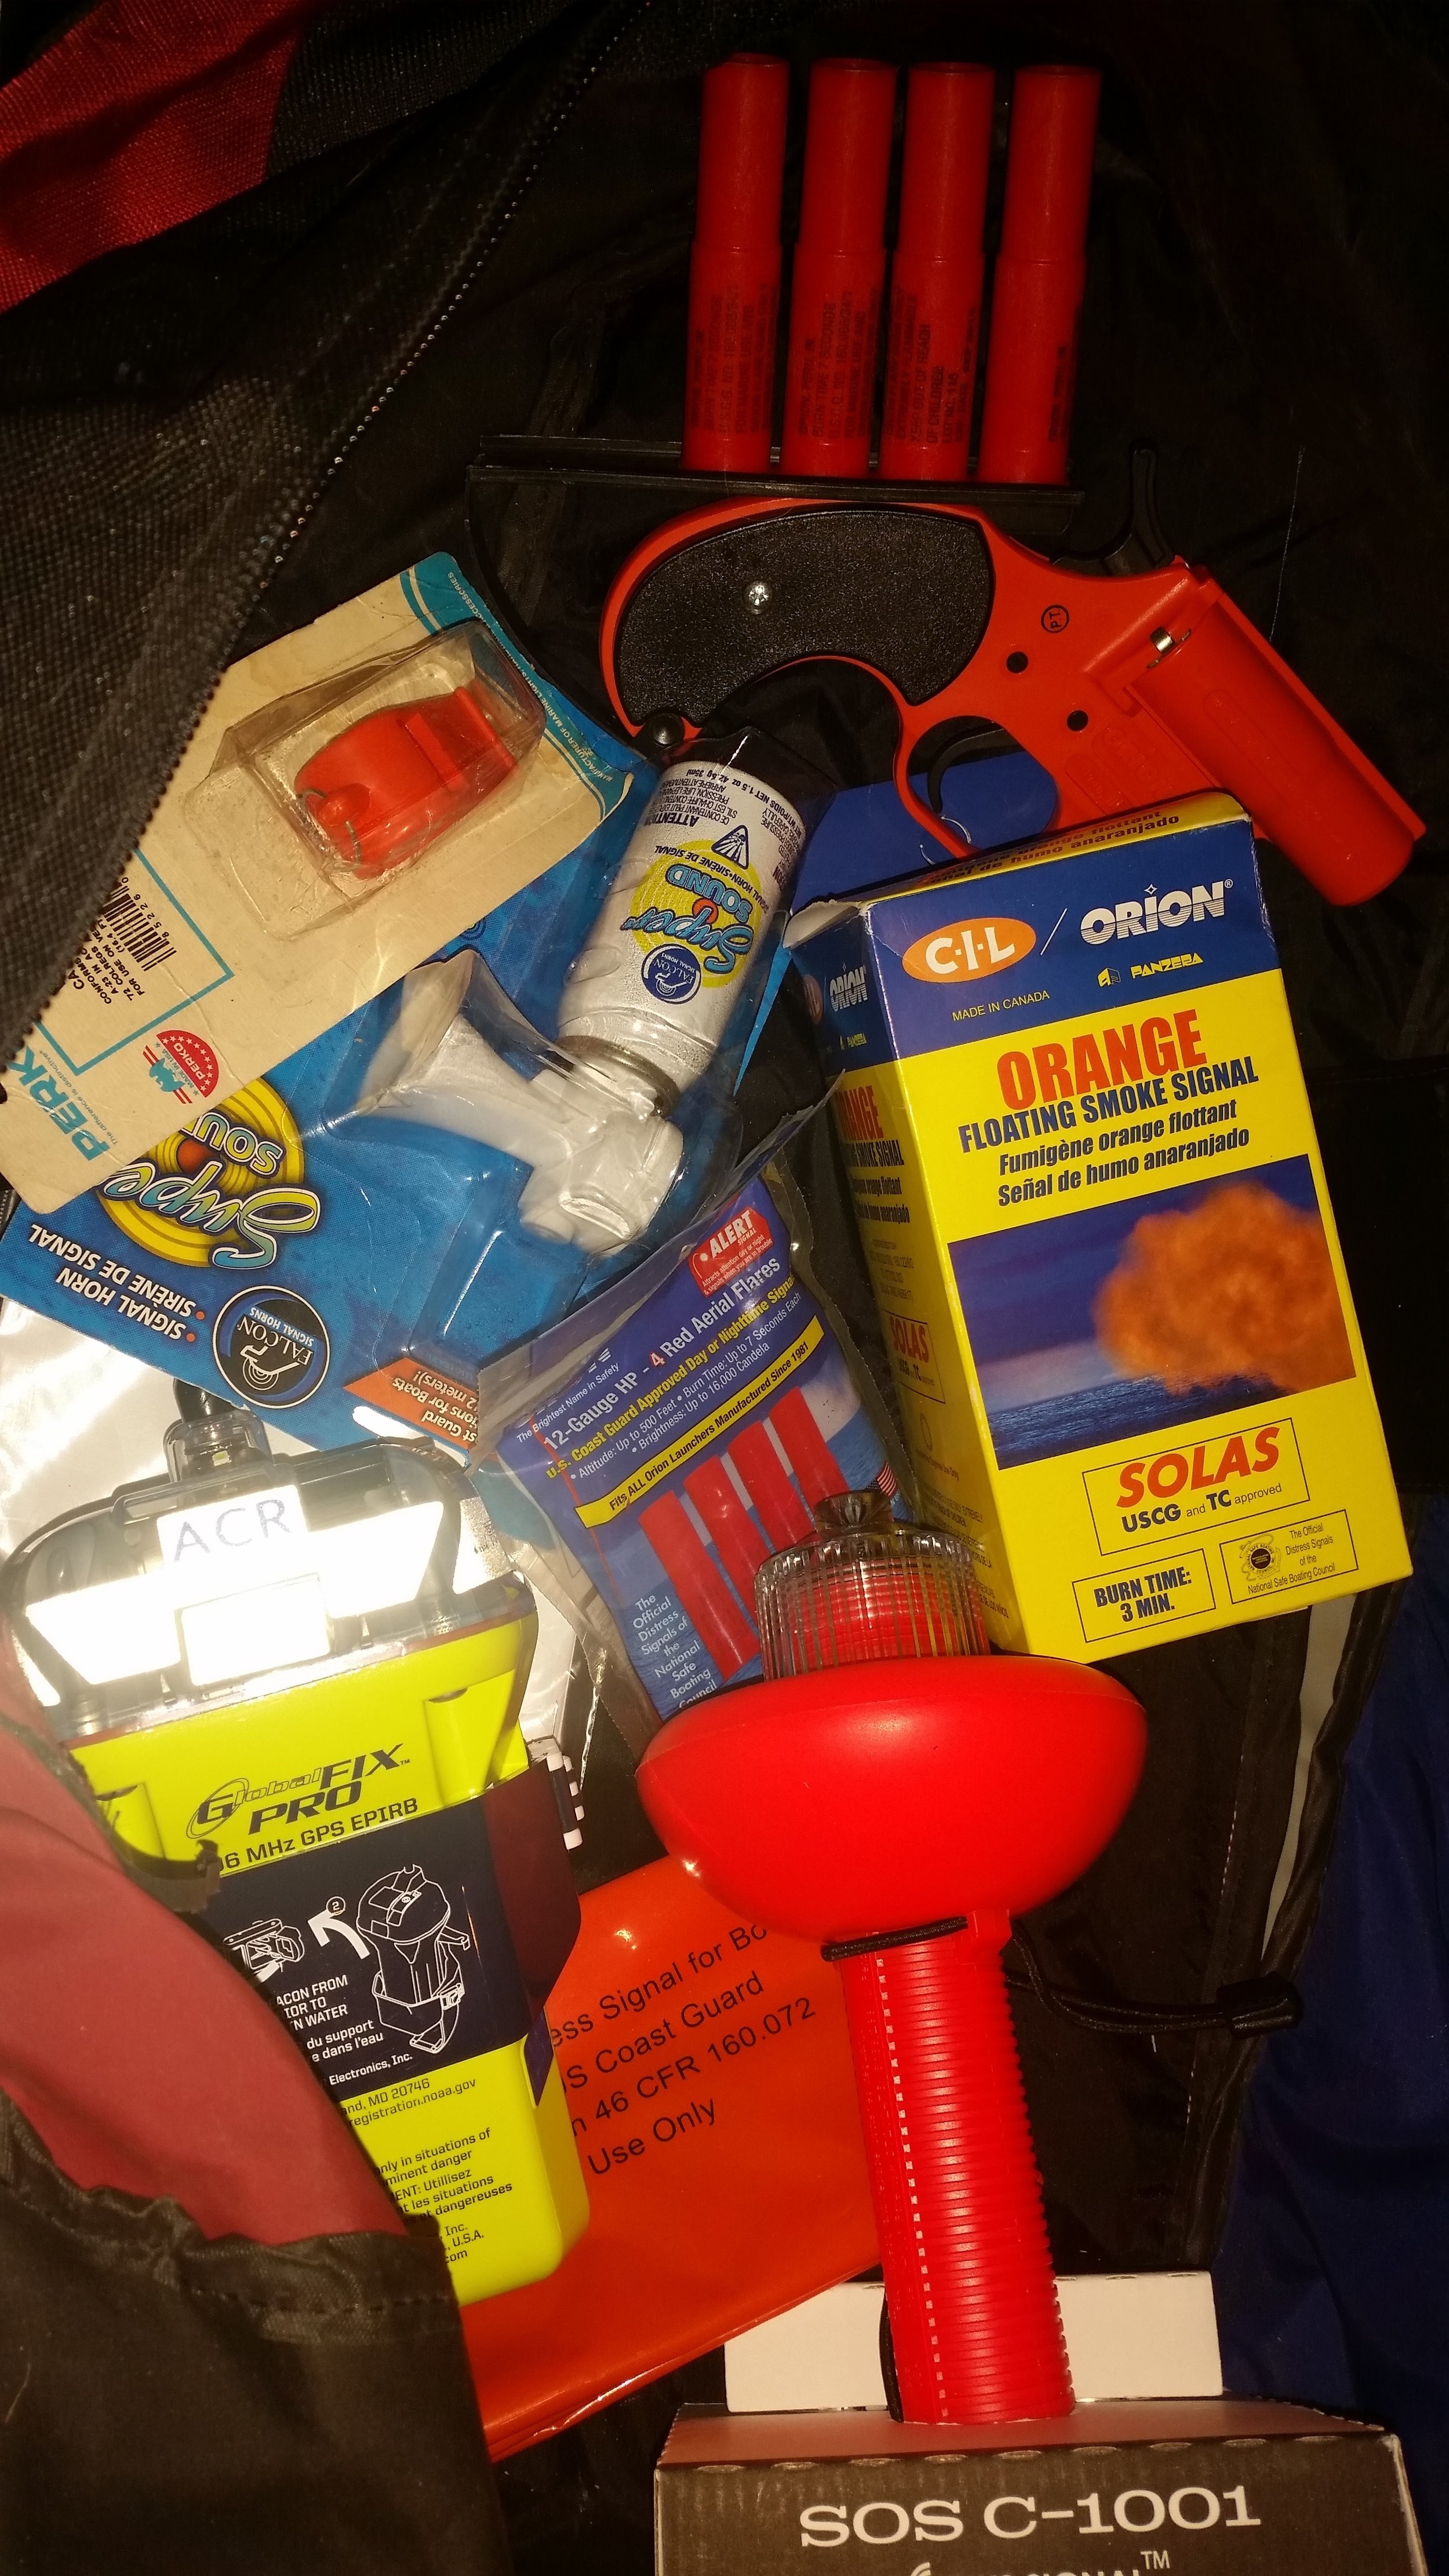
Ditch Bag

A ditch bag is a bag that you grab as you ditch your ship. This bag is supposed to contain important items that are crucial to your survival and recovery. The time to collect all of these important items is not when your boat is sinking and panic is setting in. The idea of a ditch bag is it offers you a place to store all of your important items in an easy to grab bag that can be set aside and ready to be taken with you in the event of an emergency.

A ditch bag is a great place to store your coast guard required equipment for two reasons. 

  1. If you get boarded by the Coast Guard or Marine Police and they ask for you to present your flares, horn, whistle, etc., that is not the time to begin searching your boat for the place you stored them.
  2. If you need to jump ship, having everything in one bag makes it easy to grab and go, without the risk of forgetting something important.

If you have to look around for a while to find your flares, the boarding party sometimes will give you a citation because "taking too long to find it means you couldn't find it in an emergency". Secondly, if you are jumping ship, you don't want to be searching around the boat to find everything you need as the yacht is sinking.

Having everything in one bag stowed in a safe and secure location will make it easy to retrieve all of your needed items in the event of an emergency and also make you look prepared in the event of a boarding. If you look prepared, the boarding officials tend to be less particular when going through your vessel. Why search the heck out of an orderly and organized boat? They can see that everything is as it should be. The sailboat that looks like a disaster needs a more investigative eye to make sure that the captain can manage the chaos in a safe manner.

On Wisdom, we keep our ditch bag stocked with the basics while in port. 

  • Flare gun
  • Un-expired flares
  • EPIRB
  • Electronic flare (flare substitute)
  • Batteries
  • Daytime distress signal (distress flag)
  • Noise device (whistle and air horn)
  • Floating smoke

When we are leaving port, we always add 2 liters of water in plastic bottles to the bag. Instead of carrying a water maker, we simply carry 1L of water per person on board. This will provide us enough water for 1 day in the life raft which is in accordance with the average recovery time of near shore rescues.

If we were sailing further offshore, we would stock the ditch bag with more water bottles since the recovery times are a bit longer when we are farther from land. 

The ditch bag is stored with the life raft in Wisdom, being how if you need one, you also need the other. It is stowed safely and hopefully will only be used to organize our emergency supplies.

Morty is Happy

It's funny which toys a pet will fall in love with. Maddie once bought Morty a fancy chew bone that cost almost $20 and he never cared for it. We gave it to him the same way we give him all of his toys and he simply set it down and never played with it. That fancy toy sat on the cabin sole, collecting stray dog hairs until we gave up on him ever wanting to play with it.

On the contrary, Maddie's parents picked up this rubber squirrel as a gag gift at a dollar store and we decided to give it to Morty. He absolutely loved the squirrel and will not leave it alone! It is easy to see that he is happiest when he has his squirrel with him.

Pilot Charts

When you think of a chart, you probably imagine a piece of paper with tons of numbers on it that tells you how deep the water is and where rocks are. This type of chart is known as a Nautical Chart, and these charts are very useful for navigating in a specific area. While Nautical Charts offer a very narrow view of the world, focusing on a small area of coastline and water, Pilot Charts offer a much broader view of an entire body of water.

Pilot Charts do not give information about depth and obstructions, instead they offer information about weather. Pilot Charts denote wind directions and strength, likelihood of encountering a gale, ice, or fog, as well as the typical direction and intensity of currents. Pilot Charts are about the weather what Nautical Charts are about the water.

Pilot Charts are organized by region and by month. Each month has its own weather patterns and needs to be represented on its own chart. When you look at a pilot chart, one of the first things that will jump out at you are these little wind roses placed all over the page.

Wind roses are set every 5 degrees and represent the average wind for that area via their arrows and feathers. The wind strength is denoted at the end of the arrow with the feathers according to the Beaufort scale. Each feather represents 1 force.

The arrow points into the wind, telling you the prevailing wind directions that month. The more often the wind blows from that cardinal direction, the longer the arrow will be. If the wind is particularly prevalent from one direction, it will be written on the arrow. In our example, Force 4 winds will blow from the NE 67% of the time. If it is not blowing from the NE, it will be blowing from the E. Looking at the rose, you can see that the winds tend to be Force 3 or 4 for the month of January. 

The number in the middle of the rose represents the number of days that month with absolutely no wind. 

If you are planning a cruise, choosing a route where the prevailing wind will be a broad reach with no becalmed days would prove ideal. 

If your planned route follows along wind roses that look like this, you may want to look for another route. This wind rose denotes that 1 day out of the month may be becalmed, but otherwise the wind blows from any direction and very strongly. The average winds in this area are Force 5 and Force 6!

Aside from prevailing wind information, Pilot Charts denote average currents and their strengths using green arrows. 

When choosing a route, try to find a course where you are not only on a broad reach, but also sailing with the current. The current can either be your friend or make the entire experience much less enjoyable. If the wind and current oppose each other, you can expect to encounter much larger seas! 

Picking a route where you sail downwind and down current will make passage making much easier as well as much faster than if you choose a different route where you are fighting the elements as you voyage.


Below are links to PDF copies of pilot charts for the entire world. They are organized by ocean, and sub-organized by month. Clicking on the desired month will open the link to that pilot chart in a new window. Using these pilot charts, you can plan the best time and route for any ocean passage.

North Atlantic Ocean, Caribbean Sea, Mediterranean Sea

South Atlantic Ocean

North Pacific Ocean

South Pacific Ocean

Indian Ocean

Cost of Conversion

One of the first questions I am asked by clients is: "How much will it cost to convert to synthetic standing rigging?"

The short answer is: Around the same price as 1x19 SS rigging if you have me do all the work, and much cheaper than 1x19 SS rigging if you do the work yourself.

The cost of materials is significantly cheaper than stainless steel, mostly due to the fact that stainless steel is made of metals that need to be mined and processed. Synthetic standing rigging is made out of UHMWPE (Ultra High Molecular Weight Poly Ethylene), otherwise known as plastic. Plastics are cheap and as manufacturing processes and techniques improve, costs go down!

Since the costs of materials are so much cheaper, the total cost to re-rig your yacht is also cheaper. Turnbuckles cost around $100 each where the materials to make a deadeye cost around $24 each. The fittings at the end of stainless stays cost between $100 to $400 each, where the fittings at the end of synthetic stays cost around $1 to $12 each; significantly lowering the cost to re-rig.

The major difference is the cost of labor. Splices are more labor intensive to perform than a swage or compression fitting, and tensioning standing rigging with deadeyes is a lot more labor intensive than with conventional turnbuckles. The cost of labor is significantly higher than with steel rigging which offsets the cheaper material costs to give a similar end price.

If you are the type of person who will do it yourself, you can save a significant amount of money by doing the conversion to synthetic standing rigging yourself. If you need to pay someone to do it, the costs will be around the same in the end.

Using the Islander 36, which fits the mold of an average 36 foot cruising yacht with a double spreader rig, the material costs were:

  • $861.49 for the stays
  • $64.60 for the deadeyes
  • $379.62 for the lashings
  • $156.84 for the thimbles

At this point, the materials only cost $1,462.55

If your mast has regular tangs that can accept a clevis pin, you are set! If your mast has t-ball fittings or some other connector, the costs will go up as you need to include the costs of adapters into the cost of conversion.

  • $1,303.76 for 8 T-ball fittings and toggles to connect to the synthetic stays

Now the material costs have nearly doubled to $2,766.31. This is significantly less expensive than if you were to re-rig with stainless steel, as long as you do all the work yourself and don't need to pay anyone for labor.

Fabrication of a backstay and eight shrouds (Cap, Intermediate, Forward and Aft Lowers [Port & Starboard]) and all 9 deadeyes took me 30.14 hours on the Islander 36. This number doesn't fluctuate very much because the length of the stay doesn't add considerable time to the job. I work at the ends of the stays and the space in between doesn't affect my working time. On average, it takes me around 32 hours to fabricate the rigging for a double spreader sailboat. Single spreader sailboats are quicker because they have two stays fewer and only need 2 areas serviced instead of 6 with a double spreader rig. 

Being how I currently charge $105 per hour for labor, 32 hours of labor adds $3,360 to the cost of re-rigging.

In the case of the Islander 36,

  • The material cost was $2,766.31
  • The labor cost was $3,164.70

This brings the cost to re-rig the Islander 36 up to $5,931.01. This number is significantly cheaper than the cost to re-rig a 36 foot yacht with stainless steel, but the job is not finished yet. At this point, the new rigging is sitting in a box awaiting installation. If you install and setup the rigging yourself, this would be the final number in the cost to re-rig. If you don't want to do it yourself, you will need to pay someone to continue doing the work.

Average installation and setup takes around 30 hours (at $105 per hour), which would add another $3,105 to the bill, bumping the cost to re-rig up to $8,010 for an average re-rig.

This number is reached by assuming that the average cost for materials is around $1,500, 32 hours to fabricate the rigging, and 30 hours to install the rigging. As you can see, there is a significant difference between the $1,500 price point of doing it yourself and the $8,010 price point of paying to have it done professionally.

$8,010 is an average amount to pay to have the standing rigging replaced with 1x19 stainless steel on a 36 foot yacht. The prices are currently around the same level, but the savings in weight are quite great! Steel is very heavy and dyneema is very light, 1/4 inch 1x19 SS weighs 0.15 pounds per foot and 6mm dyneema weighs 0.017 pounds per foot. In this example, dyneema is 8.8 times lighter in weight than steel!

Looking back at our example with the Islander 36, the final cost of materials was $3,454.56. I did the fabrication and the owner did the installation, followed by me doing the setup of the standing rigging. Lastly, I climbed the mast to inspect everything and seized the spreaders in their correct position. The total labor time was 49.74 hours and the final cost to re-rig was $8,677.26. 

The owner showed me other estimates he had received which were right around this number as well for 1x19 SS standing rigging. Once again, the cost of materials is significantly cheaper, it's the cost of labor that brings the price of re-rigging right up to be comparable with that of steel rigging. 

If you need to pay the same amount to re-rig your yacht, why would you choose a material that is heavier and prone to corrosion over a material that is so much lighter and immune to corrosion?