Islander 36 Conversion: Backstay Fabrication

The backstay was the first stay that I fabricated for the Islander 36. The owner wanted to reuse his older turnbuckles but the cost to replace the swaged top to a toggle and replace the corroded lower toggle with a new one was astronomical! Each component cost around $250, and we need 16, adding a little more than $4,000 to the cost of re-rigging. As you can imagine the decision was made to not repair the old turnbuckles and instead go with deadeyes for the shrouds.

The backstay currently has a new Hayn turnbuckle which we shall be reusing. Since we can retain the turnbuckle for the backstay, we won't need to create a backstay adjuster for minor adjustments before going sailing.

The backstay is responsible for controlling headstay tension while sailing. As a result, the tension in the backstay is often adjusted. Having to rig up the deadeye tensioning system every time you wanted to add tension or ease it a bit would be quite tedious. Retaining the turnbuckle will allow the owner to quickly increase or decrease tension in the backstay with only a few simple tools. 

Since the majority of the work will be performed by the turnbuckle, we don't need an extensive pulley system for the lashings. The lashings will connect the backstay to the deadeye which is attached to the turnbuckle. To add tension, simply loosen the turnbuckle all the way, tighten the lashings by hand and tie them off, then tighten the turnbuckle. If the turnbuckle becomes two-blocked, simply repeat the process. 

Thanks to the mechanical advantage of the inclined plane in a turnbuckle (the screws), tension can be added to the backstay without relying on a complex pulley system.

The deadeye was made using a dyneema grommet with a flat seizing knot tied in the middle. This will hold the thimbles in place for the life of the deadeye and provide a proper turning block for the lashings. 

The backstay was cut to length and then spliced together using mobius brummel eye splices. The length was cut before the splices were put in, as the stay will shrink during the splicing process. As the weave is opened up to bury the tail, the stay will contract. Once the stay is loaded, this contraction will be removed in the form of constructional stretch. If you splice one end of the stay and then mark and measure the other end, you will end up with a stay that is a few inches longer than expected. By measuring everything first, you can properly estimate the final length of the stay after all the constructional stretch and initial creep is removed.

The 12 strands were selected and removed from the tail at regular intervals. I needed to bury 20 inches of tail, but decided to bury 36 inches, as the extra bury is extra security. Should a splice in the backstay fail, the mast will come crashing forward! These extra inches are simply added security for the stays structural integrity.

The additional bury allows for a full 20 inches of bury at the ropes original size and weave. The last 16 inches were thinned at regular intervals producing a very sleek and smooth taper. If the tail were to end in a blunt cut, the splice would hold with plenty of strength but the stay would fail prematurely. The sharp transition from buried tail to no buried tail would become a source of stress on the stays fibers which would become the point of future failure. By tapering the stay slowly and gradually, this source of stress is eliminated and will prevent any premature failure of the stay. 

Once these pieces of the tail are pulled out of the weave and cut off, this part of the tail can be milked back into the stay. With the thimble in place, the stay is now completed and ready to be installed on the yacht as the new backstay.
Keeping the Bilge Dry

A dry bilge may sound like a mythical creature that will never be encountered by mere mortals. With some careful planning, any bilge can be kept dry!

To keep a bilge dry, you need to keep water from getting in, and get the present water out. A sealed deck-hull junction will prevent water from coming in from above, as well as properly bedded deck hardware that does not leak; but what about the shaft? Shafts pass through a massive hole in the hull called a shaft log. To seal out water, the packing gland will press against the sides of the shaft, keeping water from dripping into your bilge.

The moment you begin to spin your propellers, friction will create heat which can cause serious problems in the packing gland. To negate this issue, the stuffing box is adjusted to allow a slow and steady drip of 1 to 2 drops per minute. This steady flow of water will lubricate the packing gland and cool the stuffing box. This dripping water will slowly fill the bilge, defeating one of the methods of keeping a bilge dry (keep water from getting in).

Here enters the second part of the equation, getting the water back out. Most stuffing boxes will drip water into the bilge, letting it accumulate until there is enough water for the bilge pump to extract. To keep the bilge dry, all you need to do is manage where the water goes from the stuffing box. 

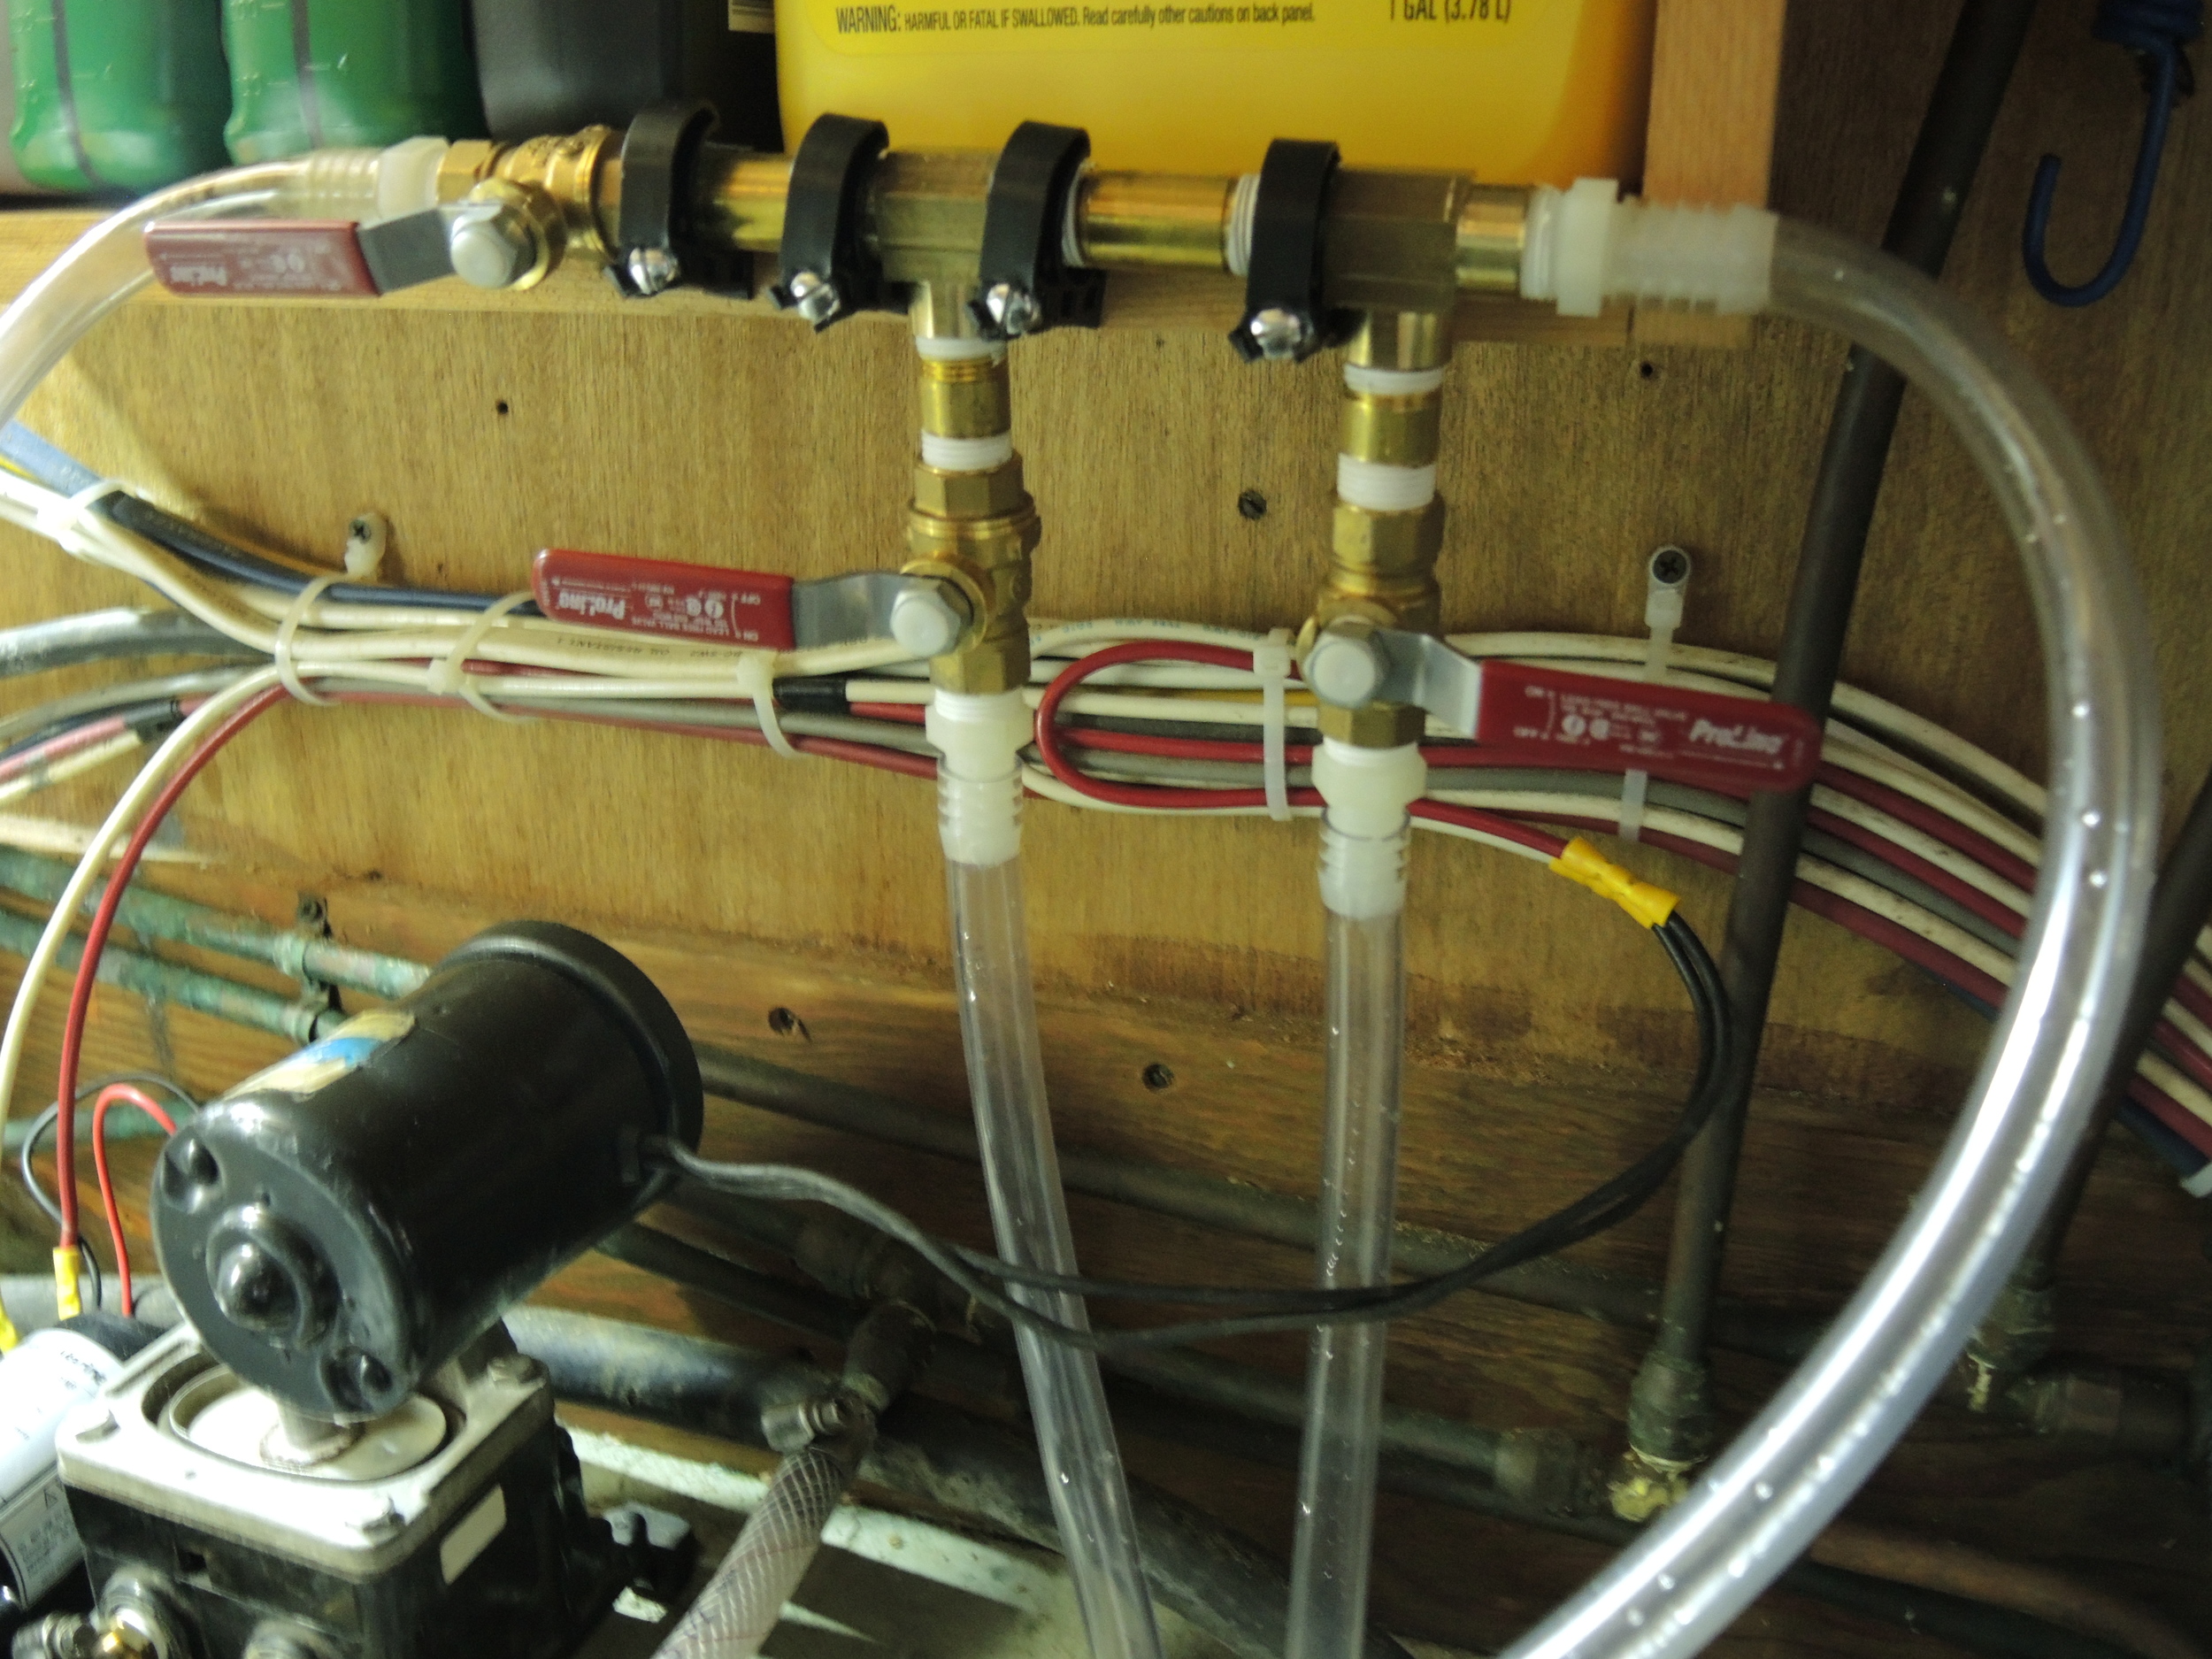
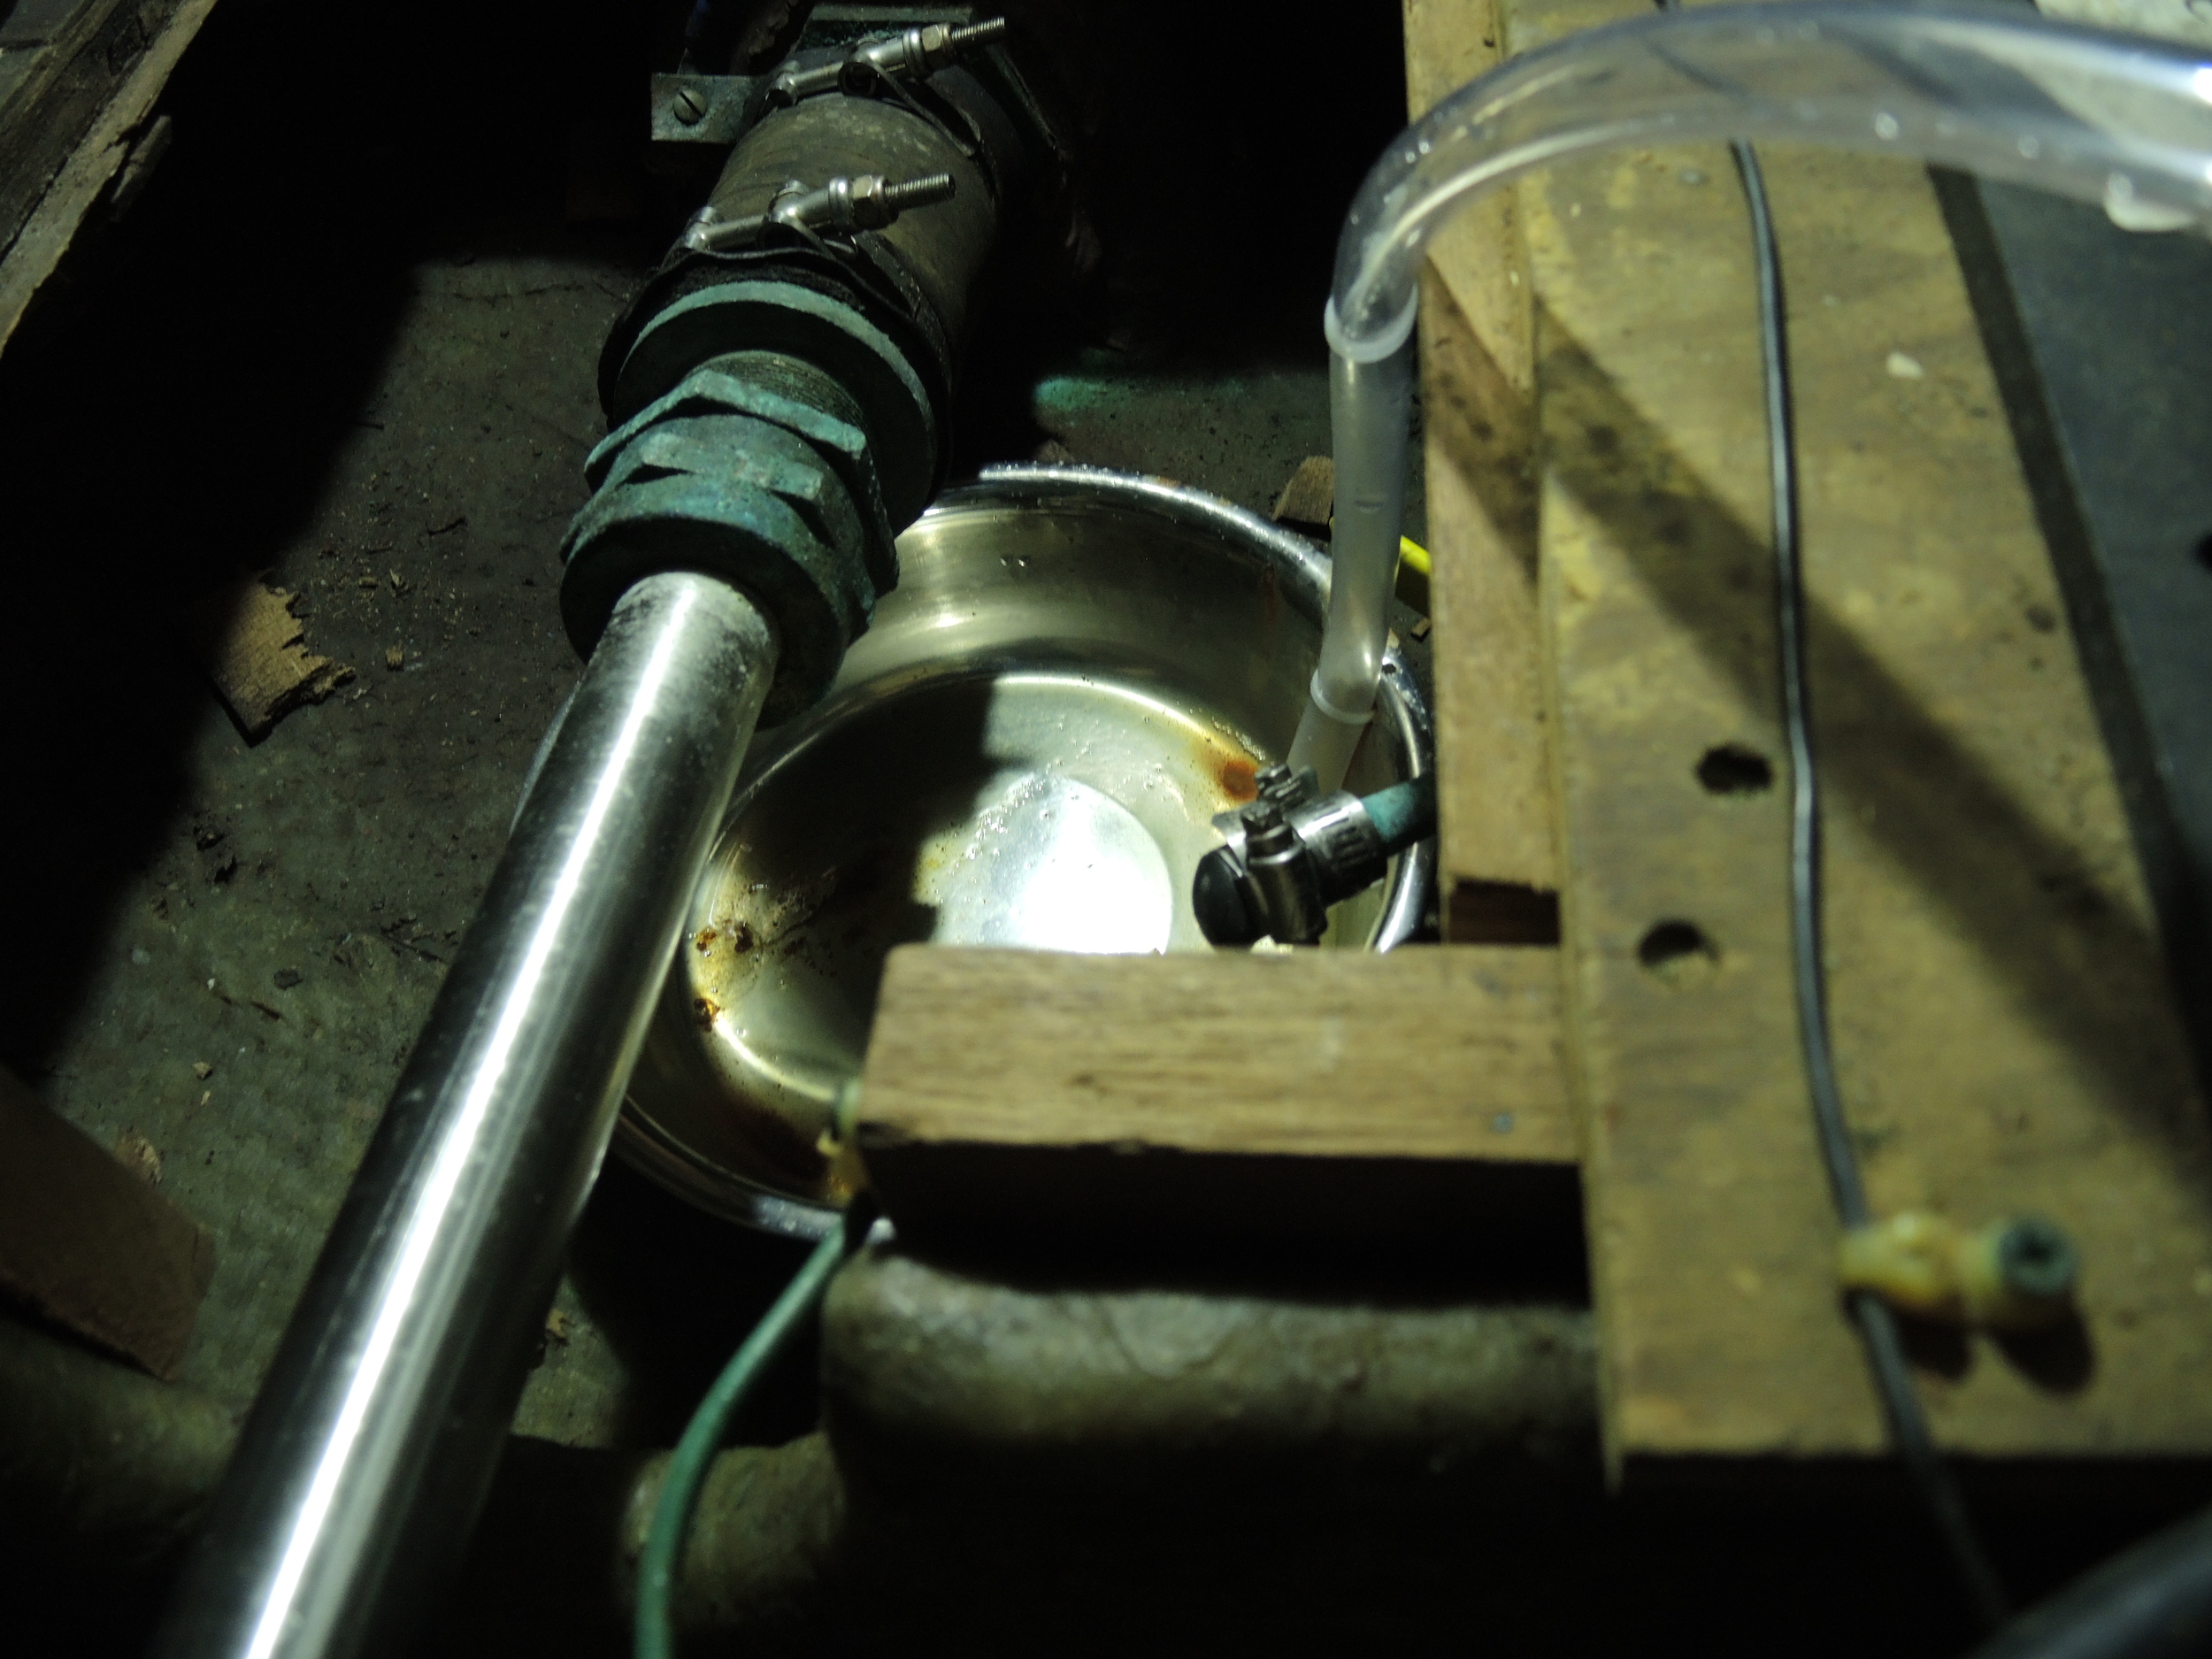
Instead of dripping into the bilge, set a pan or other collector under the stuffing box to accumulate the water without getting the bilge wet. This power boat used dog food dishes set under the stuffing boxes to collect the drips. A small hole was drilled in the top of the dish to secure a zip tie which holds a small hose in position inside the pan.

The hoses are led to a system of valves which act as a manifold. This system leads to a diaphragm pump which draws the water out of the shaft log pans in the stern and from the air conditioner in the bow.  By turning on the pump and selectively opening the valves, each pan can be drained dry, thereby keeping the bilge dry as well. 

Soft Shackle Knot

Soft shackles are a very handy tool on a sailboat; they can securely attach something and hold incredible loads while weighing next to nothing and posing no risk of damaging the boat. Best of all, they require no tools to install or remove!

A soft shackle can be used anywhere a regular shackle would be used. The difference is a regular shackle is made of metal and can scratch your topsides or pound into your deck. A soft shackle is made of dyneema and is very soft and flexible, making it safe to use anywhere that you wouldn't want damaged by a regular shackle.

One of the most important parts of a soft shackle is the bulky knot at the end. This knot will be the weak point in the soft shackle, as stress will accumulate near it and the sharp bends of the knot will further weaken the dyneema. Several different knots have been suggested for this purpose, with the goal of minimizing stresses. 

The ideal soft shackle knot is bulky and does not twist under load. To avoid twisting, the tails of the soft shackle need to both share the load of the knot. A symmetrical knot would be ideal in this situation as it will then share the loads evenly between the two tails of the soft shackle. Minimizing the sharpness of the bends of the knot would also help prevent stress points in the knot which would lead to premature failure of the soft shackle.

The Lovers Knot is a good candidate for this purpose, as it is a bulky, symmetrical knot with no very sharp bends. 

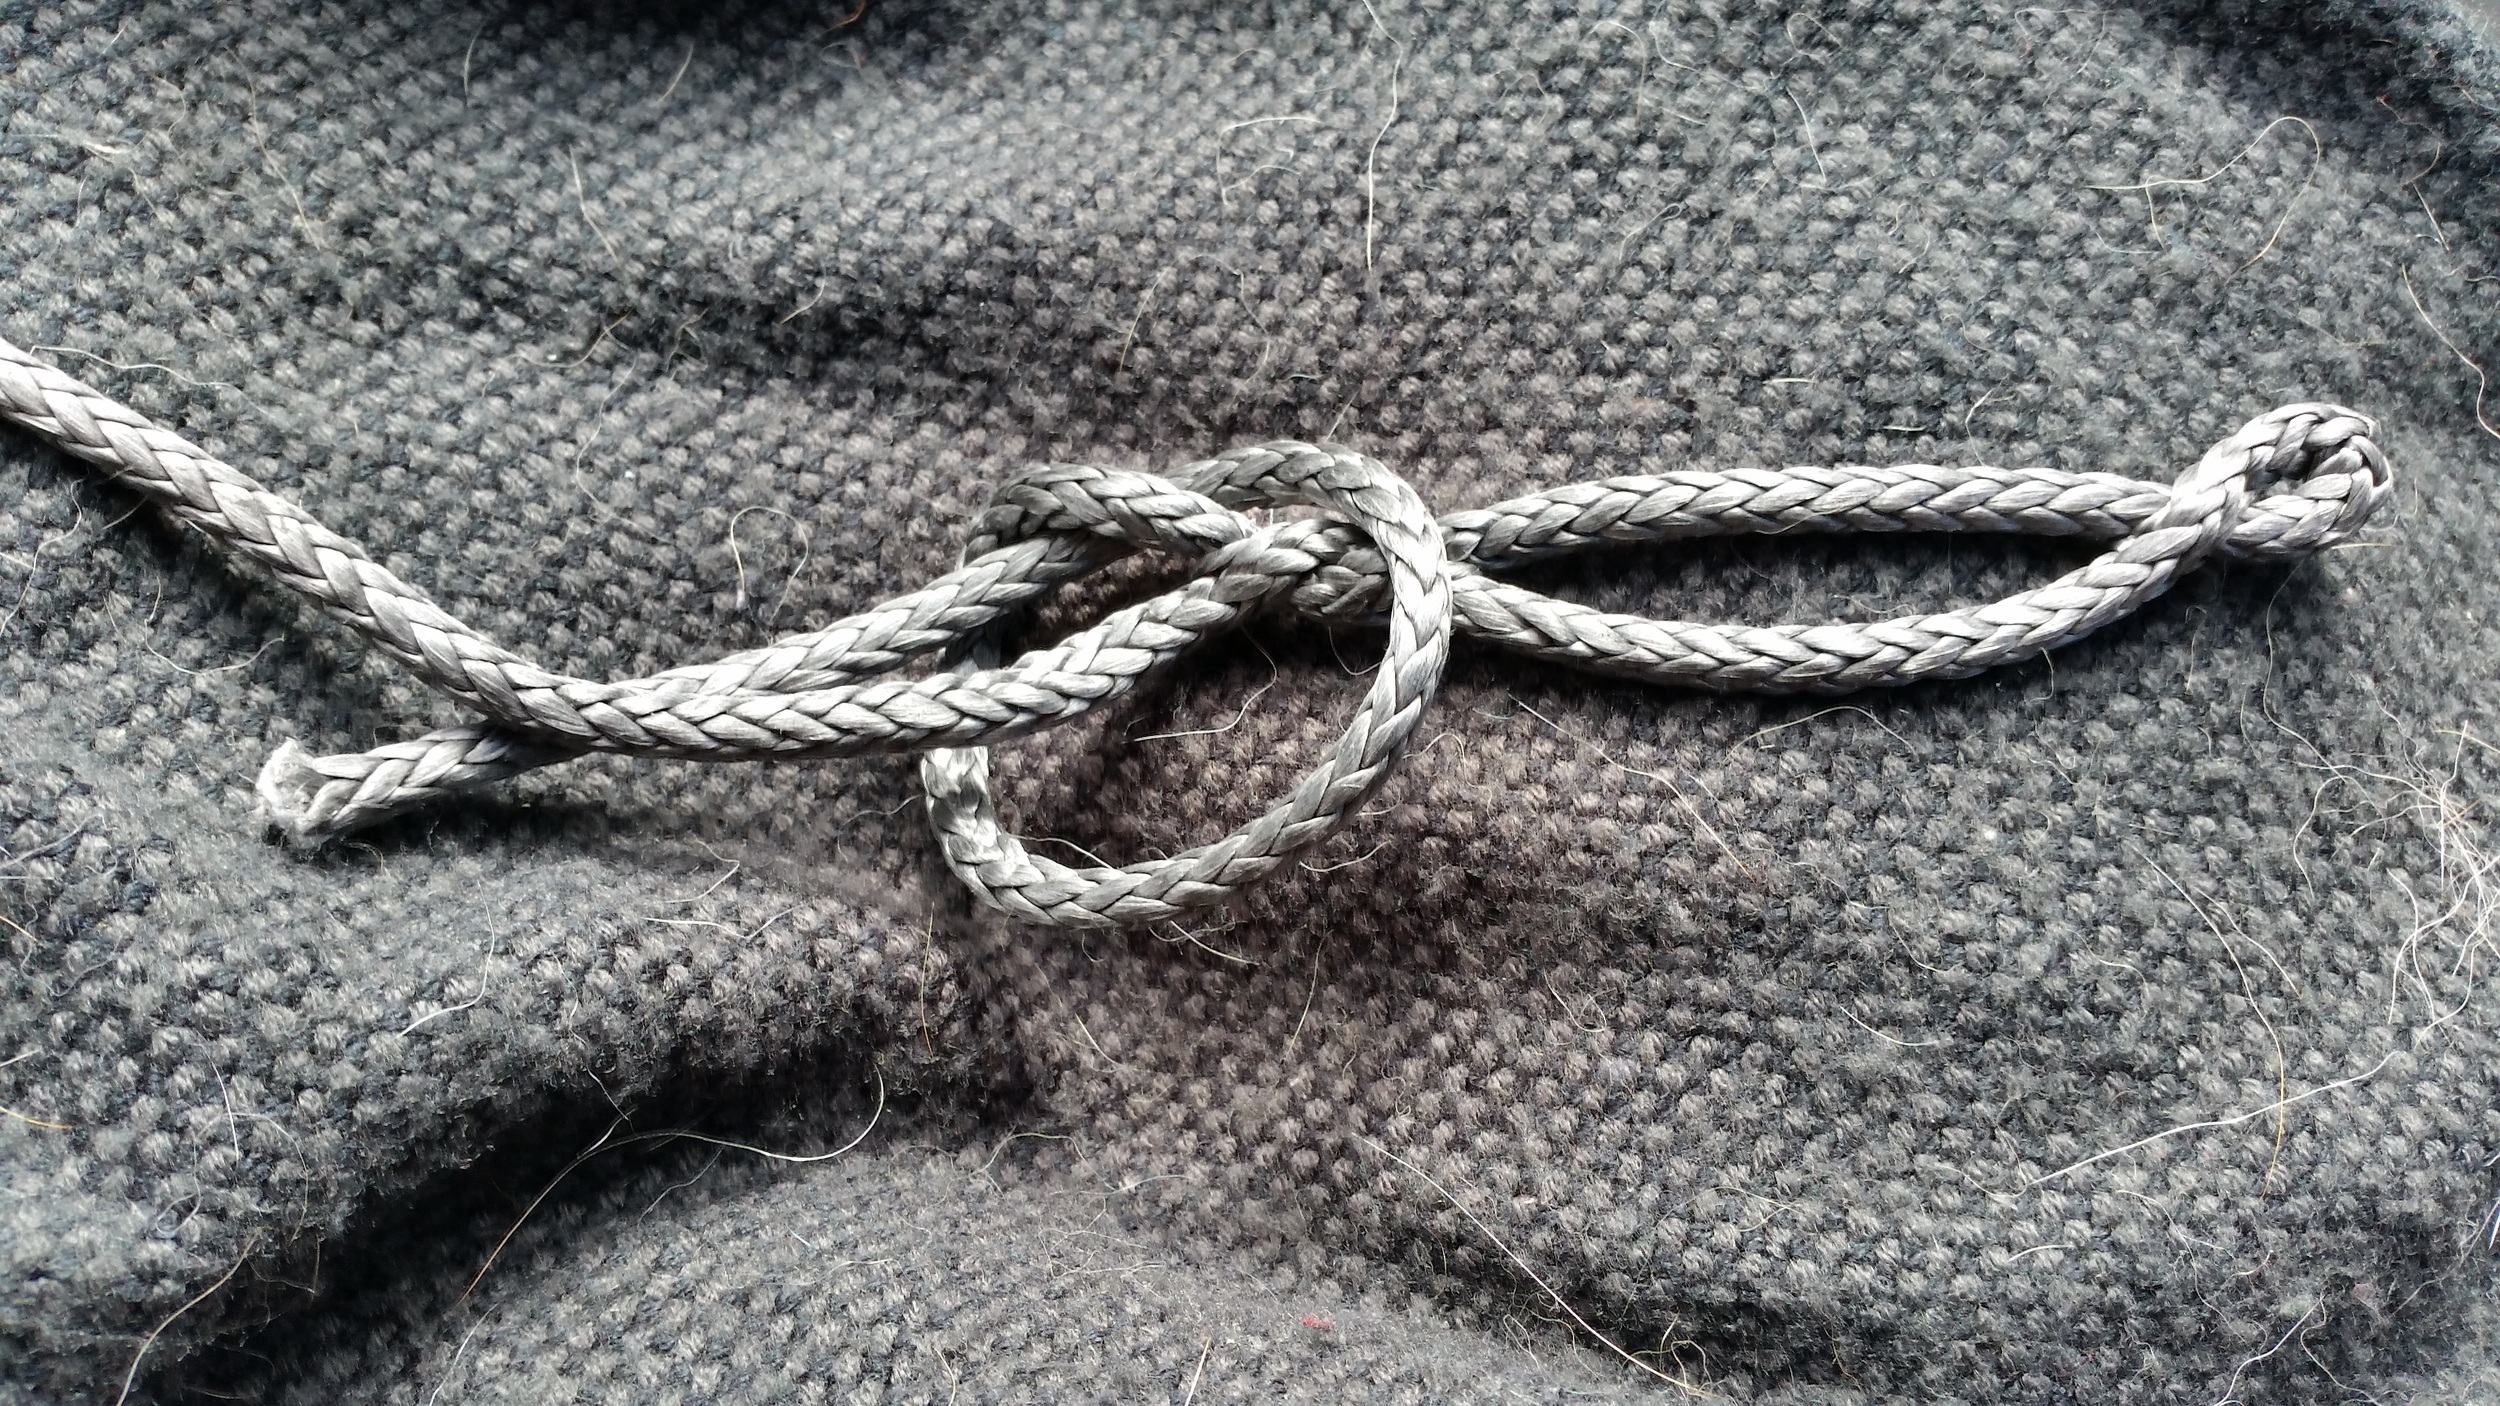
Lovers Knot before tightening

Once the soft shackle is ready to tie, stretch out the two tails parallel to each other.

Take the top tail and pass it under the lower tail, around the front of the soft shackle, and then under the top tail. This will form a half hitch with the top tail.

Then take the lower tail and pass it over the upper tail, behind the soft shackle, through the loop formed by the first tail, and over the lower leg, forming another half hitch.

You want to end up with two interlocking half hitches with the tails exiting through the same section of the knot.

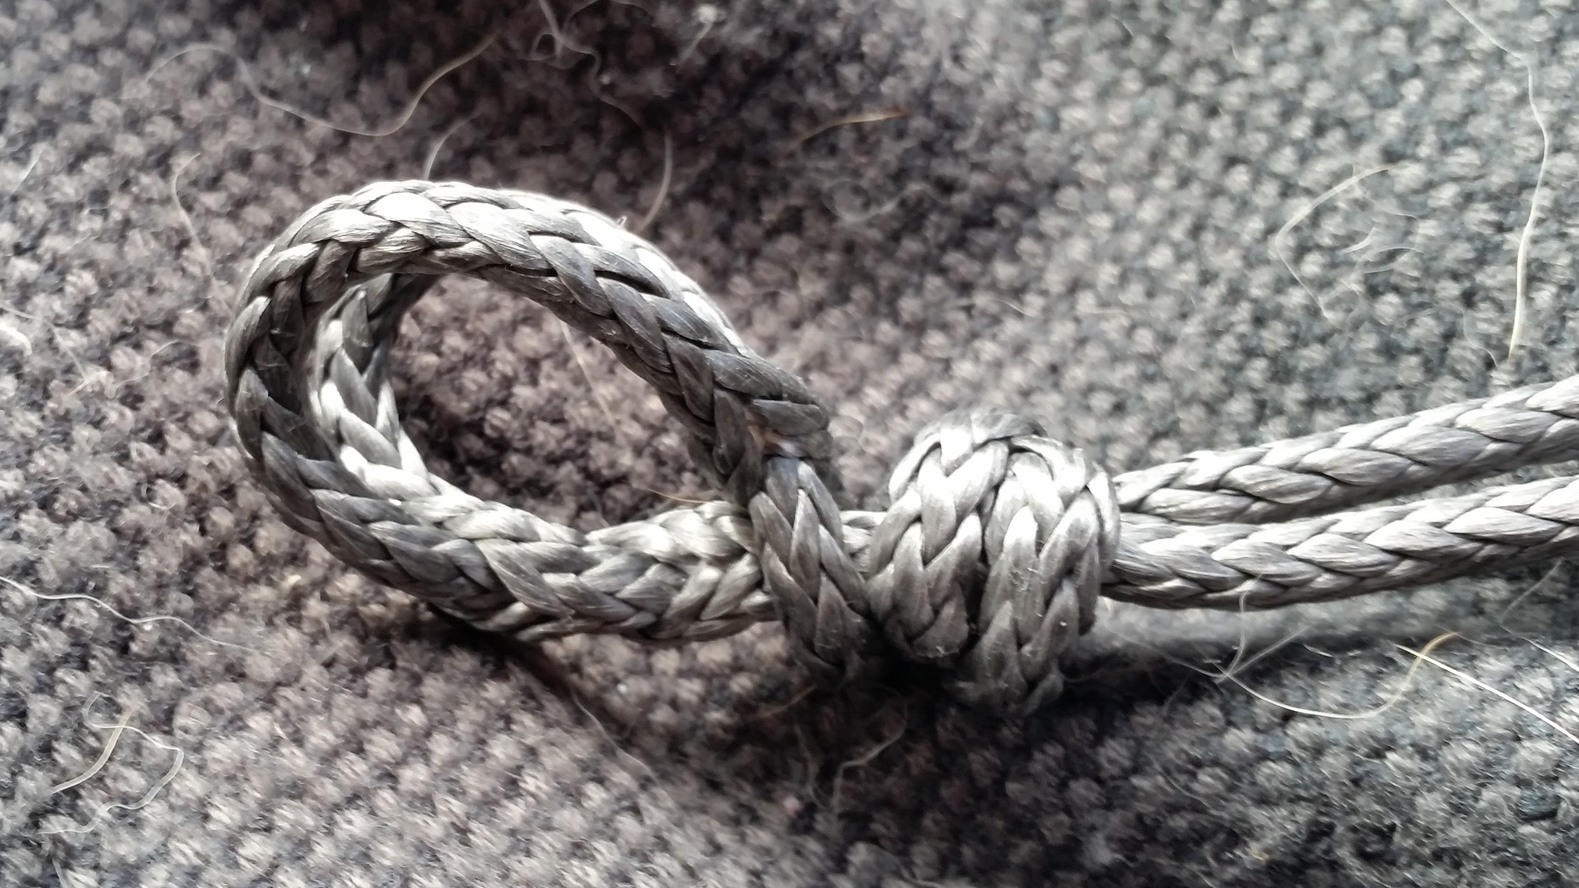
As you tighten the knot down, be sure to pull evenly on both tails, this will ensure that the knot is balanced and even. Be sure to position the knot very closely to the mobious splice, which will ensure that the tails are not going to move or be at slightly different lengths which could lead to more stress on the overloaded tail.

Once the knot is fully tightened, it will work well to secure the soft shackle and allow the unit hold itself together under incredible loads.

Dress Like a Sailor

Source: http://fashionew.com/wp-content/uploads/2015/08/Sailor-fashion-style-clothes-wearing-on-luxury-yacht-trip-1.jpg

When you picture someone sailing along, you might think they dress like this:

The truth is, these clothes don't work out too well when sailing. Imagine working hard to raise the anchor or raise the sails and breaking a sweat. 

This is what we wear when we go sailing: pajama pants, t-shirt, life jacket with harness and tether. Wearing a lot of clothes means more laundry to do, so less clothing means less laundry! The pajama pants offer sun protection without the need for applying so much sunscreen and are light weight to keep you cool. 

These clothes are comfortable and easy to move around in, making it easier to do all the necessary labors on a sailboat. I try to stay away from white pants because, as you can see, my knees get filthy. When I raise the anchor, mud from the sea floor comes up and falls on the deck. When we are raising anchor in rough conditions, I will need to kneel to avoid falling overboard. Kneeling on a muddy deck will promptly and permanently stain your pants. If you chose to wear nice white shorts, they would quickly be ruined. Instead, wearing pajama pants that are inexpensive and comfortable, we don't have to worry about keeping them getting messed up while working the boat. 

Best of all, light weight pajama pants take up very little space, meaning they can be washed in a small washing machine! And in true sailors attire, wearing the same pajama pants for a few days in a row will greatly cut down on the amount of laundry we need to do. When sailing on long trips, Maddie and I will typically wear the same clothes for a few days before changing them for new ones. While this may sound disgusting to land lubbers who imagine us wearing these clothes for four days straight, that is not the case. We wear them during the day while working the boat; as soon as we finish for the day, we shower and put on clean clothes. When morning comes, we don our old clothes once again after letting them air out all night! 

Wearing any jewelry is also risky, as it can slip off and fall overboard. Maddie and I take off our rings and watches when sailing, keeping them in a safe place inside the cabin. If time is a concern, a mounted clock can tell you everything your watch could have without any risk of falling into the great blue sea. 

One last thing to note is footwear for sailors. You always hear of people wearing special boat shoes, but the truth is barefoot is best! Yes you can stub your toe on deck gear, but once you learn your deck layout, you will be able to navigate it in the dark. Any shoe will get wet and take time to dry, and will begin to smell in the process. Bare feet will dry quickly and will stay smell free for the entire trip if you never wear any shoes. When we reach port, the hardest part is getting used to wearing shoes again because going barefoot is the best!

Turnbuckle or Deadeye

When you re-rig your yacht with synthetic standing rigging, you need to ask yourself if you want to keep your turnbuckles or not?

This question is ultimately up to the owner to decide. Each has their pros and cons, and you need to be willing to accept the limitations of each.

Turnbuckles are the standard method for tensioning standing rigging. Turnbuckles hold two screws, one has Left Handed threads, the other Right Handed threads. As you turn the turnbuckle, the threads will simultaneously pull in or push out. When they pull in, they will make the stay shorter and add tension in the process.

The reason turnbuckles work so well is thanks to the mechanical advantage they offer. Turnbuckles use a few simple machines to achieve their purposes, first is the inclined plane. The threads on the screw are actually an inclined plane, and as you turn the turnbuckle, you are moving along that incline. If your turnbuckle screws are 20 threads per inch, that means that 20 rotations will advance the screw 1 inch.

The turnbuckle also gets to take advantage of leverage in the form of a wrench or rod that can be used to manipulate the turnbuckle. The leverage gained by the rod multiplies the mechanical advantage of the incline plane in the screws, allowing the turnbuckle to tension the standing rigging to extraordinary levels!

Lastly, turnbuckles are compact. All this mechanical advantage is packed into a small machine which lives just above the chainplate. They are quick and easy to use and hold securely. As you can imagine, such a strong and powerful machine would have an equally qualified price to match, and they do. Turnbuckles are on the expensive side, and have a recommended service life of 10 years. After 10 years, they should be replaced, and the cost of doing so can be rather impacting. The minimum number of turnbuckles on a single spreader sloop rig is 8:

  1. Headstay
  2. Backstay
  3. Port Cap Shroud
  4. Starboard Cap Shroud
  5. Port Forward Lower Shroud
  6. Port Aft Lower Shroud
  7. Starboard Forward Lower Shroud
  8. Starboard Aft Lower Shroud

Additional stays from a second spreader, split backstay, or cutter rig will add turnbuckles and cost to the equation. When I re-rigged Wisdom, we had 11 stays to replace. The total cost for the materials (including extra line for spare stays) was $4,400. 11 turnbuckles would have added $1,100 to the cost, making the process of re-rigging much more expensive!

What could go wrong with a simple turnbuckle? A few things actually. Turnbuckles are typically made of stainless steel and bronze. The bronze components will last a very long time and show little damage from corrosion and stress. The stainless steel components will suffer from corrosion, both external and crevice. Crevice corrosion will lead to catastrophic failures with very little warning. While most of the turnbuckle can be inspected with ease, the section of threads inside the turnbuckle will prove very difficult to inspect. Yearly disassembly and inspection is recommended to evaluate for crevice corrosion, which then necessitates a yearly re-tune of the standing rigging. 

Turnbuckles offer a quick and easy way to tune your rigging with a few simple tools and a basic knowledge of rig tuning. Their only trade-offs are their ability to corrode and price.

The alternative to turnbuckles are deadeyes. Deadeyes use lashings to form a block and tackle setup at the bottom of the stay to achieve the necessary tension needed to tune the rigging. Deadeyes consume 4 feet of dyneema, making them rather economical by comparison. For example, a small deadeye made of 3mm dyneema would cost $6.40, while a large deadeye made of 9mm dyneema would cost $24.20; significantly cheaper than a turnbuckle.

As always, there is a trade-off. Deadeyes are much more time consuming and complicated to adjust when compared to turnbuckles. A small boat with turnbuckle rigging can be tuned in around 20 minutes, and under an hour for a mid-sized yacht. Deadeyes take nearly 20 minutes per stay and require advanced knowledge of knots and pulley systems.

While deadeyes may seem complicated and time consuming to adjust, they are not that bad. Standing rigging doesn't need to be adjusted all the time. I recommend a spring time tune up, which is a one time thing for the year, and not such an ordeal when lumped in with all the other spring time commissioning rituals.

Being how deadeyes are made of synthetic fibers, they will not suffer from corrosion of any kind. They are also very easy to inspect visually as any damage that occurs would occur on the surface of the rope and will be easily seen upon closer investigation. Pretty much, slight fuzziness is to be expected as the outer fibers degrade from UV exposure while the inner fibers remain unharmed; serious chafe will cause serious wear on the deadeye. If the chafe is severe, the dyneema grommet can always be replaced.

Deadeyes offer an inexpensive method to tension your standing rigging without any concerns of corrosion, but at the cost of more time consumed in tuning of the rigging. Turnbuckles offer quick and easy rigging adjustments but at a higher cost and with the risk of corrosion leading to failure.