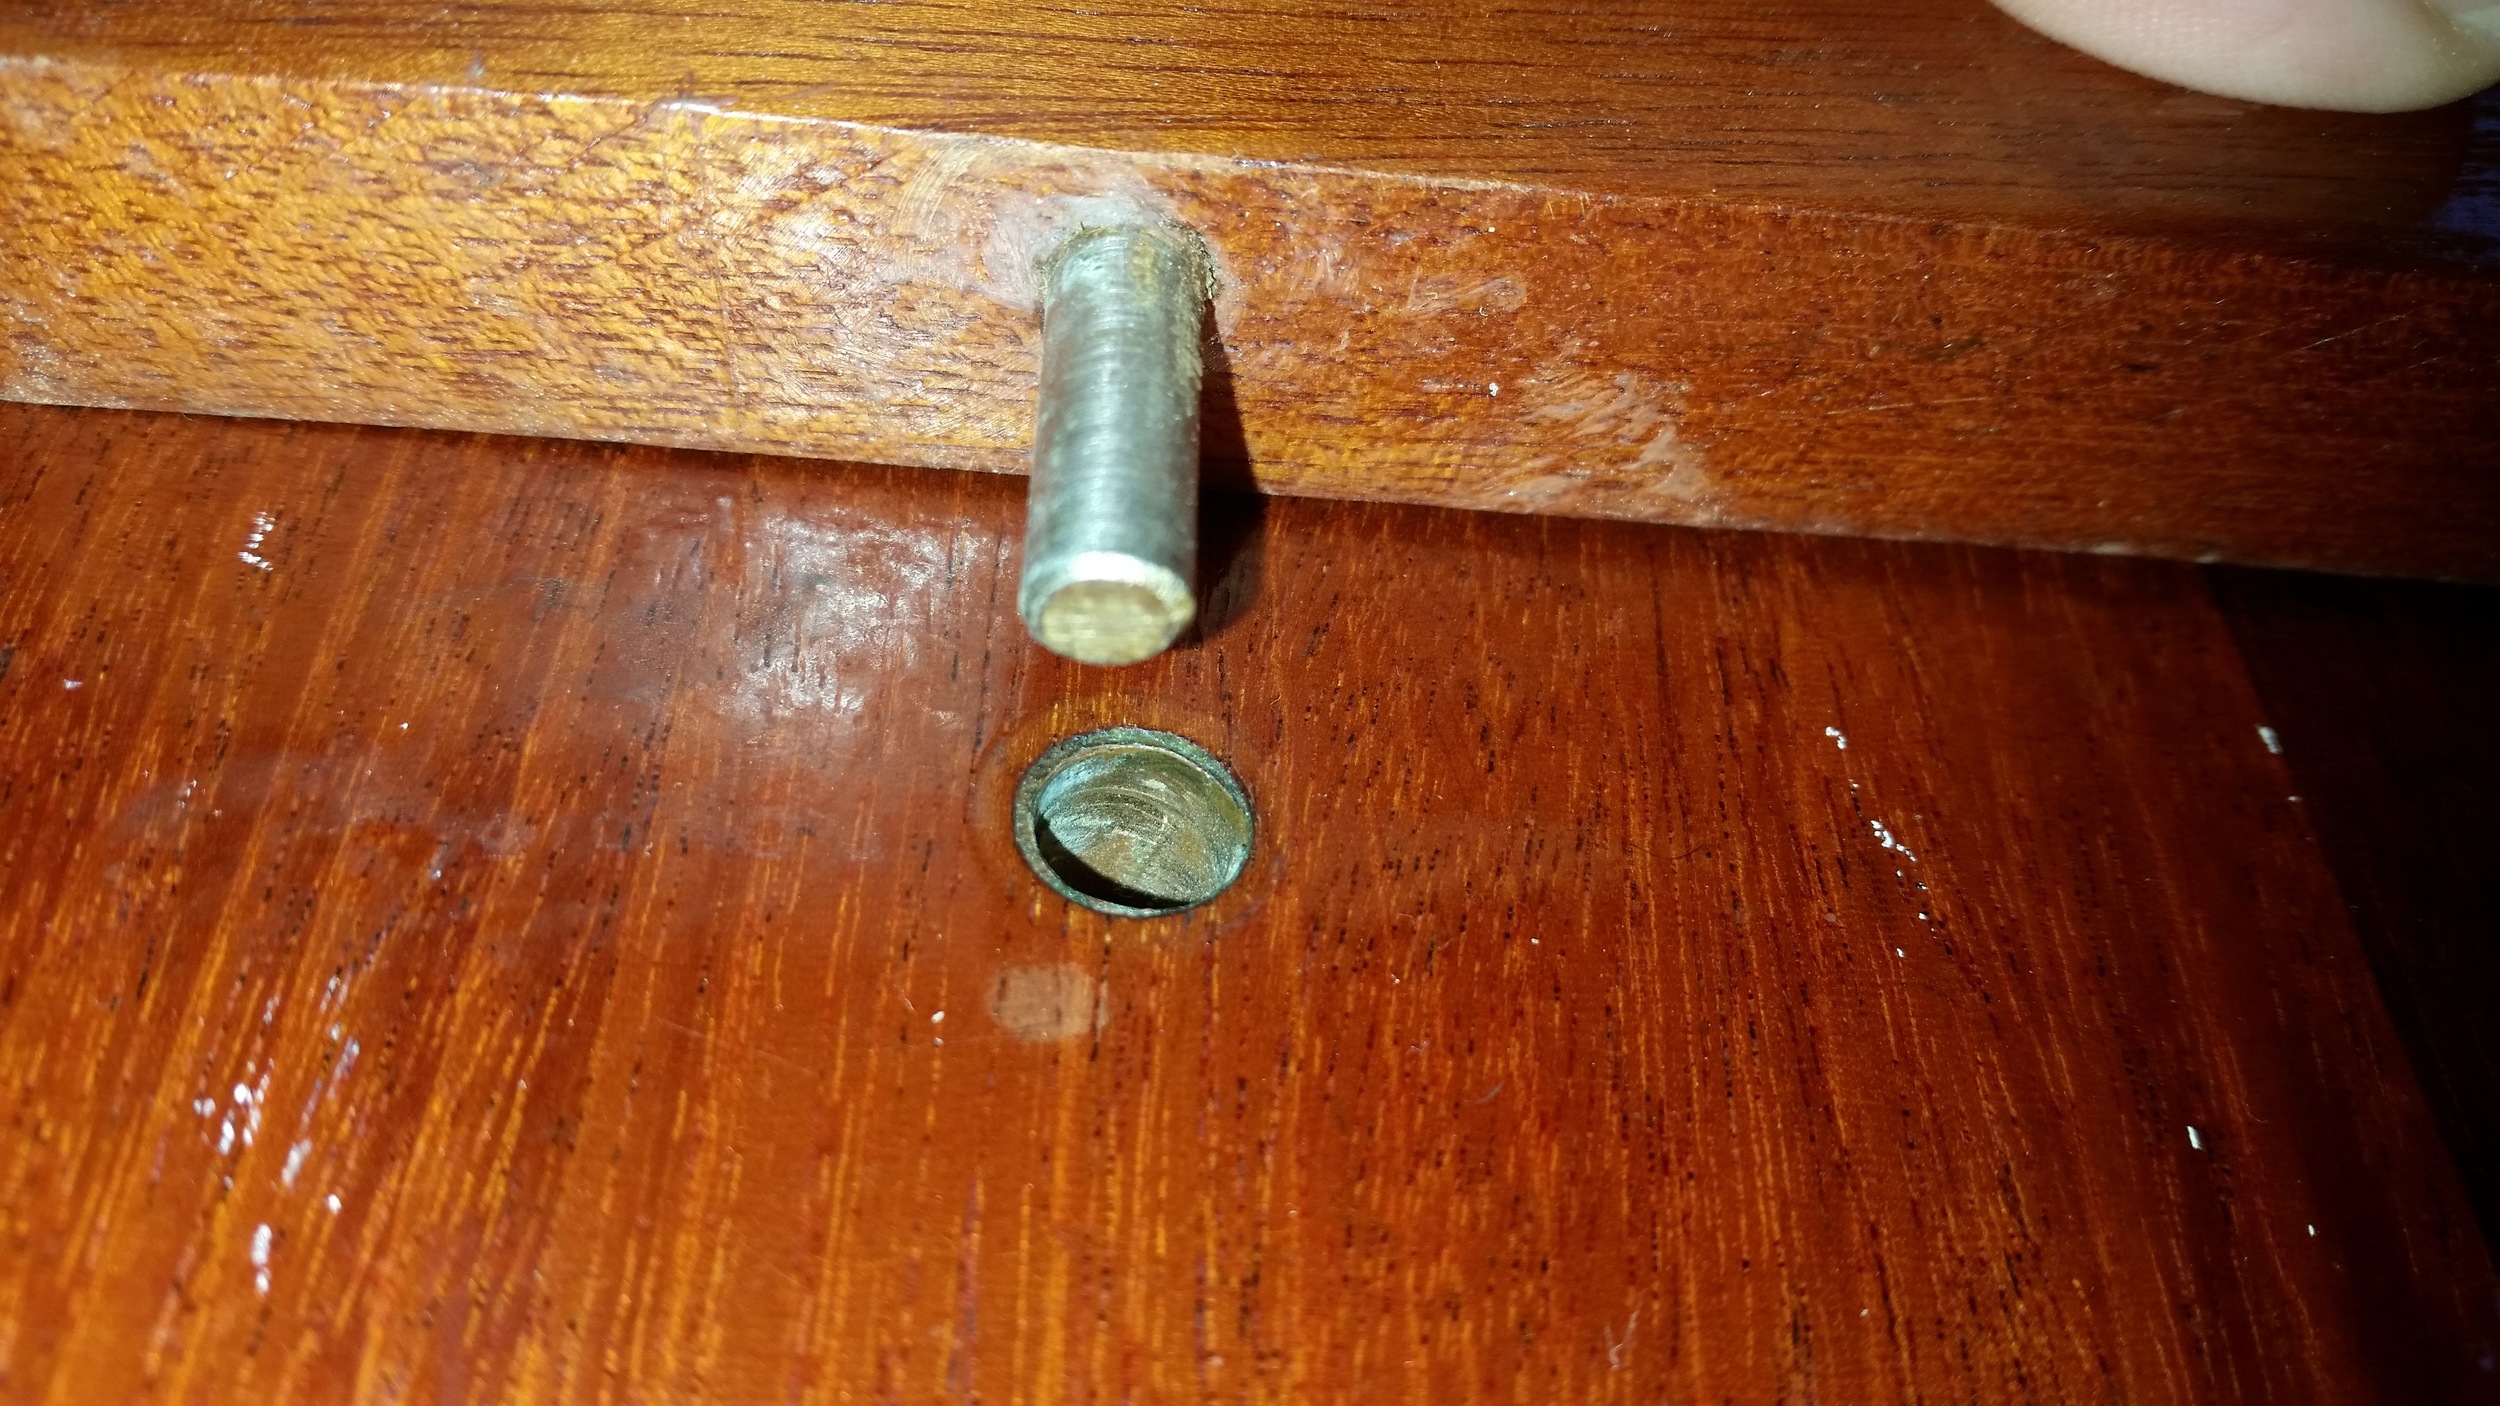
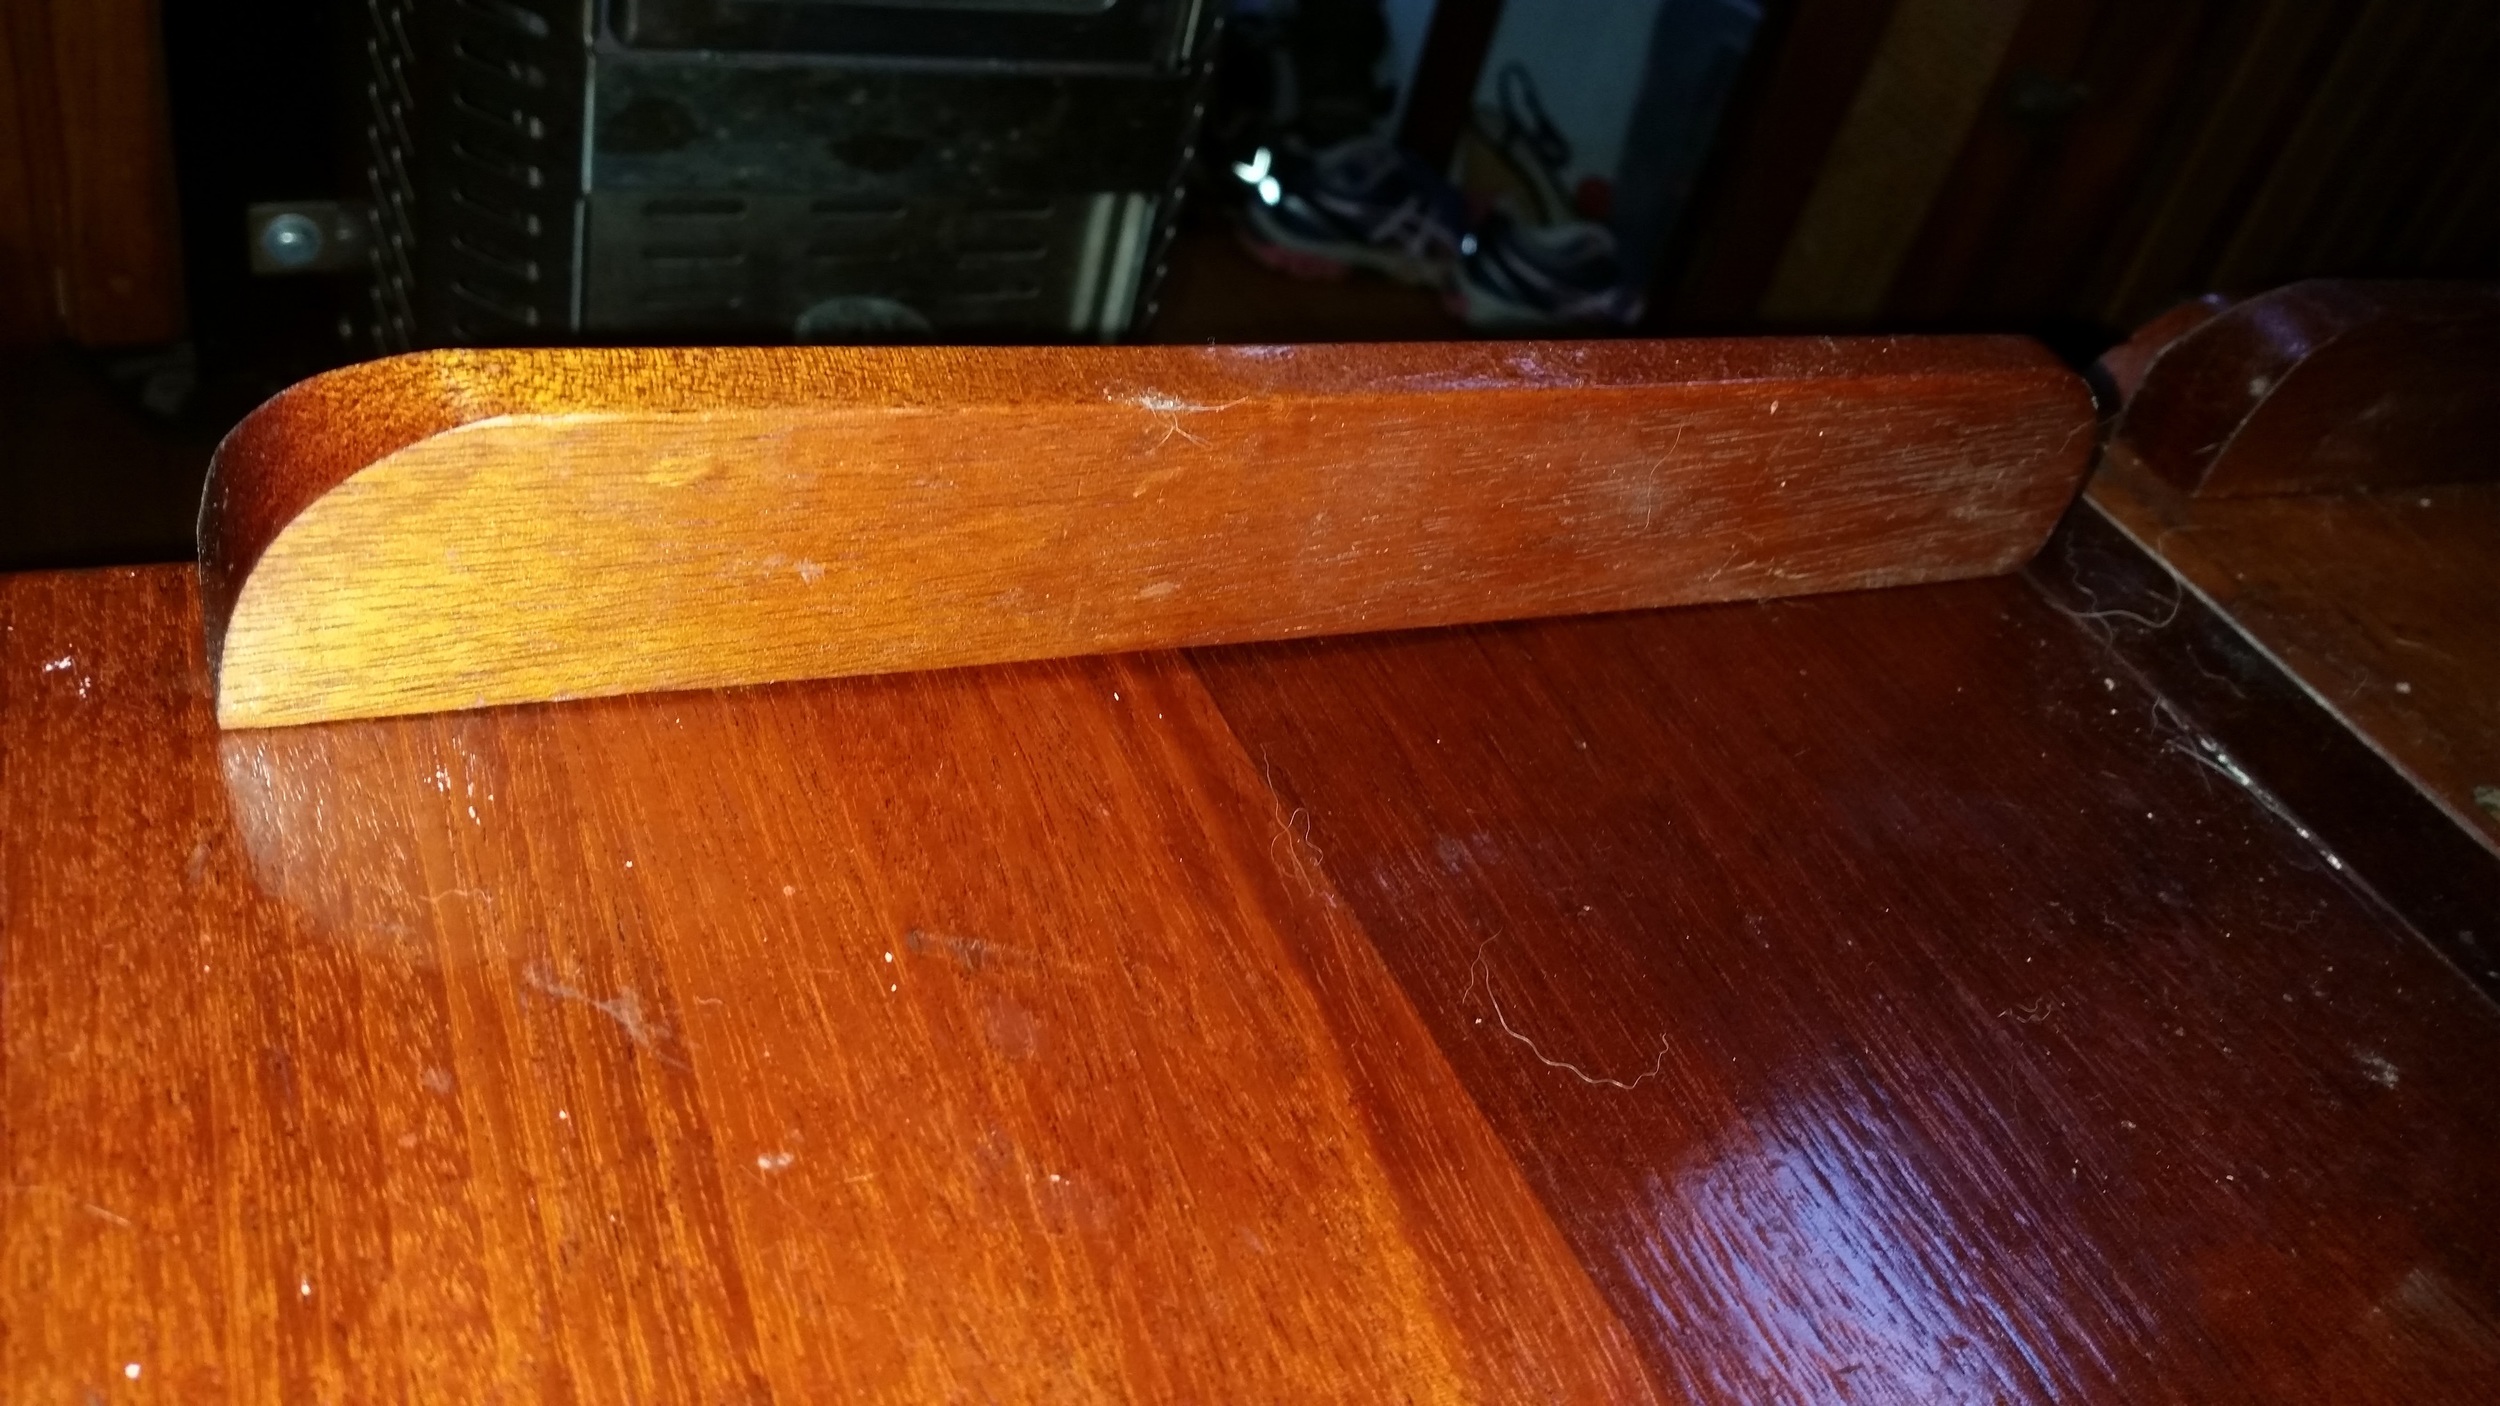
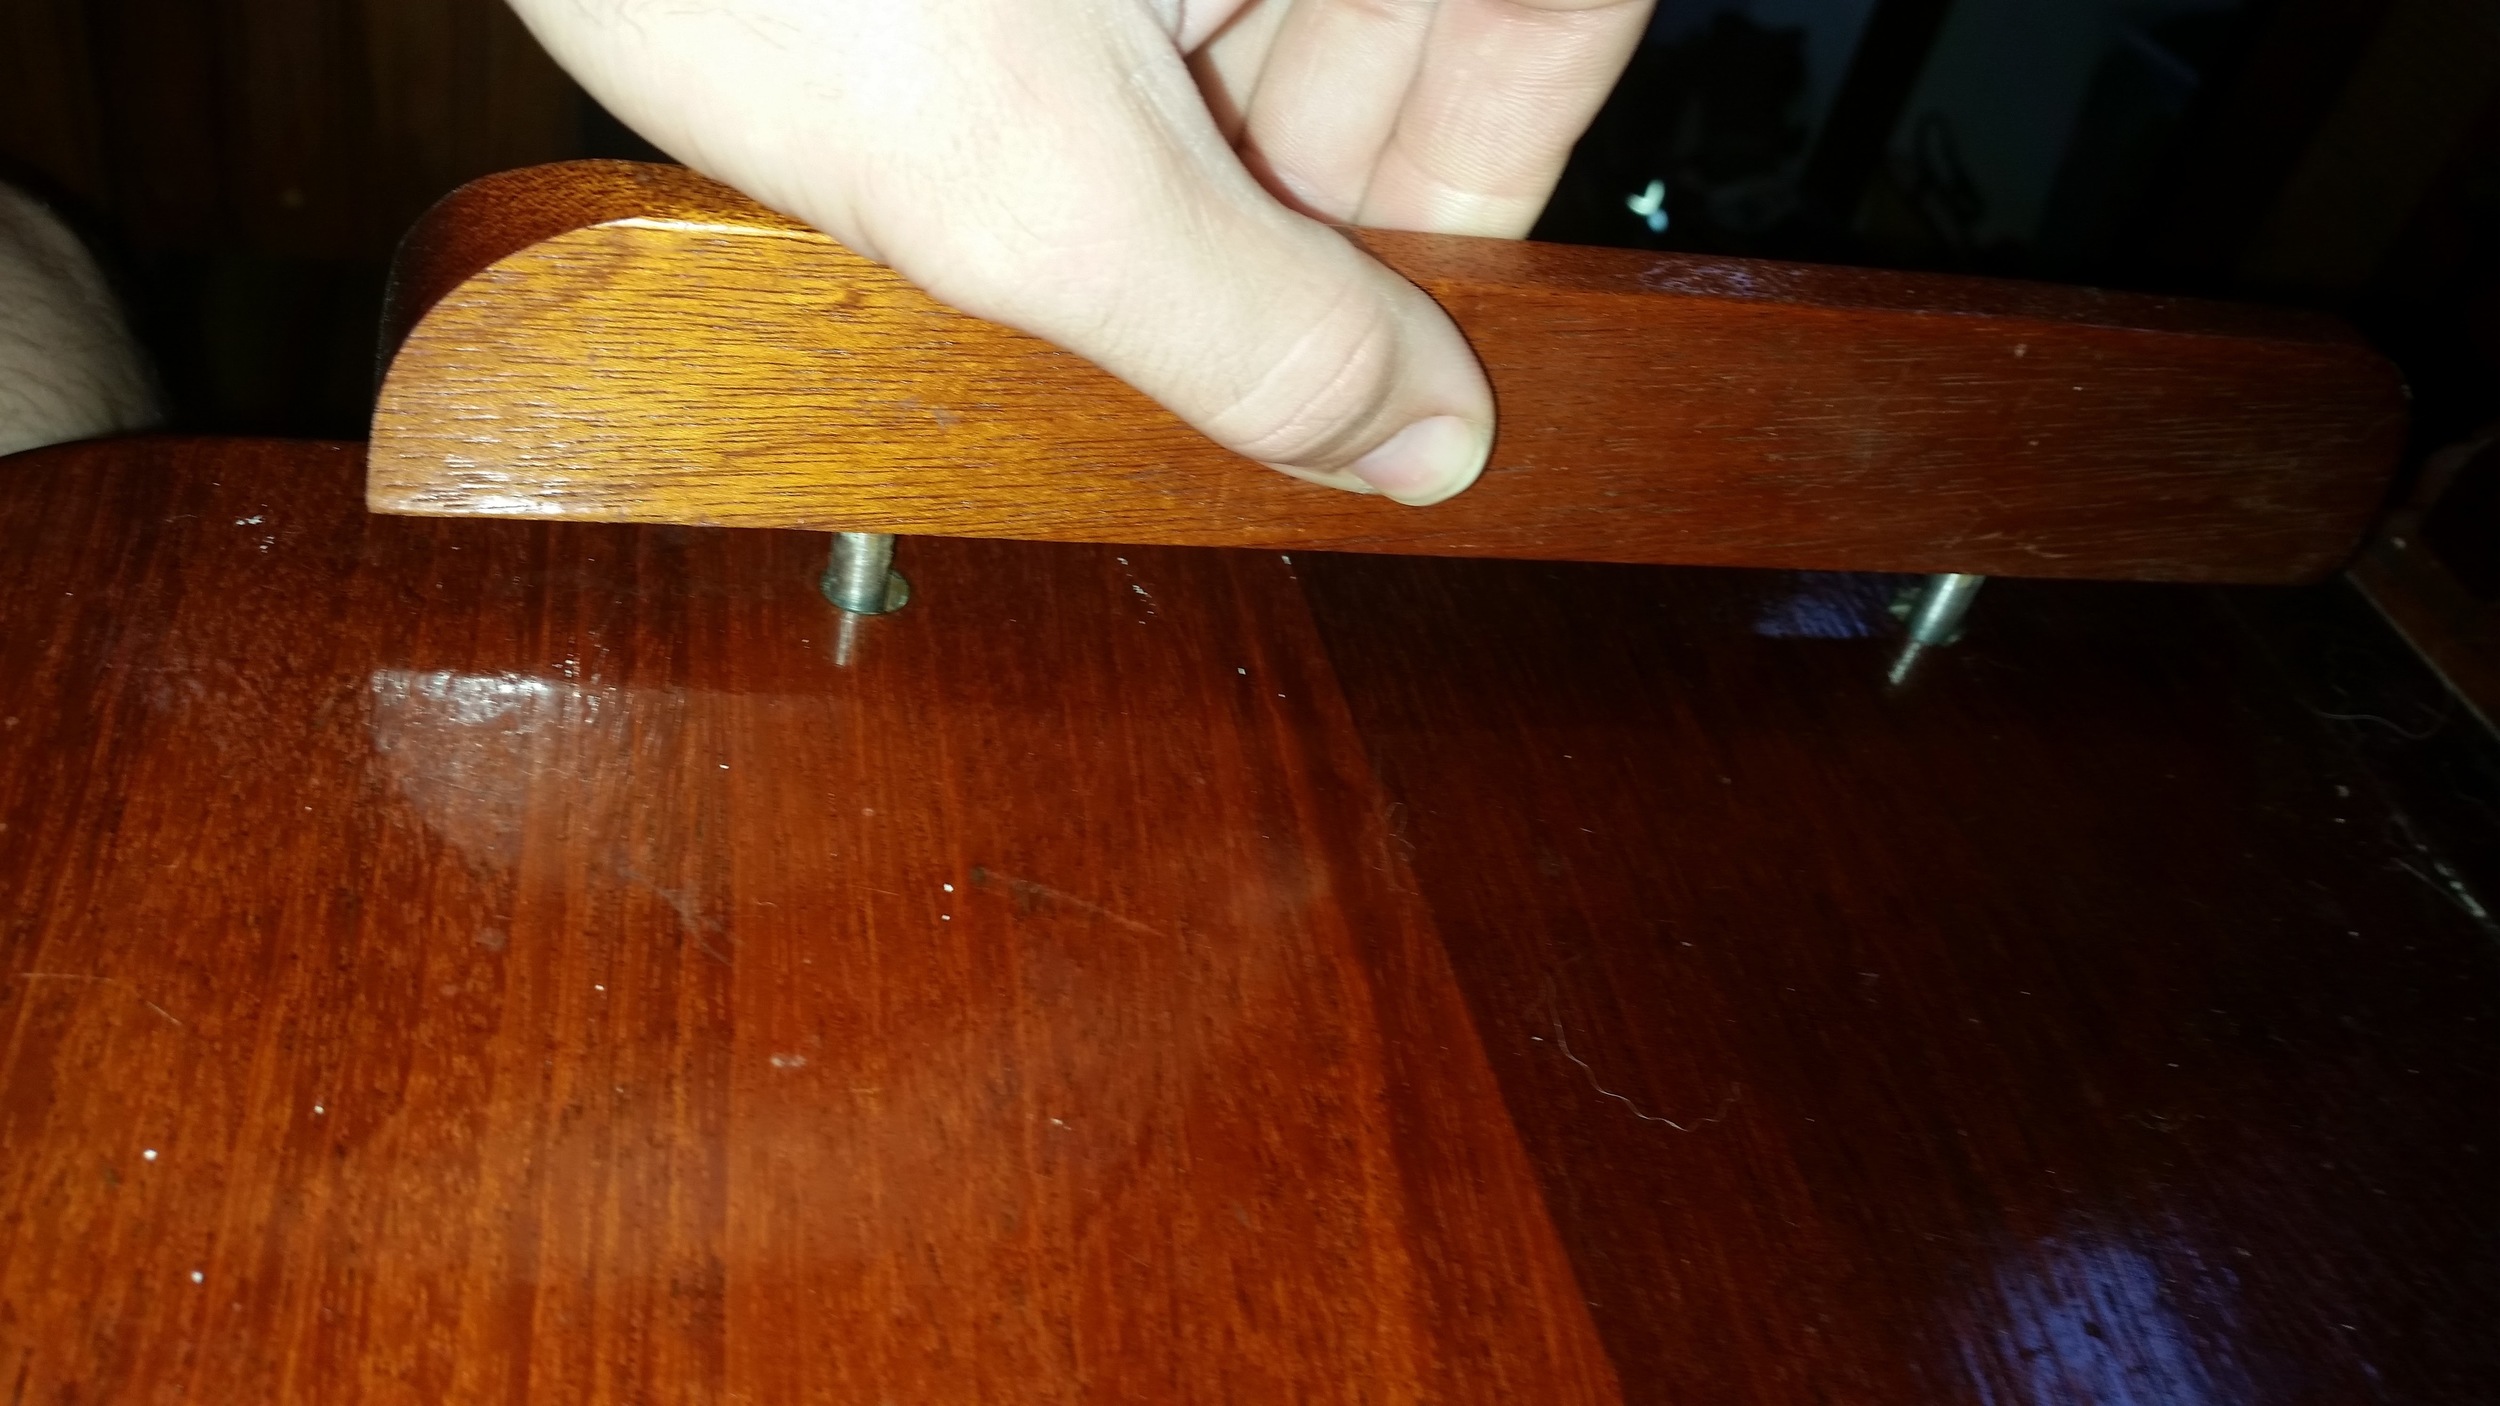
Details of Removable Fiddle Blocks

Fiddle blocks at the edges of tables may seem logical and easy enough to add, simply attach a vertical section of wood to end of the table and finish it so that it blends in and looks nice with the rest of the boats interior joinery. What if you want fiddle blocks when you are sailing, but smooth flat table surfaces when in port? This is where removable fiddle blocks come into play!

Removable fiddle blocks are simply fiddle blocks that attach to the edge of the table. The simplest method uses a system of rods to connect the block and allow quick and easy removal. On the bottom of the fiddle block, will have bronze (or other metal) rods extending out the bottom of the block that will fit into specific holes on the table top.

To protect the wood of the table, copper or bronze ferrules should be inserted into the hole in the table. Bronze and copper are easily shaped to contour to the holes shape and can be burnished into the wood, holding it in place for the life of the table. The bronze rod simply slides into the copper ferrule, providing a very secure connection between the table and fiddle block.

It is best to make the holes in the fiddle blocks and table after the wood has completely dried out. If you build a table with moist wood, the holes may not line up with the rods as the table shrinks a bit further. For this reason, only do this on an already existing and old table that lives inside and not exposed to the elements.

A small waiting period will give you a wonderful table that will accept your fiddle blocks as needed for the rest of your cruising life.

Chart Symbols: Bottom Composition

Bottom compositions are notated on charts using a system of letters that convey the necessary knowledge to the navigator. At first, these markings may seem random and confusing, but when you boil the system down to it's basics it turns out to be rather intuitive.

Chart symbols referring to the bottom composition will be located amongst depth soundings and will begin with a capital letter. If the symbol is only one letter, then it will be capital. Modifiers about the bottom composition will be in lower case letters.

S: Sand
M: Mud
Cy: Clay
Si: Silt
St: Stones
G: Gravel
Grs: Grass
K: Kelp
P: Pebbles
Cb: Cobbles
R, Rk: Rock
Bo, Blds: Boulders
Co: Coral
Co Hd: Coral Head
Oys: Oysters
Ms: Mussles
Sh: Shells
Vol Ash: Volcanic Ash
Wd: Weed

Modifiers to the bottom composition are:

f: Fine
m: Medium
c: Coarse
bk: Broken
sy: Sticky
so: Soft
sf: Stiff
v: Volcanic
ca: Calcerous
h: Hard

Once you know the language, it is simply a matter of putting the words together to spell out the bottom conditions. They are always stated with the main bottom constituent first.

fS M bk Sh: Fine Sand with Mud and Broken Shells
S/M: Two layers, Sand over Mud
hS Sh: Hard Sand with Shells

Just remember that modifiers about the bottom are in lower case letters, while the bottom composition starts with a capital letter. When the bottom is composed of more than one substrate, it will be listed from main bottom constituent, followed by the lesser constituents.

Top Load vs Side Load Refrigerators

When most people think of a refrigerator, they probably think of the massive monstrosity sitting in their kitchen. These towering units have so much space inside that food can be lost in the back of them for years! 

Boats don't have unlimited space inside them, so these mammoth appliances from your local department store are not typically found inside of a boat. Instead, boats use much smaller "marine" versions of refrigerators.

Some boats have fridges commonly found in college dorm rooms, offering a few cubic feet of storage space and tucking neatly into the galley cabinets. Other boats will have refrigerator systems built into the boat, blending in with all the other interior joinery.

Power boats tend to have side load refrigerators, which is similar to the kind found in houses. Sailboats tend to have top load refrigerators, which may take people some time to get used to. You must be wondering, why have one style over the other? You should look at the pros and cons of each style and decide which is right for you.

Side Load Refrigerators

Side load refrigerators make it easier to access the food stored inside. They also are more familiar to most people, since this is how most household refrigerators are setup.

The problem with side load refrigerators is when you open the door, all the cold air will rush out the bottom and be displaced with warm air. This means that the refrigerator needs to run more often to maintain a cool internal temperature when the door is opened. Standing there for a few minutes looking around for the right item will ensure that all the cool air rushes out and is displaced by warm air. In the long run, these units will consume more energy to maintain the space inside them cool.

The other problem with side load refrigerators is the side of the refrigerator opens. If the refrigerator is positioned with the door towards the midline of the vessel, on one of the tacks the food will be resting into the back of the refrigerator while on the other tack the food will be resting into the door. Should the door be opened when all the food inside is resting into the door, all of the food inside will pour out and into the cabin. Some boats use a small latch on the door to prevent accidental openings, but if you are pounding in rough seas, the last thing you want is for the latch to slip and all of your food to spill into the boat.

If your side load refrigerator is positioned so that the door faces fore or aft, there is less risk of your food escaping when opened underway. As you know, when sailing in rough weather, everything will shift and move meaning the contents of your refrigerator may have shifted. When you open your fridge, be ready to catch anything that might fall out and keep your toes clear of frozen foods.

Top Load Refrigerators

Enter the top loading refrigerator! They have an opening lid rather than an opening door. This means that you can open them and look around on any tack without fear of food flying across the hull. The only way your food would accidentally fly out of the refrigerator is if you capsized, and honestly the food would be the last of your concerns.

The other advantage of a top load refrigerator is they tend to run more efficiently. When you open the lid, the cold air which sinks to the bottom will stay in the bottom of the refrigerator. This means that you can take a little bit of time to find what you are looking for without sacrificing too much cold loss.

While top load refrigerators might seem like a perfect solution for a boat, but they do have their draw backs. Food in a deep refrigerator will have to be stacked. If you want to access food at the bottom, you need to dig for it. This typically involves unloading everything in the top levels to reach the lower levels. Food at the bottom is hard to reach as well, I have long arms and can reach everything if I stretch, but my wife Maddie has trouble reaching food stored along the back wall. It's simply too deep for her to get to comfortably.

The other problem is you need to lift the lid every time you want get into your food. This might not seem like a huge problem, but large doors are heavy and you have to hold it up the entire time you are in there! This is why most top load refrigerators will have multiple small lids, each weighing much less than a giant massive lid.

Sectioning the top into smaller lids means that you now have a smaller hole by which you must access all of your food. You really need to know where you put something, or you might spend a long time searching through a tiny little access.


Neither style is a perfect solution. Top load units are more energy efficient but are not as easy to access. Side load units are less energy efficient, risk spilling all your food, but have great access and feel more familiar to people.

Power boats tend to have side load refrigerators as most first time boat owners gravitate towards power boats. They feel that boats are simply large cars with "entertaining" space inside. Therefore, side load refrigerators are employed to make these boats seem as comfortable and familiar as possible to everyone.

Sailboats tend to have top load refrigerators because opening the fridge while heeled would be a mess. In recent years though, more and more sailboats are offering the combination of top and side load refrigerators. These offer the best of both worlds, allowing you easy access when anchored or in port via the side door, and also through the lid while out sailing. These sailboats should have very robust locks on the side door to prevent accidental openings.

I feel that these combination side and top load refrigerators are being installed to bring more people to the wonderful world of sailing by making them feel more at home when they are in the cabin. Imagine how much easier a sales persons life got when they no longer had to explain why the refrigerator opens from the top, and instead gets to say: "See, the refrigerator opens here, just like at home." 

If you are in the market for a new boat or are refurbishing your galley, consider which refrigerator style suits your needs and desires best and will make you feel most comfortable while aboard.

Beam or Length

When looking for a boat to live in, consider the total size of the boat, not just the length. Many people think they want a 30 foot boat, or a 45 foot boat, or even a 65 footer! As length goes up, so does interior volume and living space. The problem with length is it will cost you!

When you tie up to a marina pier, they charge you by length. The charge can range from $1 to $2 per foot on the east coast, and even higher during holiday times. If you have a 30 foot boat, that would cost you $60 per night; a 45 footer would cost $90 per night, and a 65 footer would cost $130 per night! While length is nice, it does not have as much of an effect on interior space as beam does. 

If you have a 45 foot boat with a 10 foot beam, and you add 1 foot, you now have a 46 foot boat! This will add one foot of length, or 10 extra interior square feet at a cost of $2 extra dollars each night. If you take the same 45 foot boat with a 10 foot beam and add one extra foot of beam to it, you now have a 45 foot boat, but with roughly 45 extra feet of interior square footage! That is a huge increase at no added cost to your overnight docking while traveling. 

When you are searching for a liveaboard boat, consider finding the beamiest (widest) boat in a size range as it will give you added interior volume without increasing your docking fees.

Hull Construction Materials

When searching for your perfect boat, the question of hull material will inevitably come up. The most common categories are fiberglass, wood, and metals; lesser seen categories are carbon, kevlar, and cement. 

Exotic Hull Materials

High Tech Materials

Kevlar and Carbon Fiber hulls are typically found in the ultralight and high performance yachts. These materials have incredibly high strength to weight ratios, creating hulls of mammoth proportions and negligible weight. The price tag of these yachts keeps pace with the astronomical properties of these construction materials, and the cost of repairing any damages that might occur to these hulls is pricey. Even more difficult than the yard bill to fix an issue is the struggle to find qualified skilled technicians who know how to work with these materials. Large cities will usually have one yard that is capable of handling these repairs, but a small yard on a tiny island may not be able to help with these repairs.

Cement

Cement hulls were popular for amateur boat builders. It was advertised as an easy way to make a cruising boat, you could buy the molds and get a bunch of friends over to mix and pour the cement. After the cement cured, you could pop it out and sail it (after you finish the rest of the construction, it is funny how kit boat companies make it sound like building the hull is the hard part)! The problem with cement boats is the integrity of the hull greatly depended on the skill of the builder. If the cement was not mixed properly, the hull could develop cracks and leak. The other problem with cement boats is insurance companies do not like them, so finding insurance for a cement hull can prove difficult.

All this aside, there is a cement boat in my marina that has been abandoned for years.  The owner died and the heirs have not come to collect it. This boat has been rotting away for the past 4 years with no maintenance, and it still floats! The paint is peeling and her topsides look like hell, but the boat doesn't leak, doesn't fill with water, and doesn't sink. This is probably an example of a well made cement hull, which shows that any well made boat will last a long time.


Popular Hull Materials

Looking at the more common hull construction materials, we see wood, fiberglass and metals dominating the scene. Each has their strengths and weaknesses, proving that none is better than the other. It really is a personal choice about which hull material you prefer. If the cons outweigh the pros from your perspective, then that is the wrong hull material for you. On the contrary, if you don't mind the drawbacks and love the strengths, that is certainly the perfect material for you!

Metals

Metal hulls fall into two main categories: Aluminum and Steel. Metal hulls in general are favored for their high strength and durability. People who are comfortable working with metal tend to love metal hulls. To them, it is a known material that they feel confident in their ability to repair. Steel hulls are preferred by people who plan to sail in high latitudes and will run into ice. Steel hulls offer excellent durability and repairability, if you were to collide with a reef, sandbar, or ice sheet, the steel will simply rub on it without much damage. Thicker steel hulls will offer more puncture resistance and added durability to the wear and tear of uncharted cruising where groundings and collisions are inevitable.

Aluminum hulls are very light weight and incredibly strong, making them a favorite material for boats over 80 feet in length. High performance luxury yachts are made of aluminum because the hulls are lightweight, strong, and sturdy without taking up much interior space in the form of bulkheads and frames. This allows the interior to be finished in utmost luxury and spaciousness. 

While metal hulls may sound like a dream come true, they have one major pitfall: corrosion. Steel hulls rust wherever water accumulates on bare metal. If you rub into a pilling, you need to cover the bare metal in fresh paint quickly to avoid rust from starting. The inside of the boat is at risk of rusting in unseen areas where the paint has chipped and moister has accumulated. Rust can propagate at alarming rates if left unchecked, and it can be difficult to repair when the time comes to recondition the yacht. Steel hulls are repaired via welding new metal onto them. The problem is the act of welding produces incredible heat which will ignite interior joinery and insulation. This makes a simple patch become a arduous project of dismantling and reassembling the interior.

Aluminum hulls won't rust with the epic red bleeding that spews from beneath the paint of a steel hull, instead they corrode in a much quieter way. Aluminum will turn to aluminum oxide, a white dust that will blow away when exposed to moist air, or via galvanic corrosion when immersed in an electrolyte such as sea water. Aluminum hulls must also be very careful about what bottom paint they use, as copper bottom paint will destroy the entire bottom of the hull in a short amount of time due to the dissimilar metals reacting in the solution. If you use the correct type of bottom paint and maintain the hull clean and dry, you still need to worry about stray current in the water. Galvanic corrosion caused by this stray current will eat holes into your hull if insufficient sacrificial anodes are not available. Aluminum hulls will typically have anodes attached all over the hull, hoping that if something will be eaten away by electrolysis, let it be the sacrificial anode. While these holes are easy to fill with a welder, they still require the same amount of disassembly and reassembly to protect the interior from the heat of the welder.

Welders are available worldwide, so your chances of finding a repairman on a remote island are quite high. It would be a good idea to carry some welding wire with you, that way you don't risk the welder accidentally welding on the wrong kind of metal and causing greater problems to your hull. People who have had metal sailboats love them! They feel very safe and secure in their vessel, knowing that they won't sink if they run aground or brush against some rocks.

Wood

Wood is another known material which has been used to build boats for over a millennium, and there is a reason it has been so popular, wood floats! A properly built and cared for wooden boat will provide a very safe and sturdy vessel which can take you across oceans! If you run into problems in a foreign port, you are probably going to be able to find the needed materials and the skilled labor to repair the problem. If you are capable and willing to do the work yourself, you can do all the maintenance yourself which will keep costs down.

While wood may sound amazing, it does have it's draw backs which have given it a bad name. If left in the water, marine borers (worms) will eat away at your timbers. Termites will attack the dry wood inside the boat, and on land the wood will dry out and the seams may pop open. It may seem that wood is in danger no matter where it is kept, but it can be easily repaired with only a few tools. 

Wood boats do need a lot of care. If neglected, they will begin to rot away in their slip, slowly becoming a major undertaking to revive. 

Insurance companies and marinas seem to have an aversion to wooden boats as well. Some marinas won't allow them into their slips or yards. It seems that they feel that stems will open up and draw in the seas, taking them to the bottom and are too much of a liability for them. 

Wood hulls are susceptible to electrolysis damage. Electrolytic damage will cause acidic damage to the wood planks, eating them away and turning them into mulch and mush. Electric connections must be properly installed and maintained to prevent serious damage to the hulls planking.

A well built wooden boat is not a disaster as most will make you believe. Poorly built wooden boats which were not properly maintained simply ruined the name for all wooden boats. It is not uncommon to come across a properly built wooden boat with original frames and planking that is approaching 100 years old. These boats were well built and maintained throughout their lives, letting them be strong cruisers for nearly a century!

The most common issues on a wooden boat are leaky garboards and open seams. If the keels rabbet line is not wide enough, the garboard seam will wear out and open up. This will start a leak that can only be remedied by manufacturing new garboards. Most people will try to over caulk the seam to avoid the task of fitting new garboards, leading to the continued leaks. A leaky wooden boat will have a musty smell, which is what most people think of when they picture a wooden boat.

The truth is, if the rabbet seam is cut properly and the garboard is well attached, the joint will be strong and not leak. When it does finally wear out (as this seam resists the forces of the shrouds pulling up and the keel pulling down), replacing the garboard with a new strake will fix the problem so that the boat can continue sailing along with a dry bilge.

Fiberglass

Fiberglass has been around for a long time now, and has dominated the boating scene as the standard hull material for most boats. When fiberglass was first used in boat building, the builders didn't know how strong fiberglass actually was, so they greatly overbuilt these hulls. Hulls from the 1960s will typically be very thick and not cored. 

The benefit to a very thick, non-cored fiberglass hull, is they will last forever! The draw back to these hulls is they are insanely heavy. Fiberglass hulls from these years were the pioneers, testing the waters with these plastics. It turns out that these hulls did hold up over the years, as is evidenced by the number of boats from these years that are still floating.

As time progressed, they soon realized that the hulls could be much thinner and still be strong enough to provide a safe boat. Core materials were also incorporated into the hull construction to produce a very strong and light weight hull. 

Thinner hulls do tend to flex more, and some brands of sailboats are famous for this flexing; at the same time, the weight savings greatly adds to their performance. Everything on a boat is a trade-off, you just have to find the kind of boat that you are happy with.

Cored hulls are a double edge sword, similar to sail battens, they are great when they work and will be the root of all your problems. Cored hulls add thickness to the hull without adding much weight. A thicker hull will be much stiffer and stronger than a thin hull. Adding a core adds thickness without adding much weight to the hull, resulting in a much stronger hull without the added weight. If a solid fiberglass hull were made to be as thick as a cored hull, it would have a similar strength but it would also be insanely heavy. This sounds great, but cores tend to rot when they are exposed to moisture, leading to delamination issues and costly repairs. 

Cores are supposed to be applied to the hull as the fiberglass layers are being laid up. Layers of roving and chop strand mat will hold copious amounts of wet resin which will adhere blocks of wood or foam to the hull. This wood or foam is the core. After the core is added, more layers of resin and fiberglass will be added and allowed to cure. The core needs to be fully saturated with resin before it is applied to the underlying mat, but it rarely is done this way. What usually happens is the core is a bit dry and acts as a sponge, drawing the resin out of the mat and into the core. This dry pocket that develops is the beginning of the end for a cored hull. This dry space will slowly collect moisture and begin to rot the core. 

Sadly, no brand of boat is exempt from this problem. I have seen quality boats like Hatteras and Kadey Krogen suffer from dry cores delaminating. These boats underwent the long and costly process of re-coring the entire hull, which left the owners with a very strong and sturdy yacht after the expensive yard bill was paid.

You might be wondering why boat manufacturers don't use a bit more resin and avoid these problems? It is once again due to a trade off. Hull strength comes from the fiberglass and not from the resin that binds it together, the more resin used, the heavier and weaker the hull will be. In order to minimize weight and maximize strength, hull manufacturers use various techniques to mass produce a strong hull with as little resin as necessary. The result is a very strong hull with the risk of core failure. 

Another issue that plagues fiberglass hulls is blisters. Blisters are caused by water getting into the layers of the fiberglass and causing little bumps on the hull. They don't know exactly why some hulls develop blisters and others don't, but some boats will have blisters develop everywhere while other boats will hardly develop any. Blister repairs are costly and time consuming, and their necessity is debated. Some claim that they can lead to larger delamination issues, others disagree. While small blisters are more of an eyesore than a structural problem, large blisters (larger than a few inches) should be repaired as they can cause costly repairs later on. Wooden boat owners often tout that their hulls will never develop a blister, but a blister won't sink a fiberglass boat.

One major advantage of fiberglass hulls is they are more resistant to neglect. While I don't condone neglecting your boat, it won't kill your fiberglass boat to sit in the water for months on end. Growth will form and dirt will collect, but the boat will continue to float until you return. Fiberglass offers a more flexible maintenance schedule over other materials. Wood hulls need to be hauled every year for maintenance and inspection of the strakes; metal hulls need to be hauled to check for electrolytic damage and corrosion below the waterline. Fiberglass hulls don't need this rigorous schedule. Two year maintenance rotations are commonplace, where the boat is hauled for a few days every two years to apply new anti-fouling paint. Bottom cleaning and anode replacement can be completed by way of diver or short haul in between the maintenance hauls. I know of a couple who has had their boat in the water for the past four years without a single haul out. They have a diver clean their bottom every two months to knock off any growth that has started up and to change their prop shaft anode.

When considering the hull material for your next boat, take into consideration the amount time you have to devote to maintenance and the resources you have to pay for repairs. Doing the repairs yourself will save a lot of money, but you still need to pay for materials, making any repair "not free".