Treasure in the Trash Pile

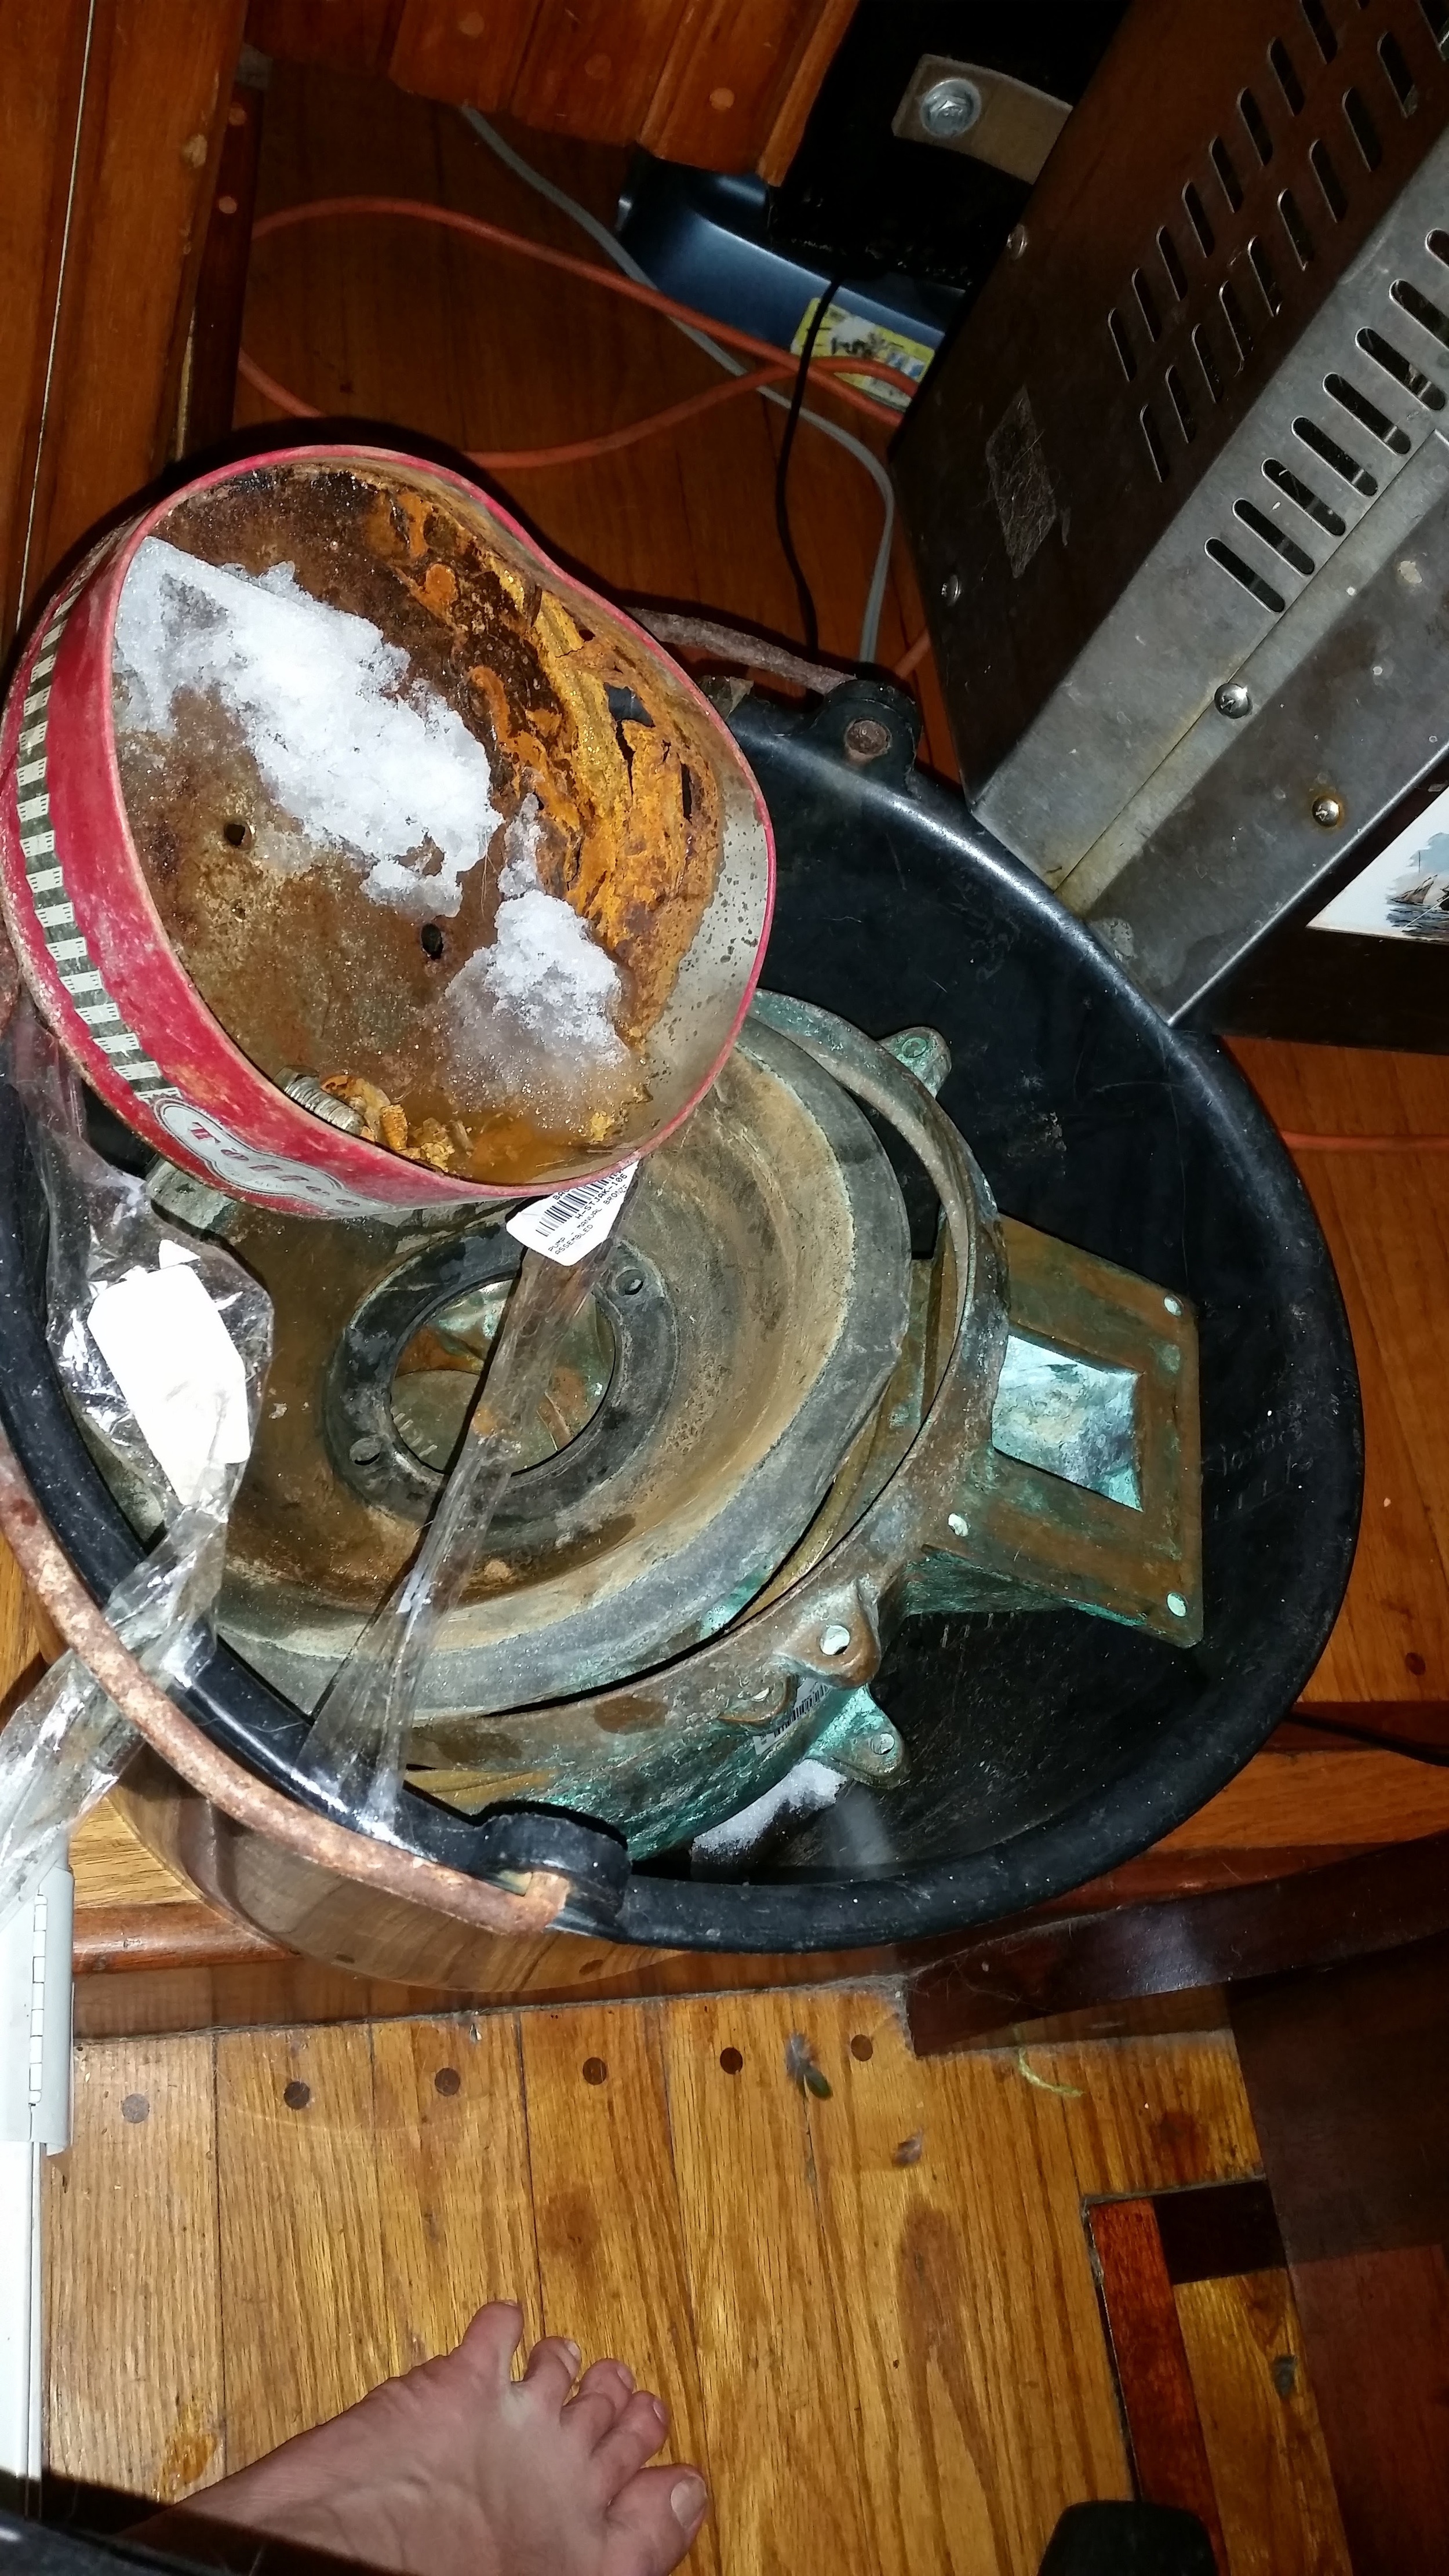
While looking around Bacon Sails, I stumbled upon an old Edson Bilge Pump for $95! These pumps will flow 1 gallon per stroke and sell for over $1000 new. The cost of the bronze fittings, hoses, boards, and hardware will still come in much cheaper than a new pump.

It was sitting in a bucket off in the corner, waiting for someone to bring it back to life. 
While cleaning all the bronze castings, I decided that the old stainless steel fasteners were not worth saving. I have no idea how old this pump is, but the stainless steel fasteners are horribly corroded! If there was any doubt about the longevity of stainless vs bronze, it can be put to rest now!

I decided to use use new stainless steel bolts instead of rods as hinge points for the pump mechanism. I made sure the bolts would rest on the shank and not the threads to prevent any additional wear. I also used lock nuts on the bolts to keep them secure while still keeping the whole system loose.

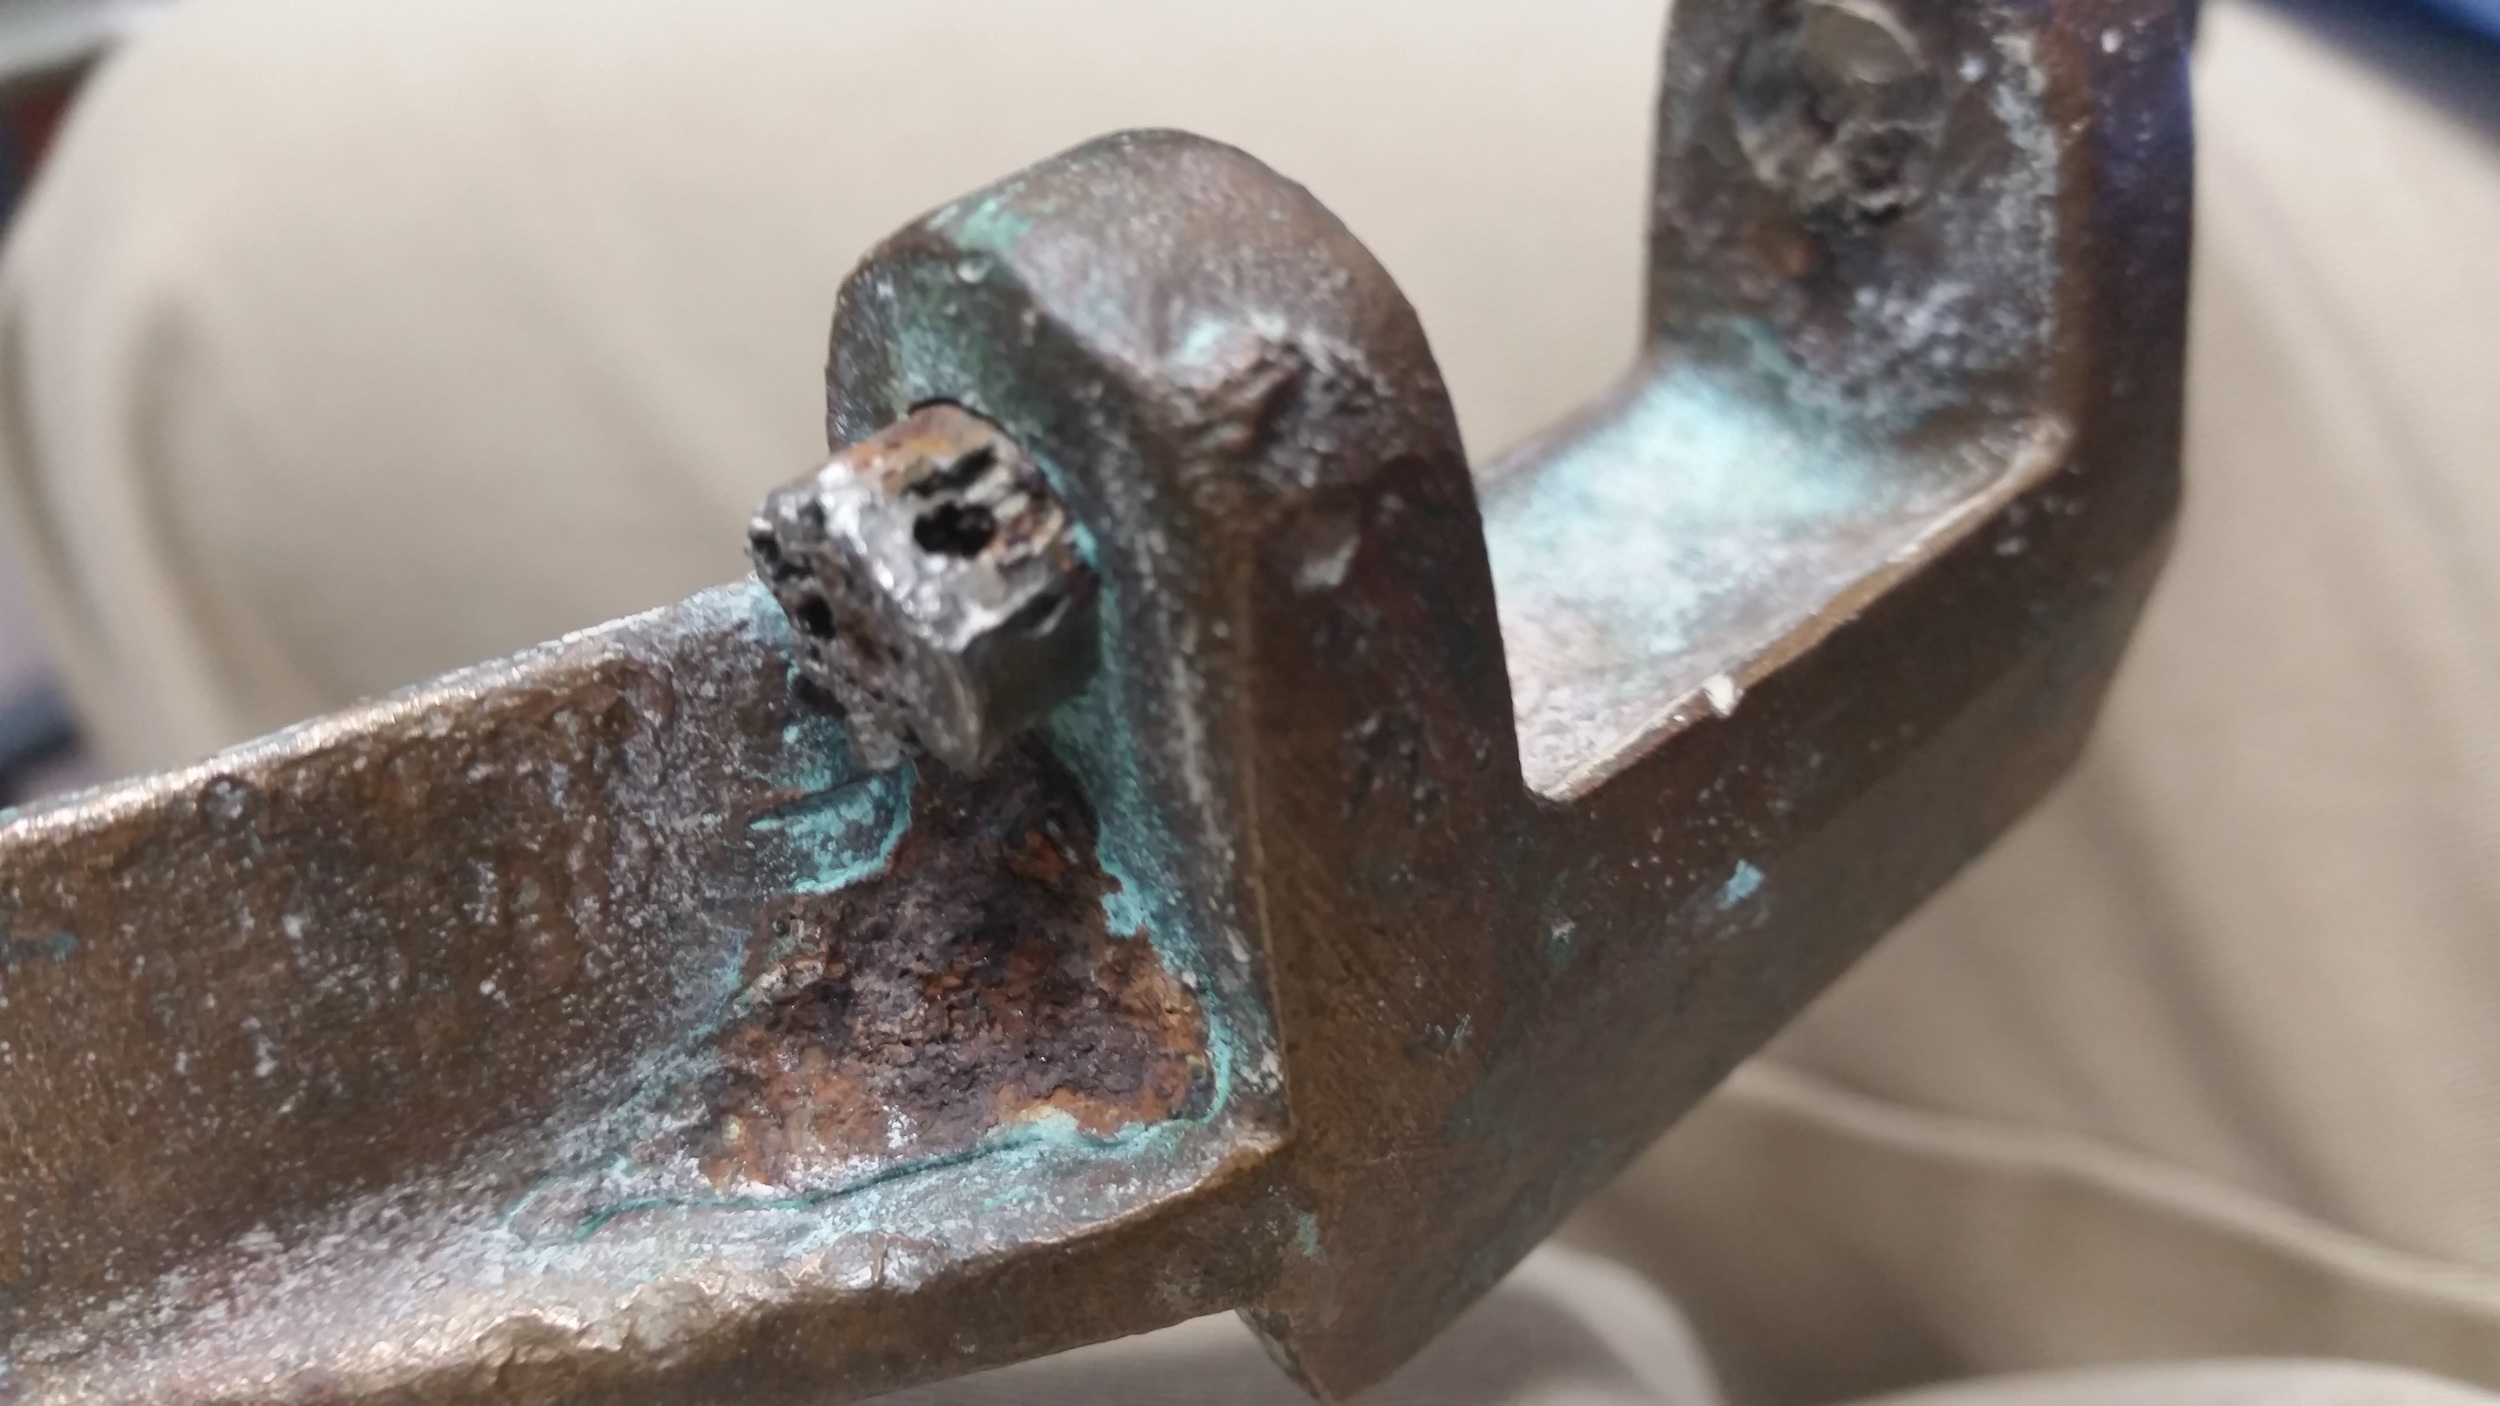
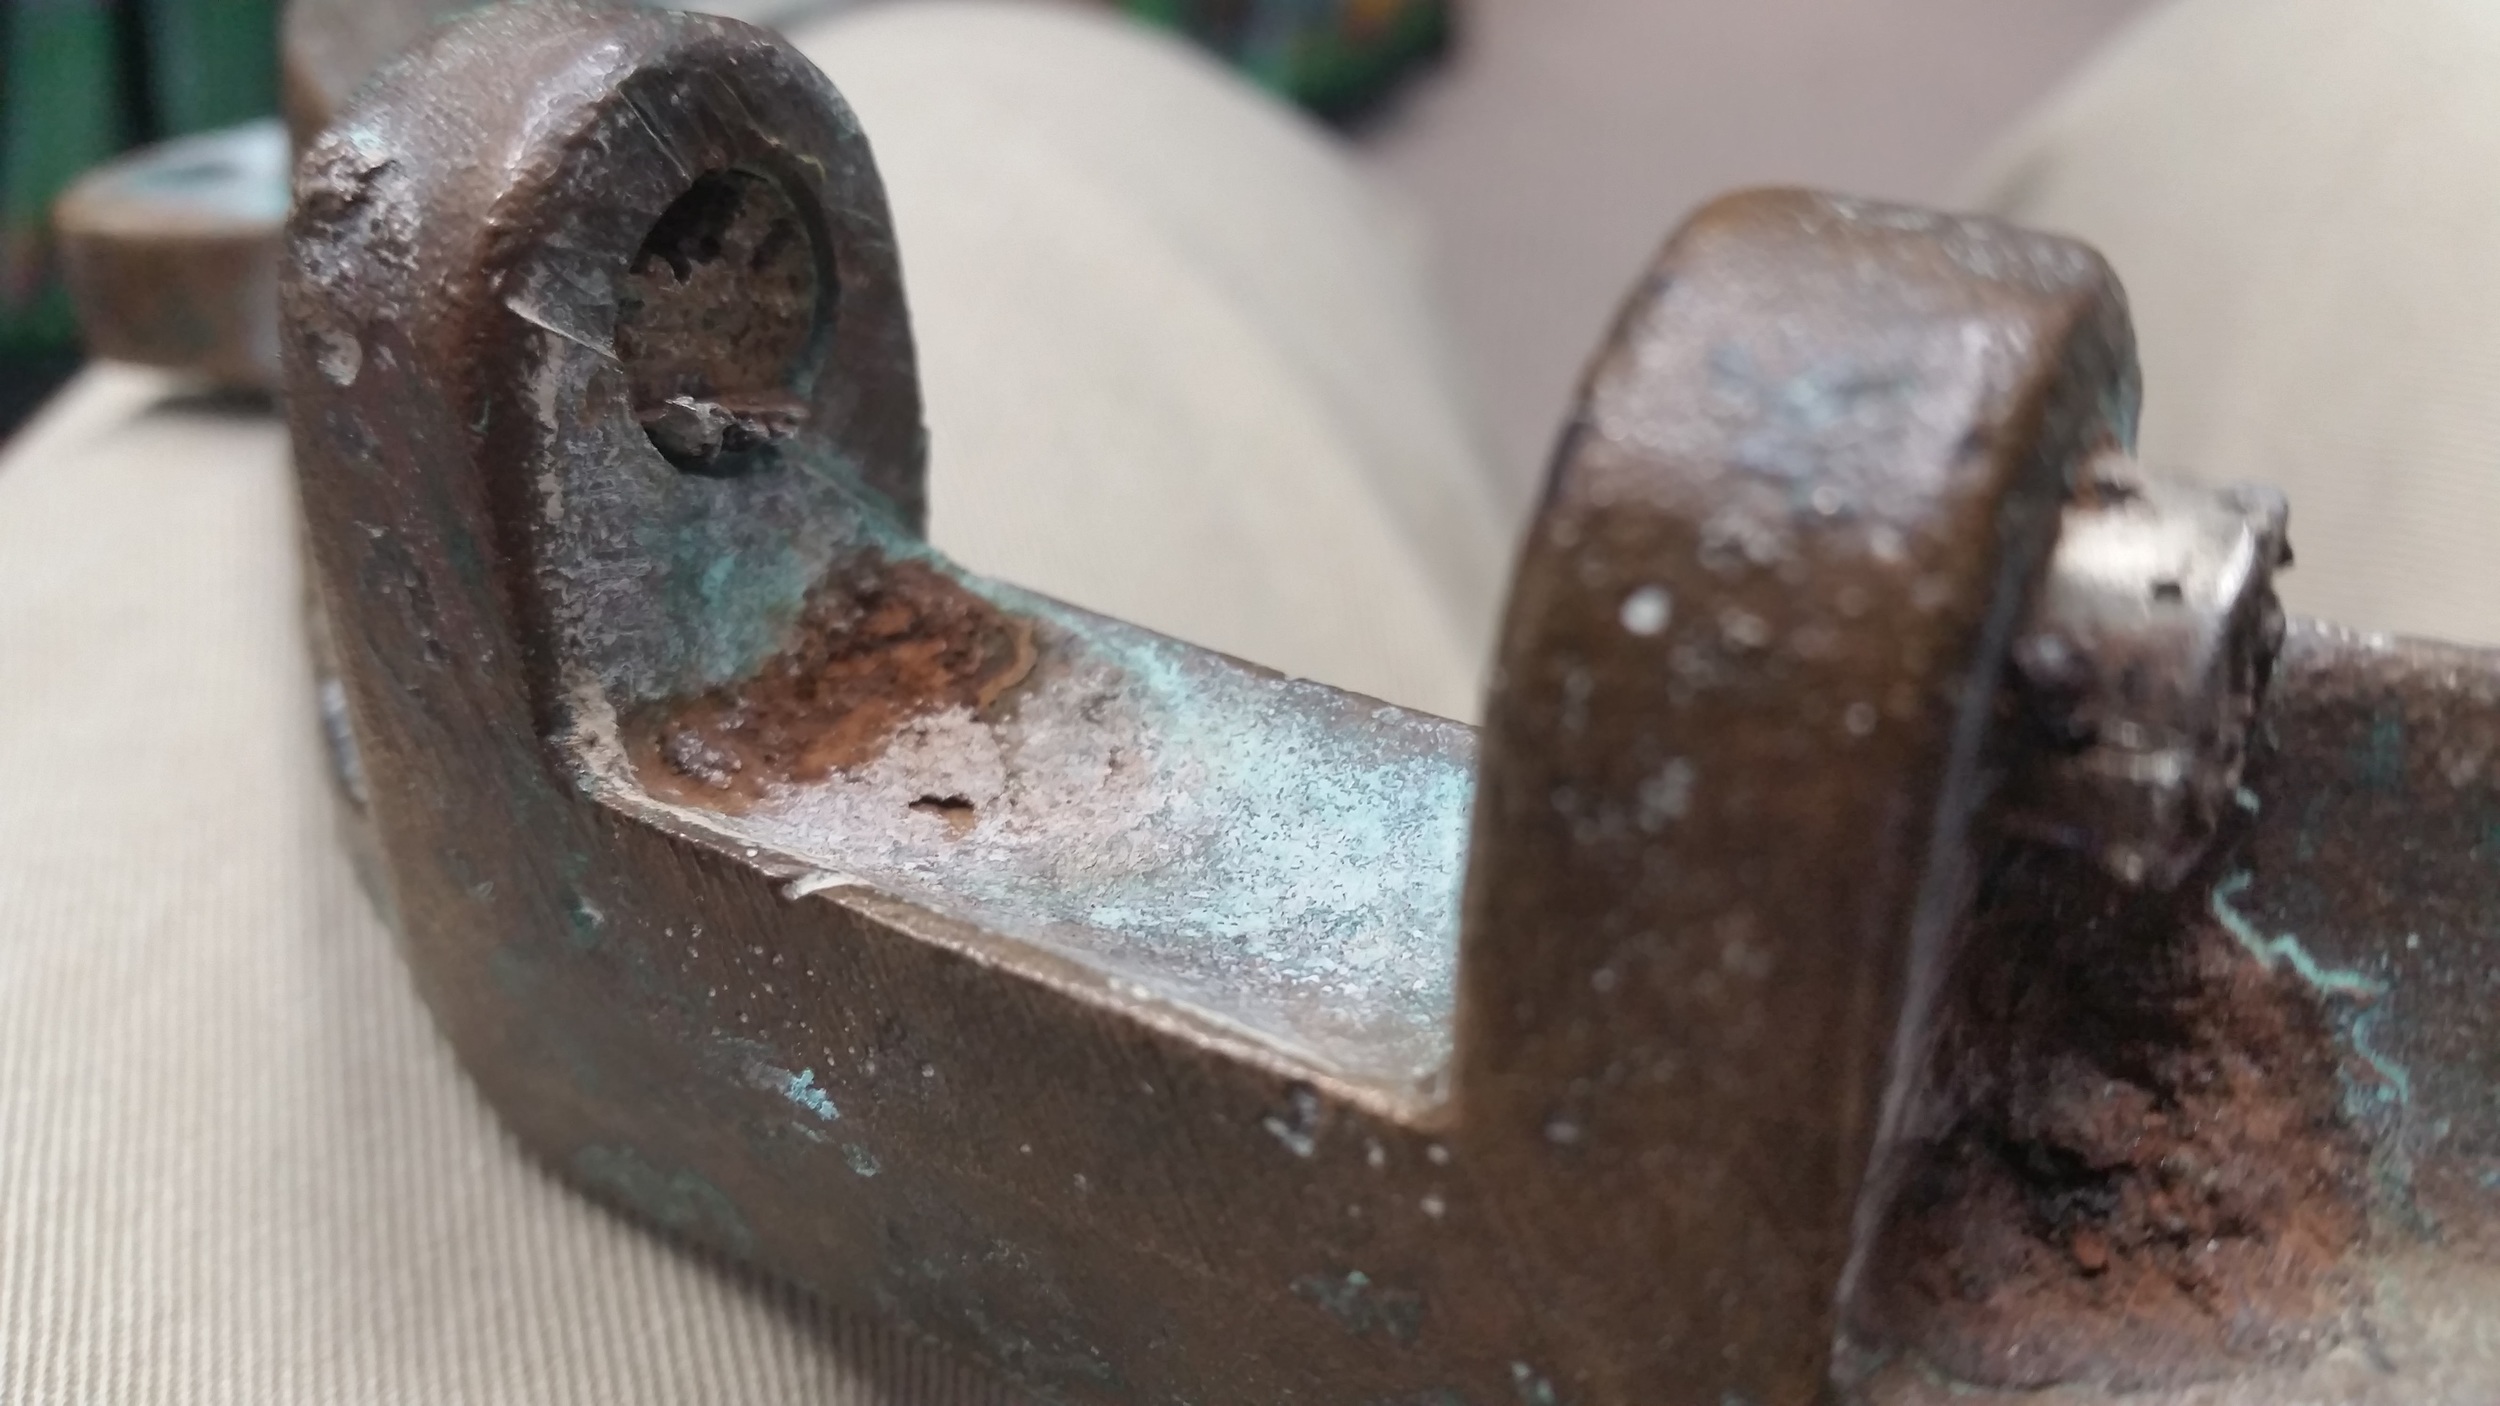
The problem is the old stainless steel rod that was in there has succumbed to the effects of severe crevice corrosion and broke off in the holes, preventing any new rod from acting as a pivot point.

To get the corroded segments of stainless steel out, I used my dental drill with a carbide bur. This weakened the metal and allowed it to collapse, similar to sectioning a tooth during an extraction. Then it could be removed easily by driving a push rod through the hole and pushing the corroded remnants out.

It burned through a few burs, but in the end, I was able to extract the corroded remnants of the pivot pin. 

The new hinge pin is the bolt's shank. This will provide a smooth surface for the lever to pivot on. I will cut the excess threads off the bolt, just after the nut to tidy things up.

The rebuild will continue with the fabrication of the wooden base for the pump!

When to Reef

When should you reef your sails? This is a common question with no definitive answer. Some common guidelines used for determining when to reef are:

A set windspeed
The first sighting of a whitecap
The approach of storm clouds on the horizon
First sight of rain
Crew comfort
Preparing to Heave-to
Gut feeling

Many sailors put in reefs at arbitrarily set wind speeds. A common guideline is to put the first reef in at 15 knots, and the second reef at 20 knots of wind speed. From this guideline, you can then determine when you want to reef. If you feel fine at 15 knots, keep the sails up a little longer. When you finally decide you wanted to reef, look at the wind speed; next time reef a few knots sooner than the current windspeed.

On Wisdom, we put the first reef in at 20 knots, and the second reef at 27 knots. We also drop the Jib at 20 knots, and fly the staysail all the way through to really high wind speeds.

On Windpuff, we have no instruments, so we reef at the first sign of whitecap or approaching storm cloud. Reefing based on whitecaps is a good indicator, as they tend to form in response to building wind conditions. I like to reef at the first sight of a storm cloud because I prefer to go forward to the mast in calm weather and await the winds with reduced sails instead of being caught off guard.

Rain on the horizon usually accompanies an approaching squall with high winds. The dark curtain approaching your boat is an excellent signal to put the reefs in. The only thing worse than putting in reefs during high winds is being pelted with stinging water droplets!
On a completely different note that does not involve weather or storms is crew comfort. If you have a frightful person on board, you may have to put in a reef to keep them calm. I have taken friends sailing and they panic when we heel over, leading me to put in 2 reefs in winds of 12 knots. We hardly moved, but the boat did not heel. With time, they became more confident that the boat will not flip over and allowed me to shake out the reefs one at a time. Eventually we were sailing along under full sail at hull speed and everyone had a good time! If I had told them to tough it out and hold onto the heeling hull, they would have been traumatized and probably never gone sailing again. While crew comfort is not related to weather conditions or sail trim, it is a valuable indicator for when to reef.

One last reason to reef the sails is when you are preparing to heave to for the night. The weather may be calm and the seas tranquil, but they might change during the night. By reefing the sails all the way down before heaving to, you can sleep comfortably and confidently through the night!

The least scientific method (which is also my go to method) is sail trim. When the wind builds, we ease the sheets to control the amount of heeling. When the leech begins to flutter because the sail has been eased too far and we are still heeled over, we typically put in a reef. This allows us to trim the sail perfectly once again and maintain the keel in a more efficient orientation. If the wind eases up and we loose speed, we wait 15-30 minutes before we shake the reef out (in case it was simply a lull in the wind, we wait to make sure the wind doesn't pick up again and catch us over-canvassed).

When do you typically put in your reefs?

Solar Panels

Modern conveniences require electricity to keep them running. GPS, AIS, Radios, Fridges, they all need a steady flow of energy to keep them going. Batteries do a wonderful job of storing all of this electricity, but after a while they will begin to run down and the conveniences will stop working. To keep the flow of energy up, many cruisers will run their engines a few hours each day to replenish the batteries charge. What if you don't want to run your engine that often, or if you don't have an engine to run at all?

This is where alternative energy sources come into play. Three major players in the alternative game are Solar, Wind, and Hydro (water). They all have their advantages and disadvantages, but today we will talk about solar.

Solar is a wonderful system that converts the suns radiation into electricity. This means that you can quietly charge up all of your electrical needs while the sun is shining. There are no moving parts to break, and no noise from the process of energy collection. They quietly collect energy while you are sailing, just as effectively as they can when you are anchored in a quiet and protected creek.

The thought of charging your batteries while anchored in a secluded area may sound like a dream come true, but there are some drawbacks to this technology. If you have dense cloud cover, you are not going to produce any electricity. At night there is also going to be no energy production. To overcome the pitfall of consecutive cloudy days providing no electricity, a properly sized house battery bank is necessary.

Deciding how many panels to install is entirely dependent on need and space available. You can calculate how many amps you need in a day to make sure that your solar array will provide sufficient power to run all of these systems, then you need to figure out where to put them all. Catamarans have plenty of available real estate, but monohulls may find space to be very limited. Ultimately, the final decision will come down to "how many panels can you fit" instead of "how many panels do you need".

Factors that affect your ability to mount solar panels come in two varieties: Shading and damaging. Shading from sails, sheets, and spars will reduce the power output from the solar panels. For this reason, it is best to place them in a location that will receive full sun at all times. 

The second danger to solar panels is from damaging blows. If a sail begins to flog, the sheets will whip around violently. A constant barrage of whippings from a sheet will shatter a solar panel in no time! This means that anywhere between the sheet block and the sail should be avoided. 

Another danger that falls into the damaging category is wave and wind action. If the solar panels are mounted to the bow rail, they could be swept off or shattered by the force of a breaking wave. Not to mention, they could act as a sail on the tip of the bow producing dangerous lee helm!

After careful consideration, the only place we could mount them on Wisdom was on the sides of the stern rail. The drifter sheets attach close to the stern, ruling out the lifelines running forward, a panel in the shrouds would snag and cut the sails, and the future wind steering device will take up the whole stern. The only place we had available is a small section of the stern rail!

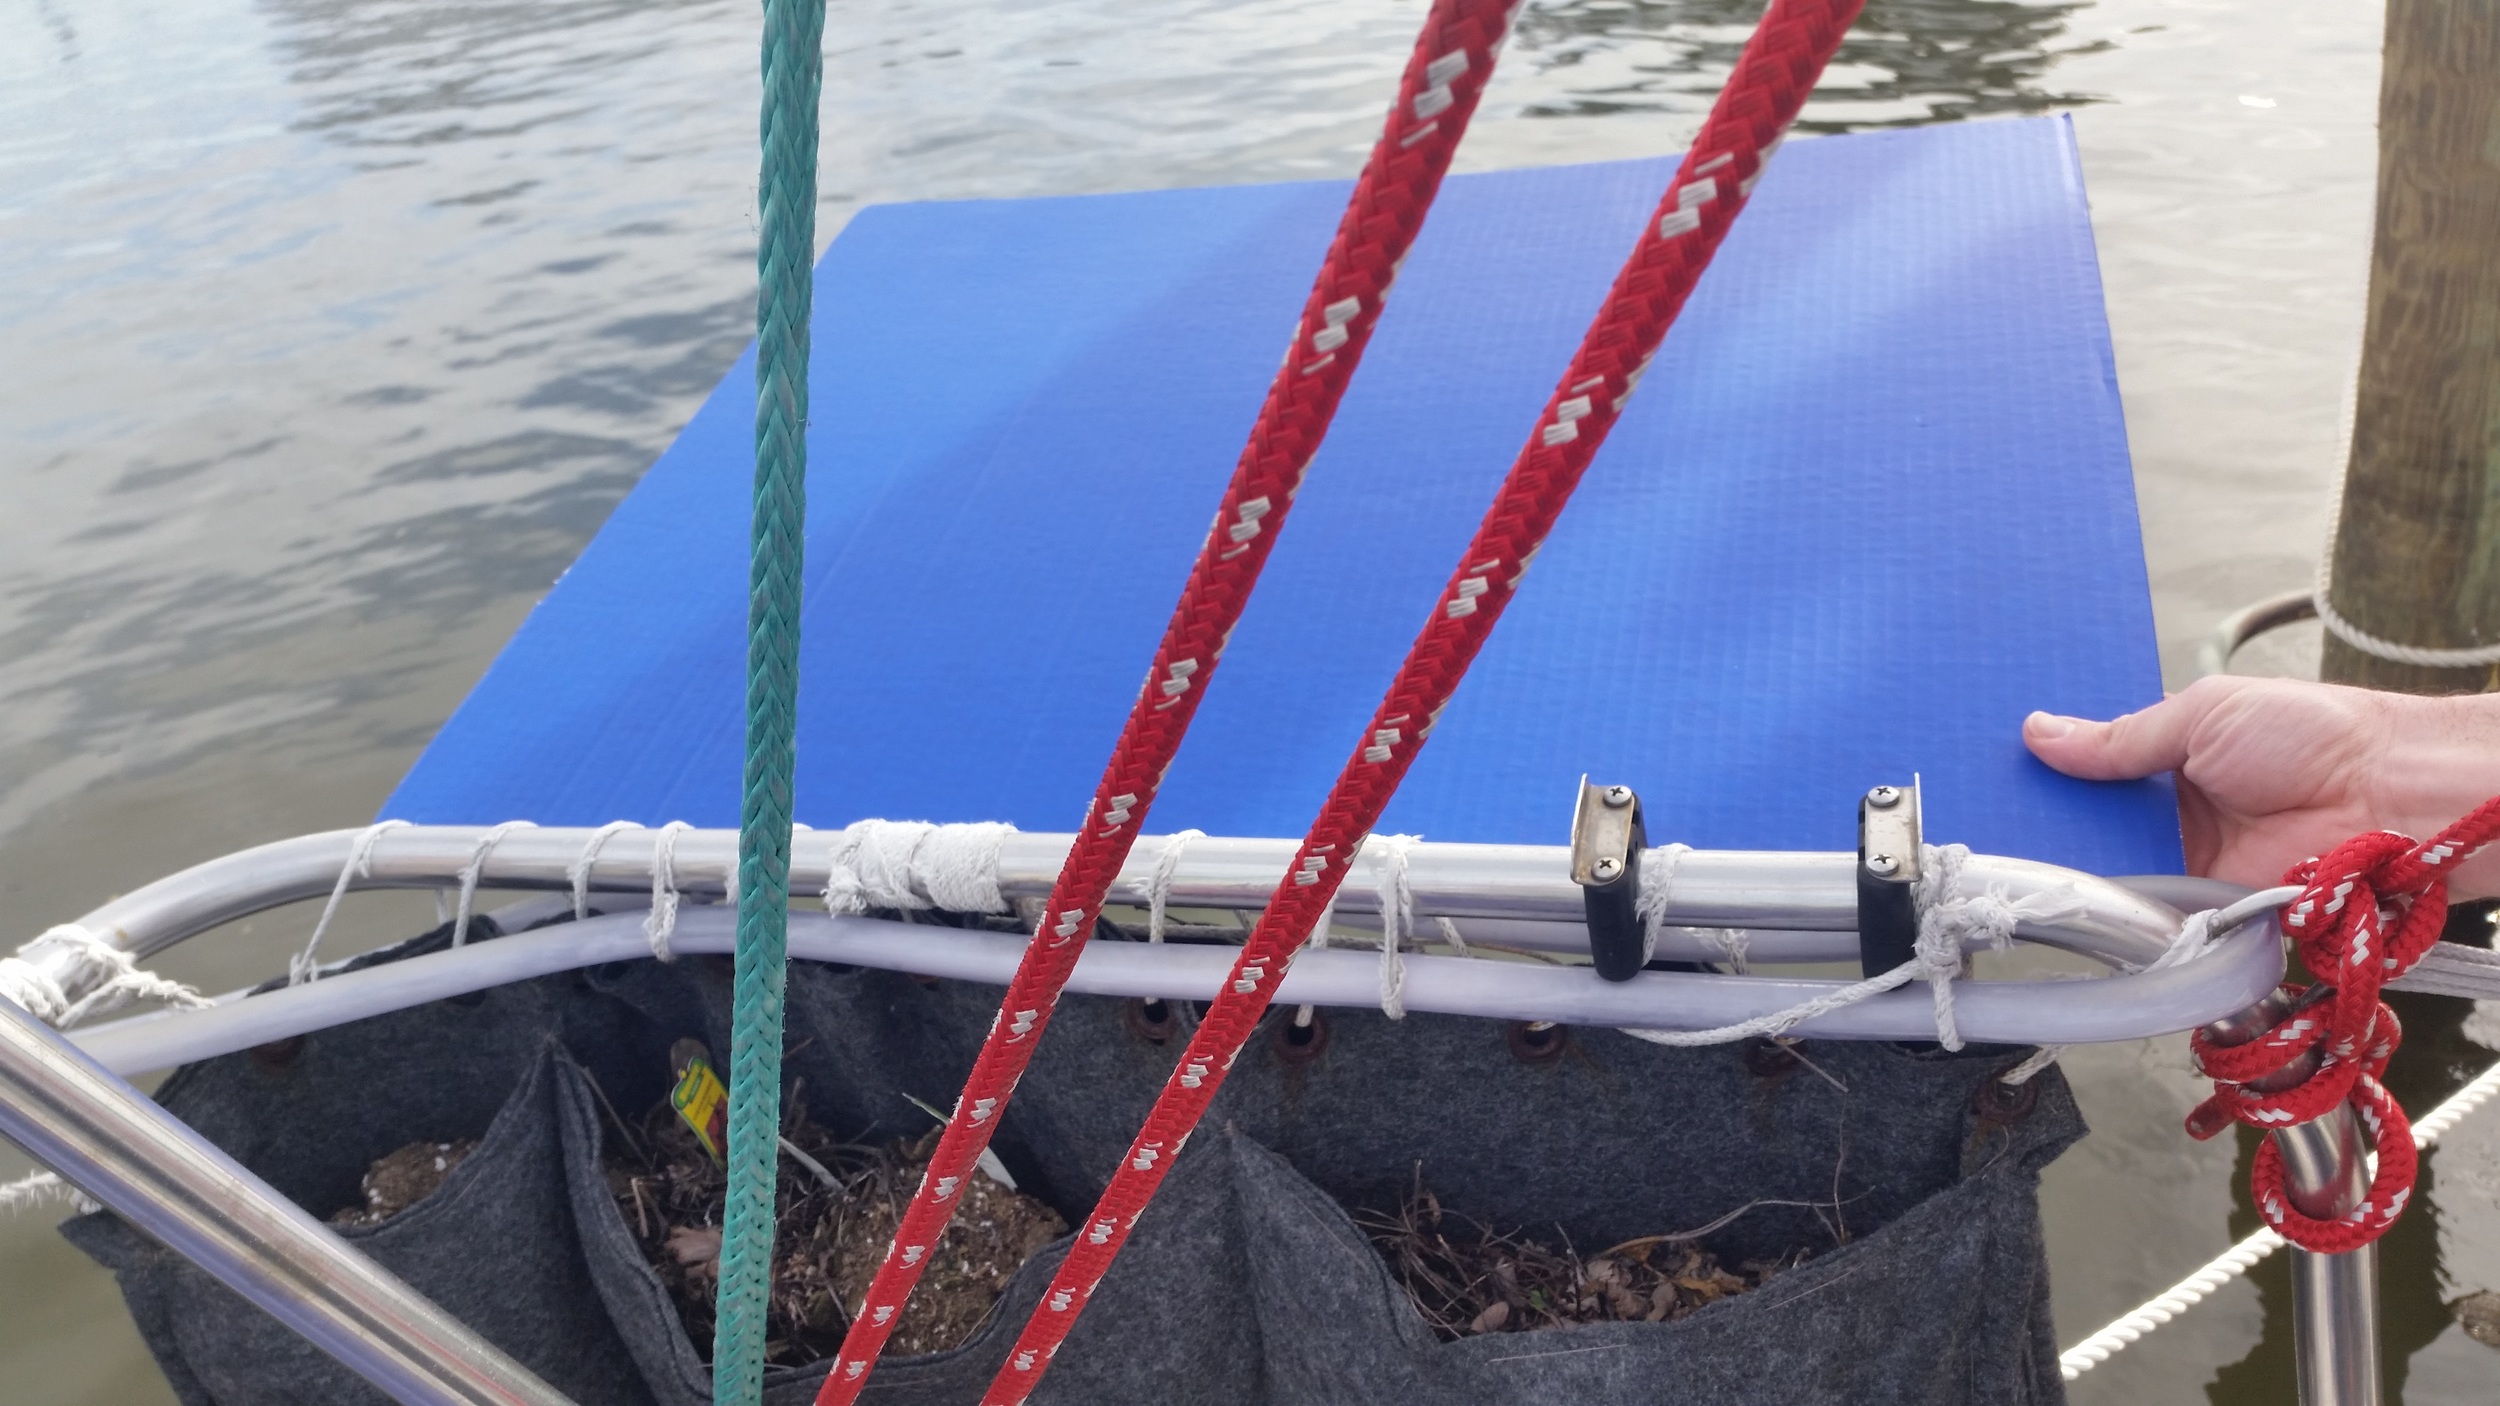
I cut out a template of a 50W panel (22in x 27in) and a 100W panel (41in x 27in) from a cardboard box. Then I placed the templates around the boat to see where they would fit best. This made it easy to hold in place without the expense of purchasing the wrong size. The 100W panels were way too big for the space available, so we were limited by space to two 50W panels. 

This will provide 100W and 5.5 amps during peak sunlight hours. Over 8 hours, we would add 44 amp hours to our battery bank! Hopefully that will be enough or we will have to get really creative to fit more panels on board.

Now we know what size of panel and where to place them, but how do we keep them safe? The plan is for them to hang off the sides like wings, this will make them the first thing to break in a close encounter with a piling or sea wall. To protect them, the plan is to mount them with the ability to fold the panels down. This will make the panels flush with the stern rail and protected behind the rub strake.

That's the idea on how they will work and mount, now we have to figure out how to make these thoughts a reality!

Making Dyneema Deadeyes

Deadeyes serve one purpose, that is to connect the synthetic stay to the chainplate. Chainplates have a small hole in them desinged to connect the rigging via a clevis pin attachment. Normally, the clevis pin is connected to a turnbuckle, but with deadeyes, the clevis pin connects a toggle to the chainplate.

This toggle serves as a metal strap that will hold the deadeye securely in place.

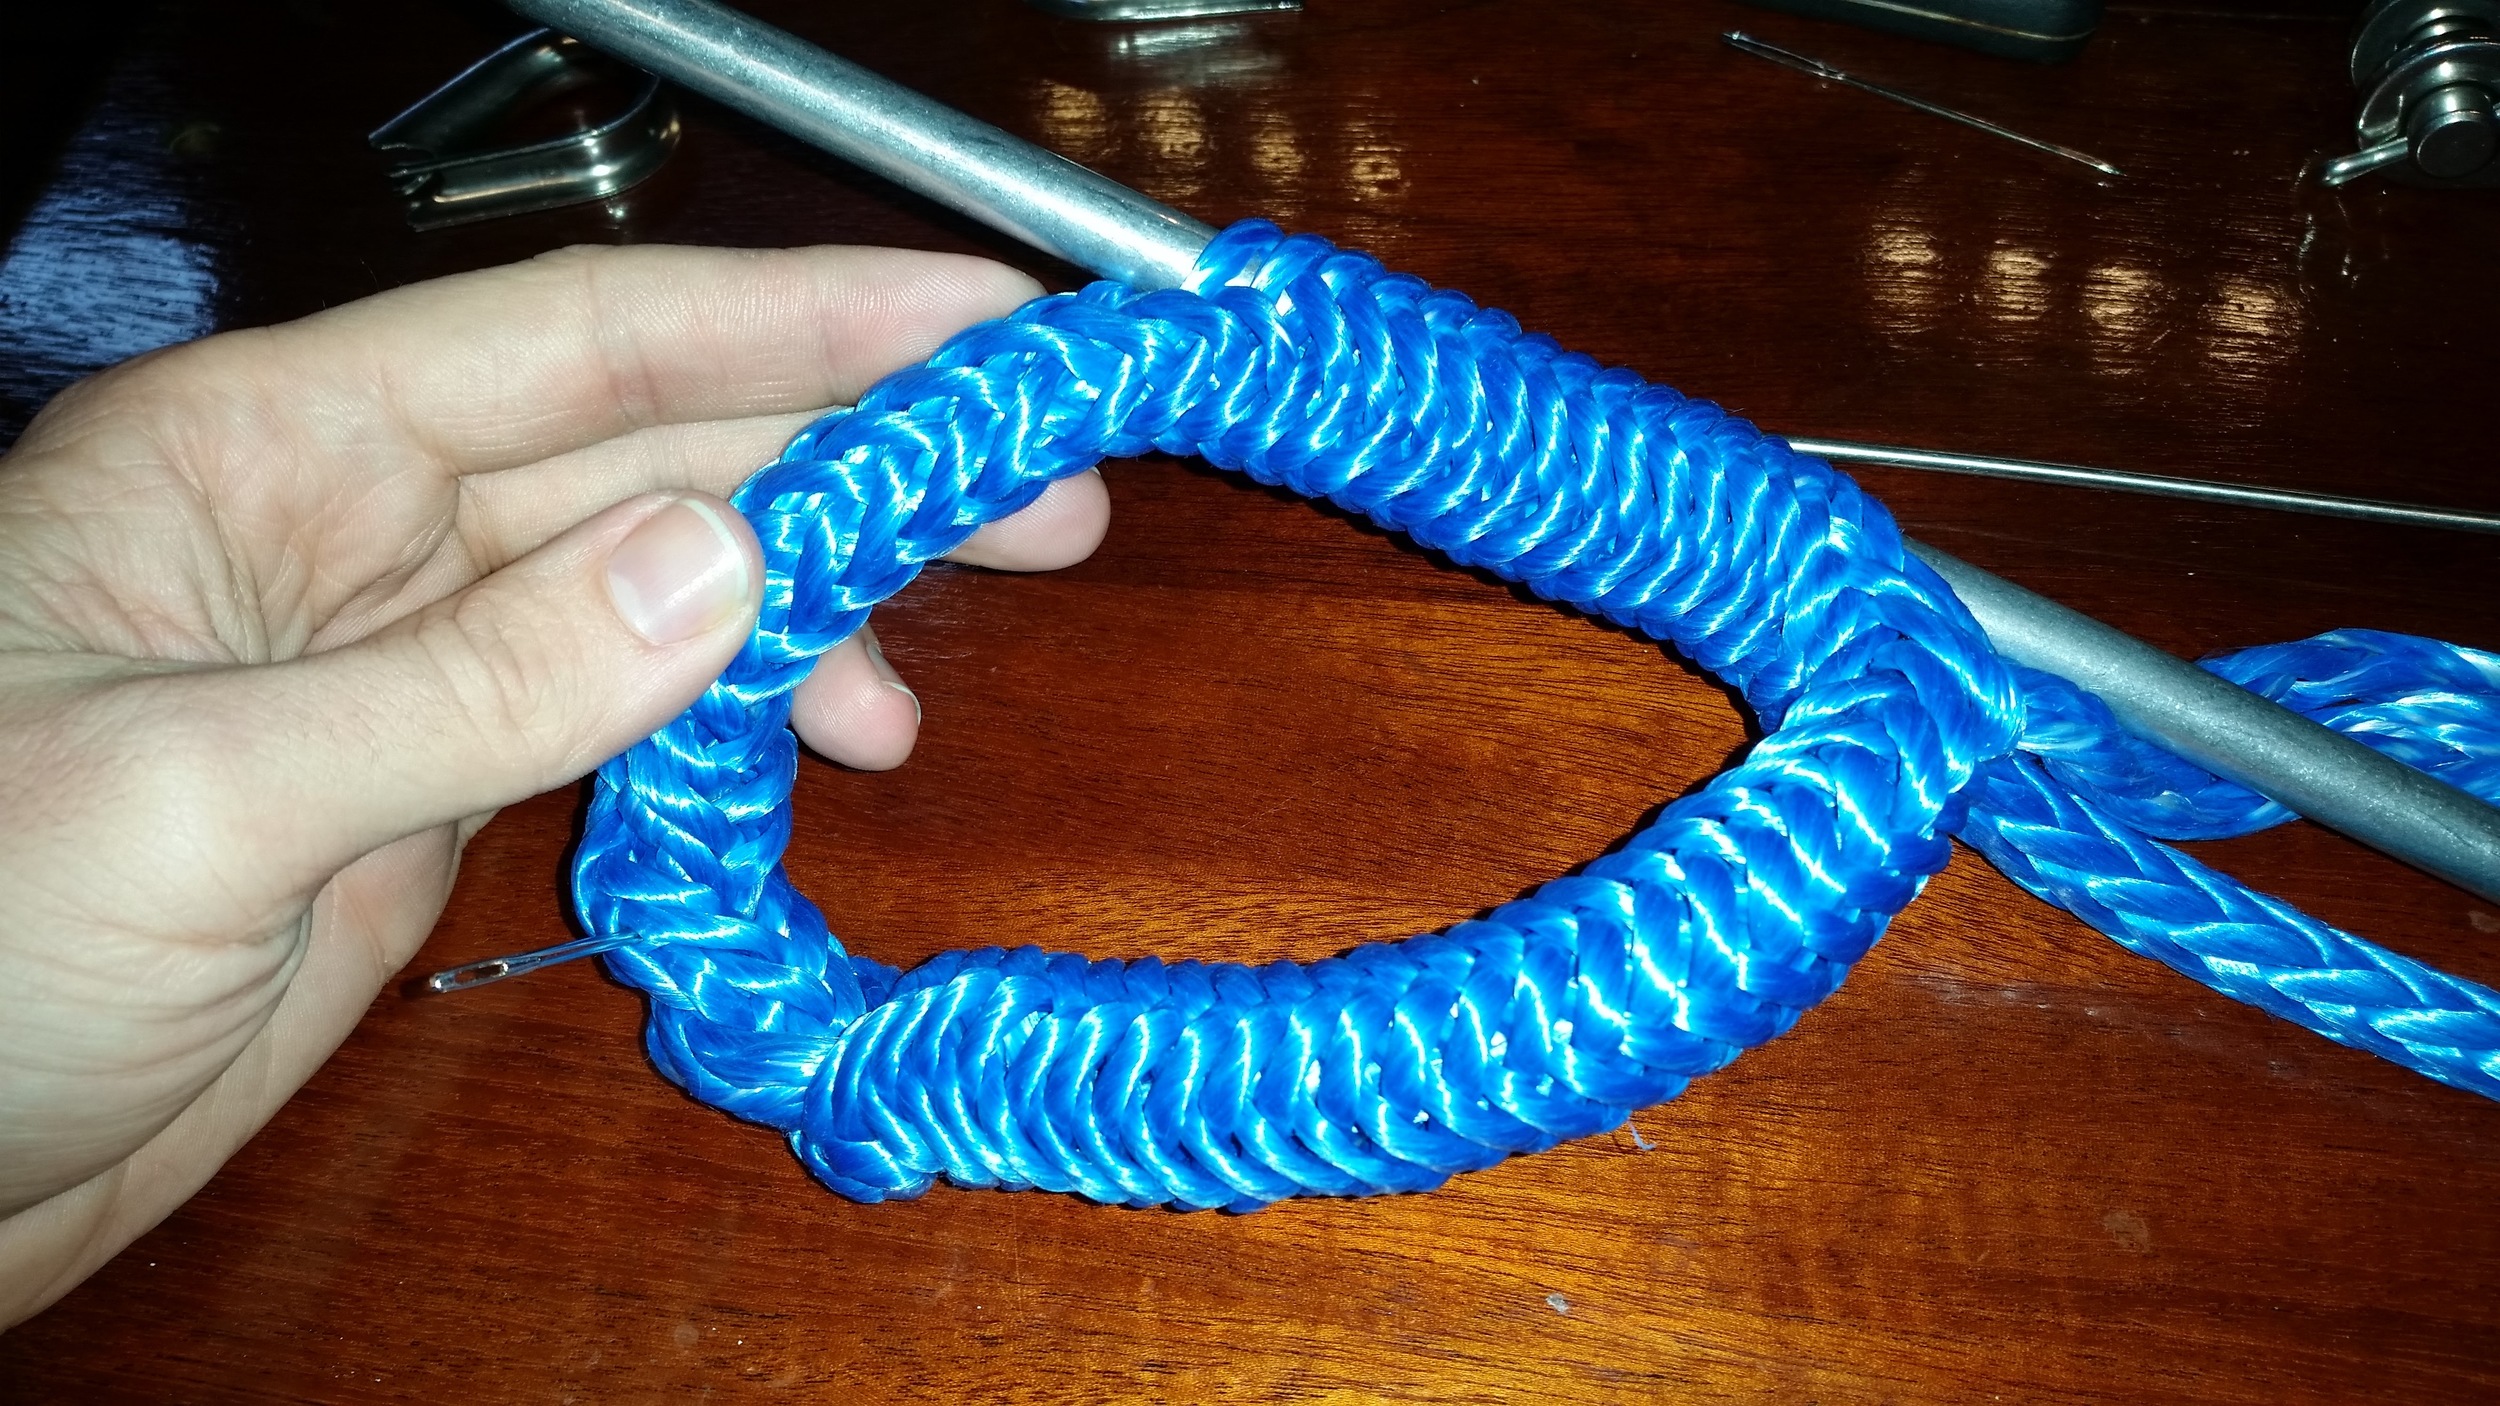
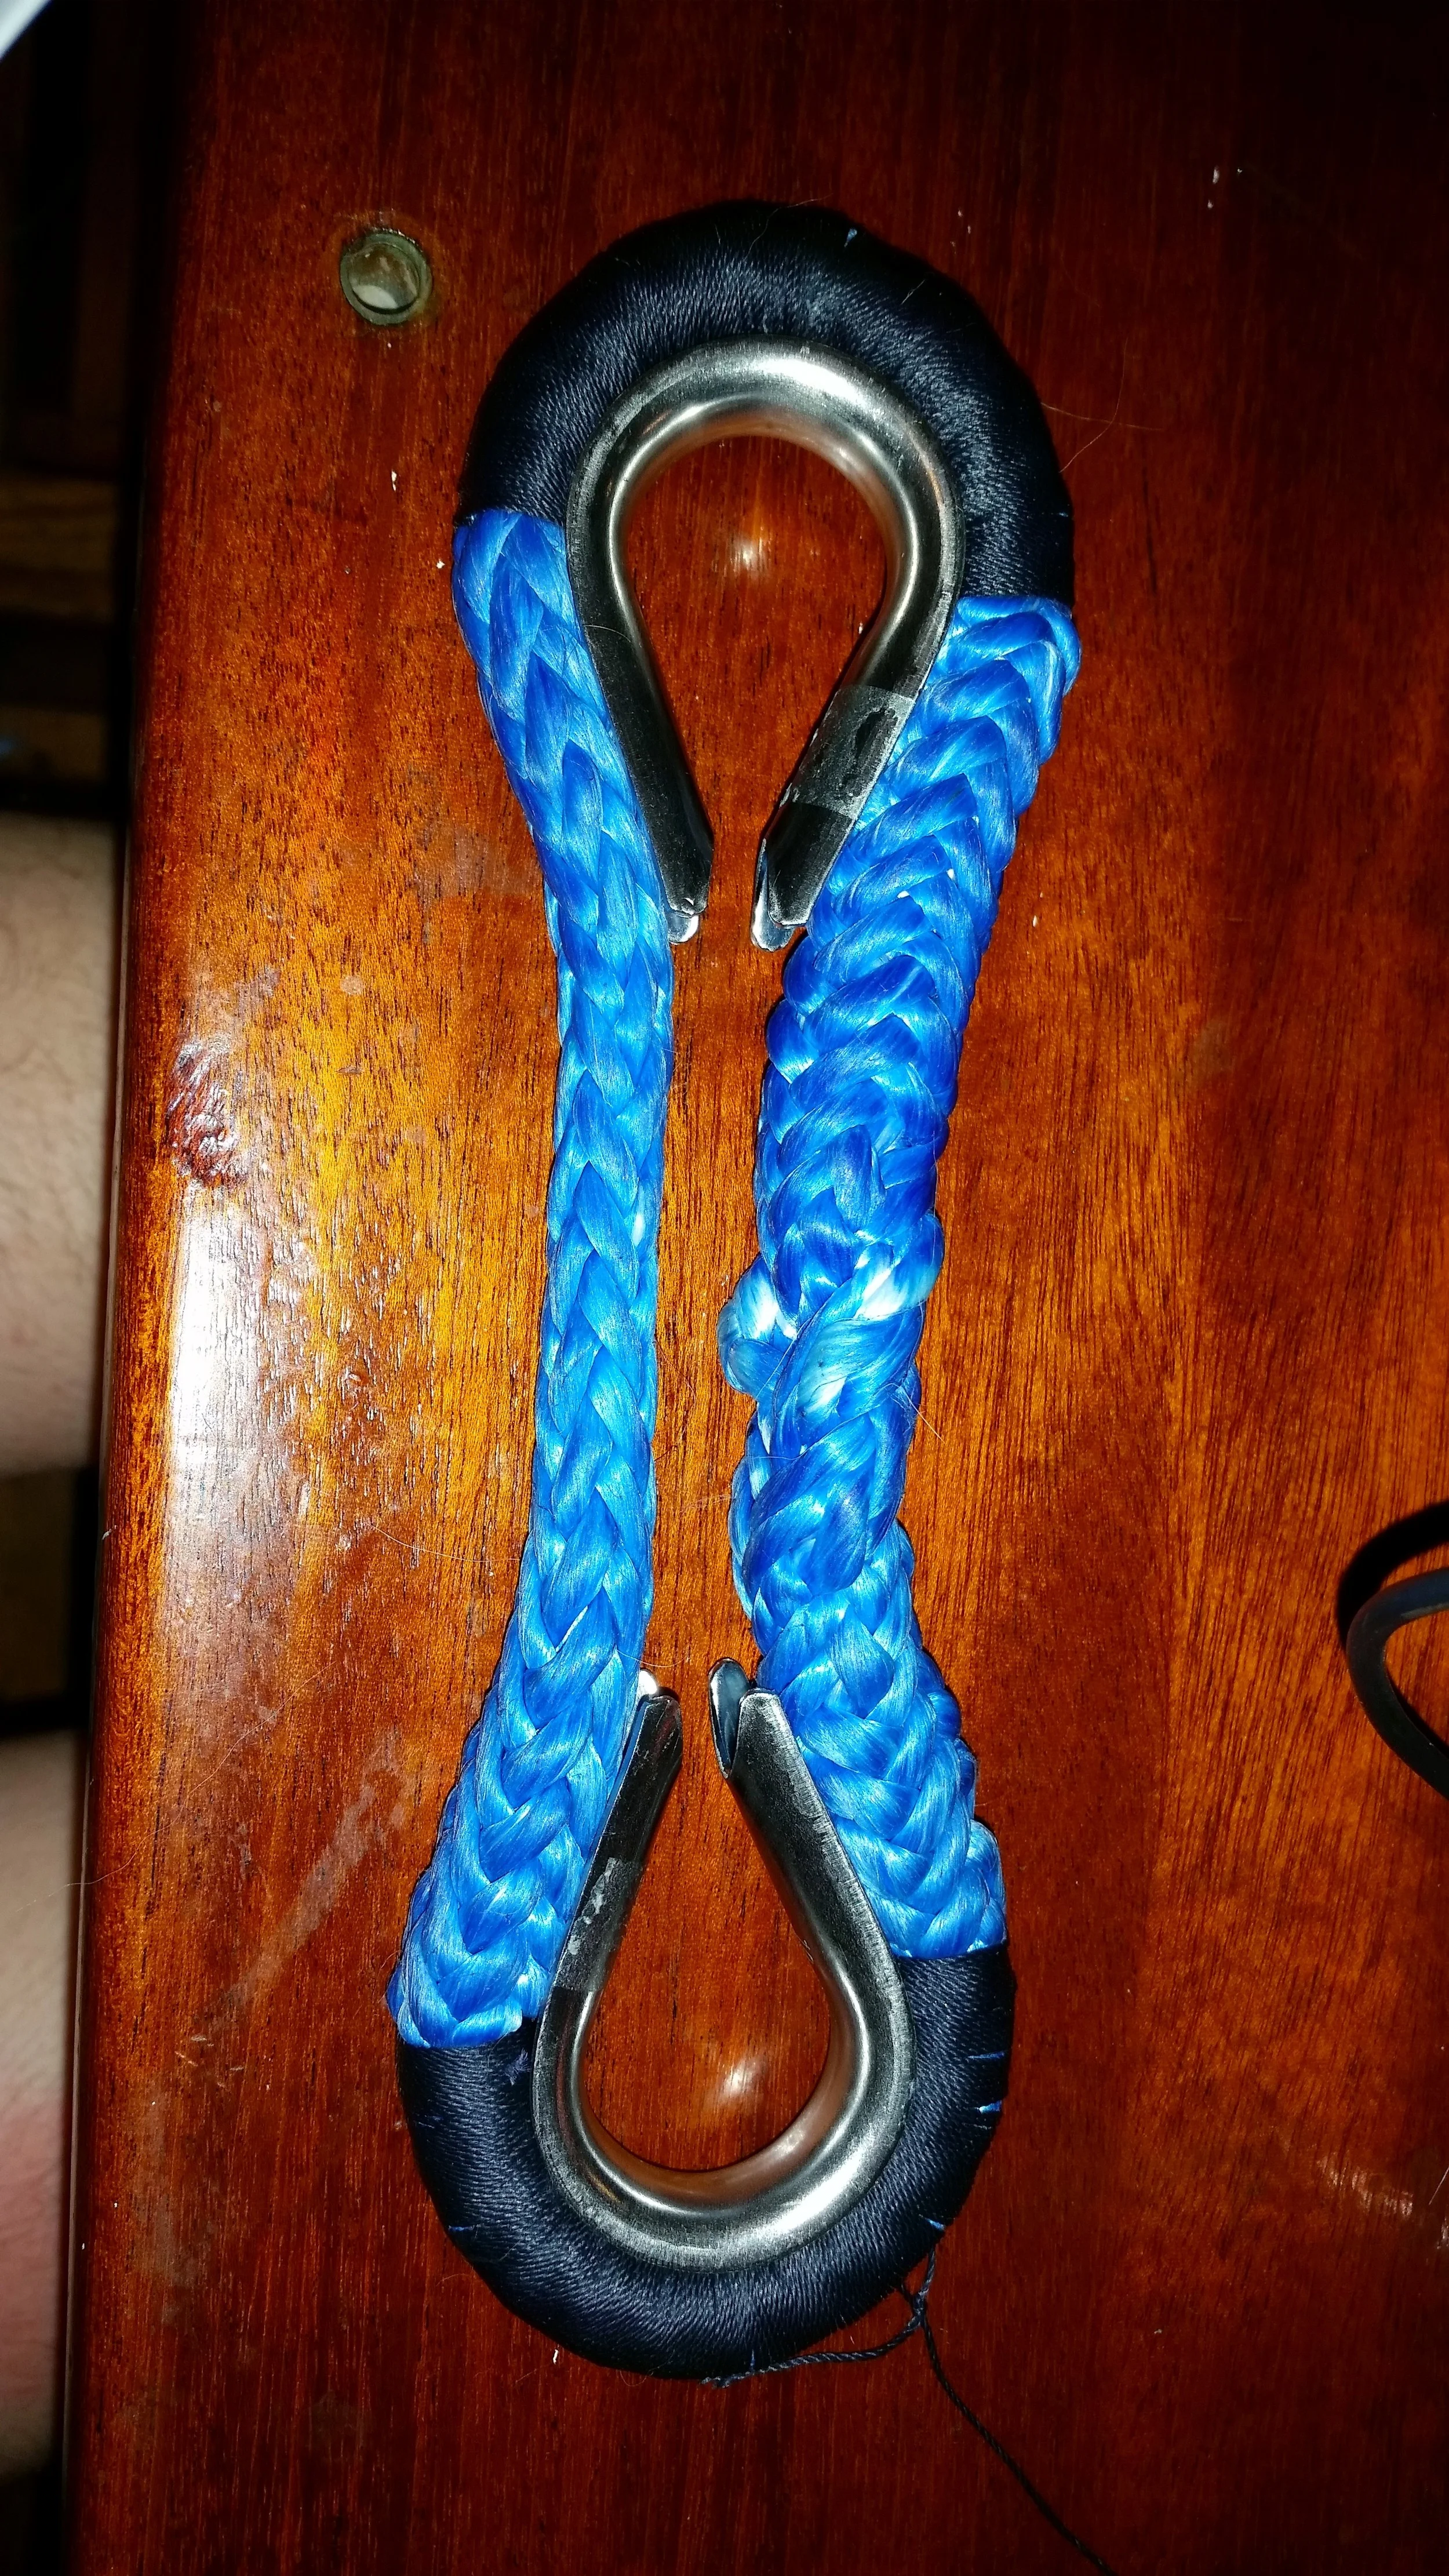
Dyneema deadeyes may look fancy with their loops and fittings, but the are actually just a dyneema grommet with two thimbles in them. The central tie is only there to hold the thimbles in place.

Making a grommet is a tedious task, and making one out of dyneema proves to be all the more complex. Dyneema is classified as 12 Strand Class II rope, and relies on a long bury to securely hold the splice. The typical recommended bury for a dyneema splice is 72 times its diameter. This means that for the 9mm line I'm using for these deadeyes, I need to bury 648mm (25.5inches) on each side. In other words, the grommet would need to be 25.5 inches in long. Mind you that dyneema deadeyes are less than 12 inches long! How can this be done?!

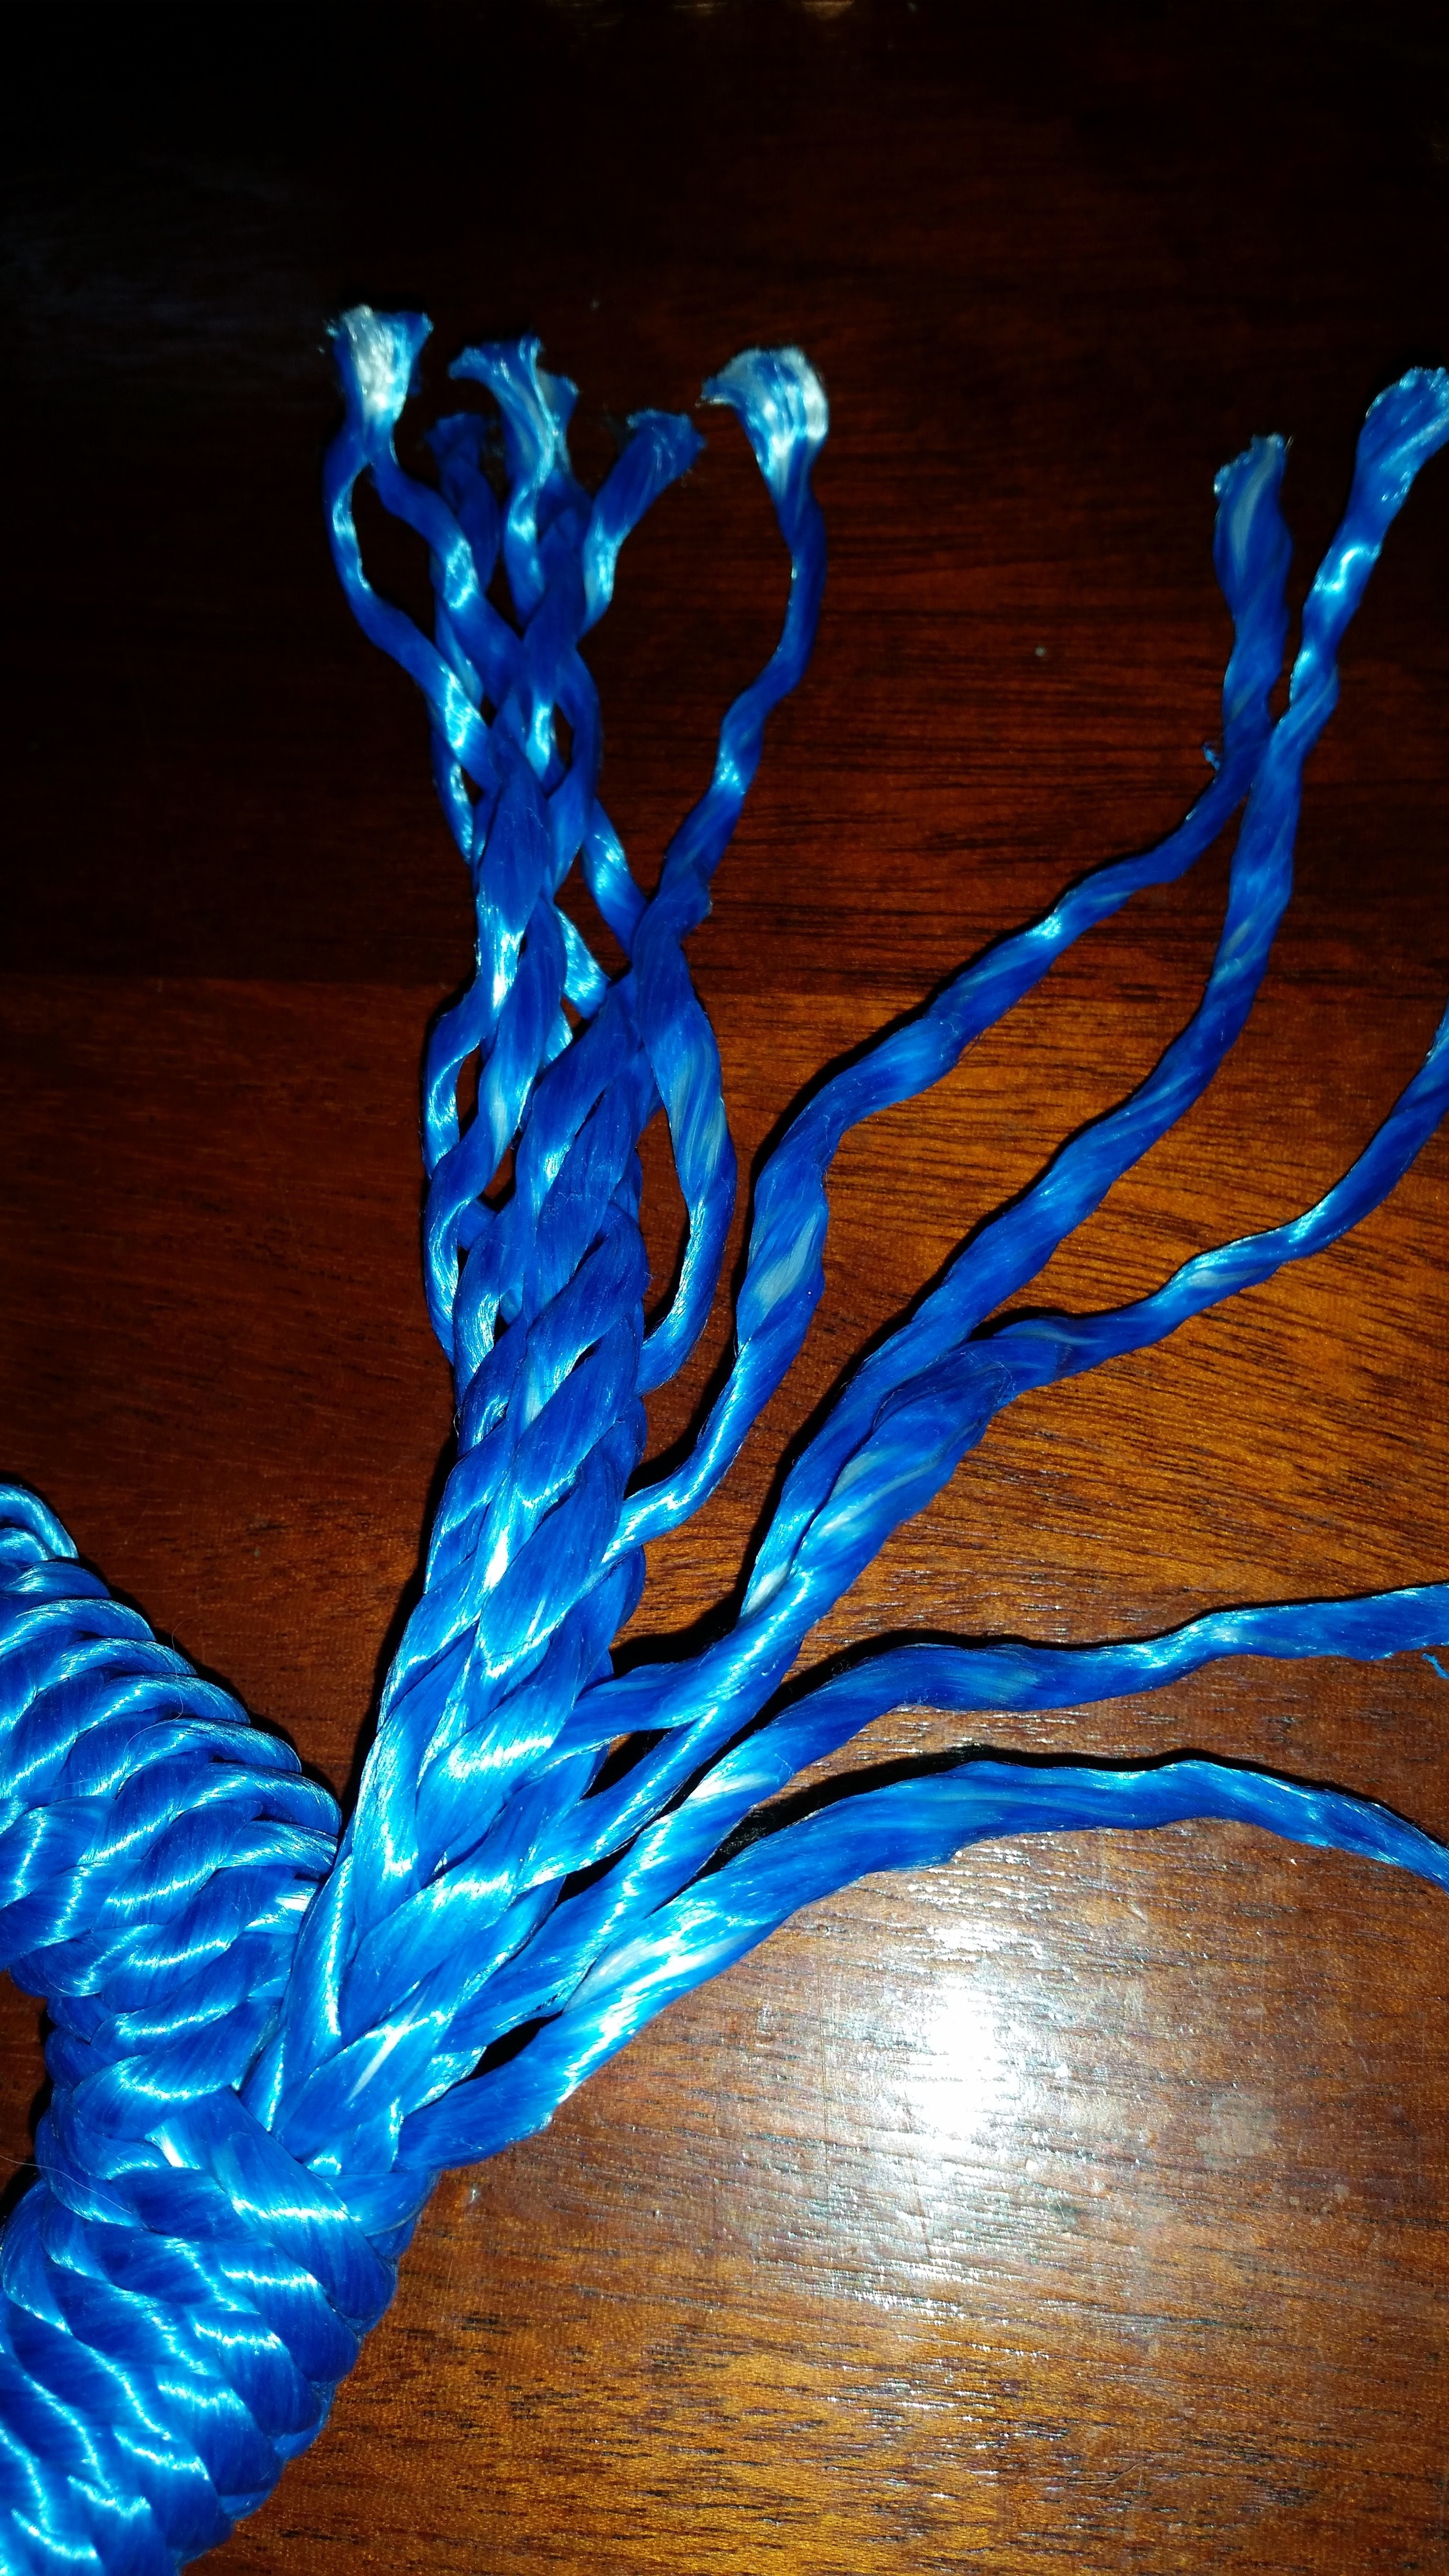
The trick is understanding how the line works and how splices work. 12 strand Class I and II ropes are simply made of 12 lines woven in a tube. When you scrunch the rope together, the hollow center will open up. When splicing 12 strand, the tail is slid through the hollow center and left untouched. There is no fancy weaving involved because the 12 strands surrounding it will crush down on it like a Chinese Finger Trap when you try to pull it apart. Class I fibers are not very slippery, so they require less bury; Class II fibers are very slippery, and require a longer bury. Dyneema is a Class II and is very slippery!

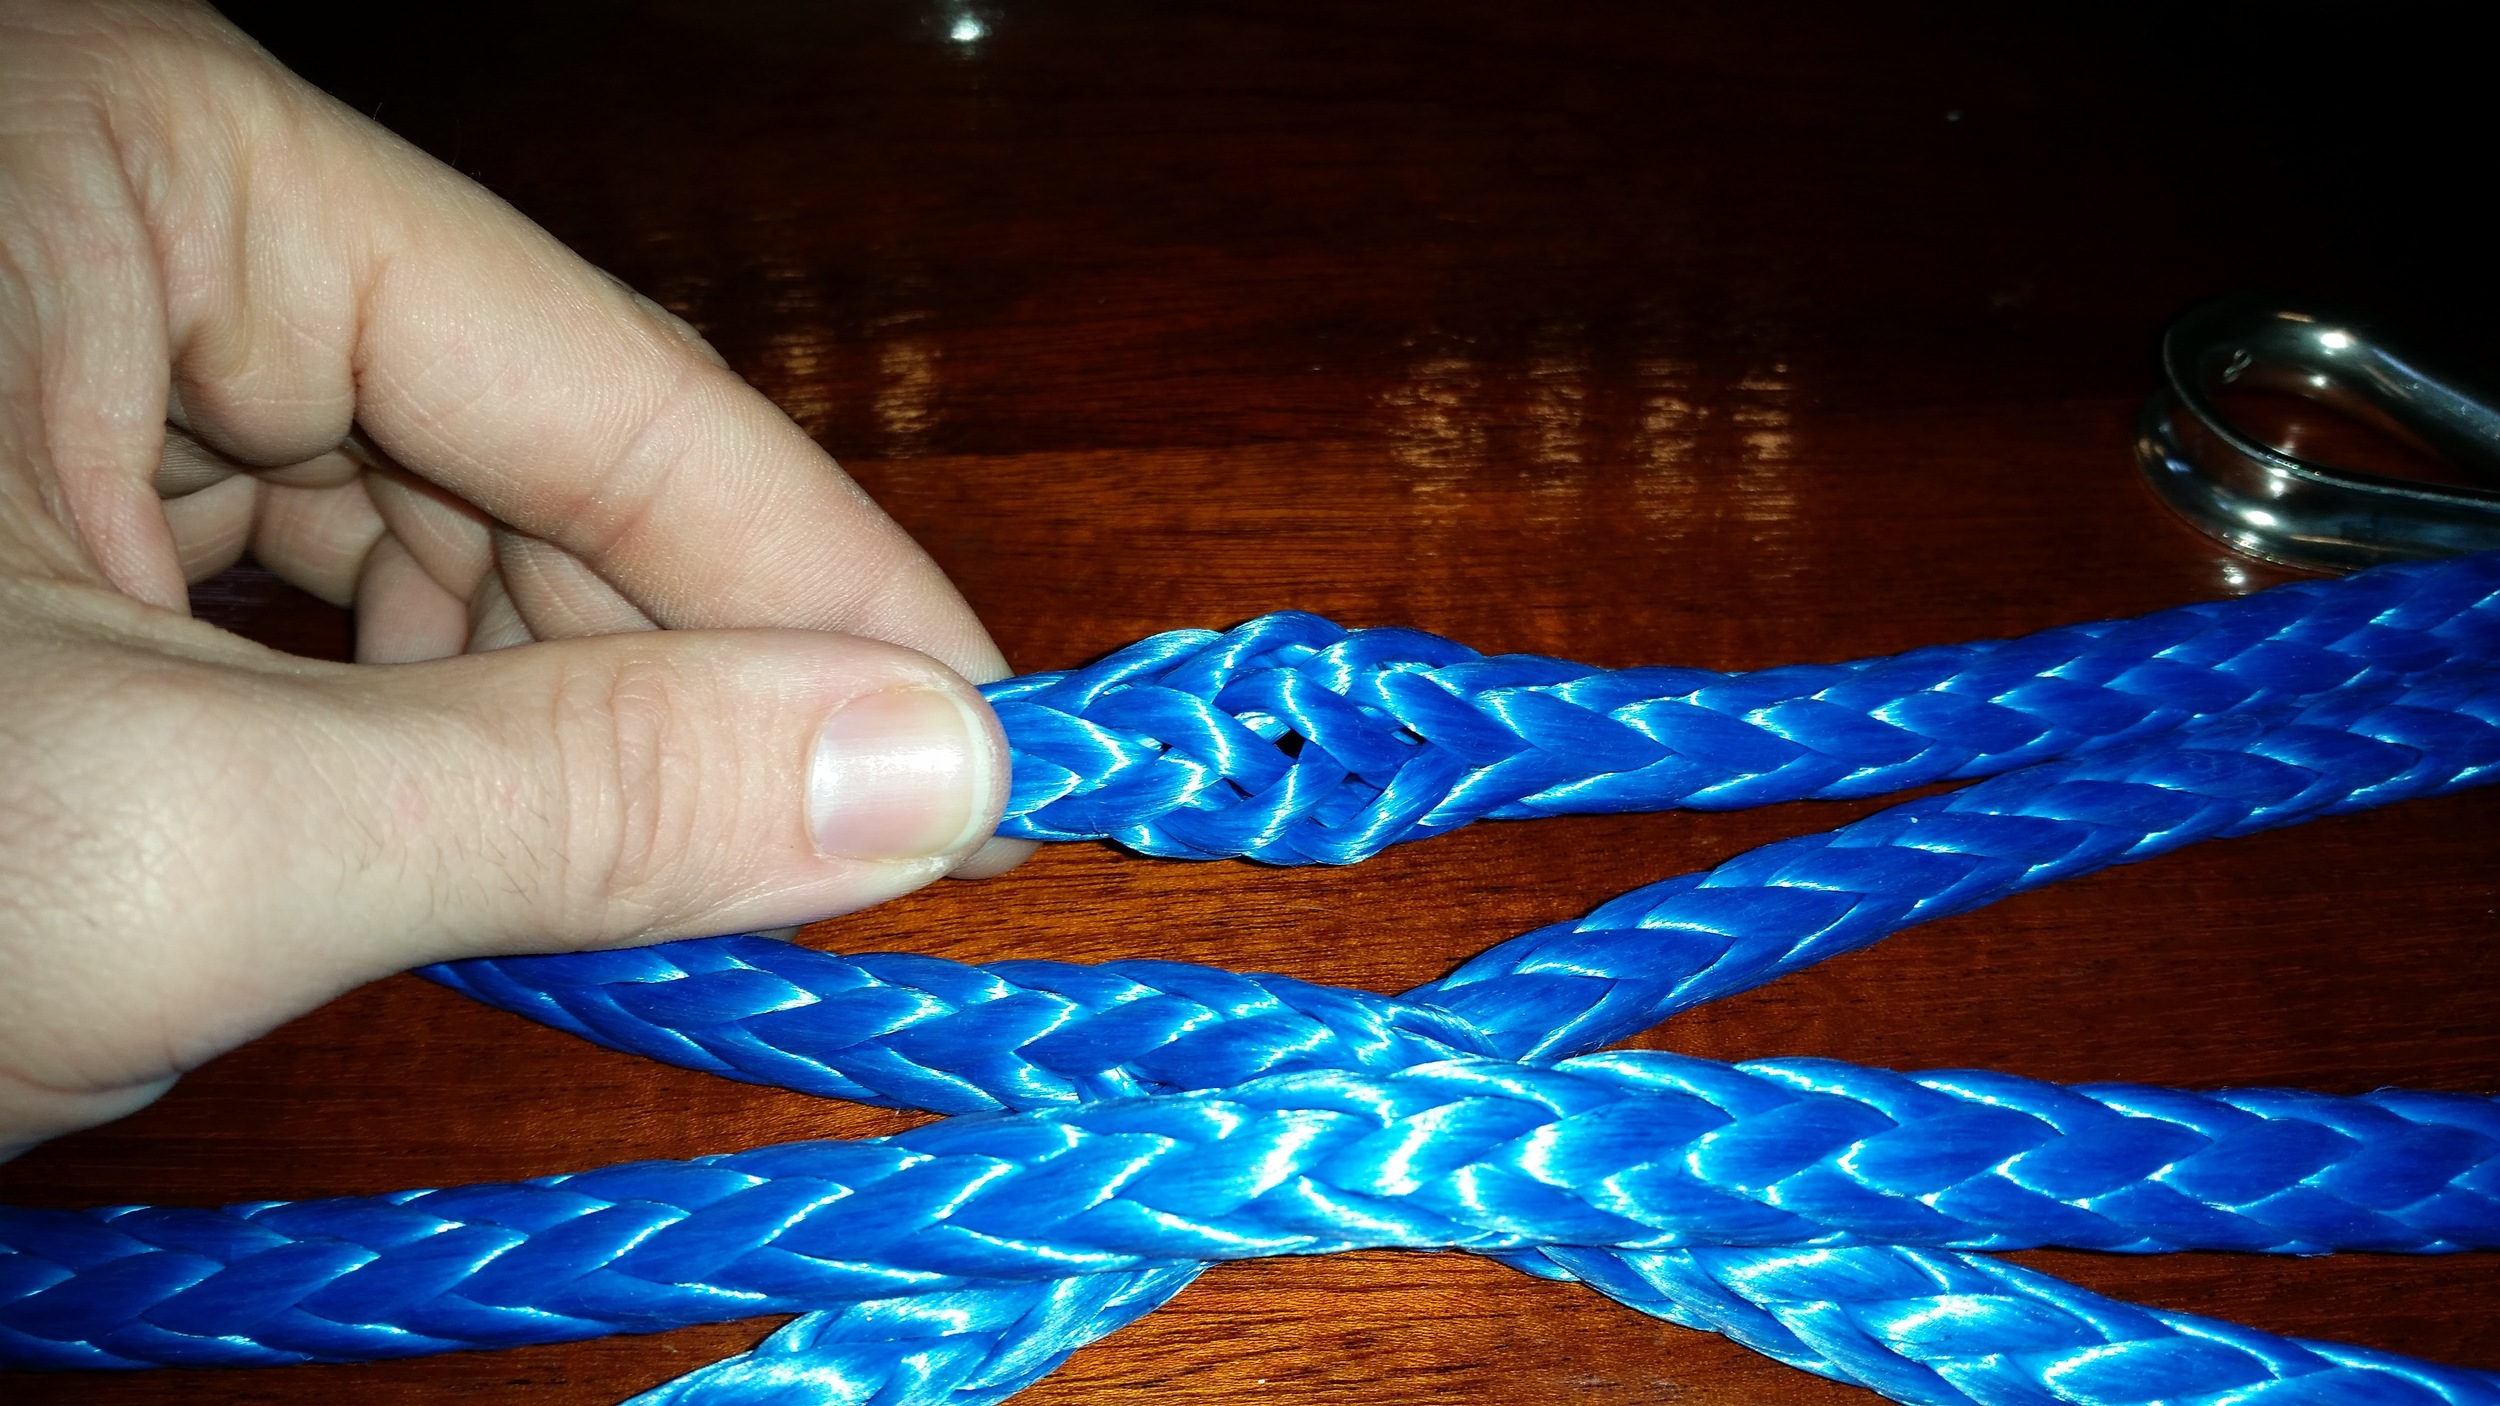
A secret to side step the bury requirement is to perform a Mobious Brummel Splice. A Mobious Brummel works by passing the ropes through each other, causing them to lock against each other when pulled. The tail is then burried, further locking the splice in place. For the junction to open up, the 12 woven strands need to unravel and separate in order to pull apart. The pressure from the woven tube crushing down on the burried tail will not allow the strands to unravel and will keep the splice secure. Locking stitches will add extra insurance to make sure that nothing slips and everything holds

Mobious Brummel splices are easy to do, simply pass the two free ends through each other and bury the tail. When making a grommet, this is not possible. There is no way to pass the other line through as it is trapped on the other side of the grommet. To get around this, you simply deconstruct and reconstruct the line as you make the splice.

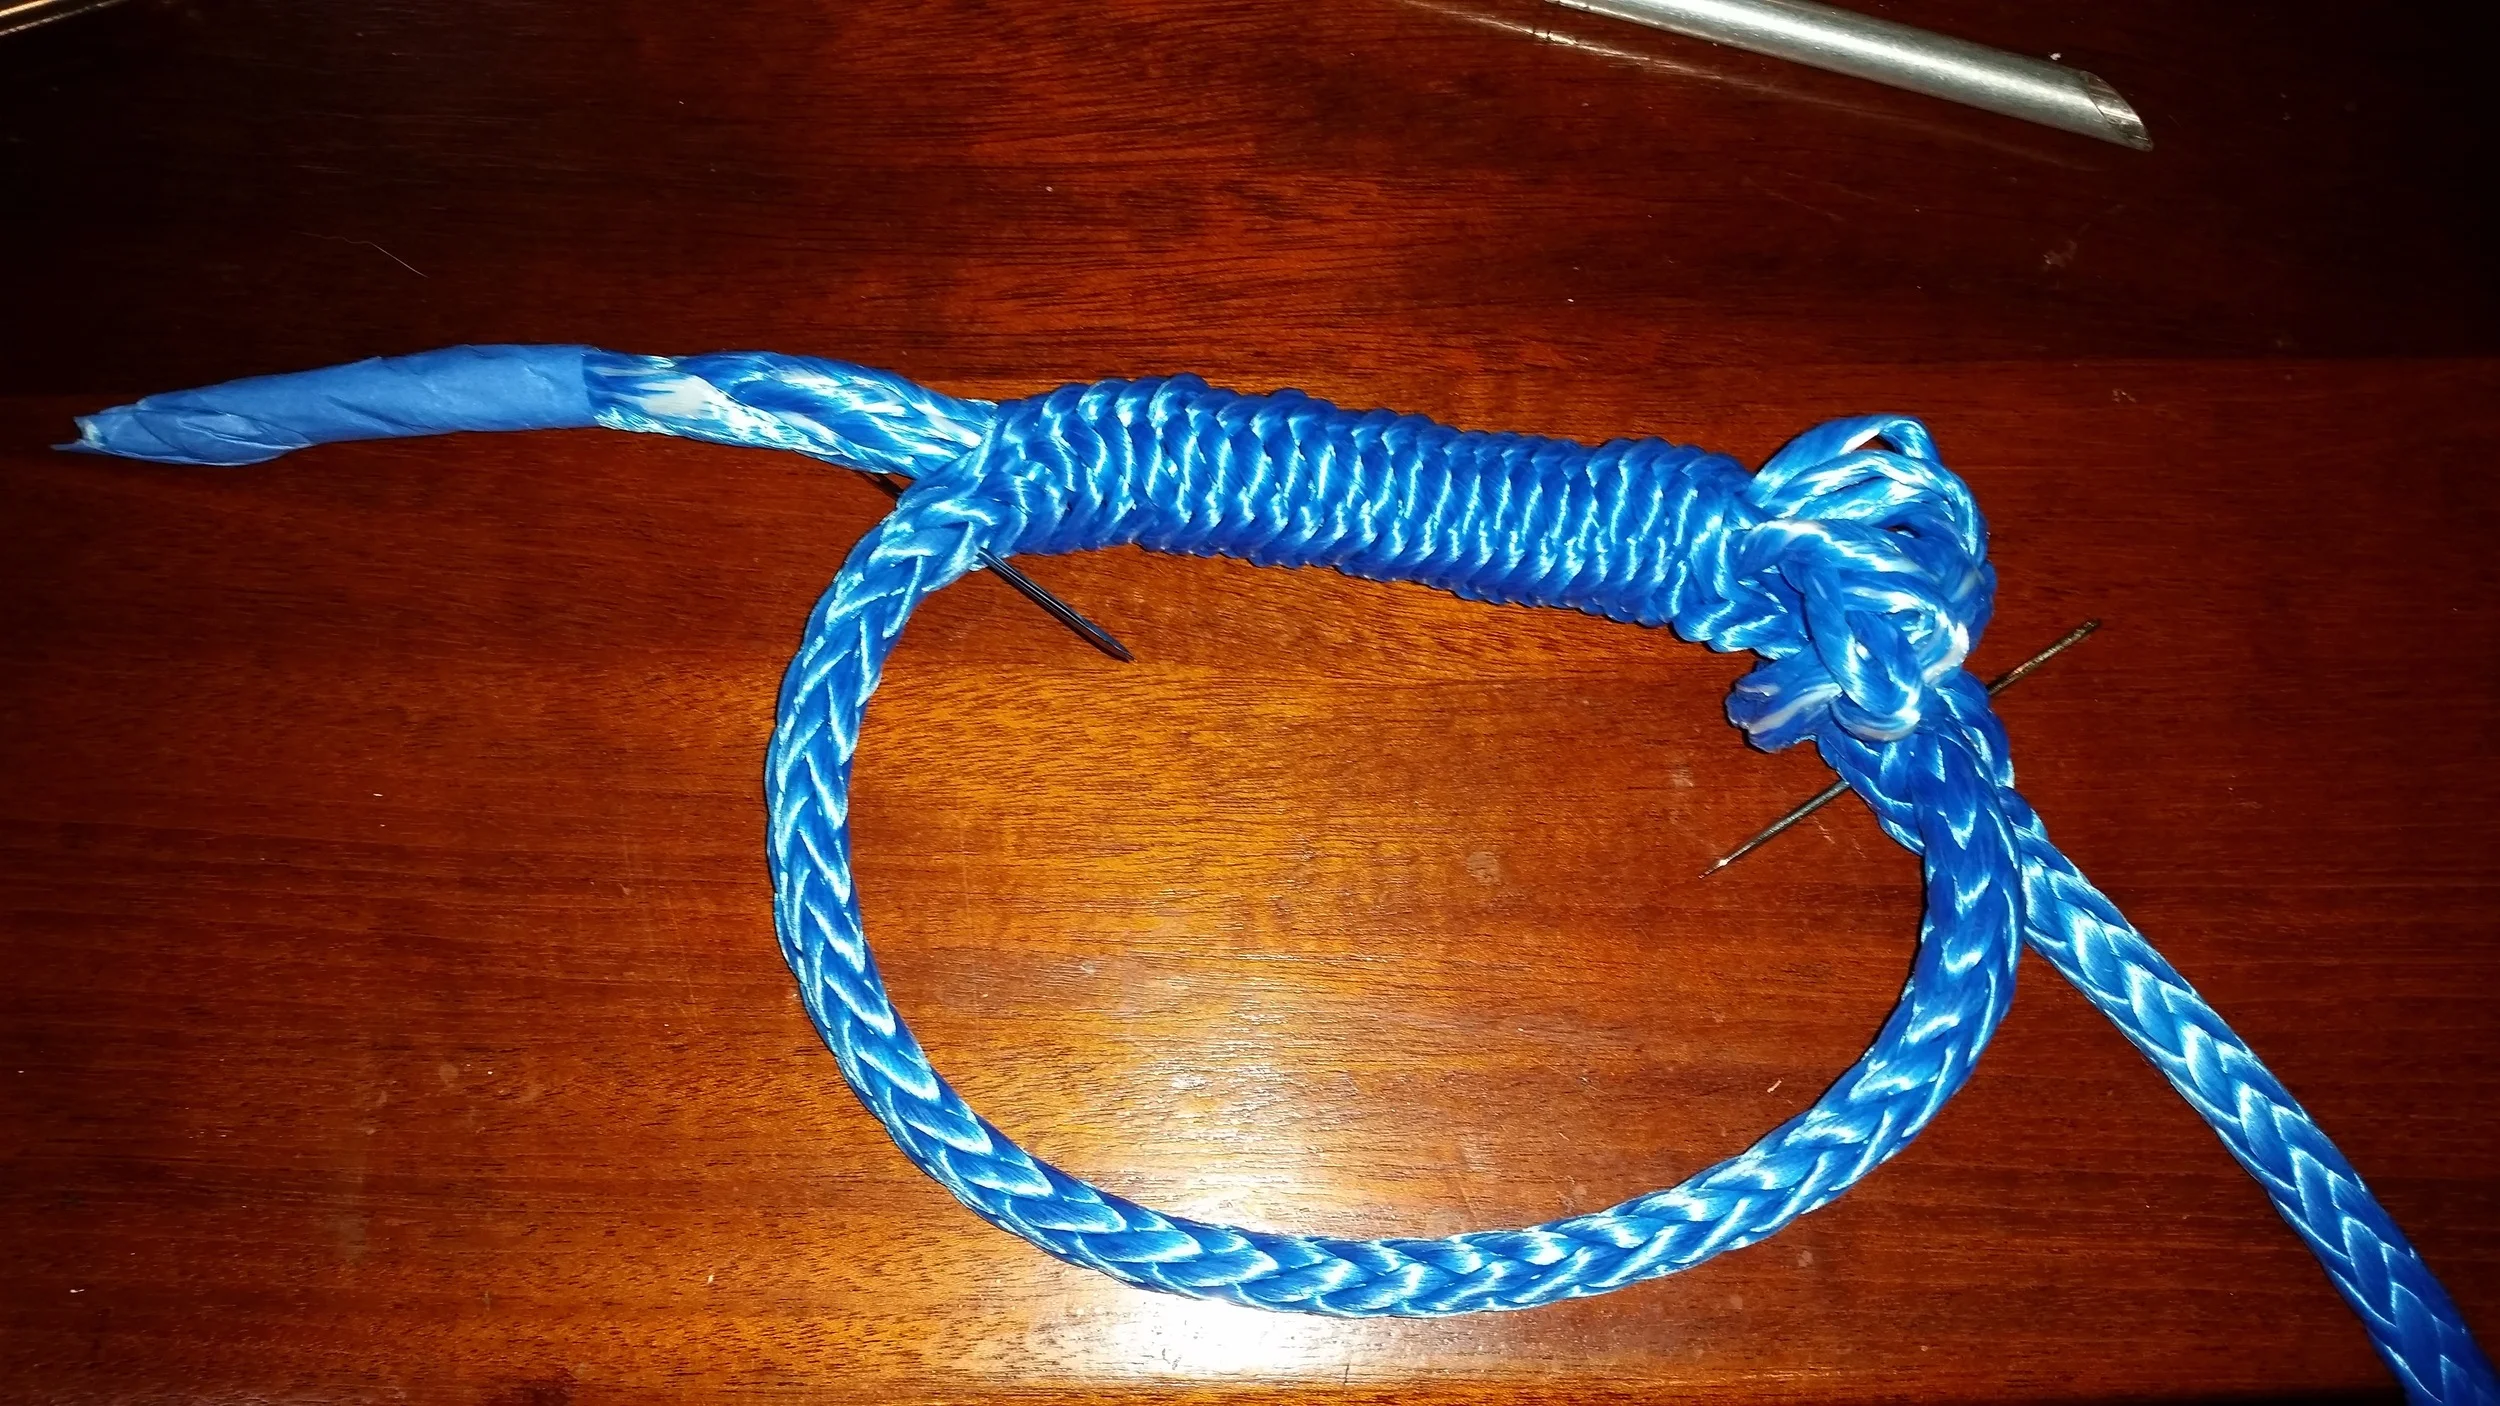
As usual, the first side is the standard and simple way. Simply open the braid with the fids and pass the line through.

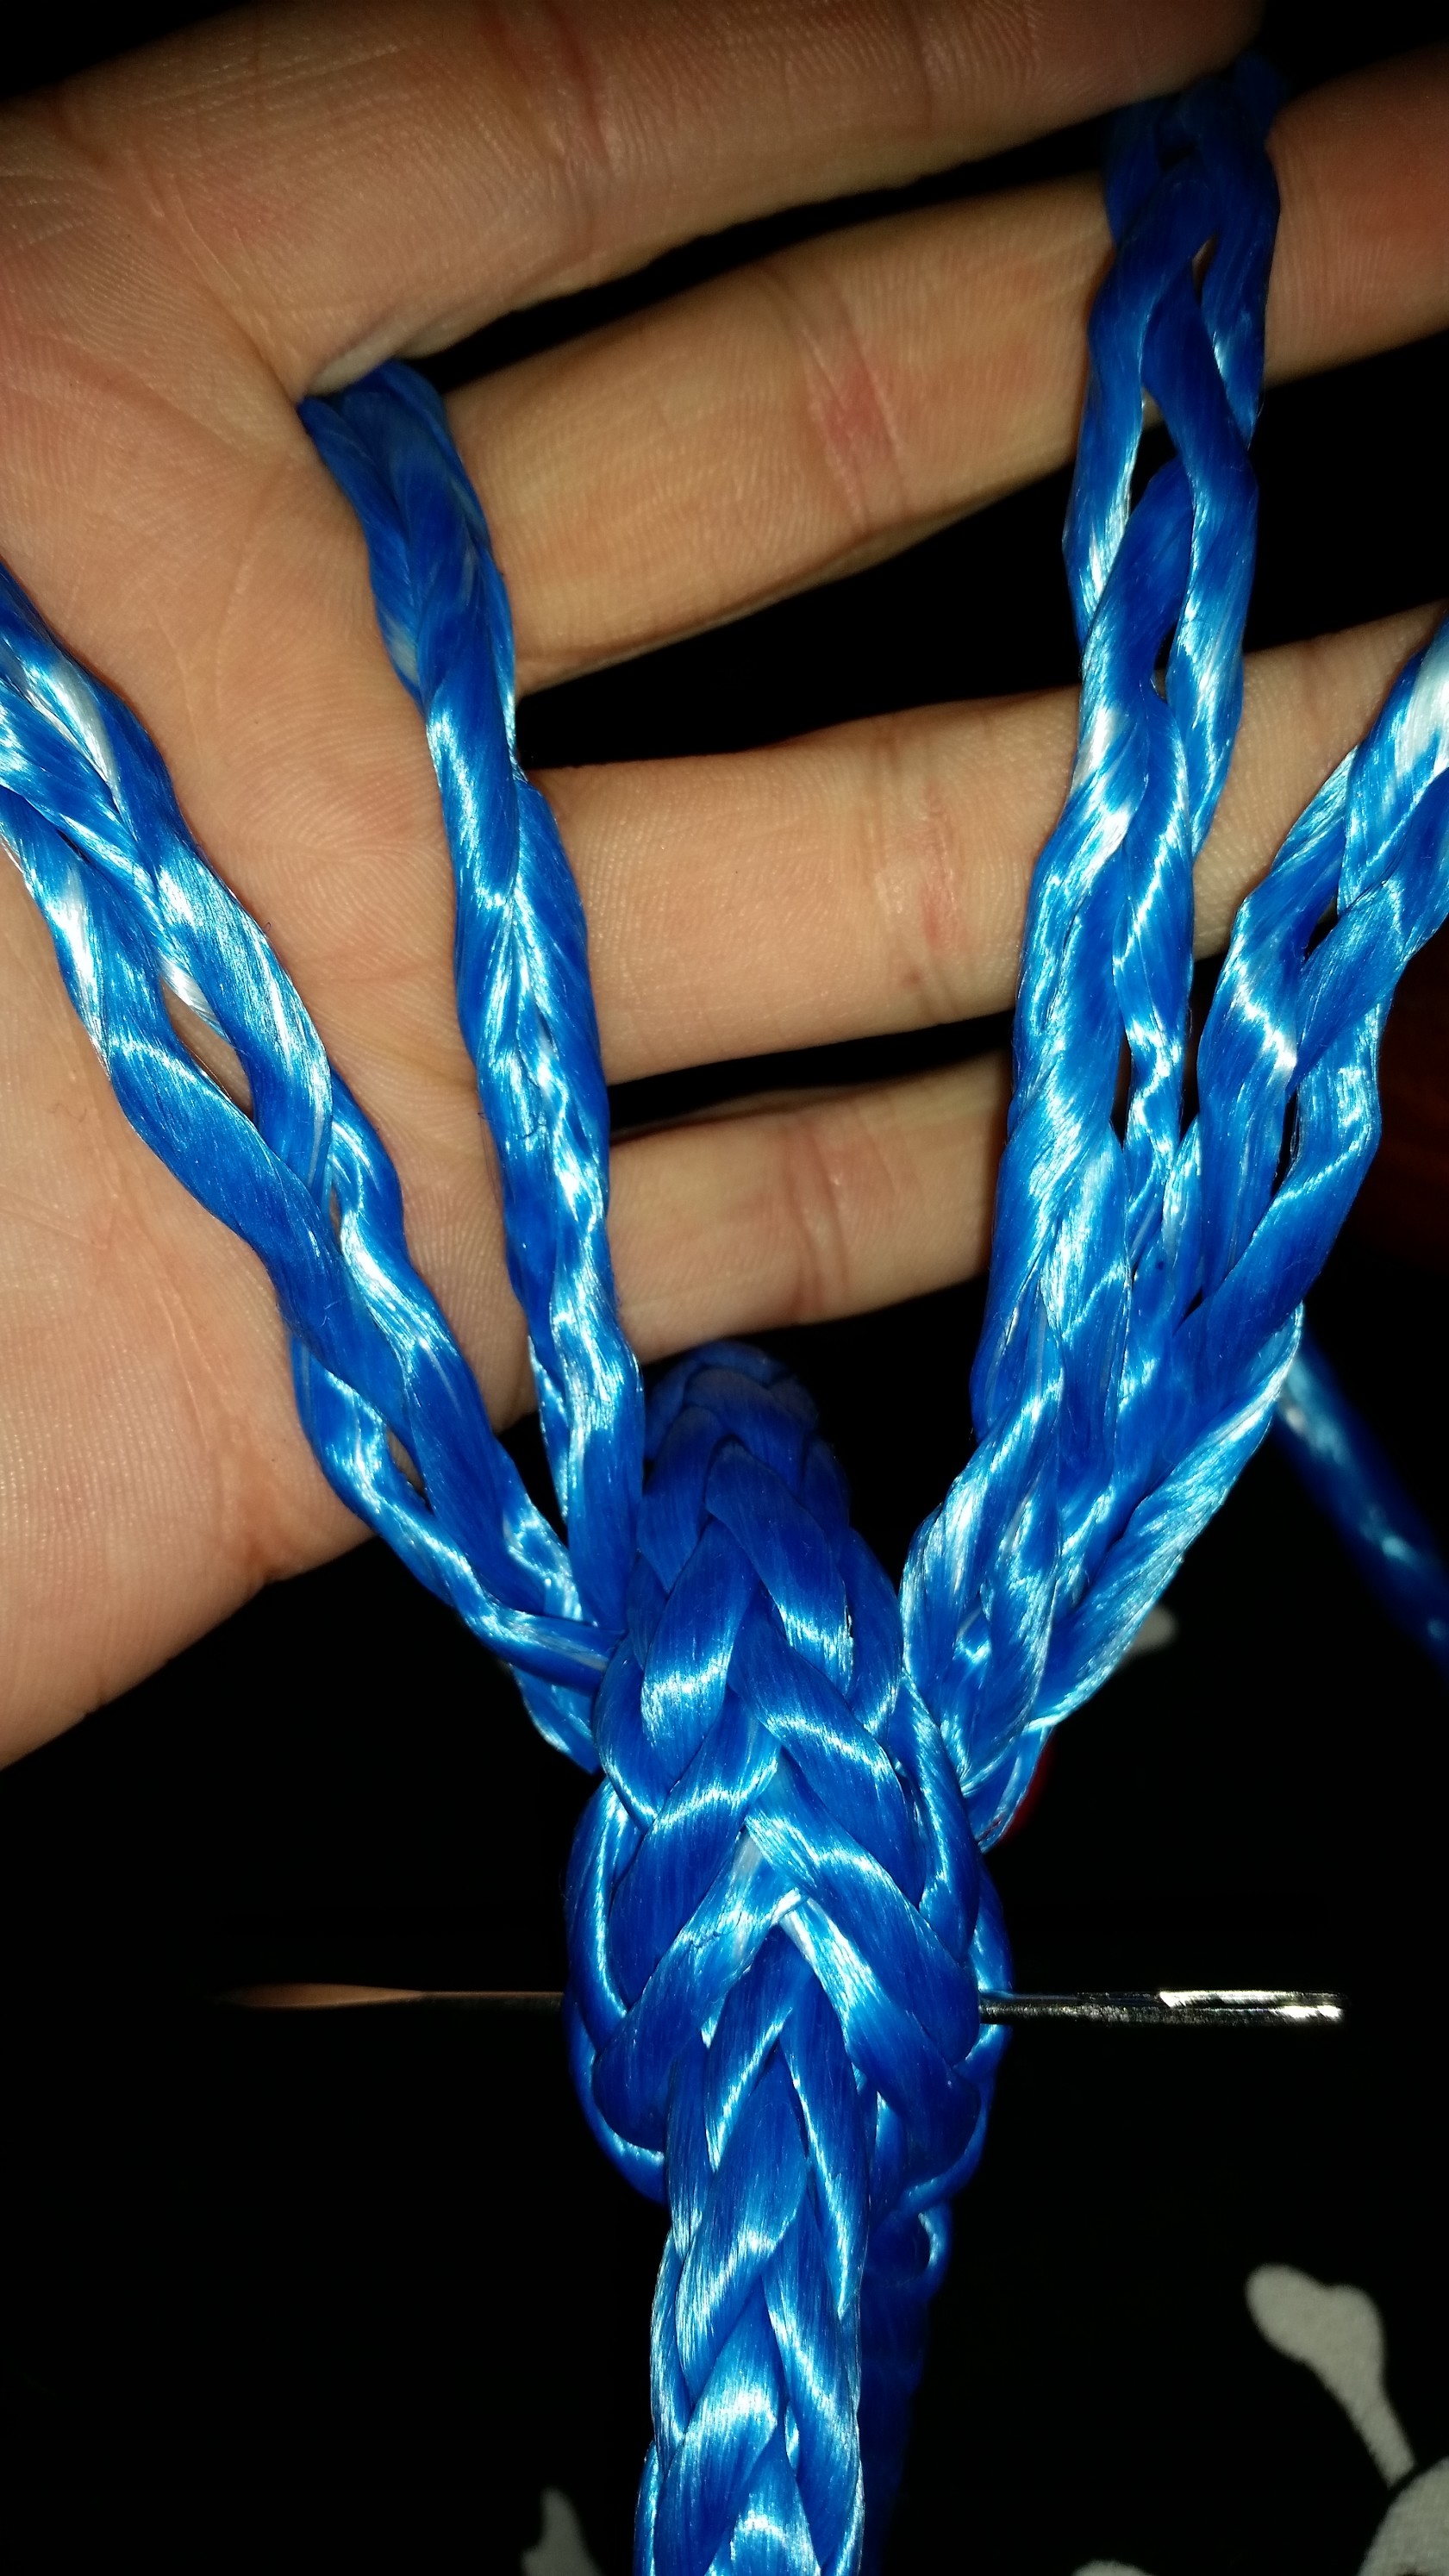
Now balance the tails to ensure that everything you are doing is symmetrical. I pierce the splice cross with a pin to keep everything in place. If you are doing multiple grommets, do them all at the same time so they all come out relatively the same size.

Now prepare to do the second pass of a Mobious Brummel splice. Separate the 12 strands into two groups of 6 strands. The goal will be to reassemble the 12 strands on the other side of the line, thus completing the Mobius Brummel splice. If you feel talented and gifted at weaving, you may re-weave the 12 strands into a hollow tube, as if nothing had happened. I am not that gifted, so I take a different approach.

When you look at a cross section of 12 Strand Dyneema, it can be grouped into 4 clusters of 3 strands. 

I simply take the 12 strands, split them into two groups of 6 which I weave into 4 groups of 3 strands. This takes the unruly 12 strands and makes it a much more manageable set of 4 strands. Now I have two sets of 2 strands on each side of the line. I pass them around the line and begin weaving them together.

All the weaves are made loosely that way the lines can be stretched and curled back into a round shape. 

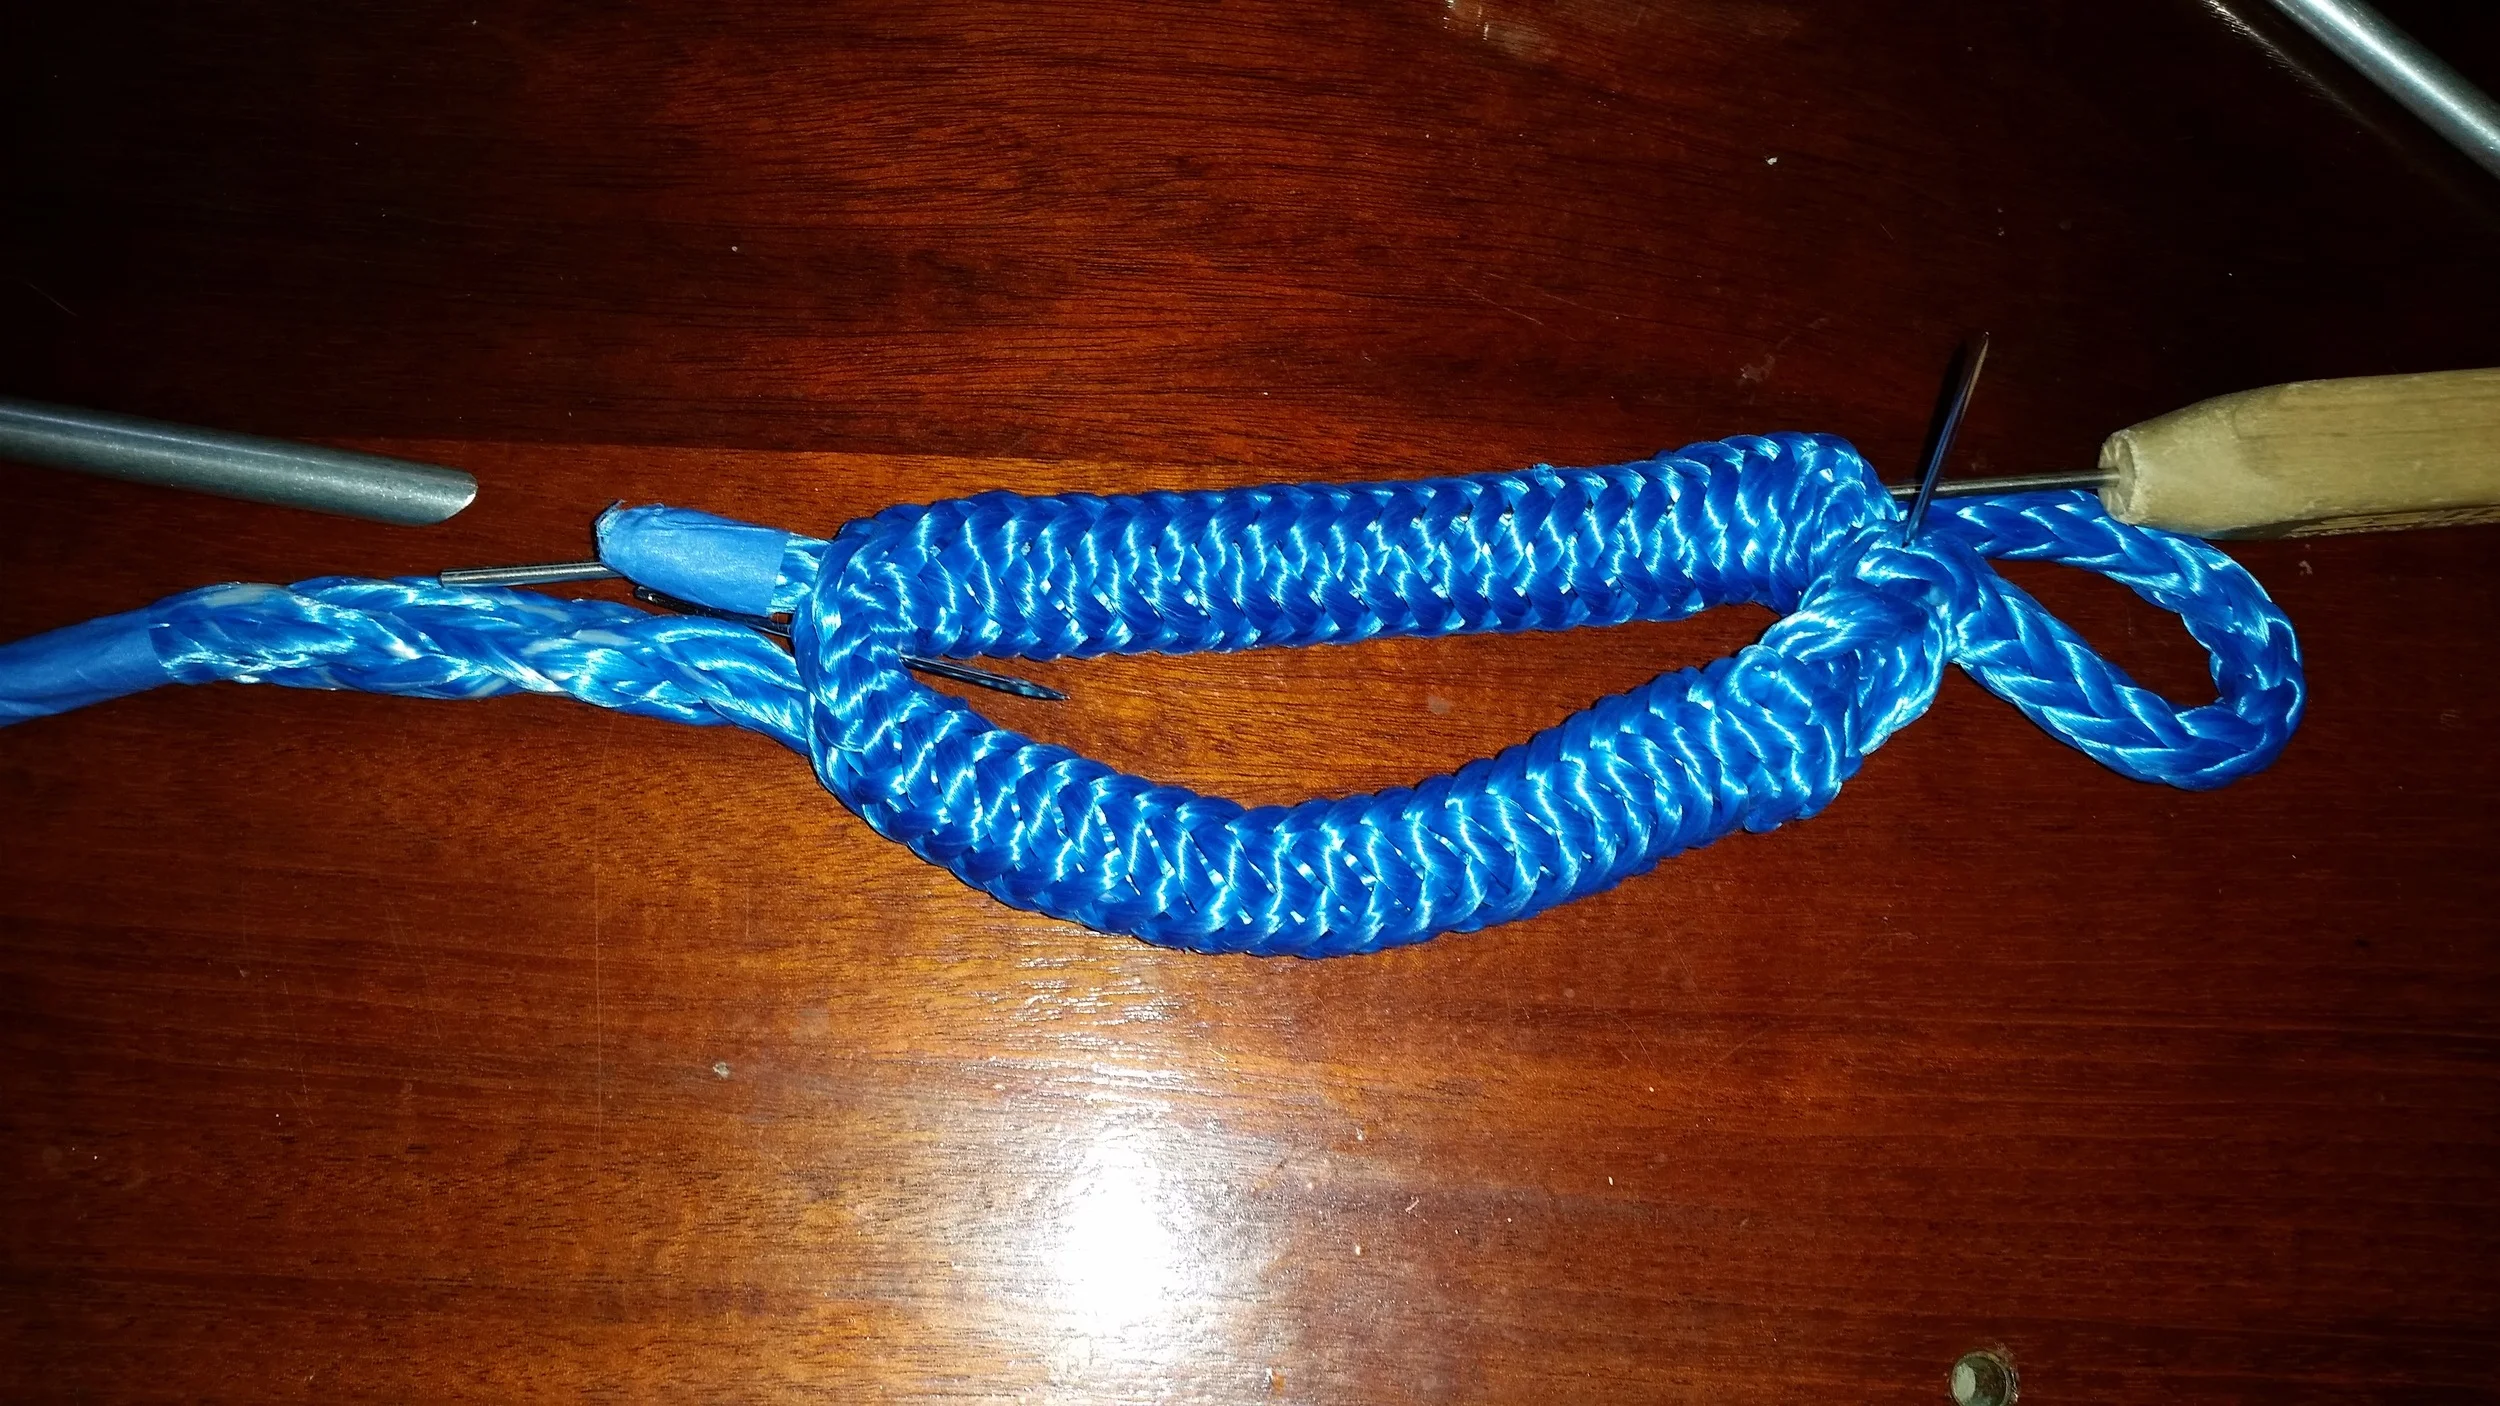
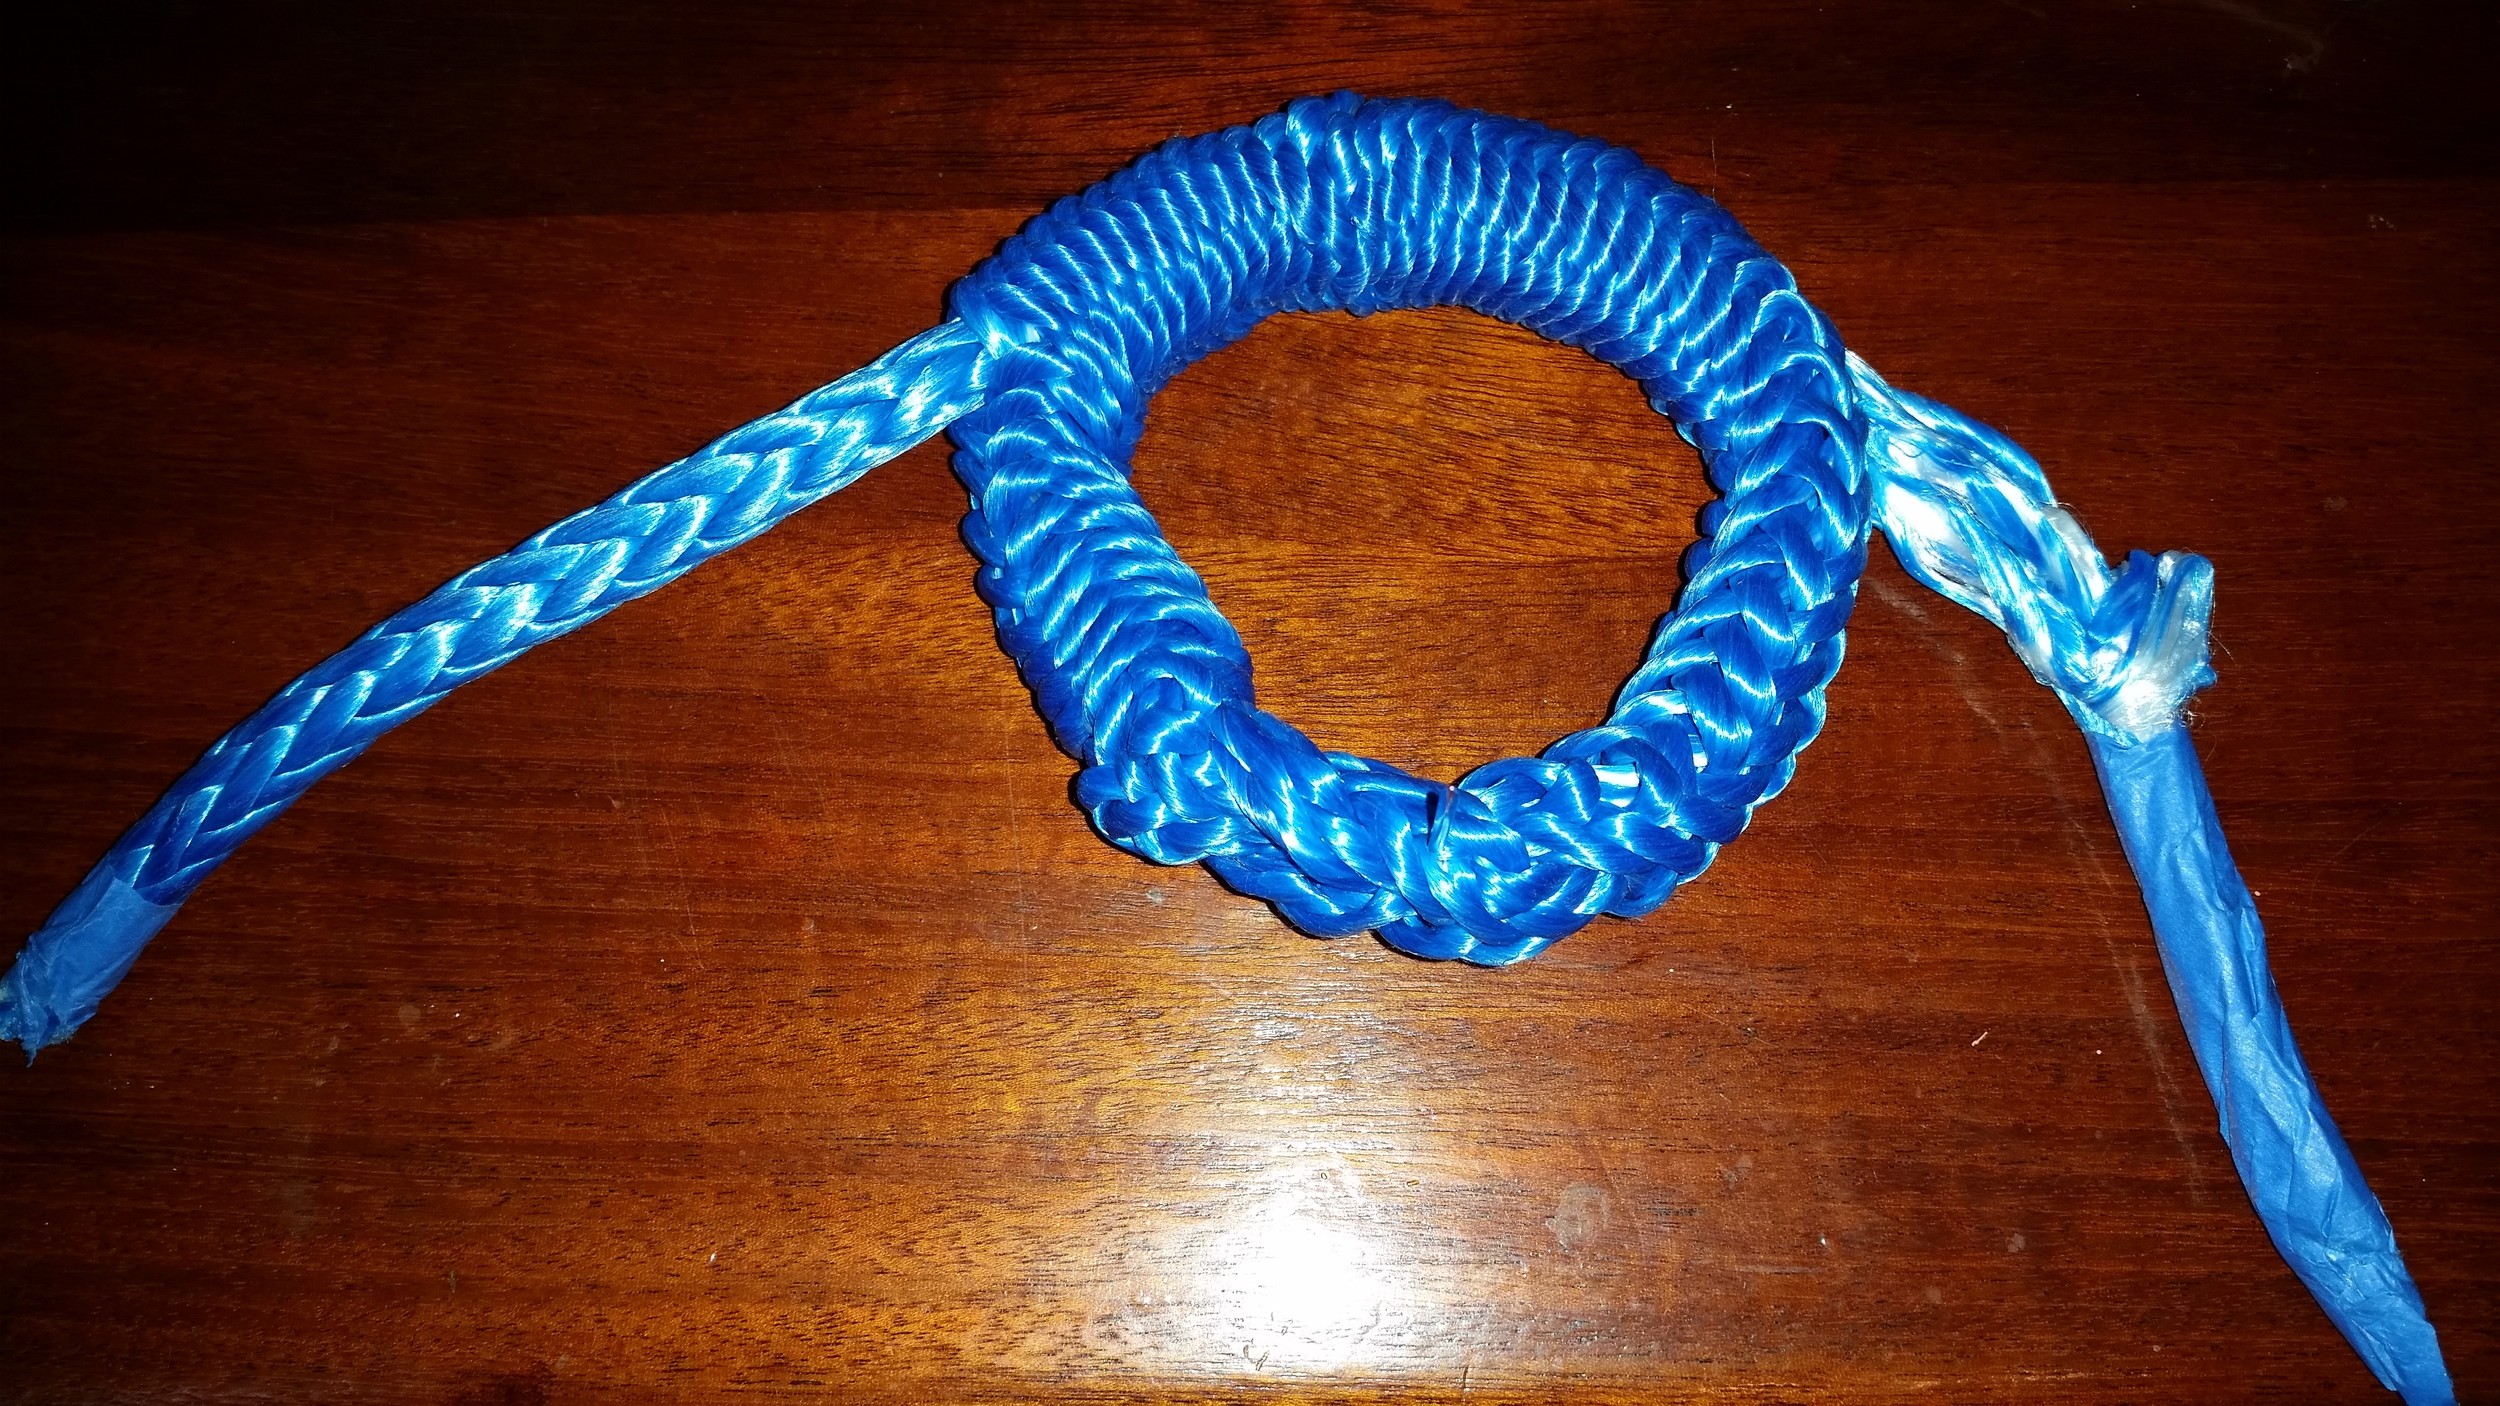
At the end, I have a Mobious Brummel splice made over a grommet. Now to bury the tails!

The midpoint of the grommet is marked with a pin, since the midpoint will move and change as the weave is opened up during the splicing. 

I pass the tails down to the end and have them exit just next to the midpoint.

Now I work the tails through the grommet all the way, making sure everything is even and symmetrical. 

Now I pass one of the tails through a few more weaves so that they both exit from the same hole.

20160320_173846.jpg

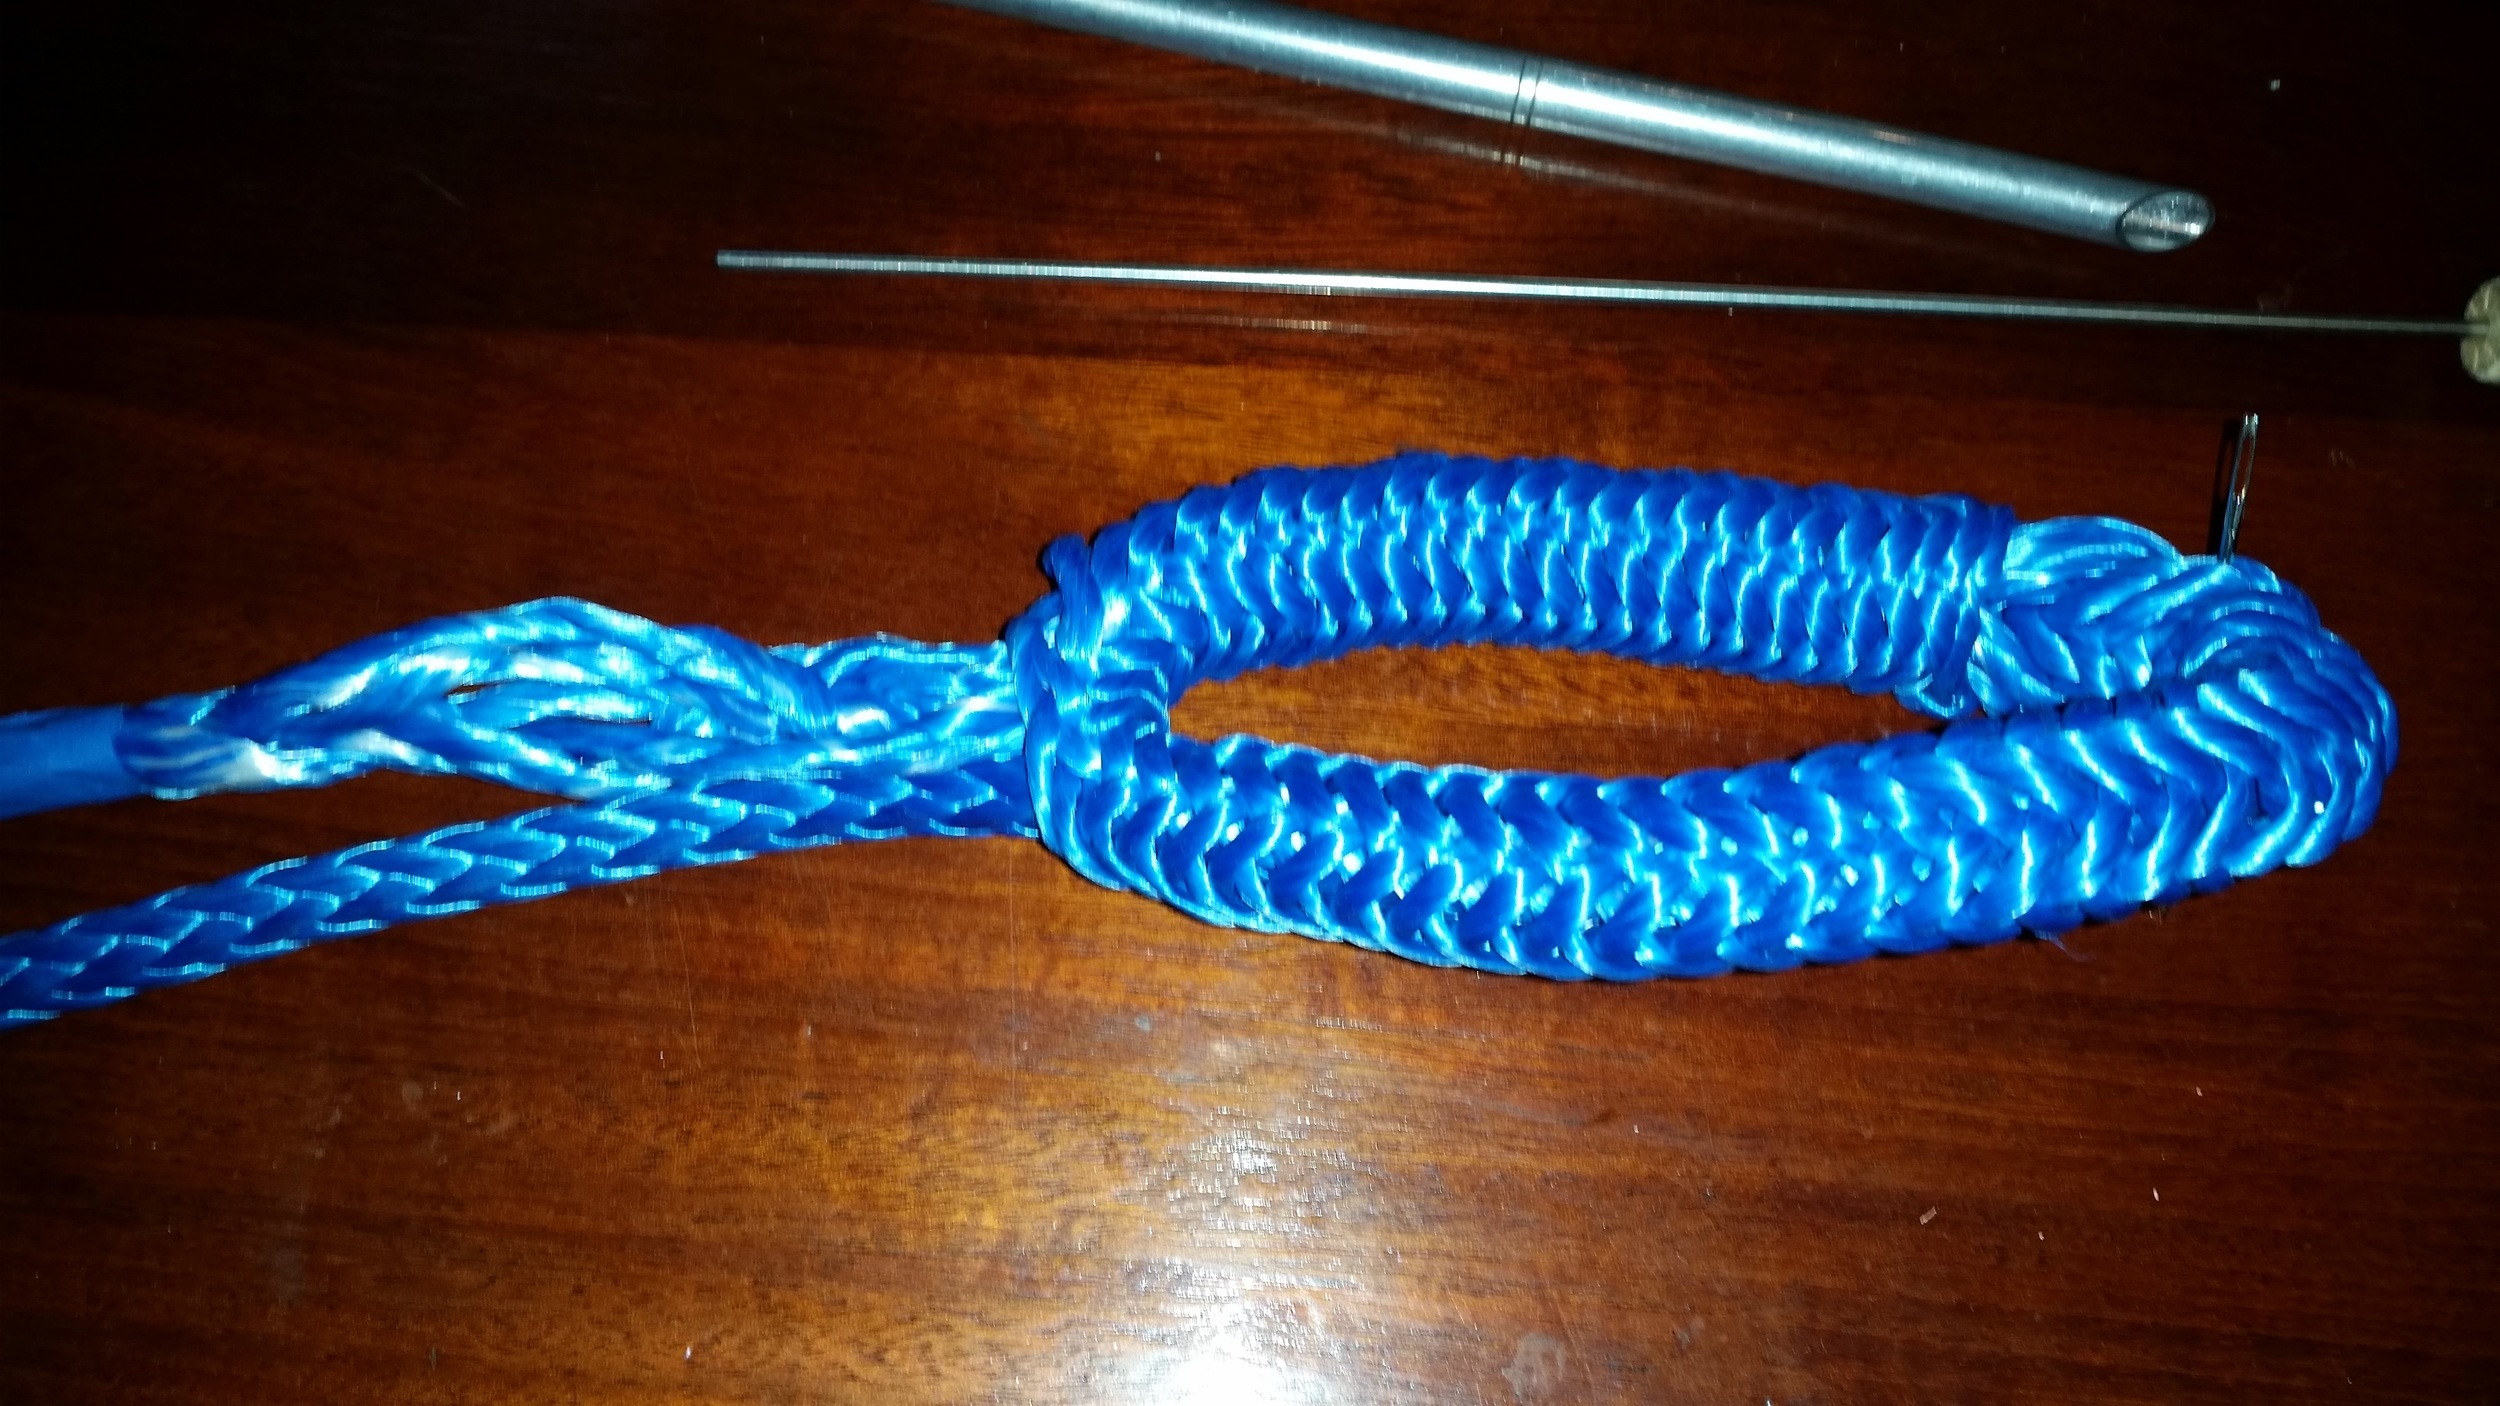
From here I bury the tails halfway through the other side and pull them out.

I then work the dyneema to open the grommet back up and assume a close to finished size and mark where the tails exit the grommet with a pin.

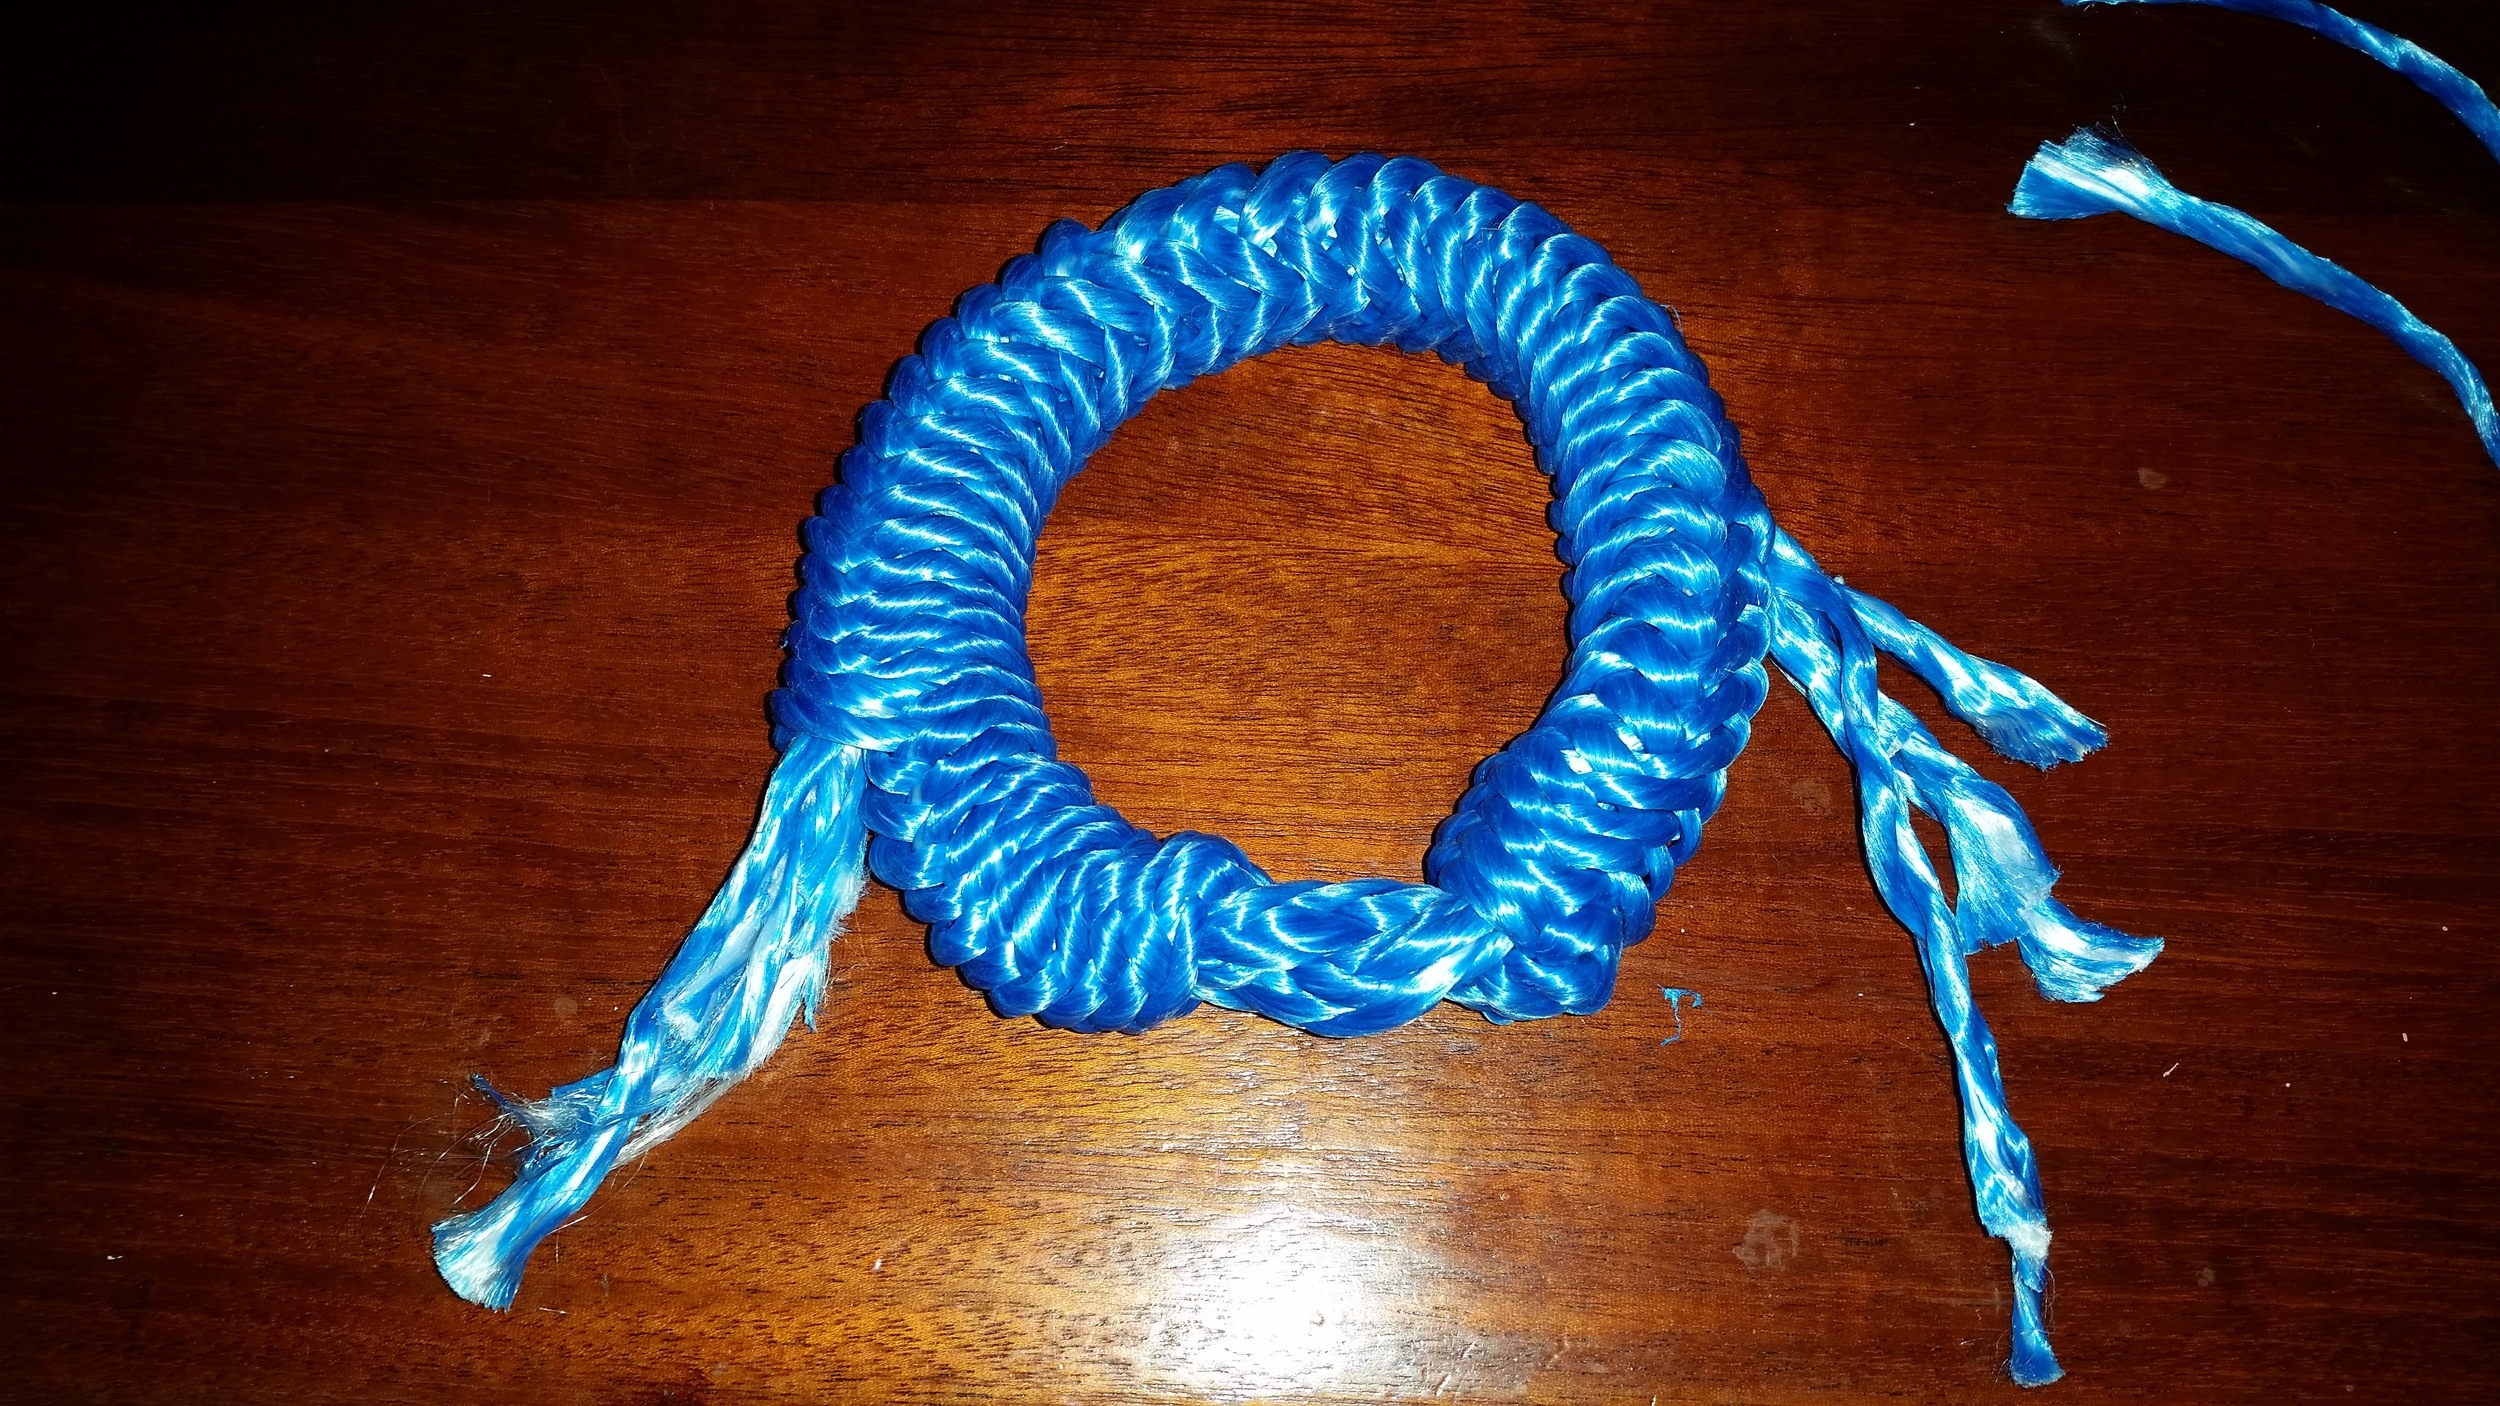
Now pull the tails back out and cut them off just after the pin. The pin marks the length that will go back into the grommet when it is worked out and stretched. Now that the longest point is marked (and cut off), you can begin tapering the tails. 12 strand has 12 tails, which means that you need to trim 11 of the strands to shorter lengths in a gradual and systematic method. 

On grommets, everything is condensed, so I trim back every row of the rope. I pull out the bottom six strands and trim them off, then I evenly trim off the remaining 5 strands. Be sure to keep the first and second strands you cut off as you will use them later.

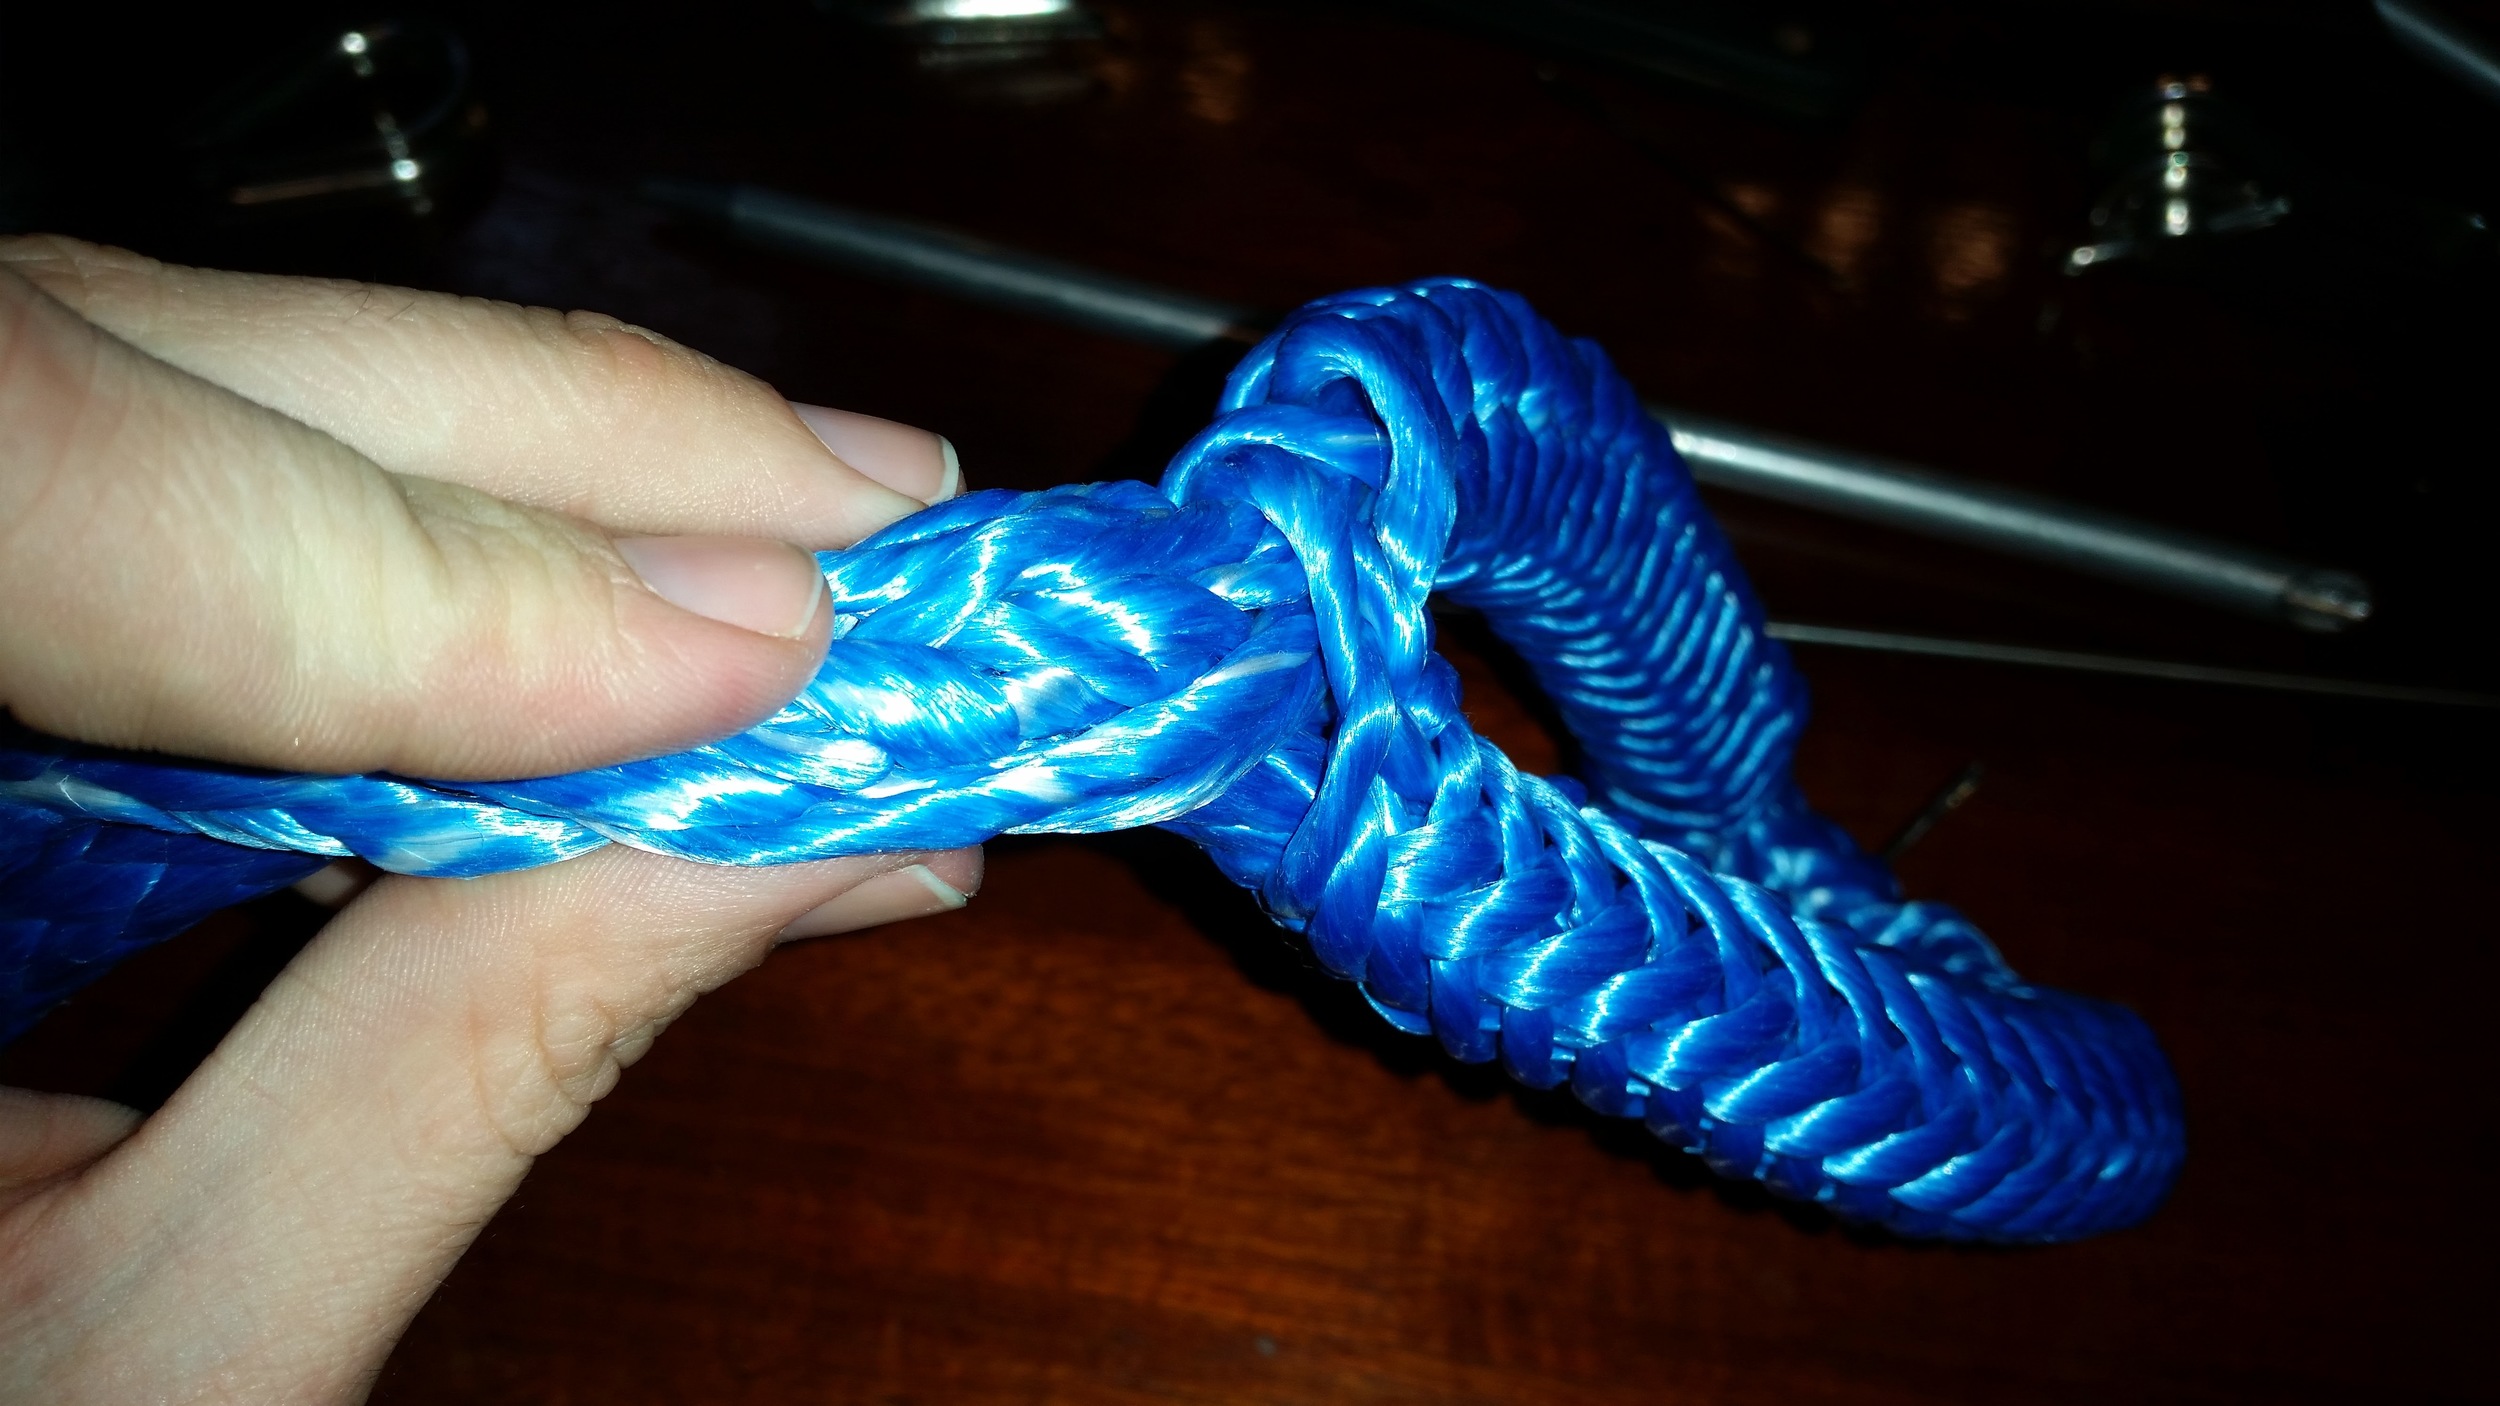
After the tails are tapered, work them back into the grommet and work the grommet back to its expanded size. The tails should disappear into the grommet as if nothing had happened at all.

Now take the long strands of Dyneema that you cut off while tapering the tails and thread it through a needle. Stitch the strand of Dyneema through the line being sure to cross over the strands of the outer line, piercing through the line inside. This will act as a locking stitch to further ensure strength and stability.

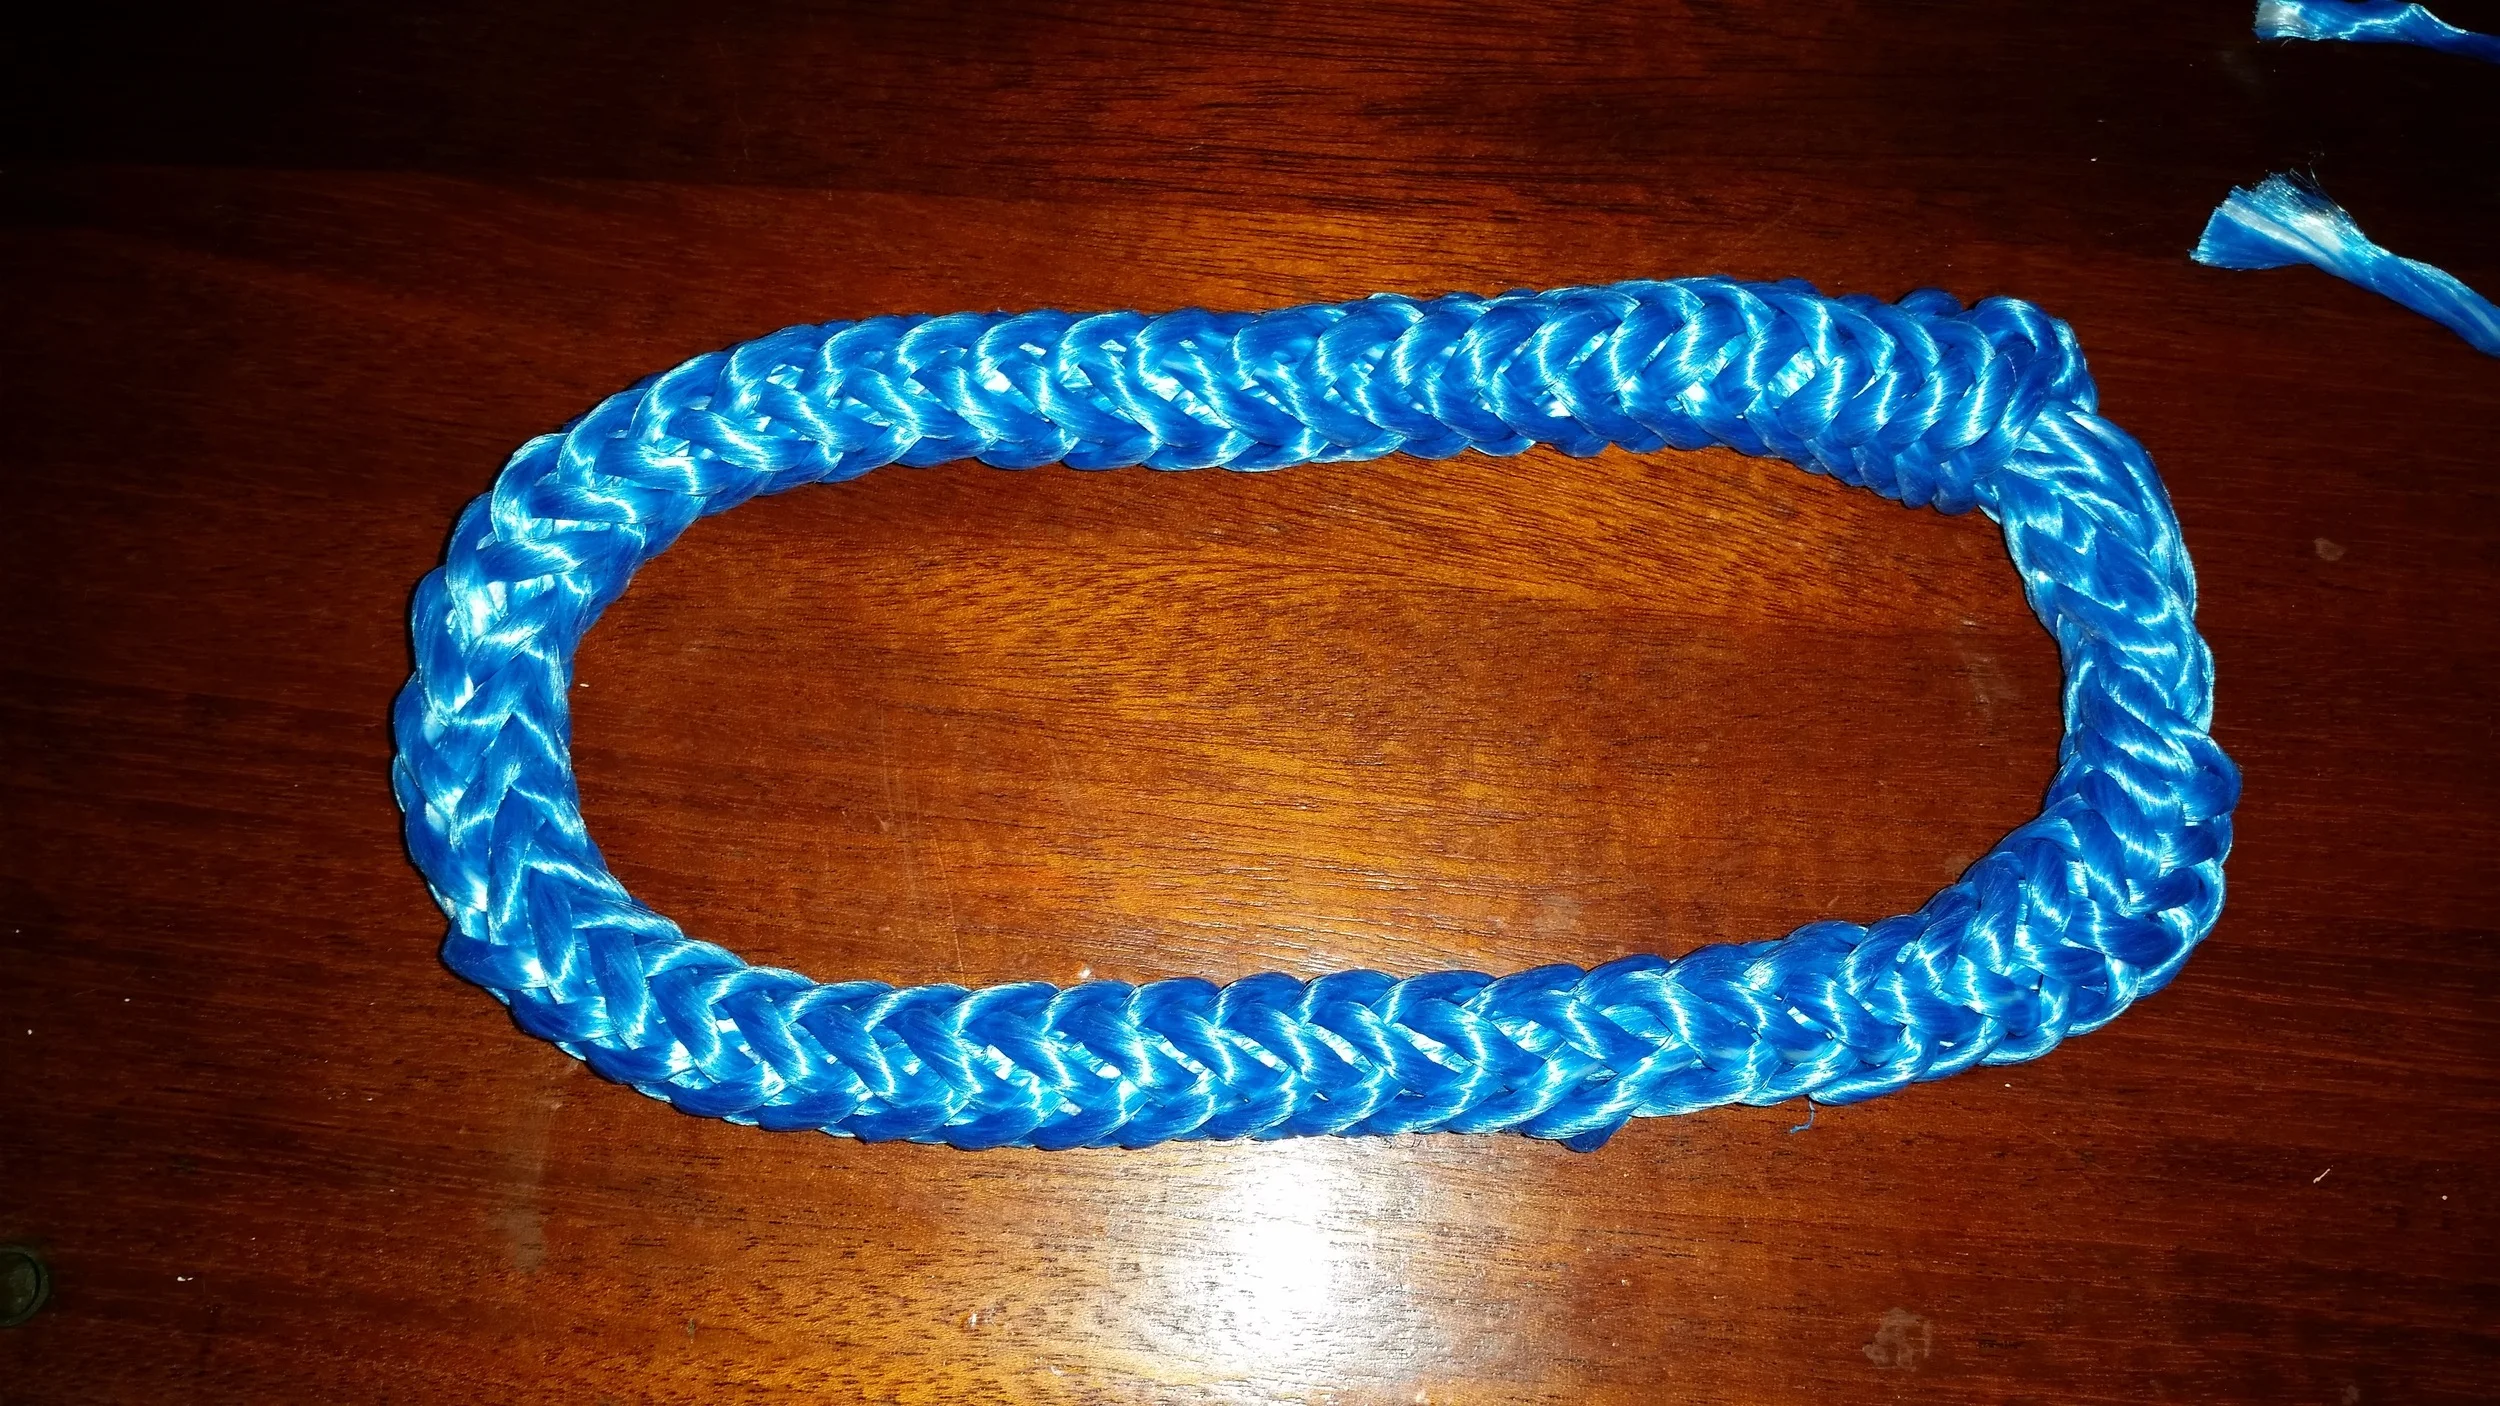
Now you have a finished grommet made out of Dyneema that will be able to hold the rigors of standing rigging.

You may be wondering if it will be strong enough since you are grossly under burying the tails? The answer is "Yes", it will be strong enough. The buried tails will wrap 3/4 of the way around the grommet. The tapers will ensure an even transition from tail to no tail, preventing any sharp changes in the weave of the outer line. This will prevent any stress points from arising in the grommet. The locking stitches will keep the tails from sliding around, which will also help keep everything in place and avoid the tails from sliding out to unravel. Since the tails can't move, the Mobious Brummel will serve to lock the grommet closed and keep it secure.

I used 9mm Samson AS-78 for my deadeyes which will support 9mm dyneema stays and have no problems with them. They will stretch out a bit and grow very thin as the weave settles back into place when tensioned to a few thousand pounds! This is why the gradual tapers are so crucial. It may look oversized for the thimbles, but once it is loaded up, it will be just right.

Each deadeye consumes 4 feet of 9mm AS-78 and takes me around 1 hour to make.

Now that the grommet is made, simply insert the thimbles and hold them in place with a flat seizing knot set in the middle of them to create the finished deadeye.

To see these deadeyes in use, check out the links below.

You can also check out this video where I walk you through the entire process, start to finish, of making the grommet for the deadeye.

Gauge or Dipstick

How much fuel do you have in your tanks? The fuel gauge says you have half a tank, but do you have enough fuel for your journey? There is a better way to know how much fuel you have, The Dip Stick.

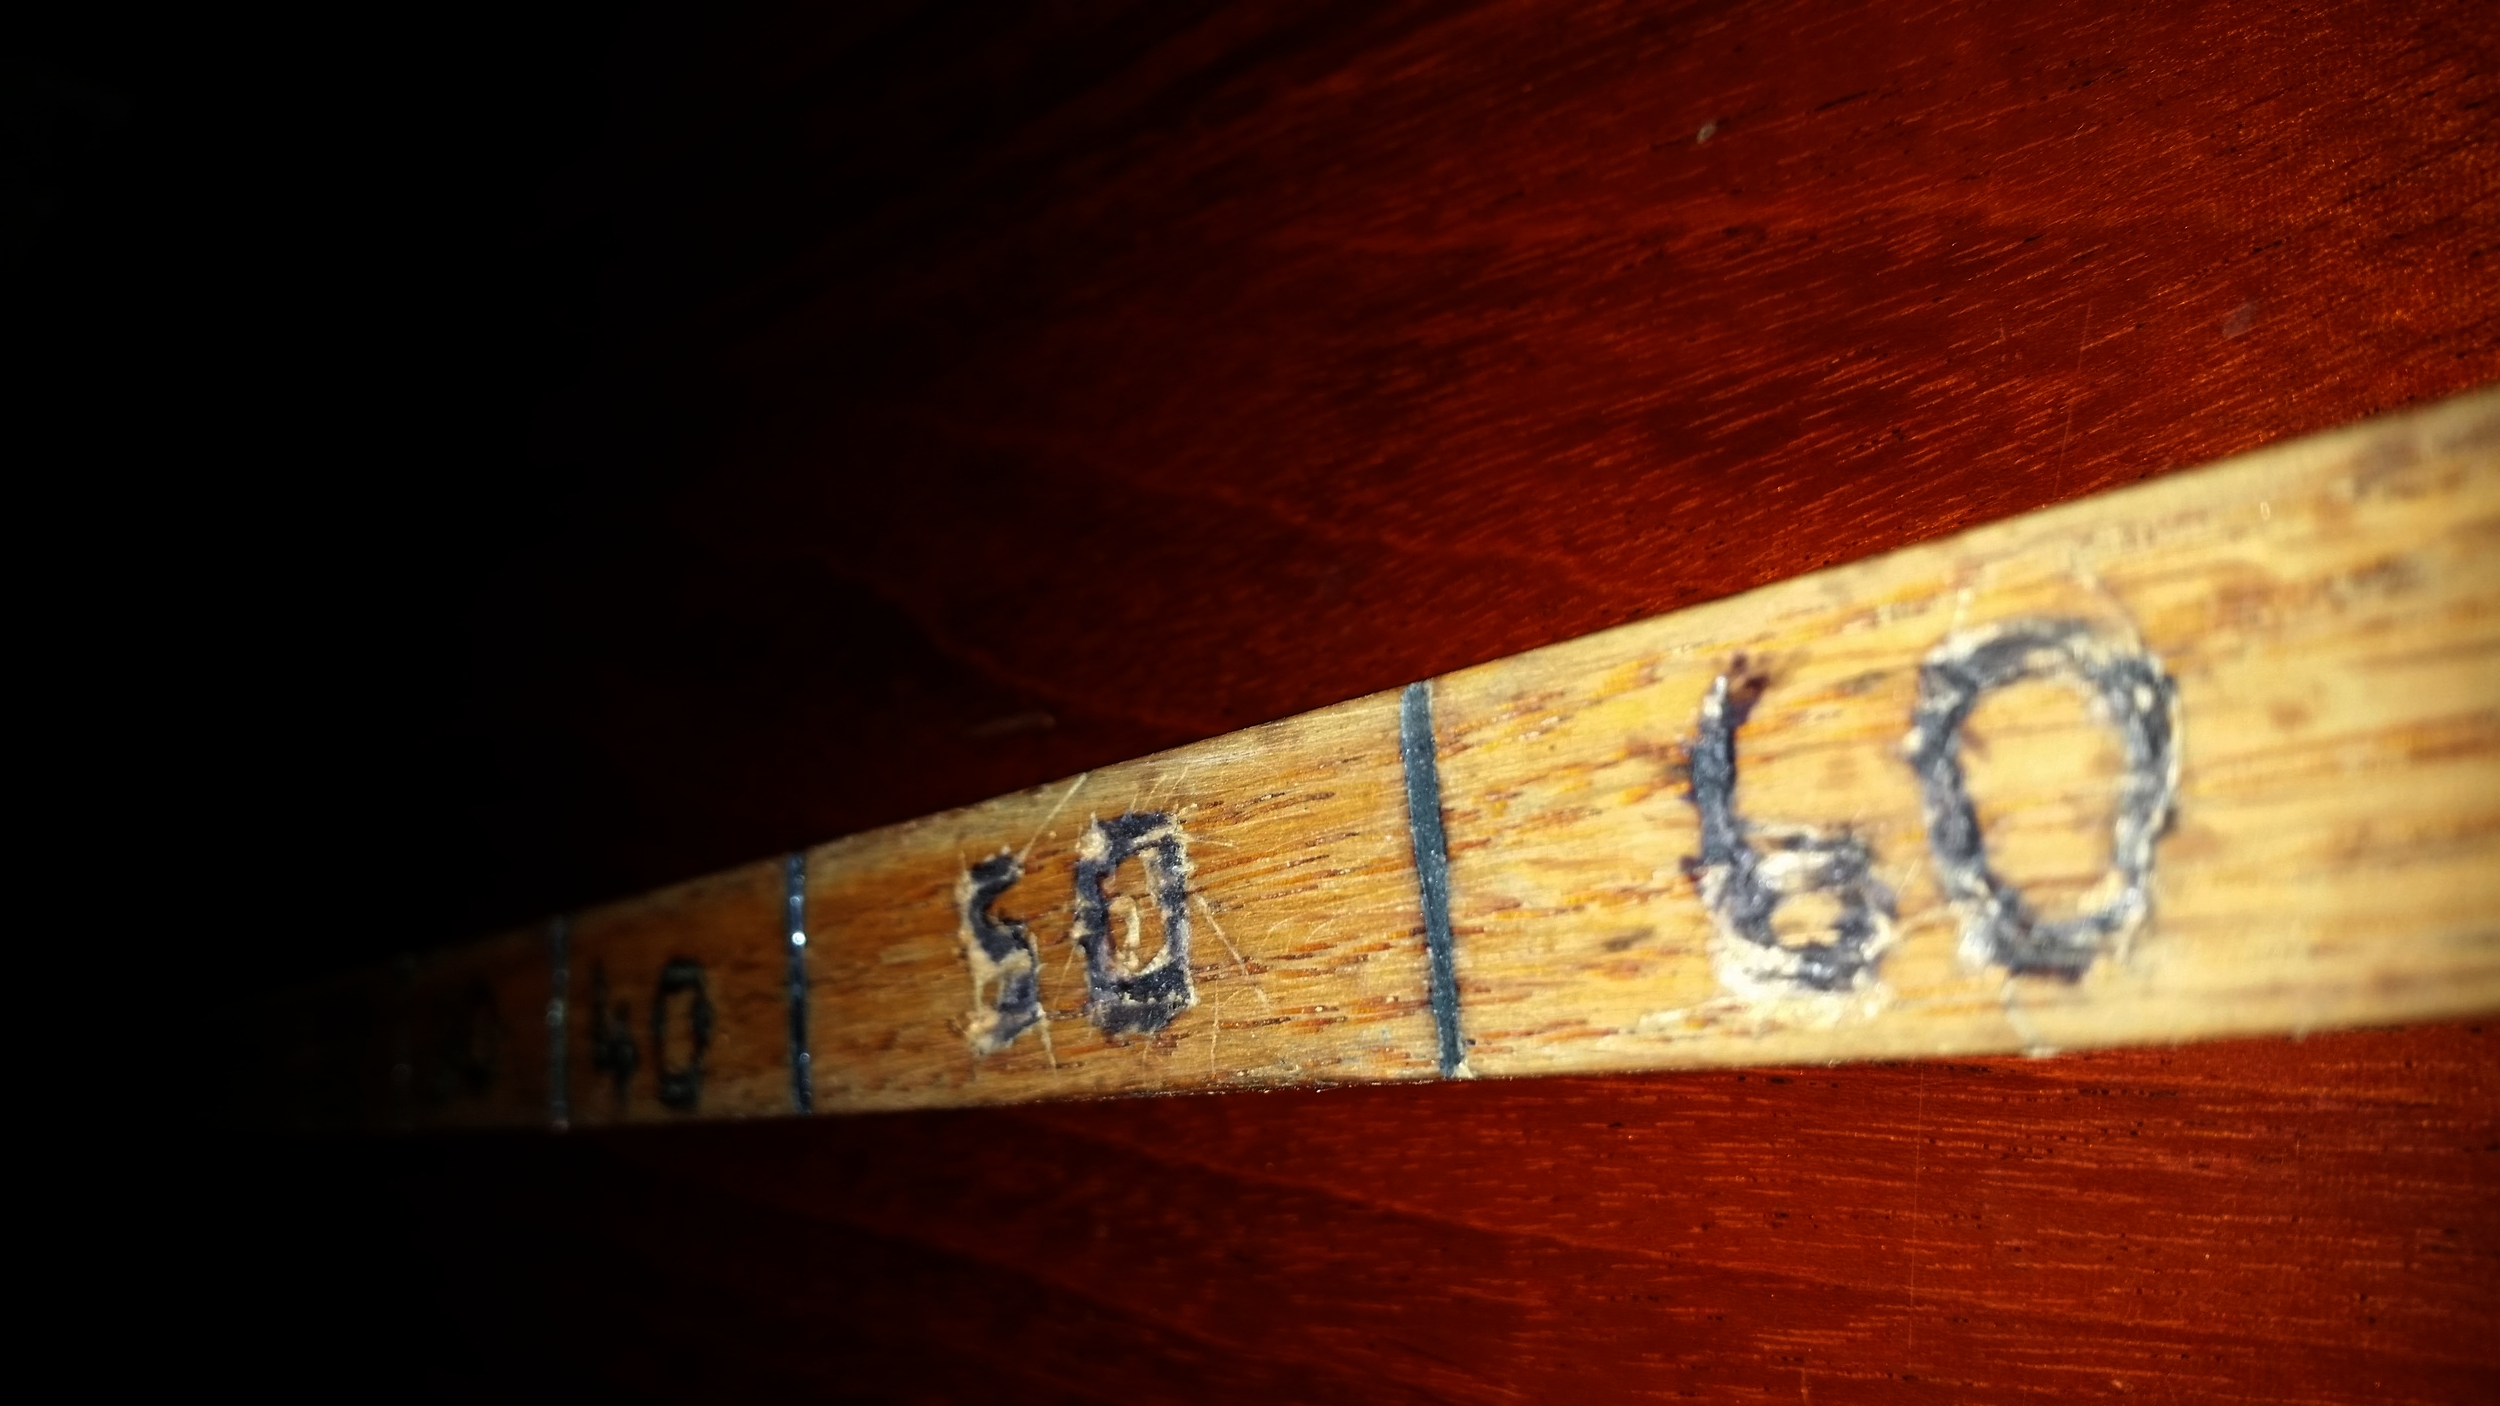
A dipstick is a graduated measuring device that tells you exactly how many gallons of fuel (or water) you have in your tank. Dipsticks can either be un-calibrated (measuring the inches of fuel) or calibrated (measuring the gallons). 

Dipsticks are easy to calibrate. Simply start with an empty tank:

Add 1 gallon, insert the stick and mark the wet line on the stick.
Add 4 more gallons, insert the stick and mark the wet line on the stick.
Add 5 more gallons, insert the stick and mark the wet line on the stick.
Add 10 more gallons, insert the stick and mark the wet line on the stick.
Continue adding 10 more gallons, inserting the stick and marking the wet lines on the stick until the tank is full.

This will give you a dipstick with 10 gallon increments, ending with a 5 gallon mark, and a 1 gallon mark. When you check your tank, you will know if you have less then 1 gallon, less than 5 gallons, or many gallons of fuel present.

A calibrated dipstick will accurately tell you exactly how much fuel you have present in your tank.  This takes all the guessing out of estimating how much fuel you are carrying at any time. 

The problem with dipsticks is they make checking the fuel level time consuming. You need to get the dipstick out, get to the tank, open the top of the tank, put the dipstick in, pull it out, read it, clean the dipstick, close the top of the tank, put the dipstick away. If you are alone and need to leave the helm to do this, you might be away from the helm for too long for safety. If you are in a power boat running along at 20 knots and you take 6 min to perform the task, you just covered 2nm without standing watch. If you take longer to complete the reading, you will cover even more ground! This proves unsafe and would require you to bring the boat to a stop and check the fuel level while bobbing around in Neutral. 

The alternative is to check the fuel level by looking at a fuel gauge. You take a glance at the gauge, and it tells you a rough idea of how much fuel you have in your tank. 

The combination of checking your tanks with a dipstick before setting off and then monitoring with gauge readings is the best compromise for evaluating fuel levels. 

Dipsticks are valuable instruments to verify the amount of fuel stored within a tank and should not be completely replaced by an electronic gauge. Gauges are more convenient, but the accuracy of a dipstick is impossible to beat!