Ocean Sailing: Rough Days

Rough weather is an unavoidable part of sailing. You can plan to avoid major systems or closely watch the forecast, but at some point you will get caught in bad weather. I must emphasize though, it is a minor part of sailing and most sailing is done under full sail in calm conditions!

Maddie and I did a trip during the summer which took us down the Chesapeake Bay and flanking the coast as we made our way offshore as far south as Kill Devils Hill, NC. I find it hard to say that we sailed to North Carolina as the closest we got to it was 4 miles offshore. 

We sailed in July because it is a very calm month according to the pilot charts. Winds should be around Force IV most of the time and the chance of gales was minimal. I figured this would be a good time to introduce Maddie to ocean sailing!

Most of our trip was calm, but when a storm would roll in, it was serious! The amazing thing about ocean storms is they are predictable and you have plenty of time to prepare for them, you just need to know what the warning signs are.

DSC_3300.JPG

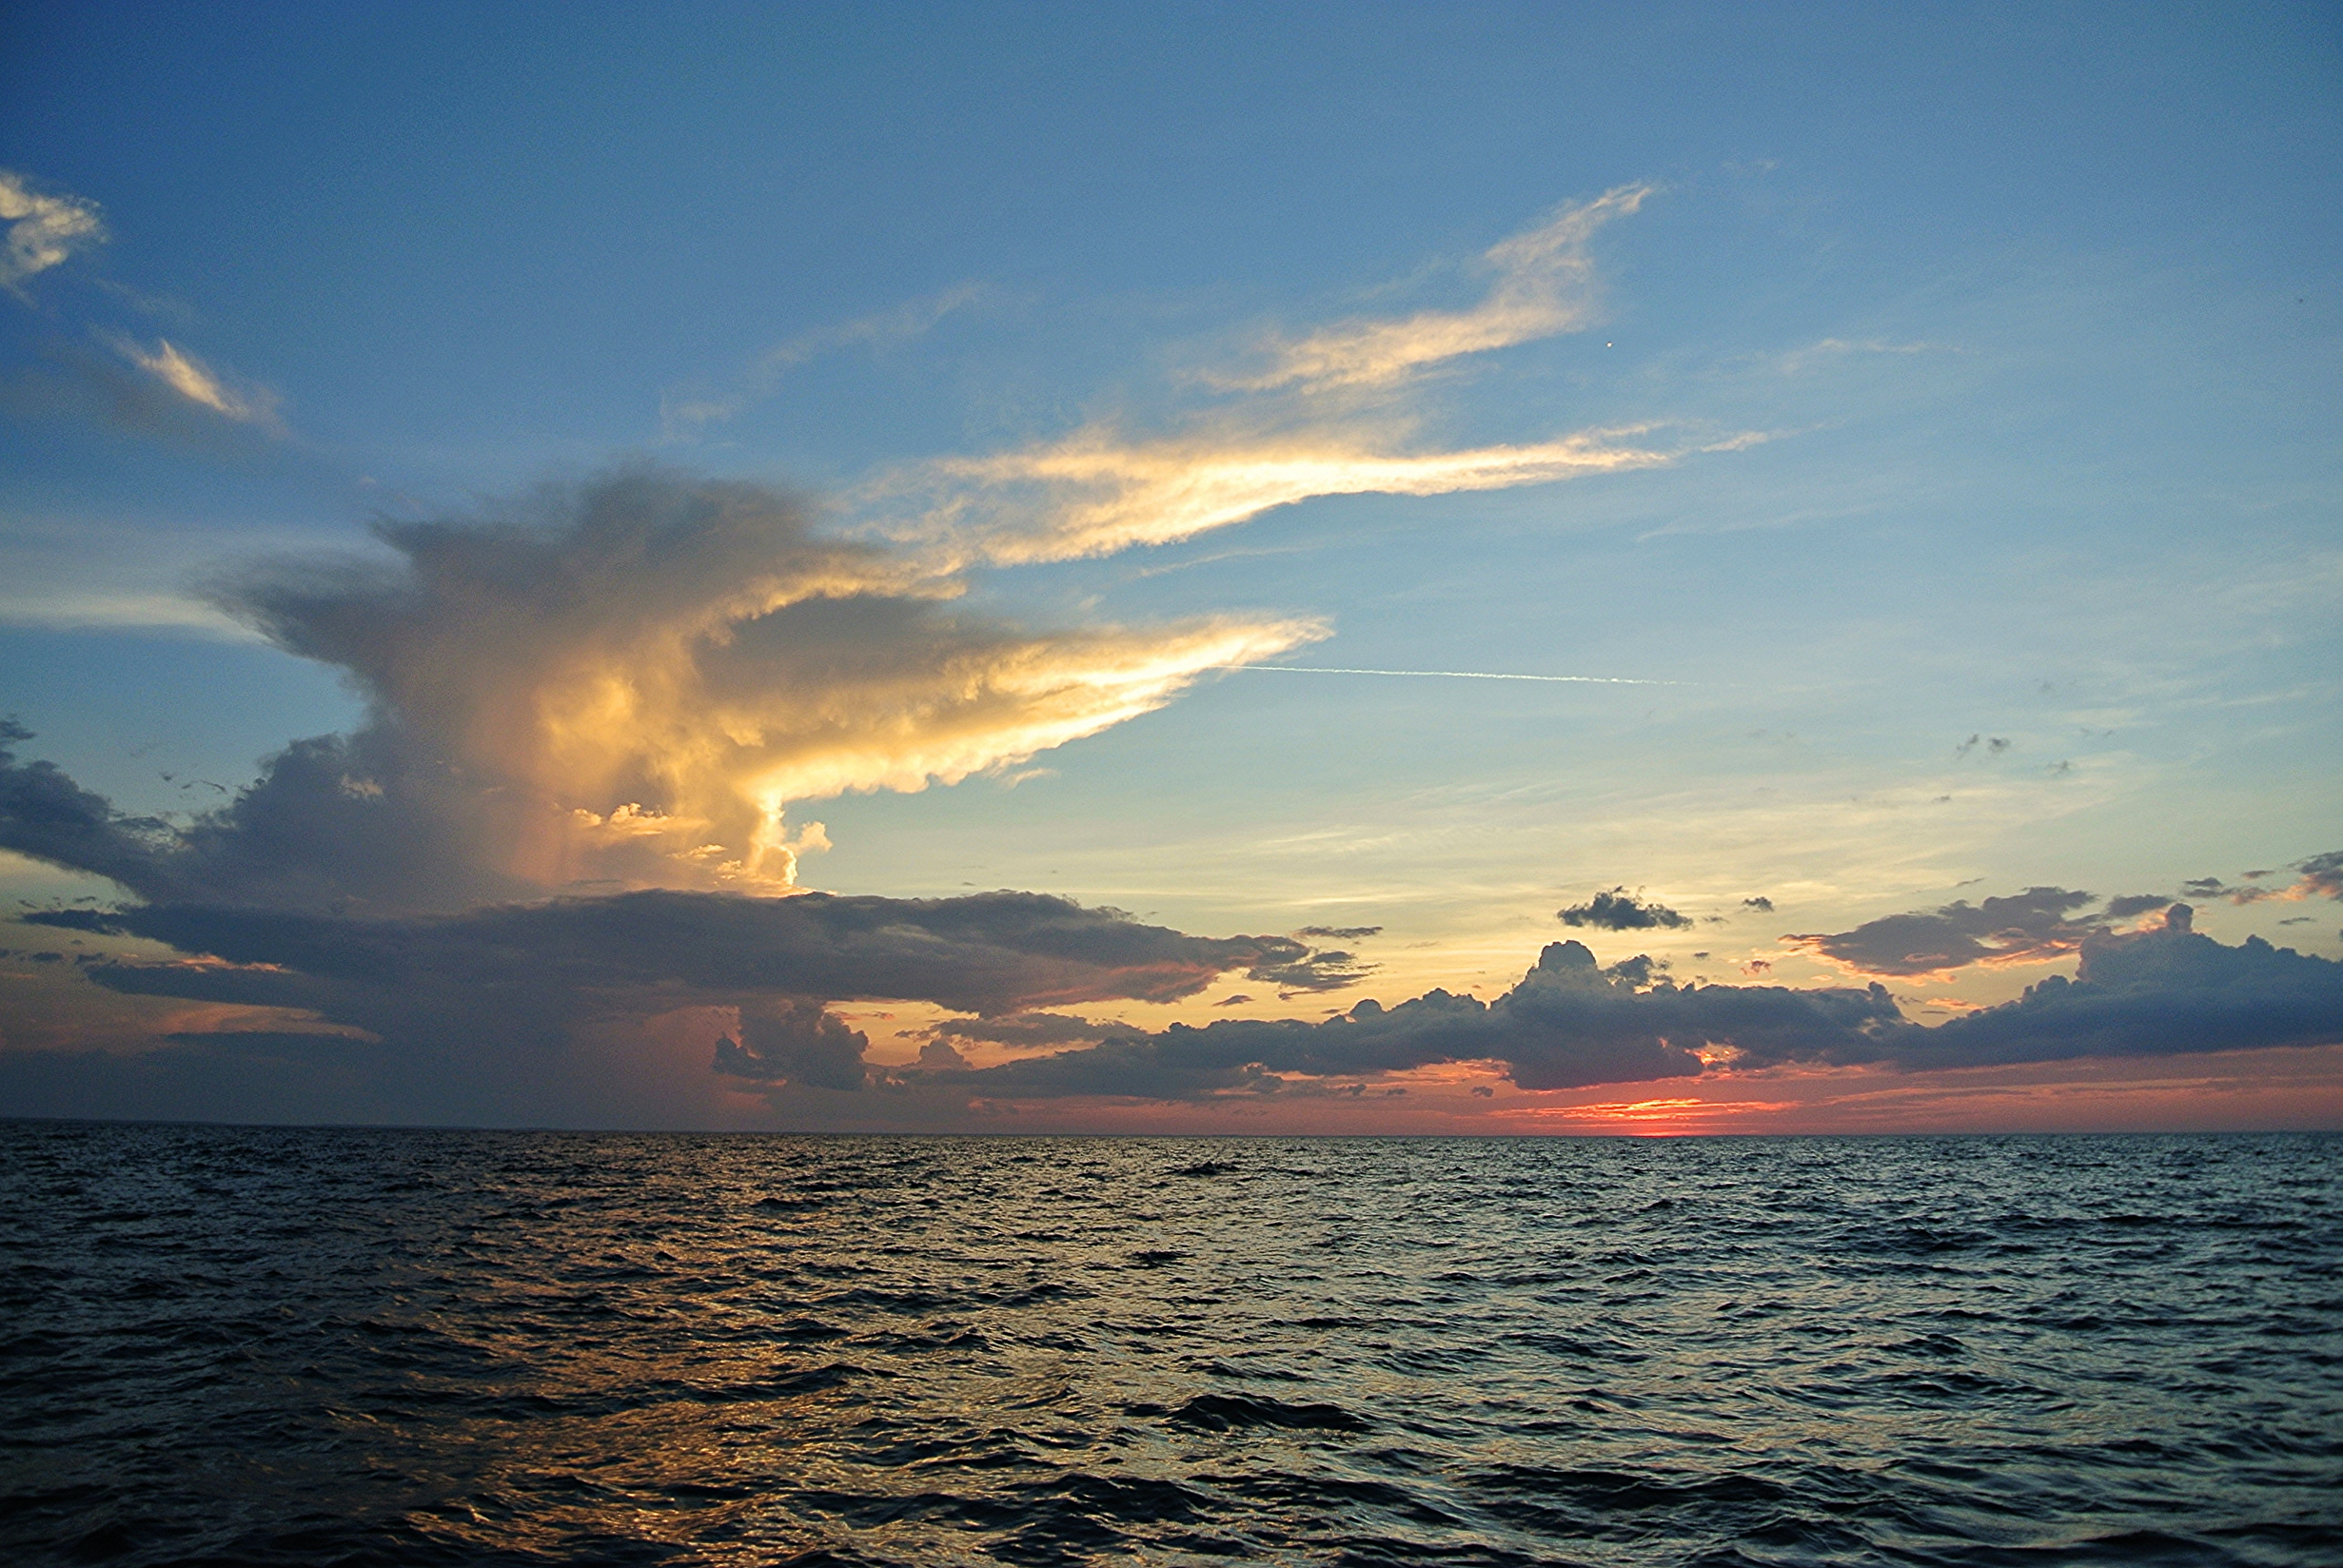
Clouds are your best warning to approaching storms. They tell you what the weather will hold for your immediate area and warn you from miles away. When this photo was taken, we were sailing along under full sail in winds blowing 10 to 12 knots. The large fluffy clouds along the horizon tell you that the weather is rather stable and the winds will be light. Then you can see the large towering cloud on the left. That is a storm in development and the top of it tells you which way its going. The top end of the cloud is being blown by the upper higher level winds and points in the direction the storm is going to be moving. 

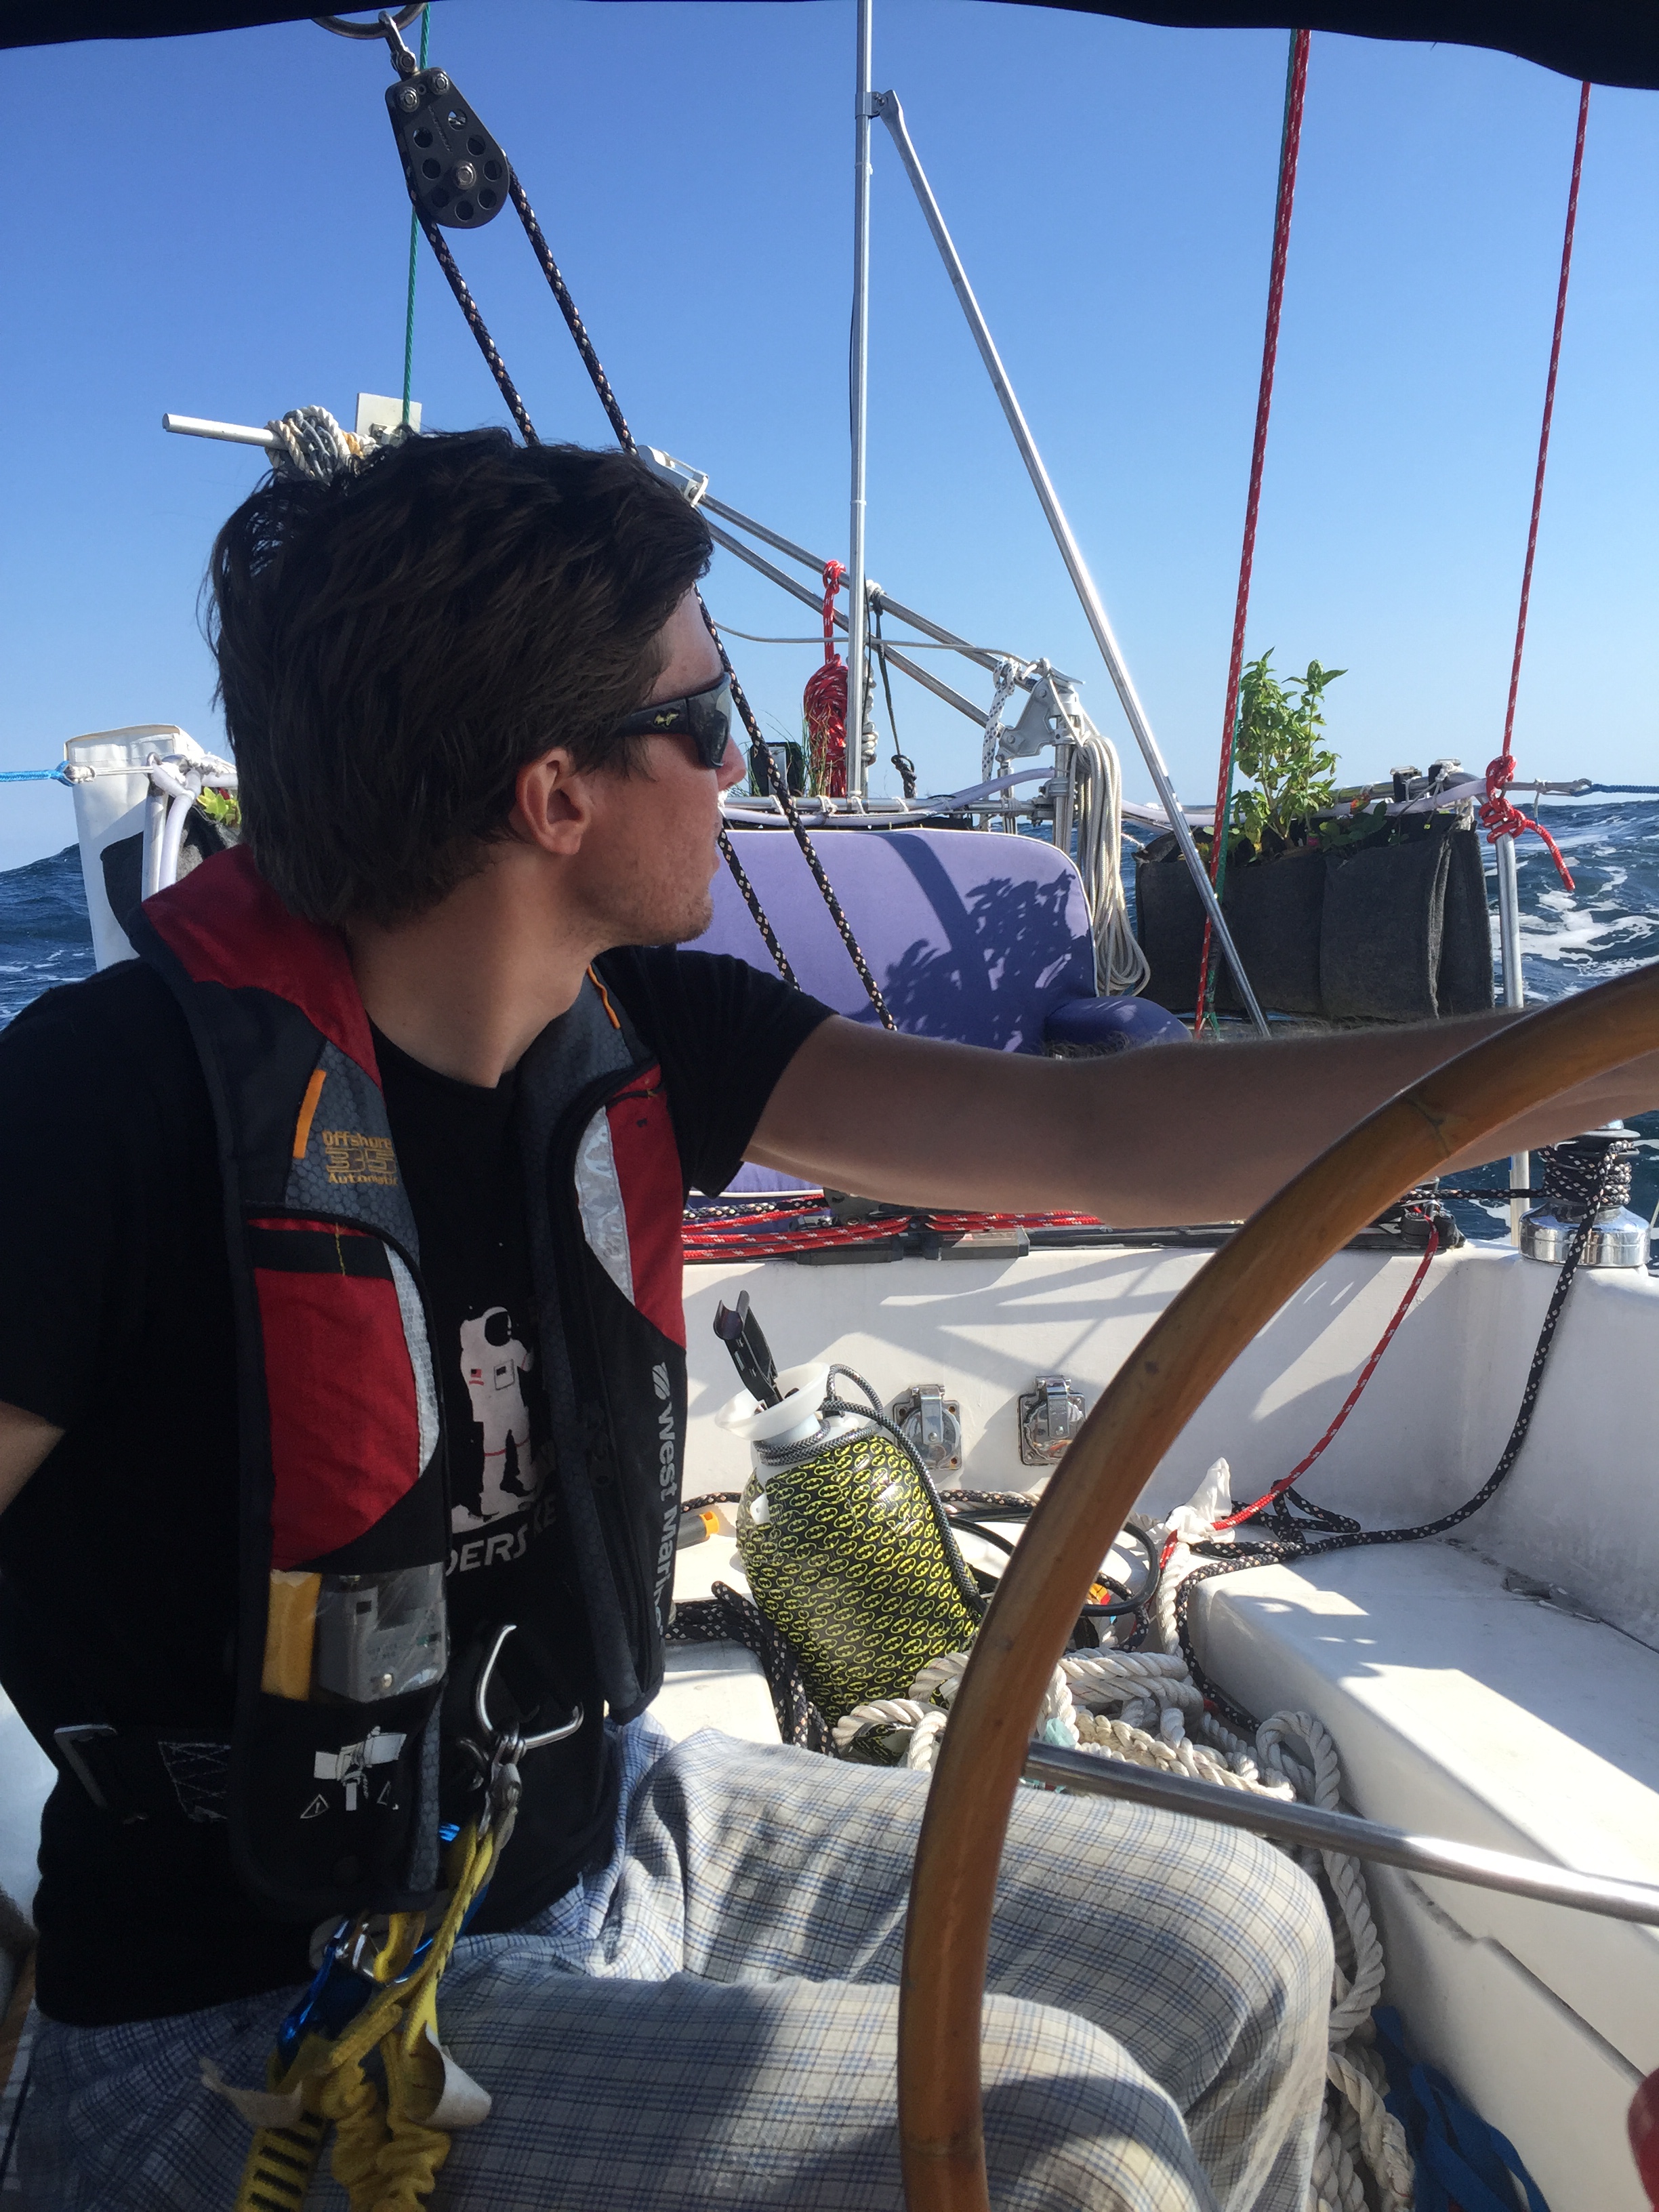
We spotted this storm during one of our half hourly scans of the horizon. We saw that the storm was far away and blowing in our general direction, so we devised a plan. We lowered the main sail, raised the trisail, and hove to for the night (when we expected the storm to hit). If it were earlier in the day, we would have continued sailing under reduced canvas and watching the storm and its movement. Since it was late and we were ready to go to sleep, we decided to end our day earlier and heave to now.

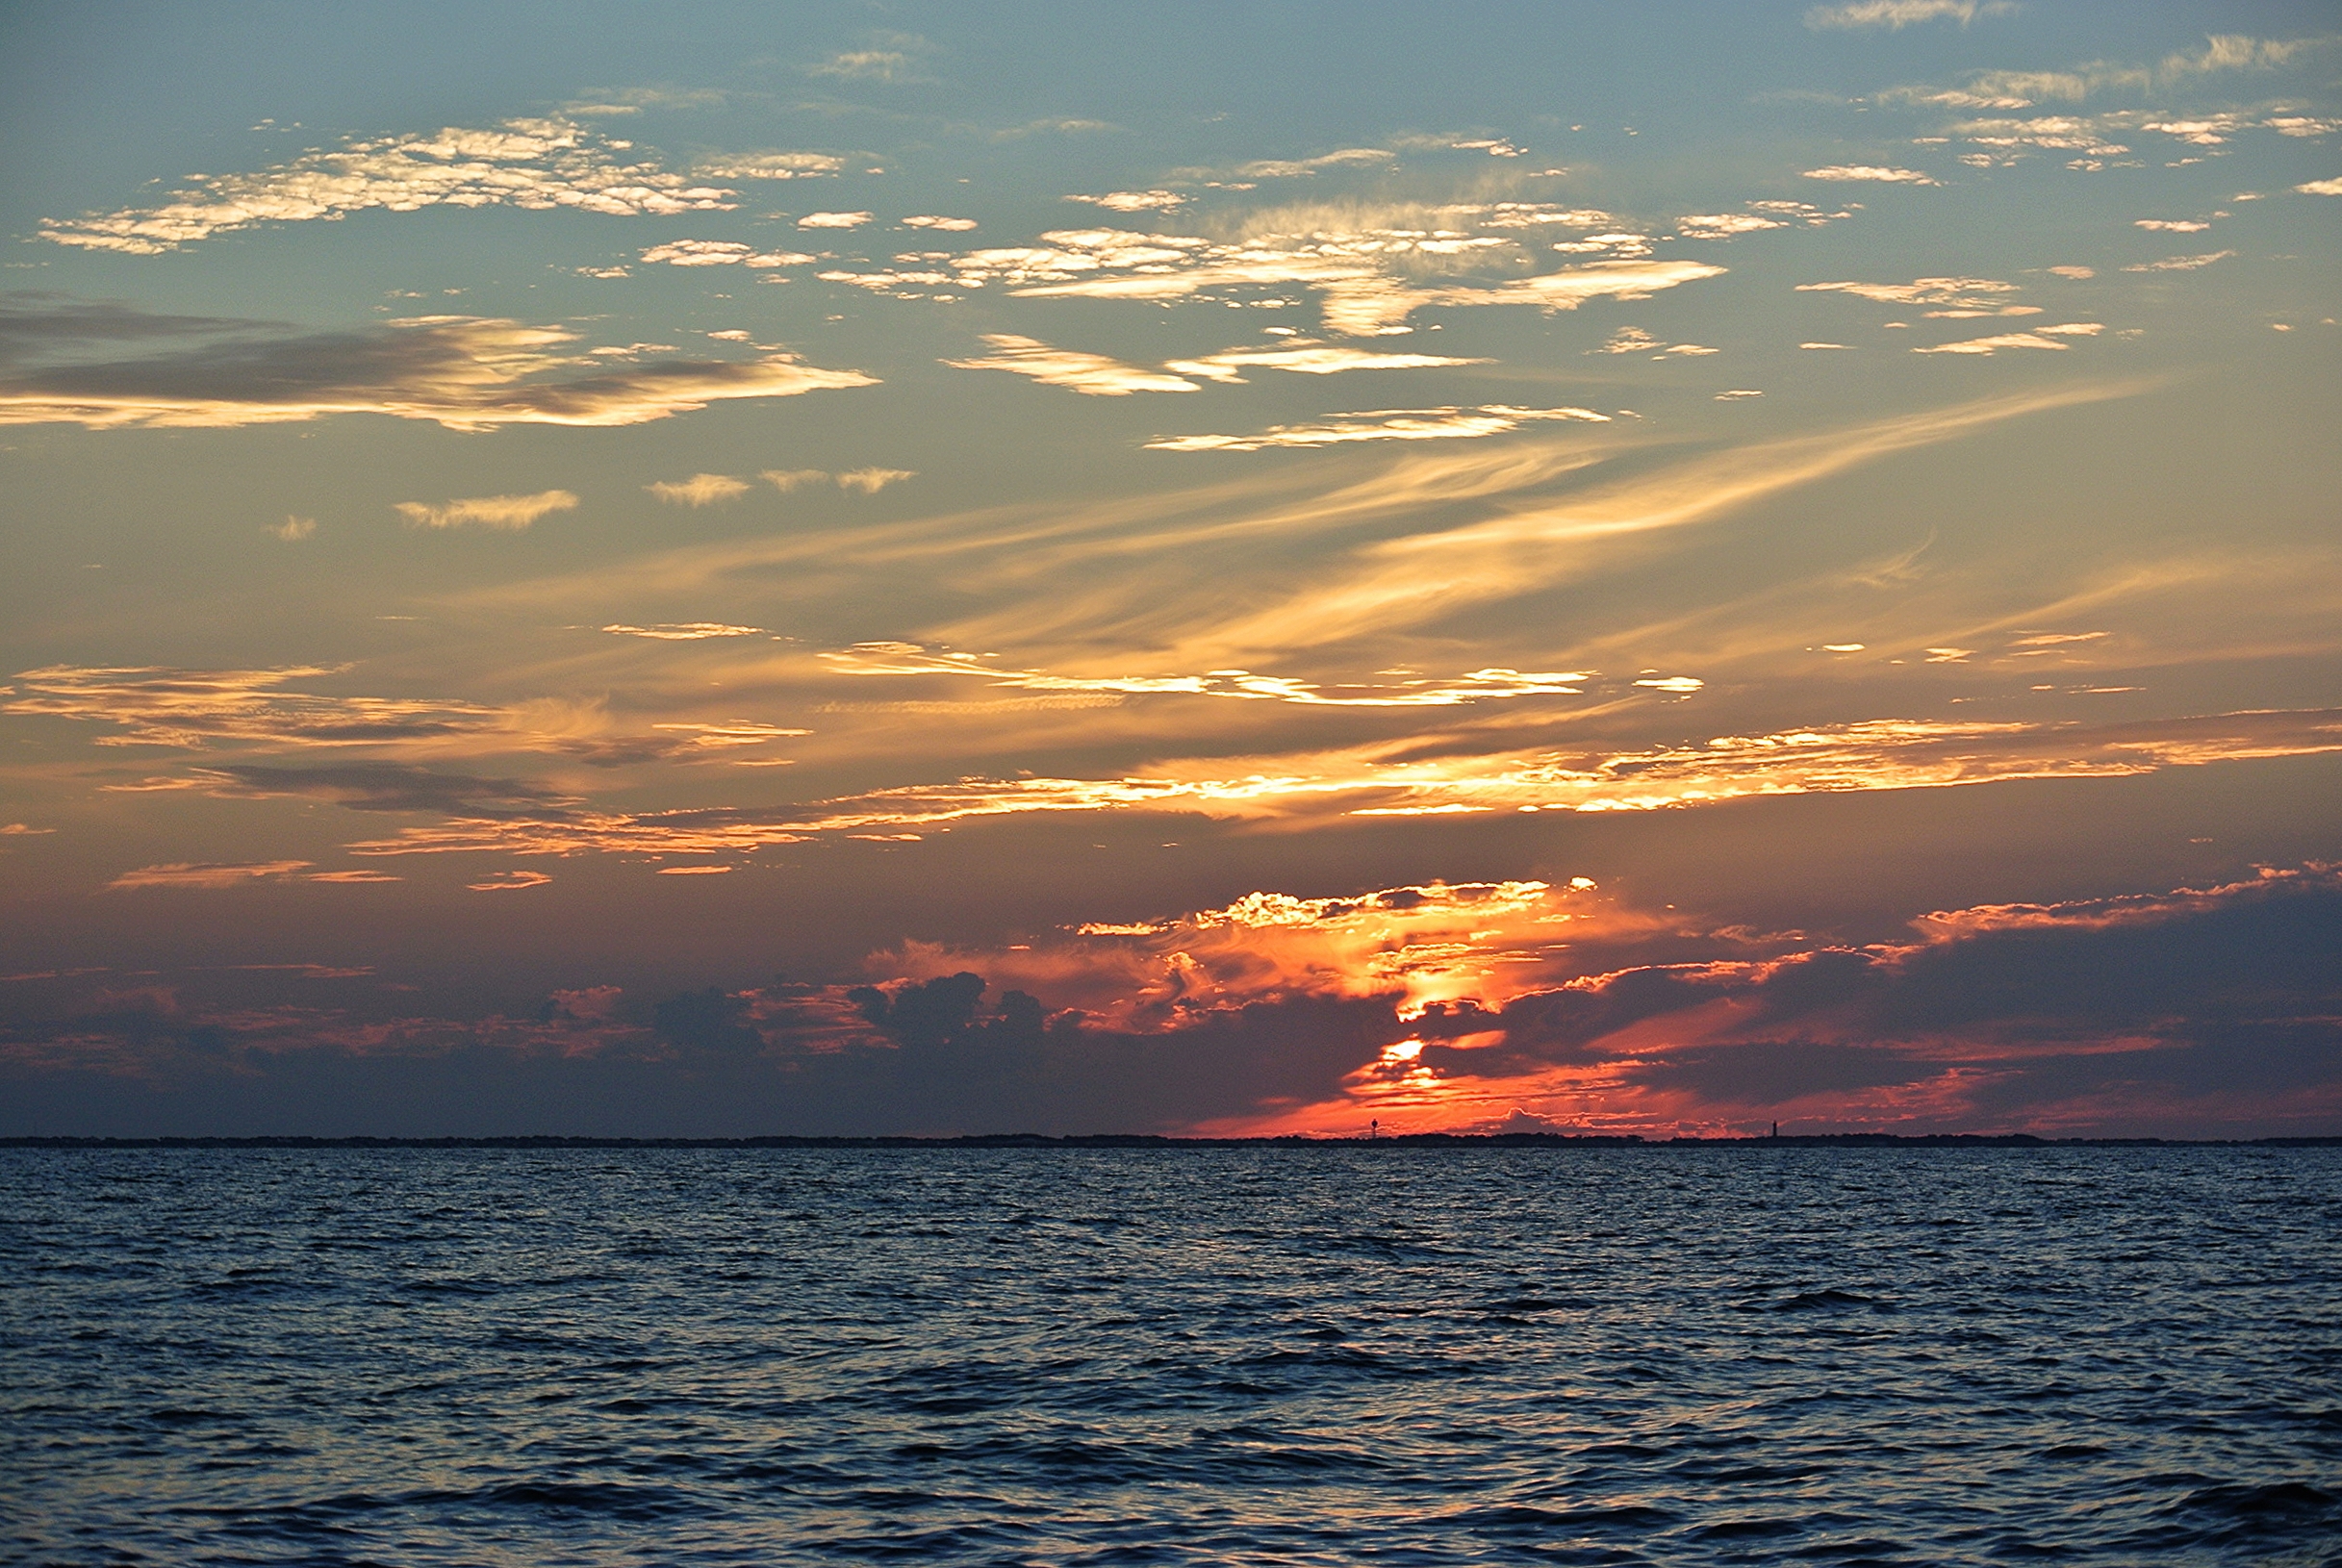
The wispy clouds in this picture are the biggest talkers in the sky. They tend to indicate that a front will be rolling in tomorrow or the next day. If you see just a few of these cirrus clouds, then don't listen to them, but do take the clouds seriously when they begin to fill up the sky. This picture was taken looking off our starboard side and the anvil cloud (storm cloud in the first picture) was off our port side. The combination of all these clouds made us decide to rig the storm sails for the night even though it was only blowing 10 to 12 knots. 

We must have looked like idiots flying our storm sails in a gentle breeze, but the key to ocean sailing is preparation. I would rather rig the storm sails and float around in calm weather than to await the storms approach and rig the sails during the storm. We slept very peacefully that night. Every hour I would poke my head out the companionway and see how things were developing. Conditions deteriorated that night and by the following day we were sailing in a nasty storm.

By that night, it was blowing 20 knots. By the next morning 30 knots. The storm peaked around 1pm, blowing around steadily 37 knots. Strong storm wind will kick up the seas, and the longer the storm blows, the larger the seas will become. This is why a squall with 50 knot winds and a duration of around 15 to 20 min will not have seas as high as a lesser storm that blows for days.

In the early morning, the seas were already rather large. Look at the water on the left and right side of the picture and you can see that this is a large wave coming up on us the height of our stern rail and not just the horizon in the distance.

In the early morning, the seas were already rather large. Look at the water on the left and right side of the picture and you can see that this is a large wave coming up on us the height of our stern rail and not just the horizon in the distance.

There are two schools of thought when it comes to storms at sea:

Light displacement sailboats that are capable of avoiding the storms
Heavy displacement sailboats that are capable of riding out the storms

I personally feel that the middle ground boats are not optimal in the ocean. They are too heavy to escape the storm yet too light to offer the comfort of a heavy displacement in a storm.

Wisdom is a heavy displacement sailboat so her motion is slow and lumbering. This translates into a calm ride in rough seas. We never get slammed around and the full keel keeps us on track as the seas rise and fall around us. 

As the day progressed, the seas also continued to build. We all stayed calm because we never felt that we were in danger. We had plenty of warning that the conditions were going to worsen and took the appropriate steps to maintain our safety.

When we saw the signs in the clouds, we reduced canvas and set course for further offshore. The only dangers that we would encounter during the storm would be breaking waves and a lee shore. Breaking waves can be calmed by the slick when hove to and the lee shore can be avoided by keeping enough seaway. 

Rough sailing is not the norm when it comes to ocean travel, but it will occur at some point. The way to keep them from becoming the highlight of your ocean voyage is to be properly prepared and take the necessary steps to ensure the safety of the crew and vessel. This way, the stories will be about the voyage and the destinations; rather than being about the storm that took the ship.


Storing Clothes

I’m not going to lie…it took me a full year to get used to living in a sailboat.  Herby has touched on the many things that I improved during the process of creating a comfortable living space aboard Wisdom, and I’m sure I’ll be talking about them as well in the future, but right now I’m going to focus on the challenge of storage.  As a female, I have many, many clothes.   Before moving into the boat, I filled a walk-in closet and two dressers with my various seasonal garments.  One of the biggest challenges, therefore, has been selecting my favorite clothes and storing them in a way that doesn’t drive me nuts.

 You may not like to hear this, boys, but if you want your girlfriend or wife to move into a boat with you, you must relinquish all claims to your largest closet.  I went to target and bought a ton of hangers for my sweaters, dresses, and button-down shirts.  I did give up quite a lot of closet space for the installation of the AC unit, but this was a necessary sacrifice and I have no regrets.  I am not a big shoe person, but when you live in a boat, even the smallest collection of items seems like a mountain of possessions.  It was a huge help when we got one of those shoe pocket things from Ikea to hang on the inside of the closet door. 

The rest of my clothing is stored in forward cabinet space.  Now in order to divvy up these cabinets fairly, I drew a chart of all the spaces and then we placed our names inside each one along with a label for what we planned to store in them.  Herby got the high up cabinets because he’s tall, and I got most of the bigger ones because I’m stubborn and have way more clothes.  Nevertheless, this worked very well for us and gave us a clear visual of all the space available before we started shoving clothes in random compartments.  I highly recommend it. 

I have an overflowing bin of pants in the largest cabinet and two plastic drawer bins from Ikea that I’ve filled with shirts.  There’s a convenient cluster of cabinets on either side of the V-birth entrance that are the perfect size for under-garments, PJ pants, and belts, and a small seat under which I store all of my graphic T-shirts.  It actually all works out quite well. 

My only complaint is when it comes to doing “The big seasonal switch,” as I have dubbed it.  This is when I take all my winter clothes in bags and switch them out for the summer ones because, I’m sorry to say ladies, but there just isn’t enough room to store warm and cold weather clothes.  My poor parents will be having to deal with half my clothes remaining in my old bedroom for quite some time.  This also includes all of my formal dress wear that I don’t use on any regular occasions. 

I’m going to list some other tips for storage that I have either discovered myself, or were passed along from my neighbors.

  1. If you have more storage room in your boat that isn’t readily accessible, store your off-season clothes there in tightly packed bins.
  2. Hang a rod in the back of your car and use it as extra closet space for dresses. (I’ve seen this done, but I wouldn’t suggest it if people frequently ride in your back seat.)
  3. Roll your clothes into tight cucumbers instead of folding them. 
  4. Use the bed to fold/roll laundry
  5. Go to Ikea
  6. Don’t wake up with a specific outfit in mind.  You’ll never find it. 
  7. Draw a picture of all the storage and divvy up space accordingly with your partner.
  8. Keep an open mind…you’ll get used to it once you establish a system that works for you.     

The Best Material for Synthetic Standing Rigging

Synthetic Standing Rigging is a wonderful system to work with. It weighs next to nothing compared to steel, yet holds your mast up with even more strength. The term "Synthetic Standing Rigging" is a generic term for standing rigging that does not use steel cables to hold the mast up. This broad category tends to include PBO, Vectran, Spectra, and Dyneema .

PBO is prohibitively expensive and tends to only be seen on race boats. It will not creep and is incredibly strong. It's major disadvantage is that it will quickly degrade when exposed to UV light. This is fine for sponsored race yachts where money is no object, but not very practical for the average cruiser.

Vectran is a wonderful product for standing rigging. It is in the Kevlar family and exhibits incredible strength with virtually no creep. While both of these features would make it wonderful for standing rigging, it is very susceptible to UV damage. The use of covers will help prolong its lifespan, but at the cost of higher windage. 

Spectra is the same as Dyneema, but is produced by DuPont. They have transitioned over to government armor contracts and no longer produce rope for civilians.

Dyneema is produced by DSM and is the same as Spectra. Dyneema is made of Ultra High Molecular Weight Polyethylene (UHMWPE) and is my favorite material for standing rigging on a cruising sailboat. It is incredibly strong with minimal creep, but with very good resistance to UV damage. This allows the fibers to be left exposed to the sun, minimizing the bulk of each stay to minimize windage.

So you decided that Dyneema is the material of choice for your synthetic standing rigging. Wonderful! Then you go to purchase the line needed for your standing rigging and they ask "Which one do you want?" Instantly you are flooded with numbers and strange words like SK78 or Heat Set. Lets take a look at the different types of Dyneema.

Dyneema comes in many flavors, each with its own properties:

SK75
SK78
SK90
SK99
DM20
Heat Set

SK75 was the be the best form of dyneema available for a while, but we have come a long way since these fibers. Some still tout SK75 as the best because of its incredible strength and resistance to UV damage, but it creeps a lot. Creep plagued SK75, and spurred the development of the newer fibers that do not creep as much. Most applications for SK75 have been phased out and replaced by SK78.

SK78 is the improved version of SK75. It offers the same high strength of SK75 but with greatly reduced creep. SK78 has pretty much replaced SK75 for all uses on the boat and many manufacturers have stopped offering SK75 since the introduction of SK78.

SK90 is the improved version of SK78 and offers significant increases in strength but no improvement in creep properties. SK90 offers a 10 to 15% increase in strength which made this fiber the best thing since sliced bread when it was launched in 2009. It reigned supreme until 2013 when an improved version replaced it.

SK99 is the improved version of SK90. It was launched in 2013 and offers 20% more strength as compared to SK78 but still no improvement over creep. SK99 may sound like a miracle fiber, but its price is equally set. For this reason, SK99 is not seen as often as SK78 which offers incredible strength with a more reasonable price.

DM20 is a different class of dyneema which has nearly zero creep but less strength as compared to SK78. The lack of creep would make it seem like the ideal fiber for standing rigging, yet it doesn't seem to be the popular choice. This is because there are treatments that SK78 can receive to improve its properties.

Heat Treatment is part of the manufacturing process whereby the Dyneema is subjected to heat and tension which causes molecular changes in the fibers themselves. Dyneema is made of polyethylene chains. The heating process under tension causes the fibers to stretch out further and creates more crystalline structures in the fiber which give the rope more strength. It also creates longer chains of polyethylene which are able to bear more load than the shorter chains found in untreated fibers, which results in less creep. The end result of heat treatment is a much stronger rope with less creep.

This may sound like a magic bullet, but sadly, there are drawbacks. The rope becomes much less resistant to bending and abrasion. This is not a problem for standing rigging because they are straight and do not move; just be sure that any bends are distributed over an appropriate radius to avoid damaging the rope. 


Lets take a moment to digest all of this information.

SK75 is strong but creeps.
SK78 is strong and has low creep.
SK99 is awesome but too expensive.
DM20 does not creep but is weak.

Heat treating SK78 results in low creep and incredible strength.

The downsides of Heat Treated SK78 can be easily overcome. Providing properly sized thimbles produces the proper radius turns needed and protective chafe coverings guards the line from abrasion. 

For these reasons, Heat Treated SK78 is the best rope for synthetic standing rigging. The price is not too much of a jump from regular SK78, and its strength and creep properties are vastly improved. 

I personally prefer New England Ropes STS-HSR which is Heat Treated SK78 and use this rope for my own synthetic standing rigging.

I'm sure as new technologies come to the market, these views will change. For now, this is the best product for the money and it will have a long service life as standing rigging if properly cared for.


Longdog wants to know what happened to the rope fenders

They are coming along. They have taken me a long time to make because the process is slow. Each layer involves cutting longitudinal lines and seizing them to the ends, followed by wrapping the whole thing in a coil. They have been gaining bulk, but a post of each layer added to them would be insanely boring! So I have not mentioned them.

The very last layer was done differently, instead of coiling the line around it like I always do, I did a bit of macrame. It's called a chain stitch.

By coiling the line in a chain stitch, I was able to add a lot of bulk to the fender quickly.

The next step will be to wrap the whole fender in a series of half hitches. This will also be a very slow process but if they tear or get cut, the whole thing will not untie. Then I will be able to mend the broken area without worrying that the fender will unravel.  

LED Lighting

The old dim florescent light

The old dim florescent light

Wisdom came with florescent lights mounted throughout the boat. A total of 9 lamps could evenly distribute a pale yellow glow. Each lamp consumed 16 watts,  burning 144 watts to light the whole boat. The truth is only 2 lamps worked so the boat was rather dark inside. 

I decided to update the lights rather than replace high energy consuming bulbs. I decided to convert all the lights to LED!  

I took a stroll over to West Marine and suffered incredible sticker shock as I gazed upon small lamps with prices ranging from $23 to $52 per lamp! I returned to the boat without any lamps but full of ideas. 

The lamps they offered all reminded me of lights I had seen before in IKEA. I made a trip to the closest IKEA and discovered that their cabinet lights are 12v DC! The best part is that a 4-pack only cost $22!

I decided to place the IKEA lamps over the existing holes from the old lamps. This allowed me to complete the conversion without replacing the ceiling. 

Each lamp had 3 holes that we not evenly spaced, one for the wires, and two other areas for the screws. I simply placed a set of 4 lights evenly spaced to cover the 3 holes. I also added a few extra lights in dark areas of the boat.  

The IKEA LED lights provide more illumination than the florescent ones and only consume 3 watts between 4 lamps. This allows me to have interior lights on while anchored out and not worry about my house battery bank holding up. 

The conversion itself was more involved than I had anticipated (like all boat projects tend to be). I had to lower the ceiling in each part of the boat to remove the old lamp, then (by the use of a jig I made out of the box the lights came in) install the 4 new lights in their respective spaces and run the wires. 

IKEA lamps are 12v DC which means you can cut the fancy IKEA connector off and wire the lamp directly into the boats 12V system. LED lights are polarized, so be sure you connect the lamps positive to the boats positive (you can trace the wires inside the transformer to figure out which wire is positive).

I have read that if the lamps are connected with their polarity crossed, they will either die instantly or else have a shorter life. I did not want to find out so I made sure it was correct before I connected it to the current. 

Once the lights were wired and tested, the ceilings and all their associated mouldings were reinstalled.  

The new lights provide plenty of light to live and read by while producing minimal heat.  

The downside to the cheap lights is they are not marine grade. I don't believe they use tinned copper wiring, and I don't expect them to last forever. They have been working wonderfully since 2012 and for a fraction of the price, I think they are doing just fine!  

When installing 48 lights (which only draw 36 watts when they are all on), cost became a significant determinant. My cost from IKEA totalled to $264. If I had bought them from a marine store such as West Marine, it would have cost me around $1,104.

These little cabinet lights deserve some credit, they can light up a tiny living space with minimal electrical consumption, they look modern, and they are flush mount!