It's really easy to go out and buy hardware that will attach to your spar, be it your boom or your mast, but it gets a bit complicated to attach them.

Sure, you can just screw it onto the spar and continue on with your life! In a few months, that fancy new piece of hardware will fall off the spar and be covered in a white powder. Upon further inspection, you will notice that the holes you drilled are full of this white powder and you can't to get the screws to bite when you try to reattach it.
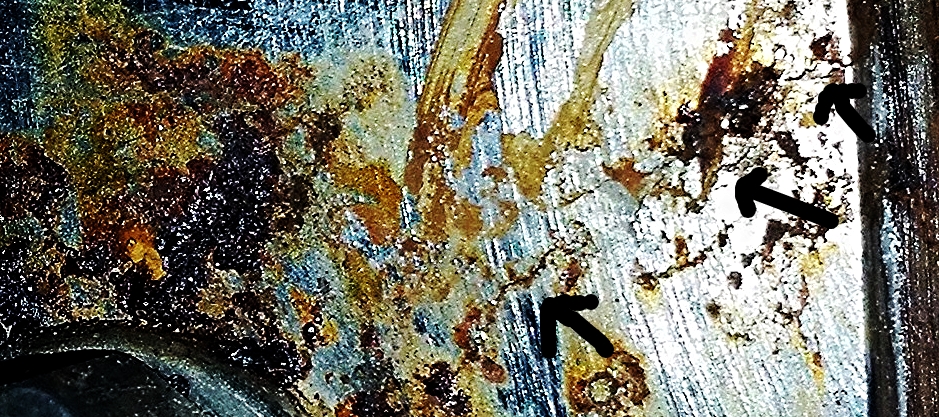
What has happened is known as galvanic corrosion. It is the corrosion between two dissimilar metals, in this case, the aluminum of your spar and the stainless steel of your component and fasteners. The two metals are reacting and eating each other away like zombies in a horror movie!
To avoid this horrible fate, you have a few options:
1. Only use like metals.
2. Do not let dissimilar metals touch.
Option 1 sounds pretty straight forward. If your spar is aluminum, so should be your components and fasteners. The problem with this plan is aluminum is not a very strong metal and an aluminum cheek block attached with aluminum pop rivets would sheer right off the side of your boom at the first sign of wind!
This is why high strength components are always stainless steel. Even if the component is made out of aluminum, they will still recommend using stainless steel fasteners to achieve the needed sheer strength required to hold the component in place.
Option 2 sounds like something out of a science fiction movie! How will you keep two items from touching if you are connecting them? The secret is to use barrier layers in between them, this way they sit up next to each other but will not touch one another.
The cheek block shown in the top picture was attached to the boom with nothing separating the stainless from the aluminum. This was just to fit the piece and get all the holes drilled. With the holes drilled and the screws fitted, the entire assembly was removed to add the separation layer.

What we have here may look like a mess, but it is actually a collection of goodies that will keep the stainless from touching the aluminum. Teflon tape, also known as plumber's tape, is laid out over the entire back of the block. This will provide a base layer of separation between the two components.
The next layer of separation is polysulfide that is piled into the middle of the block. This overfilled amount of material will ooze out over all the surfaces and provide an additional layer of separation and keep any water from getting in between the block and the spar. Polysulfide is great because the excess simply oozes out and is then allowed to cure. Once cured, it can be cut off for a clean, professional looking installation.
The brown stuff in the corners is Lanocote. This stuff should really be called "wonder grease" because it does everything you could ever dream of, and it's non-toxic. Lanocote is just wool nap, the grease that sheep produce to keep their wool waterproof. This stuff is probably the only material that you can smear on with your finger and not worry about getting cancer from it in 20 years! It acts as a separating layer, anti-corrosive, and anti-galling. Best of all, Lanocote is very inexpensive!
I put Lanocote in the corners since these are the only parts that are actually going to touch the spar. The rest of the plate is merely "close" but not in actual contact. The Lanocote also helps hold the teflon tape in place while the block is being positioned, that way it doesn't slip out of the way when you are not able to see it.
All of these layers might sound wonderful, but there is still one serious fatal flaw in this setup. The screws themselves are stainless steel and will be in the most intimate of contacts with the spar. They have to be holding onto the aluminum or the block will fall off!
The secret here is once again, Lanocote. Dipping the screws in the pot of Lanocote will pick up a lot of material that will coat all the surfaces of the screw. The Lanocote will get into all the nooks and crannies between the threads and down the shank, everywhere that the aluminum will also be in contact.
When you drive the screw into the spar, the Lanocote will coat everything and provide all the necessary qualities needed to isolate the two metals while still allowing them to grab onto each other. This will prevent galvanic corrosion and keep all the metals happy, granting you a long service life with happy components.
You might think that this must be too good to be true. How can such a wonderful material be inexpensive and easy to use?! Unlike other more expensive isolation creams and gels that can be purchased, Lanocote will stand up to the test of time. I have removed old components that were attached with synthetic isolators, such as Loctite, and found signs of galvanic corrosion beginning. On that same note, I have removed components that were installed 20 years ago and there were no signs of corrosion between the aluminum spar and stainless steel fasteners. The Lanocote was still moist, just like the day it was applied!
If you ever need to attach two dissimilar metals, be sure to apply a liberal coating of Lanocote between them to extend their service life and give you peace of mind that all your boats metals are happy.