
Crew Position Available

Greetings all, we are looking for a third crew member for our voyage across the Atlantic from Bermuda to the Azores.  This could be a once in a lifetime opportunity!  

We would prefer that you have sailing experience, but prepare to relax for most of the trip! You would mostly serve as good company and peace of mind since Maddie is nervous about single-handing the boat if something were to happen to me. Both sets of our parents would feel more comfortable if we had a third hand along for the longest stretch of our journey.  

You will find details about the trip, our vessel, and contact information below.  We hope that you will consider joining us for this segment of our adventure!

If you are interested in being crew or have any further questions, please email us at RiggingDr@gmail.com.

A few things to know about our personalities: 

We are very laid back, especially at sea.  We enjoy listening to music, reading, and playing games.  We are not huge drinkers, but there's nothing quite like a happy hour on a calm day.  I am slightly introverted and enjoy my alone time, but I also enjoy good company.  Maddie is extroverted and always easy to talk to.  

Wisdom is a 45 foot Morgan from 1968. She has been completely refitted and repowered. The equipment list includes:

Power and Batteries

  • 20kw electric motor/hydrogenerator
  • 210Ah 48VDC motor battery bank
  • 525Ah 12VDC house battery bank
  • 100W solar array on stern
  • 200W flexible solar array on deck
  • Electronic autopilot

Pumps

  • 1000gph electric high water bilge pump
  • 500gph electric bilge pump
  • 250gph electric shaft sump pump
  • Whale Gusher manual bilge pump
  • Edson 1 gallon per throw manual bilge pump

Rigging

  • Synthetic standing rigging
  • VPC running rigging
  • Sta-set control lines

Sails

  • Battenless dacron mainsail with 3 reefs
  • Full batten laminated mainsail with 2 reefs (spare mainsail)
  • 100% jib with 1 reef
  • 95% staysail with 1 reef
  • 80% staysail with 1 reef (spare staysail)
  • Nylon 180% drifter (light air sail)
  • Nylon battenless mainsail (light air sail)

Safety and Navigation

  • VHF radio with AIS and GPS
  • Handheld GPS
  • Satellite communicator
  • Garmin chartplotter with GPS
  • Depth sounder
  • Windspeed and windpoint
  • 4 person Offshore Life raft
  • Ditch bag
  • Life Sling
  • Emergency boarding ladder
  • EPIRB
  • Floating orange smoke
  • Non-expired flares
  • LED signaling device (electronic flare and spare batteries)
  • Flare gun
  • Handheld VHF radio
  • Paper charts
  • Sextant, compass, and accurate time piece
  • Sea anchor
  • Monitor Windvane

Provisions

  • 160 gallons of water in rigid tanks
  • 27 gallons of rain water in bladder tank
  • Rain water collectors
  • 80 gallons of diesel (for heat)
  • Large volume of canned and dry foods
  • Large ice box for cold items


To prevent a mutiny while crossing the ocean, we feel it is important to lay out some ground rules before we proceed any further.

  • We do not have any significant range on our electric motor, so if there is no wind, we will put up the nylon sails and sit as we drift along. This is when we cook nice meals and read books or play games.
  • If we see foul weather approaching, we will put up the storm sails preemptively and sit as we await the storm to approach. When the storm hits, we heave to and wait for it to pass over. If the winds are too powerful, we will deploy the sea anchor and lower the reefed staysail, but the trysail will remain set to keep us hove to. We will not lay-a-hull during a storm. 
  • Fresh water is very precious. Water usage is calculated based on how many miles we have left to go. If we are sailing quickly, we can use more water for showers or laundry. If we are not moving, the water usage is also exceedingly strict.
    • We carry 120L of bottled water in addition to the tanks, this is enough for 3 people to survive for 20 days comfortably.
      • Based on 2L per person per day
  • Teeth are brushed with clean sea water. Fresh water used to rinse if necessary. 
  • Showers will depend on how much we all smell and how fast we have been moving in the right direction.
  • We heave to at night and go to sleep. I (Herb) wakes up at a regular interval to check for approaching vessels. AIS proximity alarm is also set to a 2nm proximity alert range. 
    • Sleep is very important, and we feel that getting a good nights sleep will better allow us to make the critical decisions that will keep us all safe. This will make the voyage take longer, but only by a few days.
  • No drugs please. 
  • No smoking please.
  • No drinking please. 
  • We will not enter a harbor by night. If we arrive at the Azores in the afternoon, we will heave to and enter the harbor in the morning.

The tentative schedule is to leave Bermuda around Oct 3rd and arrive in the Azores before November. We will be doing a fall crossing of the Atlantic, and our route will be roughly 35*N. We will ride the northern portion of the doldrums, where there is no wind because when the massive winter gales rage by to the North, they will create plenty of wind from the West in the doldrums. We will ride these puffs of wind as the storms roll by in their cyclical pattern. 

When a storm is North of us, we will have comfortable wind to sail in. When there is no storm to the North of us, we will sit and cook as we wait for the next storm to blast by and give us another push in the right direction.

Our actual course and date of departure is subject to change based on weather conditions and patterns around that time.

October 3rd was arbitrarily chosen as the departure date from Bermuda. If you feel that a different date around that time frame works for you, let us know, we are very flexible with times and dates.

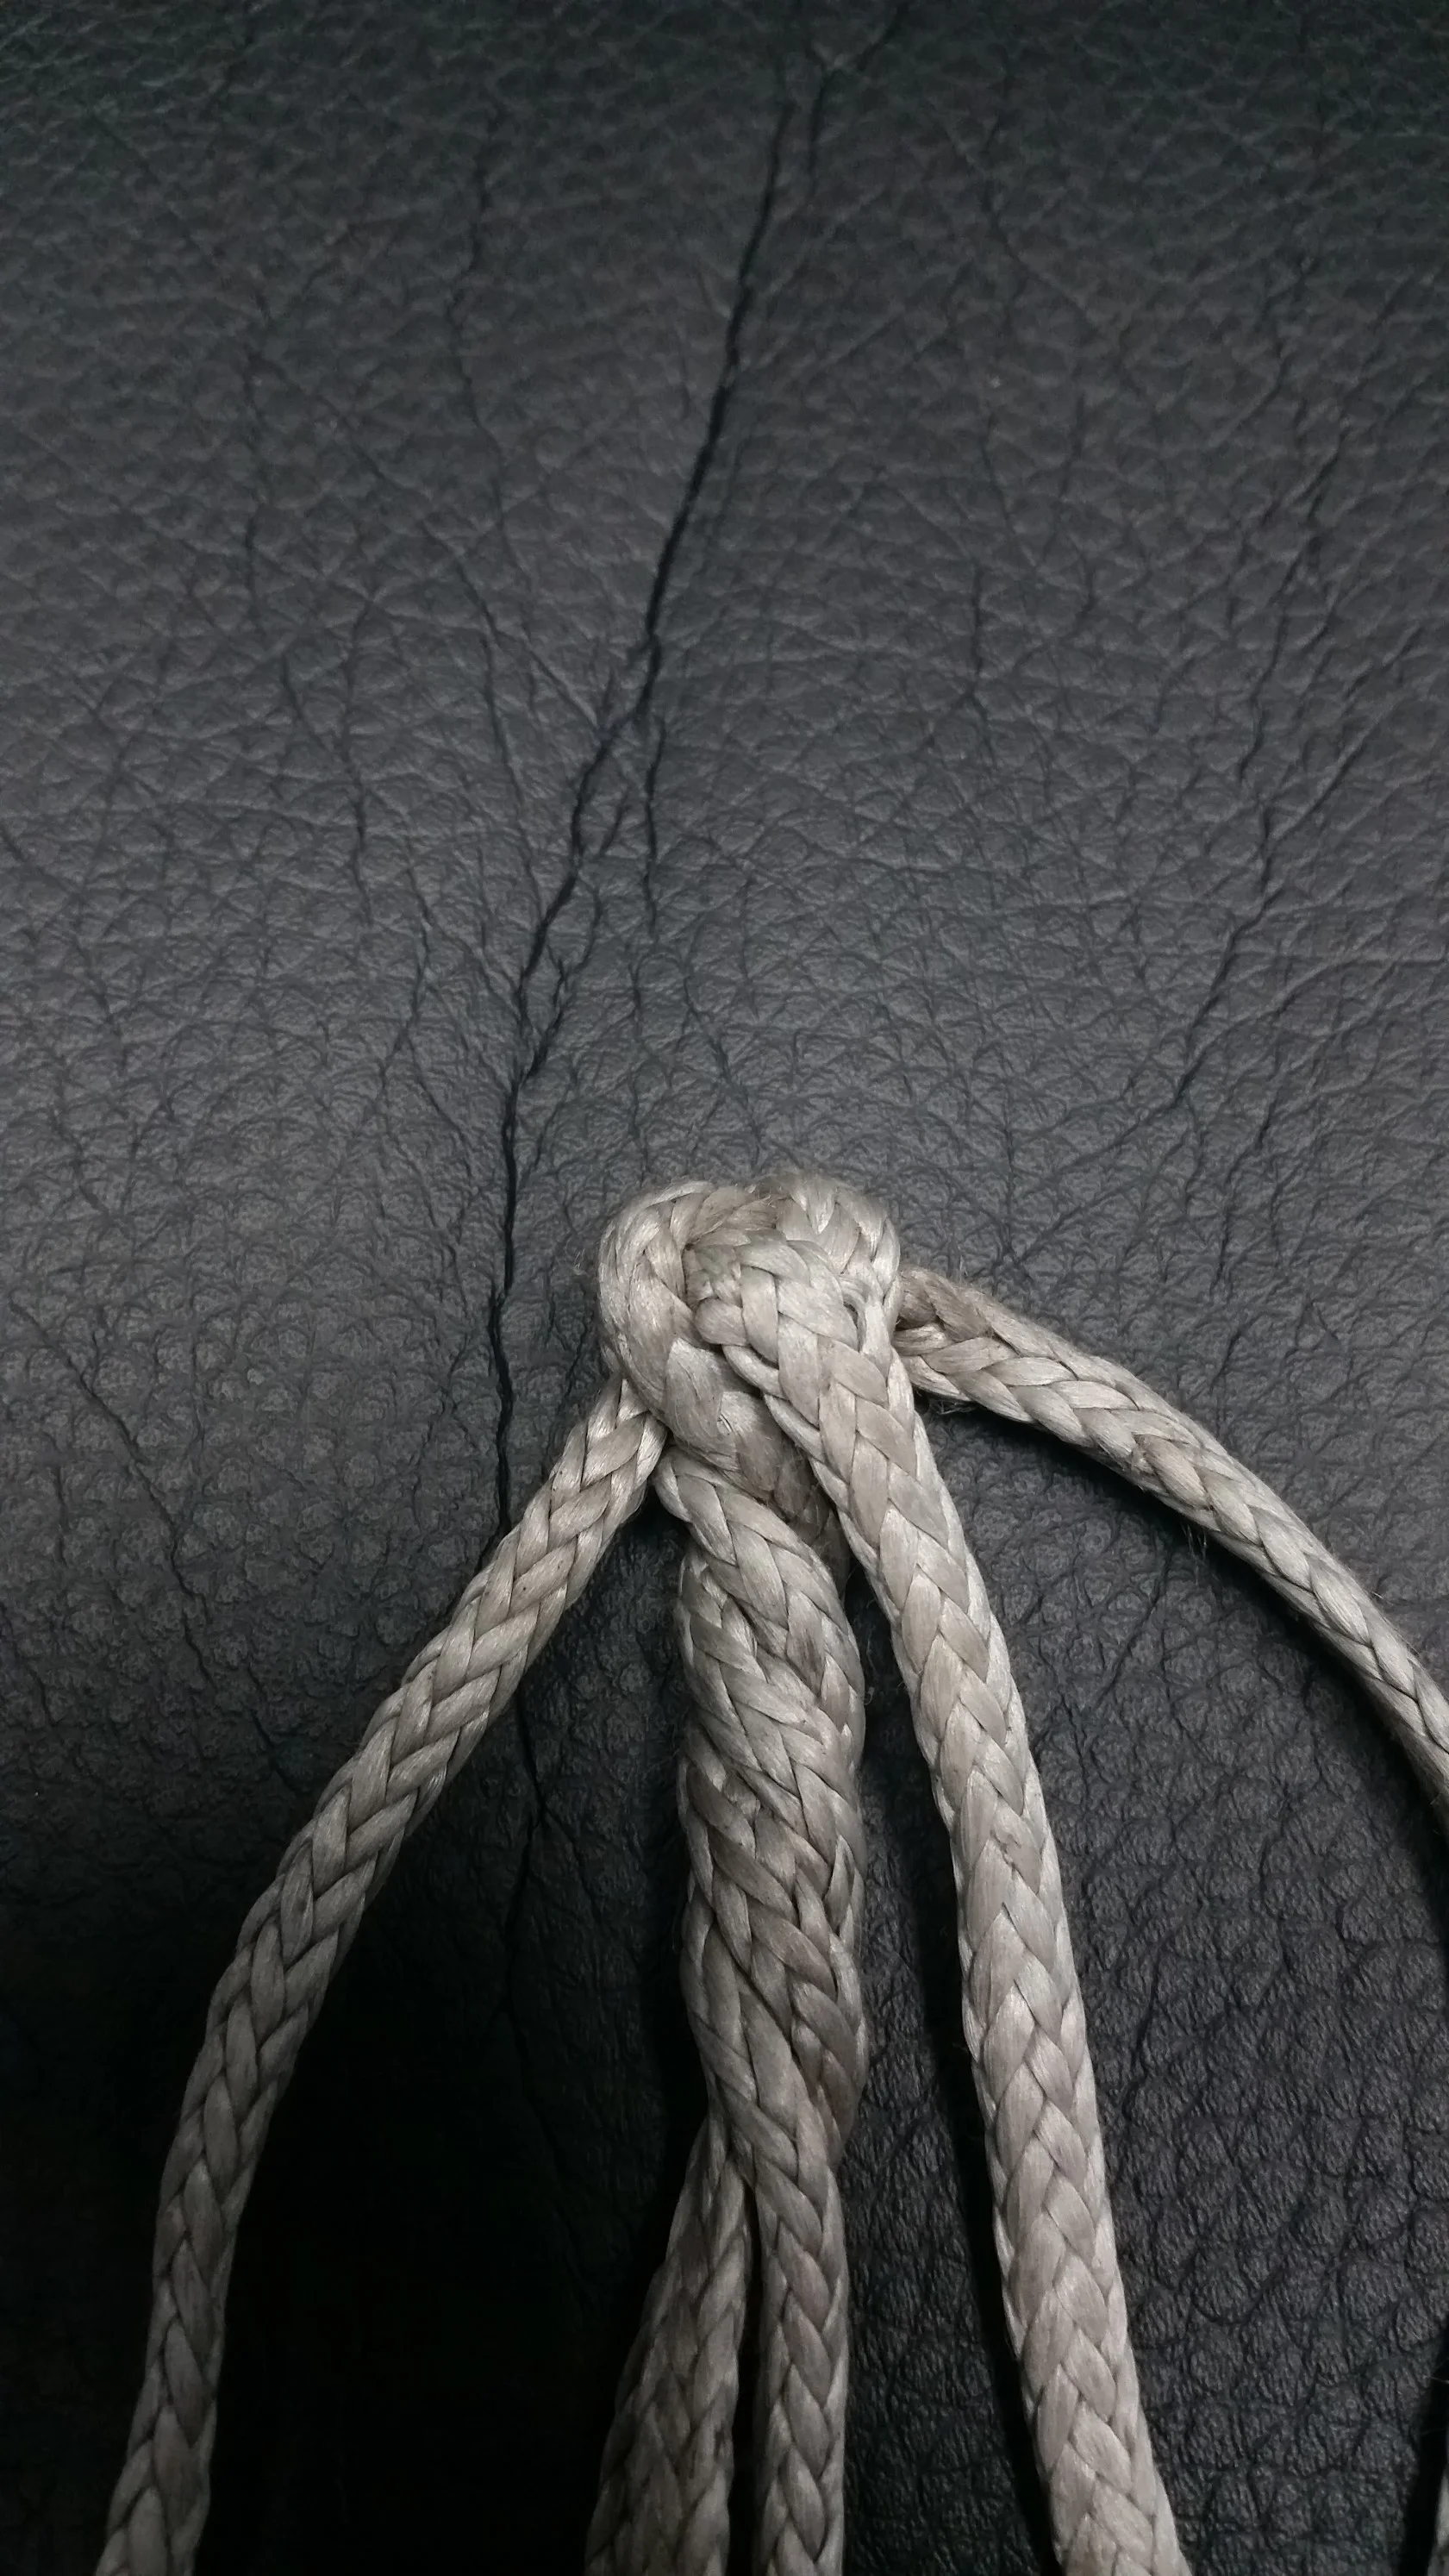
Crown Knot vs. Wall Knot

Two seldom known knots that are very useful are called the Crown Knot and the Wall Knot. These two knots, while they appear different once tightened, are actually the same thing!

Wall Knot

Wall Knot

Crown Knot

Crown Knot

The only difference between them is which way the tails run after the knot is finished. A Wall Knot has the tails continue in the original direction of the line. A Crown Knot has tails that continue in the opposite direction of the line.

Both knots are tied by looping through the other lines, simply finishing with the lines exiting the loops in on the top or on the bottom to differentiate the two knots.

Wall Knot

Wall Knot

Crown Knot

Crown Knot

Wall Knot with Crown Knot

Wall Knot with Crown Knot

As you can see, both knots are made by looping the lines through each other, the only difference is where the end of the line exits the knot. If it is above the loop, it will make a Wall Knot. If it is below the loop, it will make a Crown Knot. When deciding which of these knots to use, it is important to know what you are trying to achieve.

If you are creating a knot in the middle of a line, a Wall Knot would be your best choice. If you are going to perform a back splice, a Crown Knot will hold the end of the line together while positioning the tails in a position, ready to bury into a back splice.

The crown knot is actually used to bind the end of a line in the Tree Surgeon's Backsplice. It positions the tails ready to bury in the backsplice. The buried tails will not budge since the spliced into the rest of the line and the knot will hold everything together, no matter the abuse that the line is subjected to.

Wall Knots are sometimes used for decorative purposes, since they can be placed inline with the cords that hang lamps and baskets inside the hull. Another decorative use for the Wall Knot and Crown Knot is to combine them.

A Wall Knot will create a nice twist in the line and secure the strands. A Crown Knot placed over the Wall Knot will create a nice button at the end of the line. The tails will be oriented back towards the original line and can either be spliced back into the line or trimmed off short. 

The combination of these two knots will create a decorative button knot that can be used to secure loops and lanyards.

Montor Wind Vane Installation: Part 2

The monitor was removed from the transom and taken to the work shop to drill and through bolt the stanchions. I was planning to drill the tubes with the drill press, but I wasn't able to position the unit onto the drill press properly. The unit was just too heavy and bulky to hold in position while operating the drill press. 

I then switched to using a cordless hand drill to make the needed holes in the stanchion tubes where needed. This process was easier to manage but not as easy to carry out. Drilling stainless steel is a very slow and tedious process. Drilling stainless steel was discussed further here when I fabricated a new set of chainplates for an Islander 36.

All I needed to do was drill four holes in tubes and I would be set! I started with a trip to the hardware store to purchase two new drill bits. Stainless steel is a real pain to drill, and any tricks will help make the task less arduous. A new, sharp drill bit will make this task proceed a bit more smoothly. 

As always, there is a right tool for the job. For drilling stainless, you want to use a cobalt drill bit, as these are made of a harder metal and will hold their edge longer. If you took your regular drill bit and started spinning it on the pilot hole, you would dull and destroy the drill bit in a few minutes.  I purchased two of these because they are very sharp, but one mishap can cause the drill bit to dull or shatter. Should this happen and I only purchased one, I would then need to make another trip to the store to pick up a second drill bit!

The Monitor was positioned firmly in a flower bed where nothing sharp would hurt its polished finish and the through bolt holes were slowly and steadily made. Keeping the speed low reduces the amount of heat buildup while removing the metal. If the bur starts to blue, you need to stop and slow down as heat is building up. If the bur turns blue, the edge is soon lost and you will need to switch to a new one soon. If you see orange appear in the bur, it is toasted and you might as well drill at full speed and finish your hole because the bur is dead and not worth using for the next hole.

Drilling stainless steel is a slow and tedious process that results in an unnoticed hole in the metal. There should be no change in colors nor excess heat buildup near the hole, just a punch out in the metal where surface once was.

The next step is to install the through bolts which will tie the unit all together. If you simply bolt up the stanchions, the metal tubes would be crushed during the tightening process! To avoid this catastrophe, you need to install metal tubes that will provide resistance to the tightening bolts. 

The problem with this simple task is it is not very simple. The metal tubes are snug and do not slide through the pipe. If they did slide, there would be no way to hold them in place while the bolts are installed.

The small metal tubes were placed over the opening to the pipe in line with the holes in the side and tapped in with a hammer. This worked well until the pipe was at the maximum depth of the hammer. I then switched to a center punch (used backwards) where I tapped on the small end and transferred the force to the tube via the large wide end. This allowed the pipe to be tapped into place without issue and in line with the holes. If the pipe needs to be twisted, simply grab the pipe with a box wrench and spin the wrench with a lever bar to provide the mechanical advantage needed to spin the restricted tube inside the pipe. This trick works, but it is hard to carry out and best to not need. Just make sure to start out lined up and keep it lined up during the entire process.

With all the through bolts supported, the Monitor was fastened together and all the nuts were tightened until the lock washers laid flat. I did not over tighten the fasteners as this would cause undue stress on the whole unit. 

Next step will be another test fit!

"Kneasles"

When I was much younger, my dad told me a joke that has stuck with me. Every time I hear the word "Knee", I am reminded of it.

A man rushes into a whore house and asks the madame for a woman and states that he is in a hurry.
The madame fulfills his request with a lovely lady of the night and they head off into their room.

As he takes off his shoes, she remarks: "What is wrong with your feet?"
He answered: "When I was younger I had Toelio."
"You mean Polio" said the woman.
He insisted "No, no, the doctor told me it was Toelio."

She shrugged off his misshaped feet and they continued to undress.
As he took off his pants, she questioned his weird looking knees!
He answered: "I have Kneasles."
She questioned: "You mean Measles?"
He insisted: "No, no, the doctor told me it's Kneasles."

He reminded her that he was in a hurry and took off his underwear.
She looked at him and asked: "Now, are you going to tell me you also have Small Cox?"

Be careful what you say to your kids, you never know what will stick with them!

Back to the dinghy, we are now fitting the knees in the transom. Knees are a structural member of the hull, just as important as the keel, frames, and floors. Knees help resist wracking and keep the hull from flexing as waves and loads try to torque the hull.

In the simplest of forms, a knee is simply a brace that keeps a corner from collapsing. Knees are used everywhere: they can be found under bookshelves, and even fold out table leaves. Once you break a knee down to its basic function, it takes away all the mystery behind it and makes it easier to comprehend.

The transom knee will fit into the corner of the transom between the transom and the sheer. The shelf clamp will also connect to it, adding extra rigidity to the hull. A few simple measurements were taken and the knees were cut from a piece of quartersawn scrap wood that was lying around in the off-cut pile next to the bandsaw. 

The knee fits good enough for what it needs to do and where it will be located. I did not bevel the side that mates to the transom to make the knee rest flush with the gunwale of the dinghy because that is a lot of work with no room for error. Most transom knees are very visible, as they are the top of the back corner of the dinghy. Our transom knee is going to be covered by a lid which will double as a seat for Maddie as I row us to shore. This means that the transom knees are going to be hidden away inside of a storage locker, only visible when the lid is up and we are either storing items or retrieving them later. For these reasons, the knees only need to be functional and their aesthetic aspects can be ignored.

The knees were glued and screwed into place, with two screws through the transom and three screws through the sheer. The shelf clamp was also screwed through the tip of the knee and into the sheer, locking the entire assembly in place. You can see the screws on the sheer are set on an incline that runs perpendicular to the angle of the transom.

The knees were set and left to cure in place as the screws hold them in position for the rest of the life of the dinghy. Now the transom knees are finished and installed and the hull is a lot stiffer when torqued. 

Foggy Mornings

Dense fog will transform the marina into a magical wonderland. The city disappears into the mist with the street lights glowing off in the distance. As soon as the sun comes up, the fog will burn off, but for now, it feels like walking through a completely different world.