Marina community

When I first moved onto the boat with Herby, the thing that struck me as most exciting (besides living with him) was the vibrant boating community that surrounded us in the marina.  In general, people who live on boats are very nice.  We all look out for each other in a number of ways and are more than just neighbors.  We’re friends.  Herby and I like to joke that there are four types of people that live on a boat: divorced men who didn’t get the house, retired couples living out their life-long dreams, those who actually work on boats for a living, and crazy young people with wide eyes for adventure.  We joke, but it’s actually quite true.  Herby’s the crazy one and I’m just the one who fell in love with him. 

Living on a boat creates an instant bond between live-aboards in a marina.  We all have similar challenges and passions.  When any of us goes away for a while, the whole community looks after their boat, whether that means pumping out their dingy or keeping an eye on the water line.  We all know each other by name and make an effort to stop and talk if we pass one another on the pier.  It’s a quirky bunch of people who have decided to live this way, but quirky is fun! 

I’m the youngest in the Marina, but I don’t feel out of place with my neighbors at all.  Paula, who lives across from us, insists that Herby and I call her “mom” and our friend Tammy cuts our hair while her husband Bill works on welding projects in Baltimore.  We frequently have dinner with a couple down the pier from us and game nights with a firefighter couple that is close to us in age.  One of the dock masters created a “sunset lounge” on the pier in front of his boat with a few comfy porch chairs and a cooler where a few people join him most evenings to watch the sunset and have a beer or two.  Every year there is a crab feast that includes everyone in the marina who wants to join in the fun.  And so, we all make excuses to spend time together and chat.    

Now, this is not to say that we absolutely adore every person who lives in the Marina.  There are those who have built up certain undesirable reputations, but we all generally steer clear of them.  It is a special quality of boat life, however, to have such accessible friends all around you.  Everyone knows that if they need help with something mechanical or personal, all they have to do is knock on our hull at any time of day or night when we are home.  We have been able to help our neighbors out of their slip or even assist during a midnight emergency after someone fell in the water.  We know that any one of our friends would do the same for us.

This community is close and welcoming in a way that made me feel like I belonged here from the start.  They were quick to offer up helpful advice to me for making the sudden transition from land to water.  Many people think that living in a boat is a lonesome existence, but in reality, it connects you to an entire community of caring people that I have come to know and love.  

Connecting to the Internet

The internet is very important to some people, and life without it may seem unfathomable to them. I go both ways when it comes to internet connectivity, I need it to post on this website and I don't care for it at the same time. As you may have noticed, electronics are a source of frustration to me. I expect them to fail in a marine environment as corrosion sets in. I don't like to rely on electronics, but at the same time I appreciate the conveniences that they have to offer.

Connecting to the internet on a boat is different from a land based structure. Verizon or Comcast won't run a line out to your anchorage! 

For liveaboards who don't take their boat out of the marina, plugging a coax cable into the pedestal will provide the fastest connection available. This will connect them to shore side internet using a "pretty reliable" system. The pitfalls of this system have to do with corrosion. The coax hookup is outside and exposed to the elements, leading to a faulty connection. In time, the terminals will need to be cleaned or replaced to maintain a proper connection. 

If you take your boat out a lot, this will become a nuisance and will quickly be abandoned. The cable is very small and hard to get into the plug without damaging the terminal. The repeated connection and disconnection will lead to premature failure as well. 

The alternative to wired connectivity is to use wireless connectivity. You can tap into local WiFi signals, allowing you to get online quickly and easily. The problem is you are forced to stay in close proximity of the WiFi antenna. If you are in a big city or popular harbor, WiFi will be plentiful and a good connection will be more likely. Sometimes the local WiFi signal available is worthless and you won't be able to load a single webpage. I have dealt with these companies who give you excuse after excuse explaining the poor connection, and then a look on yelp will reveal that they tell these excuses to everyone every time. While some WiFi signals are worthless, others are wonderful! 

Connecting to local WiFi signals is a nifty trick to get online, but it is not as reliable as you might wish it to be. If you like to get online from time to time to check emails and look at weather forecasts, this might be sufficient for you. On the other hand, if you need to connect to the internet everyday for work or other reasons, spotty WiFi signals may become the bane of your cruising life.

The last option to allow reliable internet access is to carry your own WiFi Hotspot. It works off of your cell phones data plan and lets you easily connect to the internet with a reliable and repeatable connection. There are no wires involved and no complex systems to maintain, simply turn it on and connect to the internet.

I use the Jetpack from Verizon. It gives decent speed and works everywhere that Verizon has signal. This lets us reliably connect to the internet, no matter where we are. It also seems relatively resistant to corrosion, I have been using the same unit for over 3 years and it has not died on me yet!

As always, there are drawbacks to every alternative. The Jetpack works great, but only where we have phone signal. Out in the ocean it is worthless, as well as in remote creeks and rivers where there is no signal. The other issue is they work off of your cell phone plans data, meaning that all those videos you stream on YouTube will tick away at your month's data allowance. We survive on a relatively small data plan (keeps the bills down) but we do not have the luxury of Netflix or endless hours of surfing the web. 

When deciding to disconnect from land and live aboard, you don't have to worry about giving up the internet! You just change the way that you connect to it and use the internet. While it may seem like a shock to not watch YouTube for hours, but you will be surprised how many other ways you can unwind with that amount of time while living in a small space on board a boat!

Navigating to Windward

Sailing is fun! Raise the sails and off you go, but in which direction?

You probably have a destination in mind and will want to go in that general direction. When this destination is downwind from your current position, it doesn't take as much planning to get the boat going in the proper direction. When the destination is upwind from your current position, the proper course may seem a bit of a mystery to onlooking power boats.

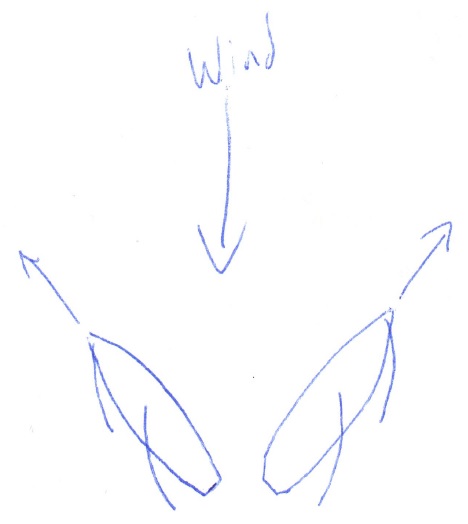
Sailboats can move in any direction for a long time, except dead upwind. To move a yacht towards an upwind destination, you must set a course for a few degrees to the left or to the right of dead upwind. This course is known as a tack, and the act of changing from left to right of the wind is tacking.

To move to windward, you will end up sailing to the left or to the right of the wind. This will present to you the characteristic image that power boaters think of when they think of sailboats: "I want to go dead ahead, so I'm going to sail to the left of it, and then to the right of it!" With time (lots of time) you will make your way towards your windward destination.

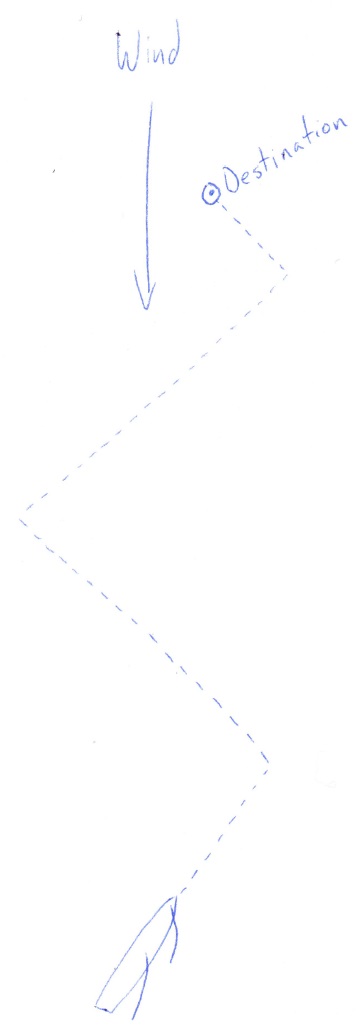
An important thing to remember when working to windward is that longer tacks are preferred over shorter tacks. Every time you tack, you will loose some distance as the boat slows and gets in its groove again. If you loose a few feet of forward distance, then minimizing the number of these episodes will be very advantageous! If there is not enough water to carry out a long tack, then you will have no choice but to complete various short tacks. If the body of water you are sailing in is wide enough, the longer the tack the better.

A very important point to remember when sailing towards a windward destination is that it is best to overshoot the target and fall back to it instead of choosing your tack so you will come directly to your target. If there is any disturbance in your journey, you will slip to leeward. If you are aiming directly for your target, you will now need to carry out two additional tacks to arrive at your destination. If you aim for a more windward target, you will have leeway to allow for leeward slip which will mean that any disturbance will allow you to still reach your target without any additional tacks. As you overshoot your target, you can then begin to fall off and come into your destination with much more comfort and predictability.

While the ideal is to tack up and arrive directly upon your destination, the reality is that the winds will change, current could pick up, or debris could cause you to alter course (crab pots in the Chesapeake are a common offender). If you are picking your course so that you are close hauled and can't sail anymore upwind, then you have no leeway if you encounter a disturbance. You will undershoot your target destination. The alternative is to select an upwind target, to which you sail close hauled while keeping the final destination a bit to leeward of the target. This will allow you wiggle room if you encounter a disturbance and slip to leeward. As you approach your destination, you can alter course for the destination and sail on more of a beam reach. This will afford you the flexibility to turn more to windward if the situation calls for it.

The variability in the wind can be seen in these charts where we were sailing to windward. You can see how we do not follow a perfect straight line because the wind would shift or change in intensity and direction, as well as the influence of the ebbing and flooding tides. This is why it is a good idea to (windward) overshoot your destination and afford yourself the leeway. If you cut it too close, you might have to add some extra tacks to make it to your destination which will make your journey take even longer.

Shortsplice vs Longsplice

When you need to permanently connect two ropes and have the time and skill to splice them together, you are faced with two options: Short Splice or Long Splice. What are they and what are the differences?

Short Splice

Short Splice

The most obvious difference in the splices is the length of the splice. A short splice is betwen 6 to 8 inches long, where a long splice is around 3 to 4 feet long.

The short splice is certainly easier to perform than a long splice, the ends of the three strand line are simply braided into each other and the ends of the line are joined. This works well for docklines or painters, but not so well for sheets or halyards. The act of short splicing will add some bulk to the line at the junction. This bulk can be greatly reduced by tapering the ends, but there will still be a larger bulky segment that may jam on winches. 

The long splice is the answer to the pitfalls of the short splice! It will join the two cut ends of the line with no added bulk or stiff segments. The long splice is completed by unlaying and relaying the strands of the line to permanently and firmly reconnect the two ends. A properly done long splice will not be easy to spot as there is no added bulk in the line. The only clue to its existence would be the tufts of where the strands are knotted.

Sounds like the long splice is the magic bullet for joining two lines! Why would anyone ever do a short splice?

Long splices are a pain to do! I fouled a sheet in my prop one time and had to cut the sheet free. After returning from the water, I had to reconnect the sheet so we could keep sailing. I only did a long splice out of necessity, otherwise I try to do short splices whenever possible.

To do a long splice, you need to relax, sit back, and prepare yourself mentally for the ordeal. Tie constrictor knots about 3 feet back from the end of each line to prevent the whole thing from unraveling. 

Then you will carefully unlay one of the strands while replacing it with a strand from the other line. The first strand will go from "Line A" into "Line B" the whole length. At the end, you will tie a square knot in the two strands and bury the tails into the lays.

The second strand will go from "Line A" into "Line B", but only 2/3rds the length and then bury those tails. 

Lastly, take the third strand from "line B" into "Line A", bury it the whole length and tie the ends burying those tails.

Now you have a completed long splice with the junctions well separated from each other to distribute the stresses of the splice terminations over a long expanse of the line, keeping all the strength of the original line! What could be so hard about it?

While you are unlaying and relaying the strands, they can not loose their twist. If they come unraveled, the splice will not look right and might not work all together. If it unravels, you have to cut the unraveled part off and start over moving further back into the line you are splicing. 

After you are done, put a load on the line to get the lays to settle in, this will greatly improve the look of the finished splice. 

I have only done this splice once, and it was on my sheet after I foulded the prop. The line was well salted and stiff, which helped to avoid unraveling (but it still tried to unravel). If the rope is new and soft, it will unlay and unravel in a hurry! To combat this, either brine the rope or coat it in more hairspray than a highschool girl getting ready for prom. This will stiffen up the line and help avoid any accidental unravels. 

If you have to splice the two ends together, your first choice is a short splice. If you have to run this line through any leads or hardware, then you have to use a long splice.

The much easier alternative is to replace the whole sheet, but if you are in a situation where a replacement is not available or you can't afford a replacement, a long splice will come to the rescue and restore utility of your damaged line.

Comfortable Shower

Boat showers are much less glamorous than those on land. They don't have fancy tiled walls, or pretty shower heads; they typically look like a cheap shower head on a hose stuck in a corner of the boat. 

On Wisdom, this is no exception. I changed the disgusting looking plastic stick of a shower head with a more acceptable looking one, but there is no shower curtain or divider. The shower is crammed between the mast and the composting toilet. Maddie was a good sport about this fact when she first moved in, accepting the truth that a large shower is a waste of space in a small boat.

The part of the shower she did not accept was the fluctuating water temperature. The water would fluctuate between scalding hot and freezing cold every few seconds. When she questioned me about this horrid situation, I demonstrated the "shower dance". 

The "shower dance" involves listening to the water pump and careful setting of the water temperature. I would set the temperature at a time when I heard the pump running. As soon as the pump would cycle off, I would get out of the water stream because it was going to get really hot. When I heard the pump turn on again, I would hop back into the stream and rinse the soap off. Maddie was not impressed by my dancing skills; she wanted to set the temperature and enjoy steady water temperature.

Why does the temperature fluctuate and how can this be fixed? The temperature fluctuation is due to resistance in the water system. The hot and cold water systems run through separate piping with different resistances. The cold water runs from the pump to the expansion tank to the shower. The hot water runs from the pump to the water heater to the shower. They run different lengths, and have a different number of turns and twists in the hoses. This means that they run at different rates. When the pump is on, the whole system is pressurized, when the pump turns off, it becomes a race for the pressures to run out. 

In my case, the cold water stops flowing almost instantly when the pump stops pushing but the hot water keeps flowing a while longer, causing the spike in water temperature. Once the pump cycles back on, the cold water flows again and cools the mixture. This constant back and forth can be easily fixed by keeping the pump on constantly.

The choices available to fix this problem include

Perfectly balancing the water systems
Installing a manually activated water pump
Installing a switch that bypasses the pressure switch
Adjusting the pressure switch on the pump
Installing a system to trick the pump into running constantly

Balancing the water systems is not practical, it would involve equalizing the resistances in the plumbing so that they will both respond the same way. 

Installing a manually activated water pump is a very good choice. You simply flip a switch and enjoy a perfect shower with consistent temperature control. This does involve the purchase of a new pump that does not have a pressure switch.

If you already have an automatic water pump, you can adjust the water pressure sensor on it to make it run continuously when the shower is on. There is usually a screw on the sensor switch that allows adjustment. Once the switch is calibrated to keep the pump on instead of cycling on and off, the shower temperature will be perfect!

If your automatic water pump is not adjustable (the way mine is), you can connect a bypass switch on the pump. This switch will bypass the pressure sensor and keep the pump on continuously. The switch can be mounted in the shower, allowing you to easily turn on the pump at the start and off when you are done with your shower.

If you don't want to add more points for corrosion to start on, there is a non electronic method to trick the pump into staying on. A bypass circuit will trick the pump into running continuously. The bypass circuit is a hose teed into the inlet and outlet of the waterpump. A gate valve in the hose will allow for a controlled opening of the circuit. When the bypass is opened, pressurized water from the outlet will be dumped back into the inlet side of the pump; this will make the pump think it needs to keep pumping and that will keep the water temperature consistent in the shower.

By opening the valve, the "out" flows back into the "in". This causes the pressure to drop in the system and the pump will stay on while trying to maintain water pressure. This makes the pump stay on to maintain and even temperature.

By opening the valve, the "out" flows back into the "in". This causes the pressure to drop in the system and the pump will stay on while trying to maintain water pressure. This makes the pump stay on to maintain and even temperature.

To trick the pump, simply open the valve a little at a time. Once the pump runs continuously, you are ready to shower. If you have insufficient pressure, try closing the valve a smidge. The circuit will let the pressurized water escape into the pump inlet which will cause the pump to detect a drop in pressure and stay on as it tries to pressurize the system. 

When you are done with your shower, simply close the valve and the pump will work as normal again. It is not as convenient as the switch, but it involved zero wiring and was very easy to install and operate. Maddie was able to get the hang of adjusting the valve and now enjoys her comfortable showers, no dancing involved!