Cruising

Choosing an Anchorage Part 2

When it is not calm and you need to find protection for the elements for the night, choosing an anchorage becomes a very important skill! Last time we talked about dropping the hook in the middle of nowhere in calm weather where the only important factor is tide/current and bottom conditions. With stronger conditions, all the other important factors come into play.

When choosing an anchorage in strong weather, all of these points become a priority:

  • Length of time anchored
  • Protection from wind
  • Protection from waves
  • Tides and currents
  • Bottom composition

Now imagine you are sailing along in a stiff breeze and the sun is starting to set. In the distance, you see huge storm clouds coming right at you and you know you are going to be in for a rough night! Finding protection is crucial for anchoring because you will not get any sleep otherwise!

Length of time anchored: At least the entire night, maybe into the next day because you won't want to pull up the anchor to start sailing during a gale!

Protection from wind: Wind load on the rigging and spars is almost inevitable. The total windage from the hull, spars, and sails will try to pull the anchor out of the bottom and send it dragging along the bottom during the storm. To hide from the wind, you need to stay in the wind shadow of something else. To stay in a wind shadow, you need to know which way the winds will be coming from. If the wind will most likely blow from only one direction, you only need to have one feature causing a wind shadow. If it could be blowing from more than one direction, you need to have more features providing protection from different wind directions.

Wind shadows cast by an object are twice as high as the object and extend out a distance of 20 times the height of the object. That means that if the object is 100 feet high, the wind shadow is going to be 200 feet high and 2000 feet long! This means that hiding behind a small island can actually provide protection from the wind. 

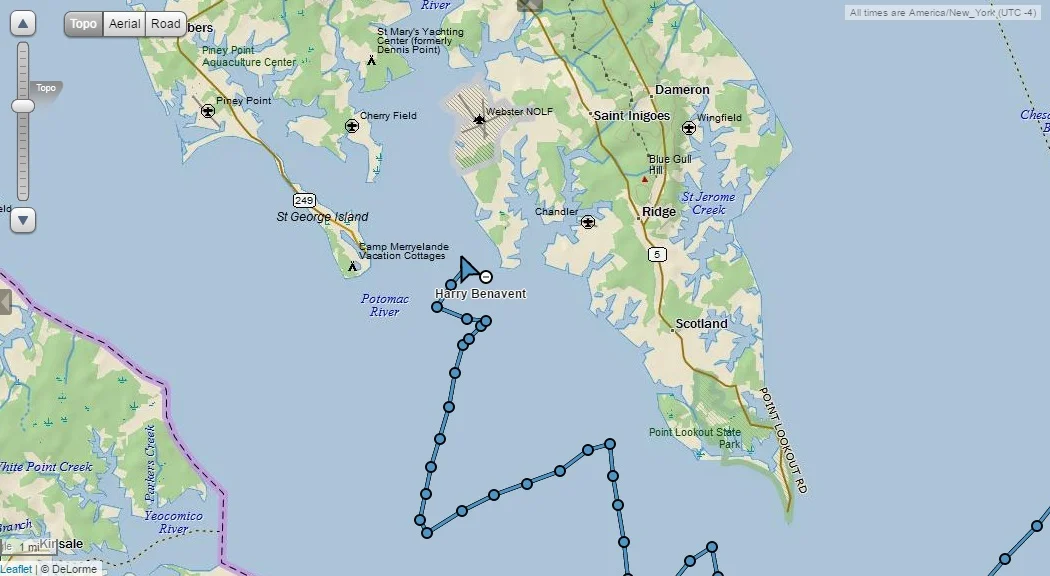
This is one example where we were looking for an anchorage to protect us from a strong wind. It was slack low tide when we arrived, so the current was going to be flowing North overnight (in the same direction as the wind) and slack high tide by morning when we would be leaving. We draw 6.5 feet, dropped anchor in 7 feet of water and slid back into 9 feet of water while leaving out 180 feet of chain. If we were to drag, we would slide into deeper water and I wanted it to set again! The bottom was hard where we dropped the hook and the deeper water was softer. We did drag anchor that night, but it quickly re-set.

The small island provided protection from the wind (we know this to be true because the wind died down as we arrived in the lee). The shallow water around the island also broke up the seas, providing us a less windy and less wavy nights sleep.

While it might seem that we were anchored in the middle, we were actually very protected from the weather, hiding in the lee of the island.

Another important point to remember when anchoring during strong weather is the shock loads on your anchor and the scope of the rode. A 2:1 scope will pull more vertically as compared to a 10:1 scope which pulls more horizontally. When the boat rides up on a wave, the boat pulls back and this puts additional stress on the anchor, trying to pull it out of the sea bed. With a nylon rode, these forces are somewhat dissipated by the stretch of the rope. Chain is much stronger than rope, but offers zero stretch! This is where having extra chain out helps to provide some form of elasticity because of the chains catenary. 

Catenary is the sag that the chain will have as it comes out of the bow roller and leads to the anchor. The weight of the chain will help form catenary and act as the absorbing force. When the boat is pushed back, the force is translated into a lifting motion on the chain. The heavier the chain, the more force it will take to lift the chain, translating into more shock protection for you. 

When we anchored in the lee of the island, we had 180 feet of chain out in 7 feet of water with an effective depth of 11 feet (6 foot bow roller) giving us a scope of 16:1. Overkill, I know! I did this so that I would have enough scope if I dragged into deeper water and to give more catenary in the chain. While the lee of the island provided some protection, I believe the mast was in the wind because the boat was being pushed back quite strongly. With 180 feet of chain, the rode exited the bow nearly vertically. This means that we had plenty of chain that would need to be pulled off the bottom before the anchor would be subjected to a shock load. In addition to this, a nylon snubber was tied to the chain to give even more elasticity and to protect the ground tackle gear on the deck from shock loads.

In this example, we were sailing North when we needed to anchor for the night. The wind was from the South, so anchoring right next to the land provided us protection from the wind and the very short fetch between shore and boat provided us protection from the seas.

This river also experienced very strong currents when the tides would change. The current runs parallel to the shoreline, so I wasn't worried about being beached by the current. Current strengths are depth dependent, so staying in the shallower water was very beneficial. The difference was rather dramatic, 1.4 knot current in the shallows along the waters edge and 5 knots in the deeper water. The additional current adds strain to the anchor which adds even more benefit to hiding in the shallows in the lee of the land, hidden from wind and currents in completely open water right by the bay!

Both of those examples involve short, over night anchoring to escape some short term weather. What if you are hiding from a large storm and don't know which direction the winds will blow from or how long you will need to stay hidden? You will need much more protection!

In this occasion, a series of large thunderstorms were going to be coming through the next day and we needed to seek more protected waters. We didn't know what direction the winds would be coming from, so we searched the chart book for a protected anchorage. What I was looking for was high land encircling the water on all sides to protect us from the wind. 

While looking over the charts I came across St. Mary's River. The topography surrounding the river is composed of high cliffs providing plenty of protection from the wind. Since the wind was blocked, there were no seas to speak of at anchor!

When we arrived in the anchorage, the wind was starting to pick up. We were expecting to work our way up the river into one of the creeks to find protection from the wind, but as soon as we entered the mouth of the river, the winds died and the sails dropped. We ghosted along and dropped the anchor in the sandy bottom and settled in for the night in preparation for the horrible storms that were to come. 

The clouds passed overhead, but the winds and waves never came. This photo was taken during the time when heavy thunderstorms were passing over.

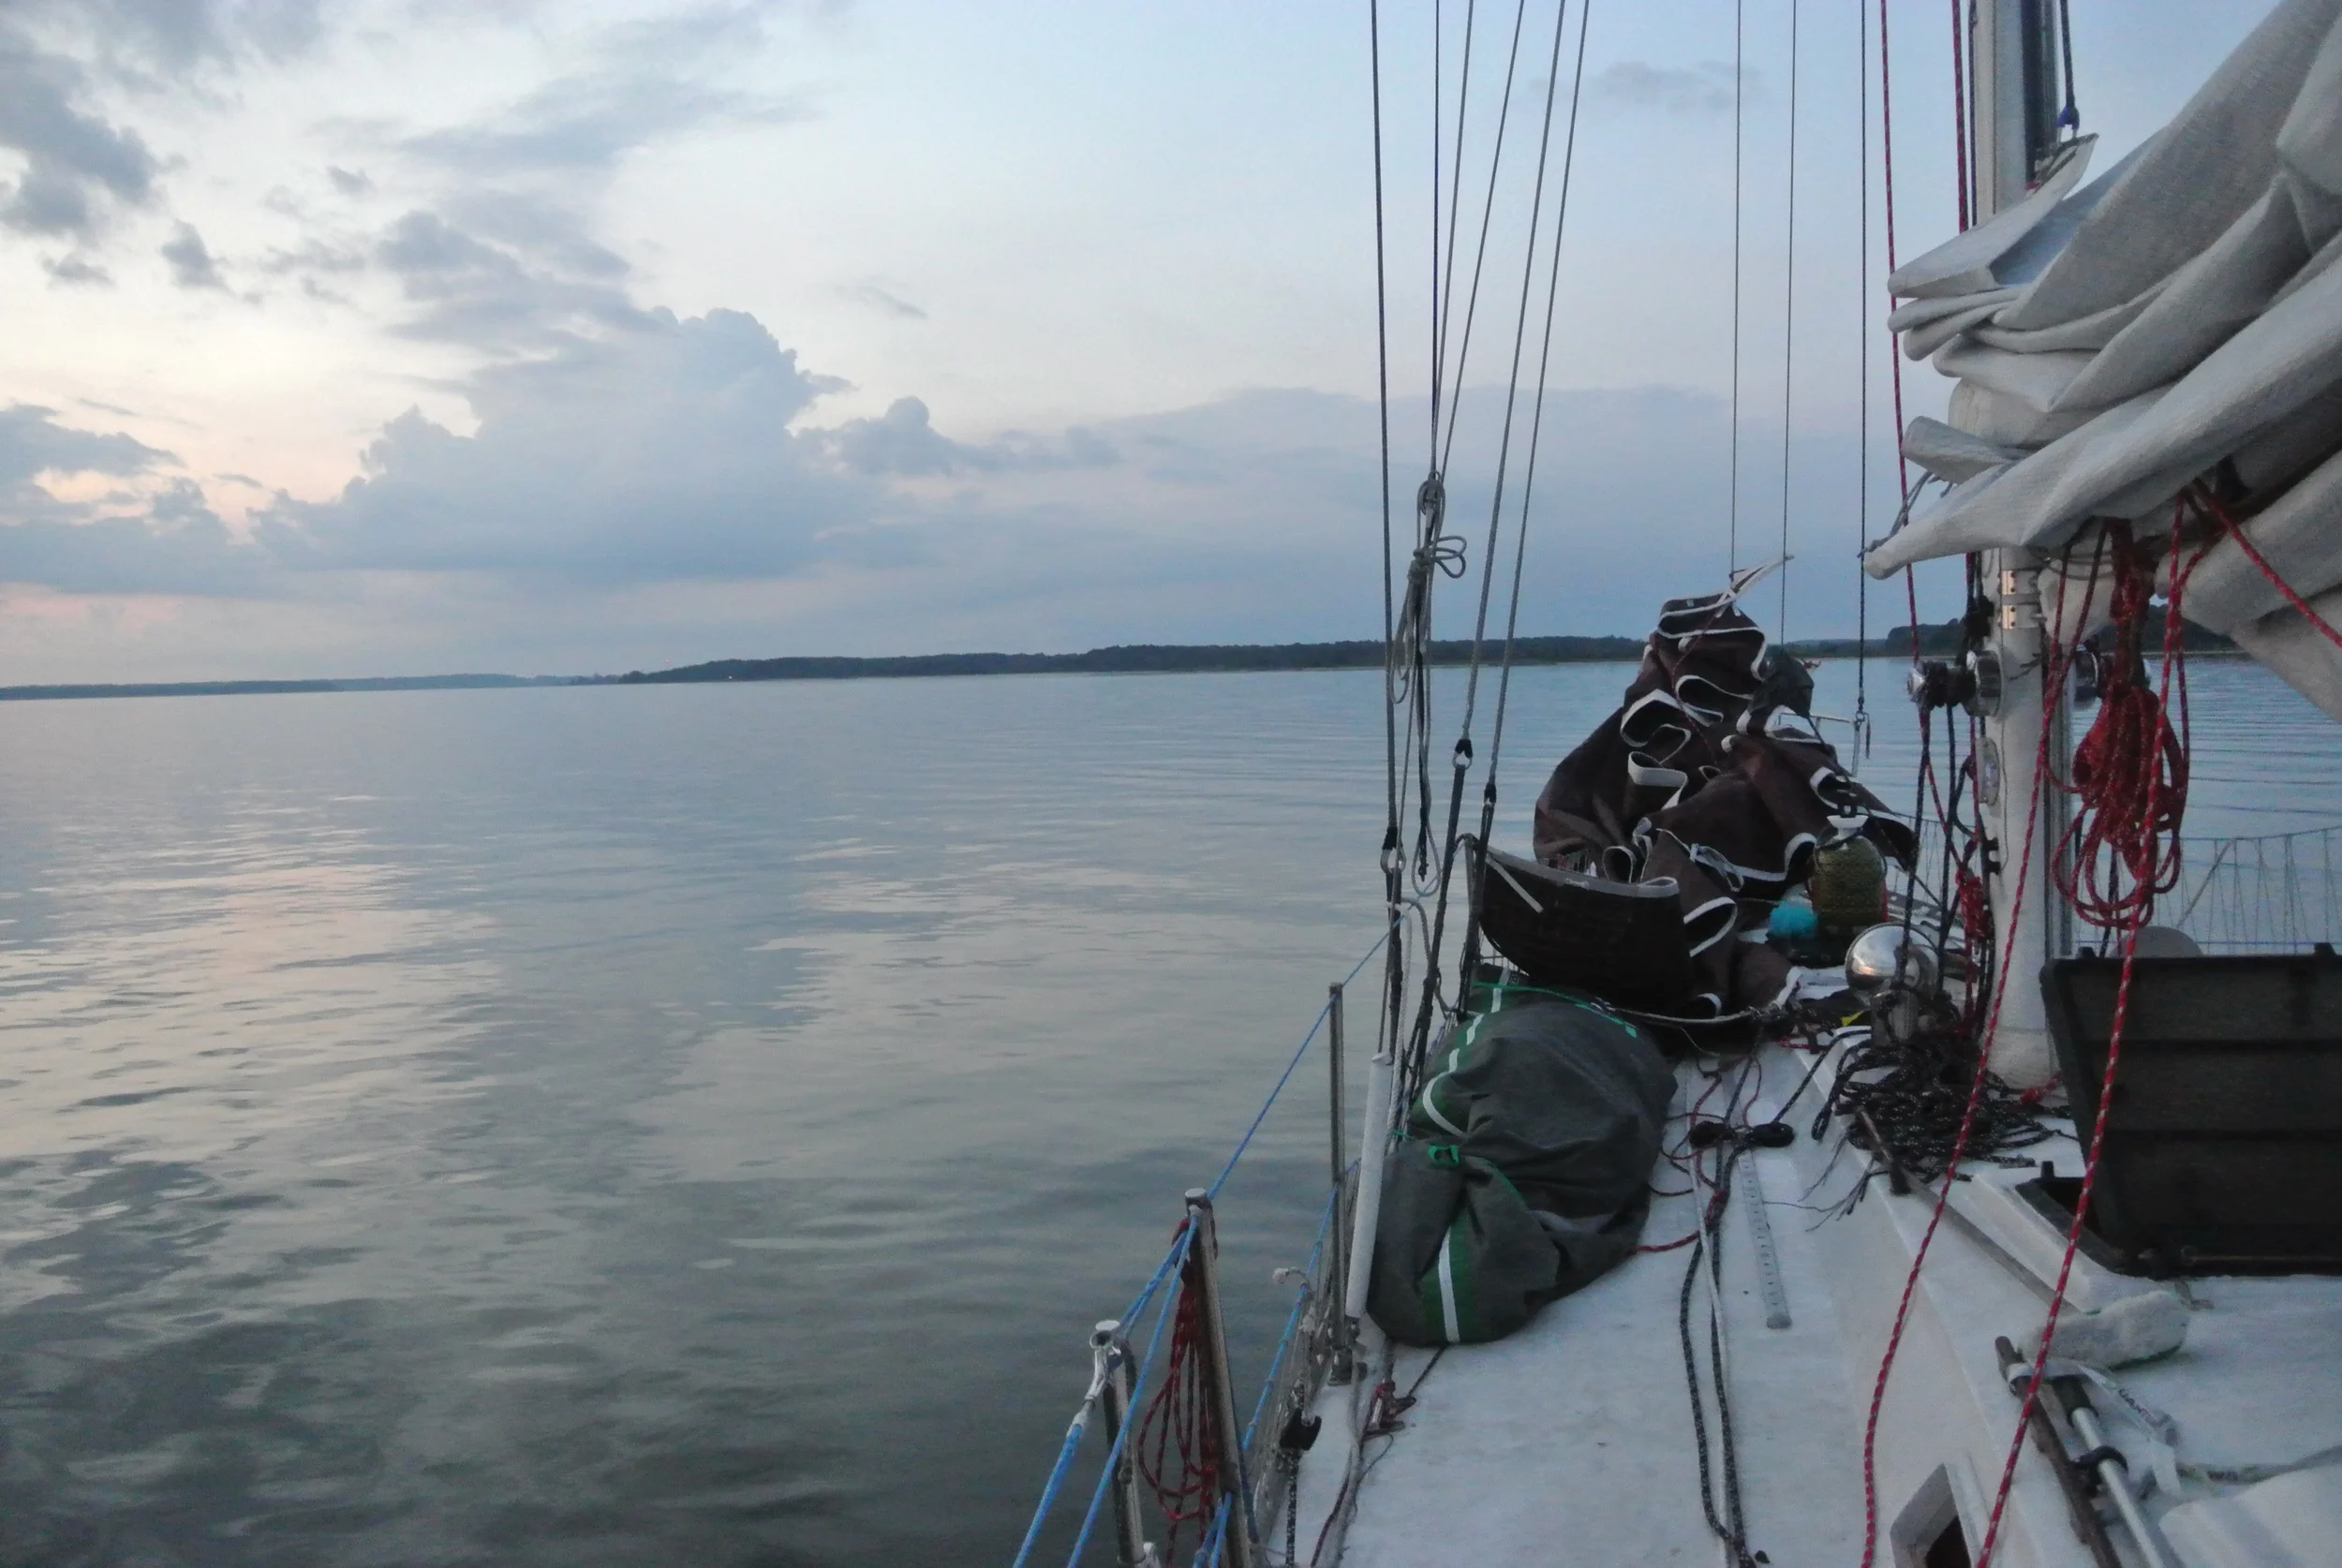
We had a very peaceful nights rest anchored in the protection of the river, where the high lands (even far away in the distance) protected us from wind in all directions. By staying in the mouth of the river, we found it easier to get out of the river and into the wind when it was time to leave. We left the safety of the river with the ebbing tide, once outside of the wind shadow, the winds returned and we were on our way once again.

Choosing an Anchorage Part 1

When the day draws to an end, it's nice to pull into a protected anchorage where you can calmly cook a good meal and get a good nights rest!

Short sailing trips tend to involve sailing from one anchorage to another, this means that every night will be spent in designated and well charted anchorages where the conditions are comfortable (or known to be uncomfortable). On the Chesapeake Bay, anchorages tend to be miles up a river or creek. When traveling only by sail, these anchorages can take a good part of the day to reach! This is fine if your destination is the next anchorage, but if you are sailing to a far away destination, these journeys to the anchorages are a waste of time!

On longer sailing trips, traveling 2 hours up a river to reach an anchorage means 4 hours of sailing are lost each day (2 hours to leave the anchorage in the morning, 2 hours to enter the new anchorage in the evening). Over 1 week, this would be 28 hours of sailing time spent entering or exiting an anchorage. As you can see, your progression would be greatly slowed! 

If you can sail all day and begin searching for an anchorage around sunset and reach it rapidly, almost no time is lost while traveling towards your destination. This is where learning how to pick an anchorage becomes an important skill.

When choosing an anchorage, there are several points to consider:

  • Length of time anchored
  • Protection from wind
  • Protection from waves
  • Tides and currents
  • Bottom composition

Length of time anchored plays into how protected you need to be. You don't have to be worried about changing weather conditions if you are anchoring for lunch as much as you do if you are going to anchor for the weekend. The longer you will be on the hook, the more protection you will need. 

If you are anchoring for the night, you will only be on the hook for 7 to 10 hours and will need to find a protected anchorage so you can sleep soundly for the night, waking up recharged!

Protection from the wind is important because wind load will cause strain on your anchor. If your boat is in the face of a lot of wind, you run the risk of the anchor dragging. By staying out of the wind, your anchor is less loaded and will be less likely to drag throughout the night.

Protection from waves is very important for quality of sleep. I don't get sea sick, but I worry that the anchor will drag if we are bouncing around in high seas instead of sleeping soundly. Maddie does get sea sick, and spends the whole night throwing up! For these reasons, protection from the waves is very important!

Tides and currents also come into play when anchoring overnight. It is important to check the tide tables to see if you can expect a tide reversal during the night. Some anchors do better than others with reversals while others run the risk of not resetting. Currents are also important to consider. If you anchor with wind and tidal current in the same direction, this means that after a tide reversal the wind will be opposing the tidal current and the waves will kick up with the boat anchored in a confused set of waters.

Bottom composition is also important. Different anchors work best with different bottoms and matching the anchor you use to the bottom you are anchoring in is very important. The bottom conditions tend to be marked on charts as well. This means that if your favorite anchor is best in mud,  choose a section that is charted as mud to anchor in and avoid hard pack or rock bottoms! If you are unsure of the bottom condition, you can place some bees wax in a sounder, drop it to the bottom (this also tells you the depth) and then pull the sounder back up. A sample of the bottom will stick to the wax and let you know exactly what bottom substrate you are working with.

Now that we have looked at all of these factors individually, it is time to put all of this knowledge together to select your anchorage while sailing along.

Imagine you are sailing along and the day is drawing to an end, it's time to find an anchorage and get there before the sun goes down. If it is a calm night and the weather is going to stay calm, anywhere is fine!

Just because it's calm now and looks like it is going to stay calm, doesn't mean that it will stay calm. Most nights when we anchored in the middle of the bay, we would cook dinner, relax, and go to sleep, all in very calm and still water; it's wonderful! 

Some nights though, late in the evening, the wind and seas would pick up. We have found ourselves anchored out in the middle of the bay with no protection, feeling everything since we were fully exposed.

If you decide to drop the hook in the middle of nowhere, simply check your charts and find someplace with shallower water and a good bottom. Bottom condition is very important when anchoring on these underwater hills because if your anchor drags, it will probably not re-engage the bottom. As you drift, your anchor falls off the top of the hill and into deeper water which relates to reduced scope. 

Say you are sailing by this area and the sun is getting low to the horizon on a calm day. When you look at the chart, you can see various bottom conditions. You have deep water with broken shells, shallower water with hard pack bottom and another shallow area with a sticky bottom. The sticky bottom is on the edge of the depth contour line. When you drop the hook, let out enough rode so that if you do drag over the contour line and into deeper water, you will still have enough scope to re-set. If you drop the hook in 12 feet of water (with a 6 foot high bow roller), your effective depth is 18 feet. If you let out 90 feet of chain, you will have 5:1 scope which is adequate. If you drag into the 16 feet depth, your effective depth becomes 22 feet and the scope is reduced to 4:1. If you were dragging in the 5:1, you will probably continue to drag with the 4:1 scope into the 21 feet deep water and your effective depth is 27 feet with 3.3:1 scope. At this point, your going to continue drifting as your anchor drags all night long! To avoid this, simply let out more rode so that if you do drag into deeper water, you will still have enough scope to re-set once you get there.

When you anchor in 12 feet of water with a sticky bottom for the night, let out 154 feet of chain. This will give you 8.5:1 scope which is overkill, but if you drag into the deeper section, you will still have a 7:1 scope. You won't drag anchor with 8.5:1 scope, but if you do, your anchor will most likely reset quickly in the deeper water.

To decide how much rode to let out, simply look at the deeper sections that you could drag into and let out the appropriate amount of rode for that depth. This will give you the depth to calculate your scope from. In the example above, the deeper sections had an effective depth of 27 feet. 27 x 7 (from a 7:1 scope) gives you 154. This is the length of chain you need to let out, even though you are in much shallower water at the moment.

Next we will discuss anchoring in "not calm" conditions when anchoring out in the middle is not an option but sailing into a distant "well known" anchorage is not feasible.

Warping out of a marina

Mechanical propulsion is wonderful, but if you don't have it for some reason (no motor or dead motor) you will need to rely on other methods to work your boat through close quarters. Marinas are especially tricky to sail through. The fairways are not wide enough to short tack a full keel yacht, and any mistake will lead to a very expensive collision. 

Oars, sculling or sweeping, work as a wonderful solution to the call for mechanical propulsion, but it does have its limitations. Rowing a boat is the equivalent of using a tiny outboard on the back of a large barge. Yes, it will move but it will be very slow. Other forces such as wind and current will have a greater influence on your vessel than you could ever hope to have with your oar. This is why I reserve oar power for windless days in still water when I can maintain complete control over the boat via a single oar.

When the wind pipes up though, the oars are stowed and the warp lines are deployed! Warp lines offer "nearly" complete control over the craft while moving about in close quarters.

Warp lines are long ropes that extend from the boat to a fixed object in the distance. Marinas offer plenty of these fixed objects, be it pilings or mooring cleats, they are plentiful and in close proximity! 

I like to use 300 foot warp lines (I carry two of them) because they are long enough to reach a distant cleat, but not so long as to be un-manageable. If I find that my 300' warp line is not long enough, I can tie other lines to it with sheet bends to extend its range.

To use a warp line, simply tie one end to a cleat on your yacht and keep the rest of the coil in the dinghy, ready to pay out as you go. As you row towards your fixed point in the direction you wish to go, the warp line will pay out to your boat with minimal drag on your rowing craft. If you left the coil on the deck of the boat and payed it out to the dinghy, you would find it incredibly difficult to row and drag all that line through the water; the resistance would be intolerable. When you reach your distant fixed object, simply tie the line off to it and return to your boat. 

Standing on your deck, you may begin pulling yourself towards this fixed object. Your boat will move straight and steady towards this fixed point! This sounds like a wonderful solution to get out of a marina, but as always it has its drawbacks.

Strong winds
Strong currents
Lack of straight line path

Strong winds and strong currents can make it very difficult to pull a heavy yacht by hand. Luckily, most windlasses have a section for rope which can be used to crank in the warp line (by un-clutching the chain gypsy). If your windlass does not have this feature, you can also use the sheet winches in the cockpit, just make sure you have a fairlead near the bow to keep the boat pointing forward instead of turning around and leading by the winch.

If you are trying to move side to the wind, you must be careful that the boat will not swing into other moored vessels as you journey towards your fixed attachment point destination. If you are moving beam to the winds, a beam warp line might be necessary to control lateral swing. These lines will be tightened and loosened as you progress towards your destination.

Similar to these concerns of traveling beam to the wind or current, traveling through close quarters without straight line access to your destination can create a situation where multiple warp lines are needed. When you tie up in your slip, you don't just use one line, you use many! All of these lines work in harmony to keep the boat in position and under control. The same holds true with warp lines. The use of various warp lines in multiple directions will ensure that control over the vessel can be maintained as you move about. 

As you may be thinking, each of these lines adds complexity and the need for additional crew to deploy and control all of these lines. It also takes time to run the lines out and bring them back and you need to be carrying all of these long lines on board, hence why engines gained such rapid popularity! 

When I warp out of a marina, I like to keep it to one line. A second line adds a great amount of complexity and I can't always manage both at the same time. By planning ahead, single warp line departures can be successfully executed without much fuss. Next time you need to get out of a tight slip, consider using warp lines instead of praying that your propwalk will help you this time.

Mandatory Items to Carry in your Sailboat

Depending on the size of your vessel, there are certain legal requirements for equipment that you carry on board. As you may assume, as the length increases, so do the required items to be carried.

Yachts are separated into four categories depending on their length:

Class A: Boats less than 16 feet long
Class 1: Boats 16 feet long but less than 26 feet long
Class 2: Boats 26 feet long but less than 40 feet long
Class 3: Boats 40 feet long but less than 65 feet long

Each class builds upon the next in complexity of the items that must be carried on board.

Class A

Class A Boats are less than 16 feet long and must carry:

Certificate of Boating Safety Education (for the captain) (Unless you were born before July 1, 1972)

Certificate of Vessel Numbers

Registration Decal Displayed

PFD (Life jacket) for each person on board the vessel. (Children under 13 must wear their PFD at all times.)

One B-I Fire Extinguisher 

Backfire Flame Arrestor mounted on each gasoline motor

Ventilation system (1 blower per motor) (should be run for 4 min prior to starting motors)

Muffler

Horn, Whistle, or Bell

Visual Distress Signals (any of the below combinations)

3 Handheld red flares

1 Handheld red flare and 2 parachute red flares

1 Handheld orange smoke and 2 floating orange smoke for day, and 1 electric distress light for night

Navigation lights

Red and Green bow light, White stern light, White steaming light 1m higher than red and green bow lights

As always, there are exceptions to the rules:

Non-motorized vessels with no cabins or closed compartments that can store combustibles do not need to carry fire extinguishers and the captain does not need to have a Certificate of Boating Safety Education.

If you are under 7m (22.9ft) in length and are strictly oar or sail powered, a flashlight is all you need to carry to count as your navigation lights.

If you are operating your vessel in inland waters, such as rivers or bays, where the distance from shore to shore does not exceed 2 miles, you do not need to carry visual distress signals by day.

Class I

Class I boats are longer than 16 feet but less than 26 feet in length and must carry:

Certificate of Boating Safety Education (for the captain) (Unless you were born before July 1, 1972)

Certificate of Vessel Numbers

Registration Decal Displayed

PFD (Life jacket) for each person on board the vessel. (Children under 13 must wear their PFD at all times if the boat is under 21 feet in length)

Throwable Type IV PFD

One B-I Fire Extinguisher 

Backfire Flame Arrestor mounted on each gasoline motor

Ventilation system (1 blower per motor) (should be run for 4 min prior to starting motors)

Muffler

Horn, Whistle, or Bell

Visual Distress Signals (any of the below combinations)

3 Handheld red flares

1 Handheld red flare and 2 parachute red flares

1 Handheld orange smoke and 2 floating orange smoke for day, and 1 electric distress light for night

Navigation lights

Red and Green bow light, White stern light, White steaming light 1m higher than red and green bow lights

As always, there are exceptions to the rules:

Non-motorized vessels with no cabins or closed compartments that can store combustibles do not need to carry fire extinguishers and the captain does not need to have a Certificate of Boating Safety Education.

CLASS II

Class II boats are longer than 26 feet but less than 40 feet in length and must carry:

Certificate of Boating Safety Education (for the captain) (Unless you were born before July 1, 1972)

Certificate of Vessel Numbers

Registration Decal Displayed

PFD (Life jacket) for each person on board the vessel. 

Throwable Type IV PFD

Fire Extinguishers (any of the below combinations)

Two B-I Fire Extinguishers

One B-II Fire Extinguisher

One B-I Fire Extinguisher and one fixed mounted fire extinguisher system

Backfire Flame Arrestor mounted on each gasoline motor

Ventilation system (1 blower per motor) (should be run for 4 min prior to starting motors)

Muffler

Horn, Whistle, or Bell

Visual Distress Signals (any of the below combinations)

3 Handheld red flares

1 Handheld red flare and 2 parachute red flares

1 Handheld orange smoke and 2 floating orange smoke for day, and 1 electric distress light for night

Navigation lights

Red and Green bow light, White stern light, White steaming light 1m higher than red and green bow lights

As always, there are exceptions to the rules:

Non-motorized vessels with no cabins or closed compartments (open boats) that can store combustibles do not need to carry fire extinguishers and the captain does not need to have a Certificate of Boating Safety Education.

Diesel motors do not require a blower, but passive ventilation is needed.

CLASS III

Class III boats are longer than 40 feet but less than 65 feet in length and must carry:

Certificate of Boating Safety Education (for the captain) (Unless you were born before July 1, 1972)

Certificate of Vessel Numbers

Registration Decal Displayed

PFD (Life jacket) for each person on board the vessel. 

Throwable Type IV PFD

Fire Extinguishers (any of the below combinations)

Three B-I Fire Extinguishers

One B-II and one B-I Fire Extinguisher

Two B-I Fire Extinguishers and one fixed mounted fire extinguisher system

One B-II Fire Extinguisher and one fixed mounted fire extinguisher system

Backfire Flame Arrestor mounted on each gasoline motor

Ventilation system (1 blower per motor) (should be run for 4 min prior to starting motors)

Muffler

Horn, Whistle, or Bell

Visual Distress Signals (any of the below combinations)

3 Handheld red flares

1 Handheld red flare and 2 parachute red flares

1 Handheld orange smoke and 2 floating orange smoke for day, and 1 electric distress light for night

Navigation lights

Red and Green bow light, White stern light, White steaming light 1m higher than red and green bow lights

As always, there are exceptions to the rules:

On non-motorized vessels with no cabins, the captain does not need to have a Certificate of Boating Safety Education.

Diesel Motors do not require a blower, but passive ventilation is needed.


A handy checklist is available to make sure you have everything you need on board


http://dnr2.maryland.gov/boating/Documents/Required_Equipment_Checklist.pdf

I also recommend reading through the USCG documentation on vessel requirements 

http://www.uscgboating.org/images/420.PDF


Solar Panel Mounting

The solar panels are to be mounted on the stern rail, supported by a strut to hold them towards the sun, as well as able to be folded down when docking or during storm conditions. Now we have to turn this goal into a reality!

These clamps were in a locker on the boat when I bought her. I have no idea how old they are, but they worked great!

These clamps were in a locker on the boat when I bought her. I have no idea how old they are, but they worked great!

To mount the panels on the rail, I used Sea Dog Rail Clamps. These nylon rail fittings will allow the panel to bolt up to the rail, while still allowing the whole assembly to pivot and hinge. This was accomplished by not tightening the clamps all the way and by not using the rubber insert (which would keep the clamp from rotating around the rail). 

The solar panels fit well, and still allow access to the stern cleats when in the folded position. By folding down, they are safely hidden inboard of the rub strake, keeping them safe during docking and close quarters maneuvering. 

While the rail clamps allow the panels to hinge, they offer no help to keeping the panels deployed to collect the suns rays. This is where the support strut comes into play!

I drilled out the rivets connecting each extrusion, allowing me to separate the furler extrusion into more manageable pieces.

I drilled out the rivets connecting each extrusion, allowing me to separate the furler extrusion into more manageable pieces.

After disasembly, I had a whole bunch of really strong aluminum pipes for random projects around the boat.

After disasembly, I had a whole bunch of really strong aluminum pipes for random projects around the boat.

I kept the furler parts from my headstay when I converted from from roller furling to hank on because I figured these pieces of hardware would come in handy at some point! Today was their day to shine! The aluminum extrusions would serve as a very stout (and free) support arm for the solar panels. I just needed a way to attach them to the panels and to the boat.

To connect the support arm to the solar panel, I used a stainless steel bolt that I had already. This bolt was mounted on the side of the panel sticking out to the side. The support arm has holes drilled in the side of the tube where the bolt can rest. I will add a safety line that will tie the support arm to the solar panel to prevent it from popping loose. This solves the problem of keeping the panel deployed for the sun, now I just needed to connect the support arm to the boat. 

I need a connection that will firmly support the tube while allowing it to move about freely while minimizing the number of holes I need to put in the deck during installation. I decided to use a knot instead of a metal fitting. It uses no holes, and can be created to achieve what I need with the ability to be tweaked if necessary.

This knot is simply a modified flat seizing knot. The line was loosely looped around the support arm and stanchion various times, then brought together by the frapping turns. The frapping turns were tightened up by using a marlin spike hitch and all of my strength! This holds the support arm in space while allowing it to move around and articulate freely without a single hole in the deck for a bracket. 

This rope contraption worked well to support the panels and allow them to be easily collected and deployed.

The solar panels blend in nicely with all the other contraptions on the Stern of the boat without drawing too much attention to themselves, like a radar arch with panels mounted over top would have caused. Maddie and I were concerned that a large solar array would end up being an eyesore, this small solar array blends in nicely with the lines of the boat. Now we just have to wire them up to the charge controllers and batteries.