Cruising

Dyneema Lifelines

Synthetic Lifelines have many advantages over steel lifelines:

No rust
Easy to inspect
Never cut your hand
Easy to install yourself

Dyneema is the material of choice for synthetic lifelines. Dyneema is soft on the hands, easy to splice, and stronger than steel with just a fraction of the weight.

Dyneema is a modern fiber made of High Modulus Polyethylene (HMPE) which offers incredible strength for its weight and size. They offer a strength greater than steel without any of the corrosion issues. 

Synthetic lifelines offer a clear advantage in inspect-ability over coated steel lifelines. Steel lifelines live hidden in a plastic casing, slowly rusting away without giving any signs. When I replaced my steel lifelines, the cable was actually broken in several places inside the plastic casing. I only learned of this when I was coiling the old lifeline to recycle it. For two years, it had escaped my inspecting eye! When dyneema begins to wear, it will show clear signals in the form of chafe and fuzzing. There are also easy ways to rate how much residual strength is present based on the visual condition of the dyneema. 

This link outlines how to inspect and assess dyneema

How much chafe is too much?
The mainsheet chafes on this part of the lifeline when on a broad reach.

The mainsheet chafes on this part of the lifeline when on a broad reach.

Steel lifelines don't have to live in a plastic covering making them impossible to inspect. The plastic covering can be stripped away leaving the wires exposed to the elements (which will accelerate their deterioration). As the steel wires weaken with time and use, they will begin to part. When you find the parted wire with your hand, you will learn why they call parted wires "Meat Hooks"! The wires tend to form little hooks on them as the wires break. Thanks to the ease of inspection, you are able to see that the lifeline needs replacing and have a very painful cut on your hand where the meat hook took a chunk out of you. Dyneema on the other hand offers the same ease of inspection as un-coated steel but while never forming meat hooks. The line is perfectly smooth to the touch and feels comfortable in your hand. I know I can hold onto the lifeline as I climb forward on the deck in rough weather without fear of injuring my hand.

The best part of synthetic lifelines is the ease of installation. All you need to do is make a few easy to complete splices. Simply run the line off the spool through all the stanchions until you reach the point where it will attach. Make an eye splice with a thimble and tie a lashing to the attachment point. Then cut the other end off the spool and make the same eye splice. I prefer the Mobius Brummel Eye Splice because it is very secure and will not slip.

How to make a mobius brummel eye splice

Once the ends are eye spliced, you can use the mechanical advantage of the lashings to tighten the lifelines. The lifelines don't have to be cut to perfect lengths because you are not limited by the adjust-ability of a turnbuckle. If you are a little too close, you can simple move the splice further into the line. If you are too far, simply make the lashing a little longer. I personally prefer to make the lifelines a little short because they will stretch while settling in.

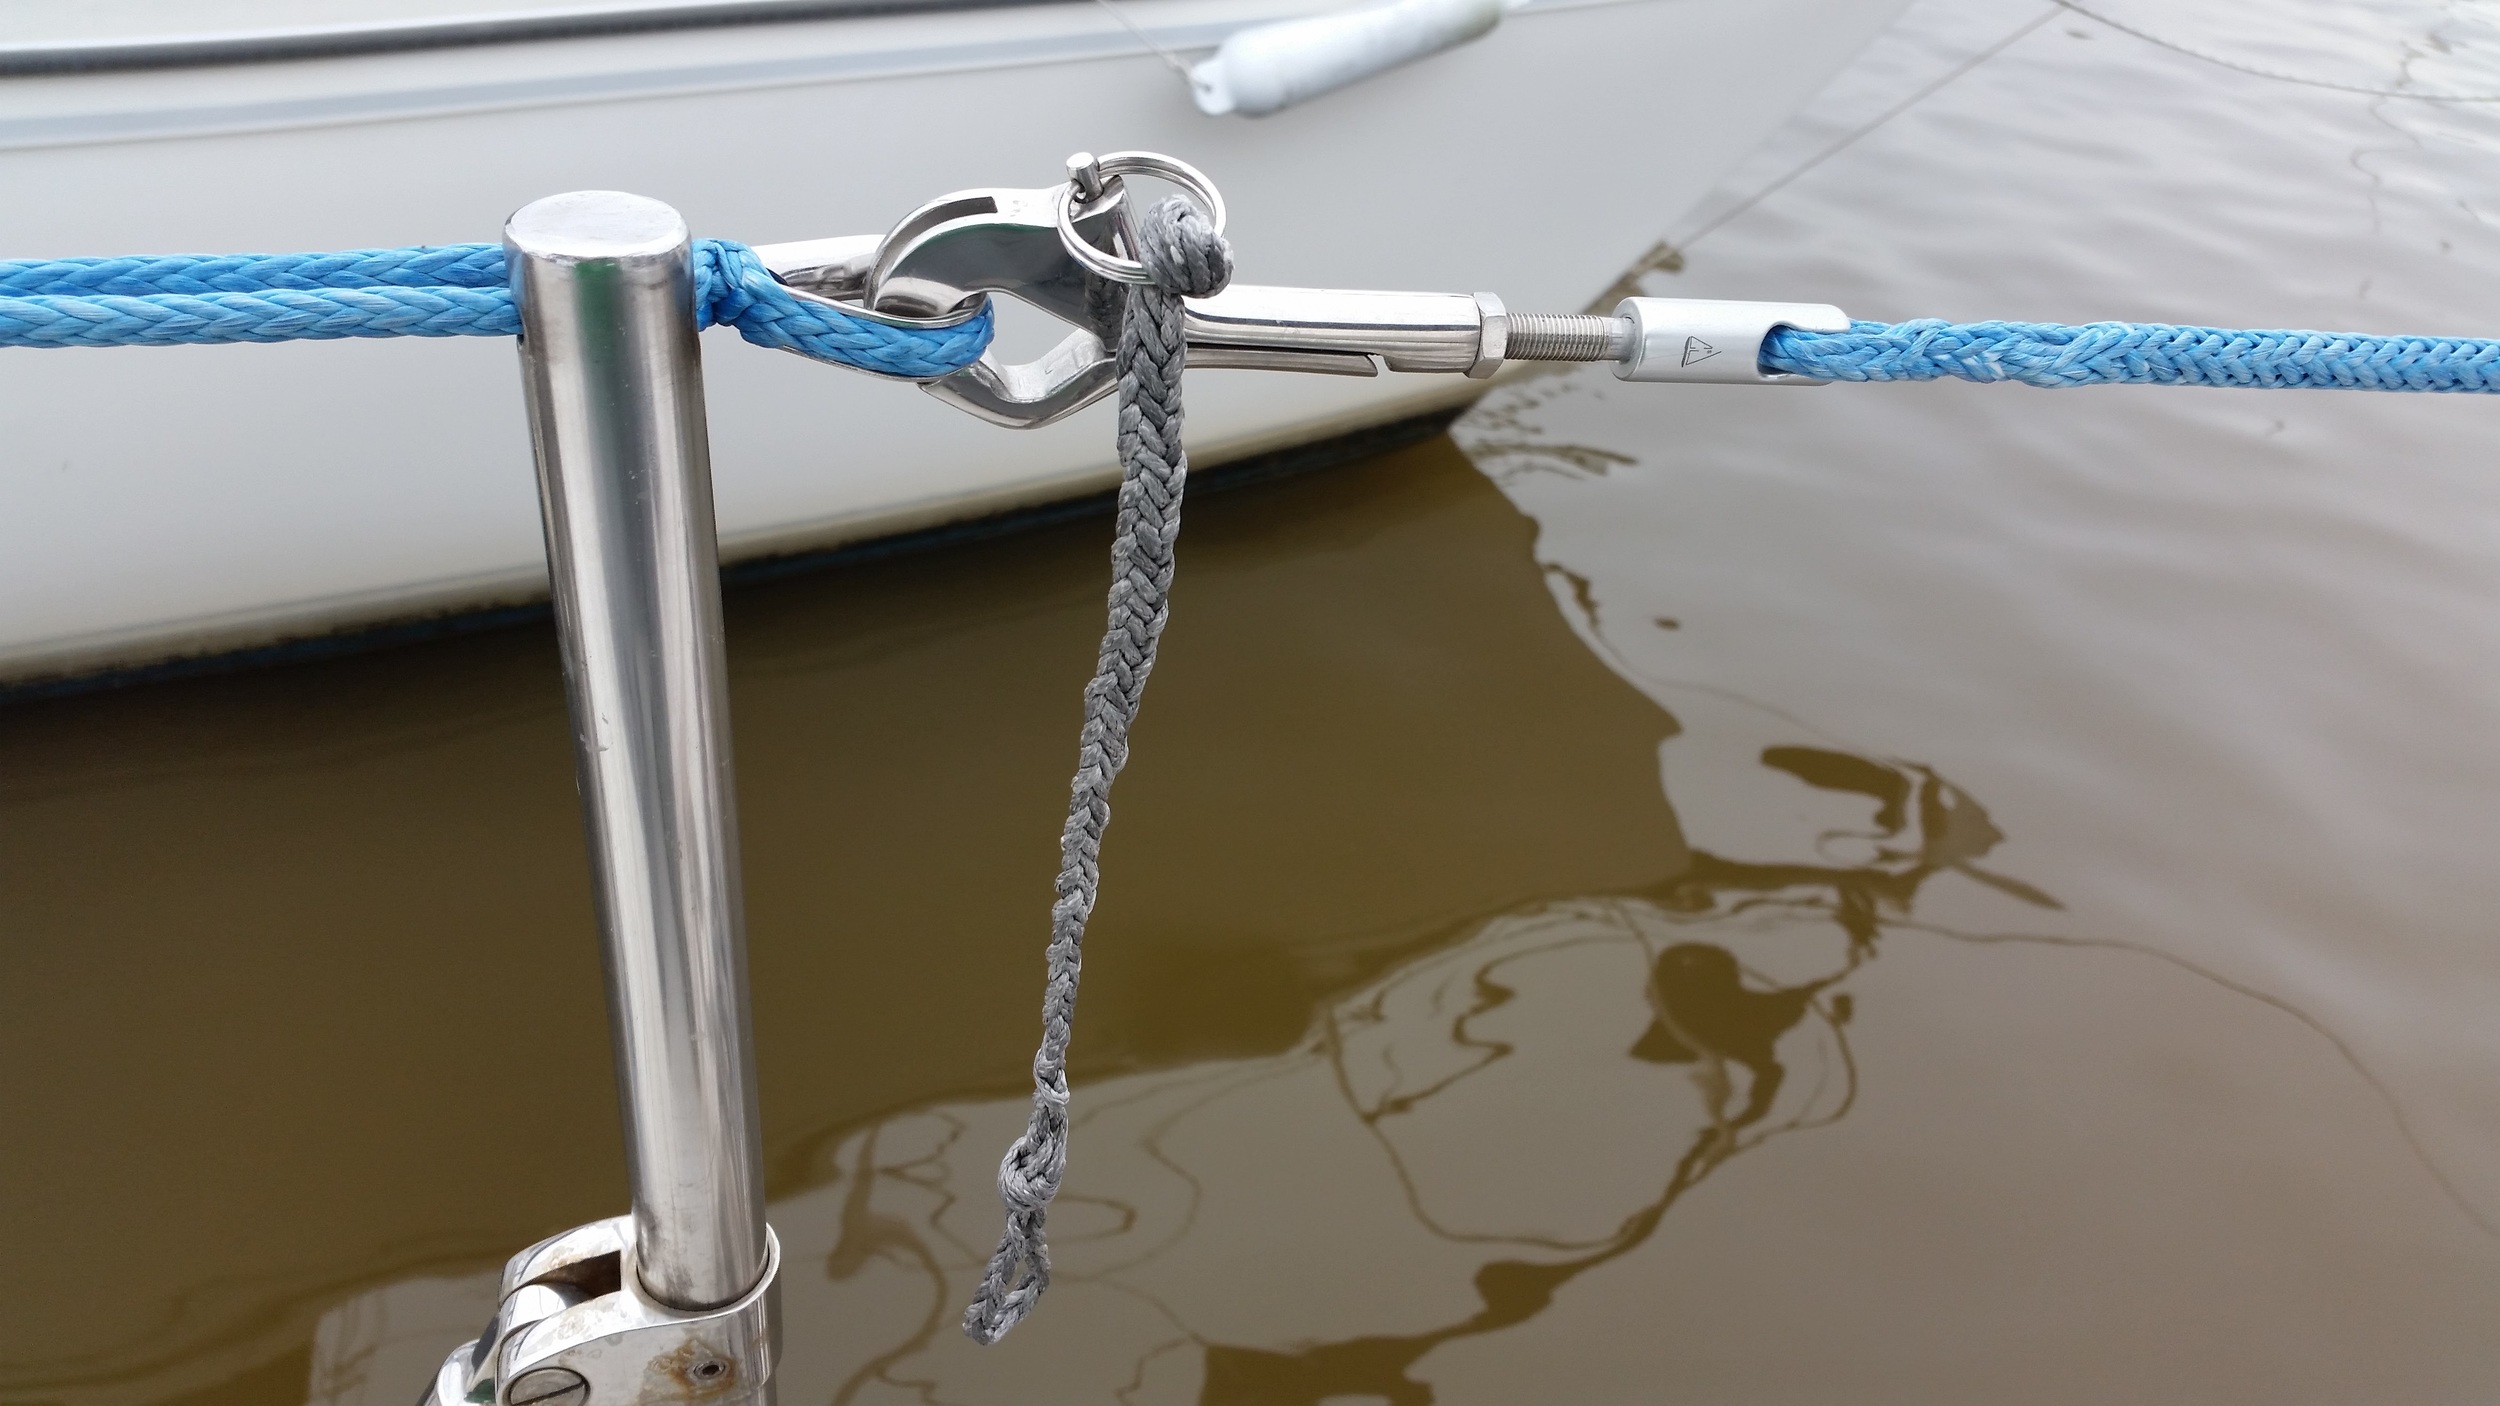
The gates are also very easy to make, simply splice the gate latch directly to the dyneema. The gate latch is perfectly happy connecting to a stainless steel thimble. I wove a lanyard onto the gate latches to make operation easier.

Synthetic lifelines are very forgiving to install. The process progresses quickly which can keep morale high during the installation. The most important thing to keep an eye on is when the lifeline passes through the shrouds. Usually the lifeline will pass inboard of the cap shroud and outboard of the lowers, but make sure there is a fair path for the lifeline before you put in the eye splice.

Overall, synthetic lifelines offer unmatched advantages over steel lifelines and truly are the superior material for lifelines on boats.

LED Navigation Lights

When the sun sets and the lights come on, we begin trying to conserve every amp of electricity we have. We turn on our navigation lights and begin our dilemma. We need to have them on for safety reasons, but each bulb is burning through our batteries.

When the deck lights are on, we are burning 3 bulbs (Port, Starboard, Stern). We can reduce the consumption by converting the Port and Starboard lights into a combination unit, which is still burning 2 bulbs (Forward Combo, Stern).

Our next best step is to switch over to a masthead light, which burns only 1 bulb! Dilemma solved! Other navigators can see us from miles away as we quietly sail along burning only 1 light bulb. 

This single light consumes around 2 amps, which doesn't sound bad, but when you think about it, that one light bulb will burn around 20 amps in 10 hours. If that bulb were switched out for an LED bulb (which is a direct replacement), you could burn a mere 0.1 amp. In 10 hours of night sailing, that would only be 1 amp. 

I have switched my lights over in 2012 and I haven't needed to replace a burnt bulb since. I used lights by Dr. LED which can be found at West Marine. Their bulbs are USCG and COLREGS complaint and work as a direct replacement for the old bulb. No fancy wiring to run or adapters to install, simply open the housing, remove the old bulb and install the new LED bulb in its place.

This way, you can sail by night without draining your batteries and safely alert other sailors to your position and relative heading.

Manual Bilge Pump Backups

On a boat, anything that can fail, will at the most inopportune time! This is why it is crucial to always have a backup. 

Today, everything on a boat is switching over to the convenience of electronics. This is great until you consider the marine environment. The boat is a corrosion haven, constantly exposed to salts and humidity. Electrical components eventually will give way to corrosion and fail.

I'm not saying that we should negate all electronic conveniences from our boats to avoid the fatalities of corrosion. Instead I'm saying that it is important to remember to keep a backup, and preferably a manual backup on board for anything that you really need.

If we were holed and our electric bilge pump were to stop working we would have problems. We have two electric bilge pumps, one in the sump, the other mounted higher (the high water pump). The idea is that bilge scum and dog hair will likely foul the primary bilge pump, but the highwater pump will still be clean and ready to pump. 

Such a wonderful theory, but the reality is that if we are taking on water, the batteries might run down and the pumps would stop working. Worse yet, if the batteries get submerged by the rising water, we will instantly lose our electric pumps. 

This is why a manual bilge pump in a necessity. It will flow a large volume of water with each stroke. It does not depend on electrical connections or battery charge, but instead it works on you. They say "Nothing pumps faster than a scared man with a bucket". This is a little more sophisticated than a bucket, but as your fear builds, it pumps water out faster. 

Can a manual bilge pump flow enough water? I found out when I was cleaning my bilge. My method for cleaning the bilge is to pour "Simple Green" into the bilge and let a hose run to fill it up. The soap will foam and the running water will eventually flush out all the bilge scum and dust that has accumulated over the past year. The manual bilge pump was able to keep up with the flow of a garden hose running full blast. I do feel confident that if we had a leak, we would be able to pump the boat dry (once the hole has been plugged).

If nothing else, having a manual bilge pump makes you feel like you are involved in your survival. If you stand around watching the water rise in the bilge, you might begin to panic. But if you are busy pumping your heart out, you will be kept occupied in your survival.

What do you call that sail?

Typically, when we decide to raise a sail, I will go forward to the mast and begin pulling the halyard. When the sail begins to fill with air, it will flap like a flag, cyclically loading the rigging with each beat. The solution is for Maddie to sheet the sail in as it is raised and then ease the sheet as I tension the halyard. The whole process goes smoothly as long as we understand each other.

Wisdom has 3 different headsails, a mainsail, and a trisail. This means there are a lot of sheets leading to the cockpit. Thankfully, the halyards stay at the mast and don't add to the spaghetti!

The problem is that I would tell Maddie "I am going to raise the jib, sheet it on the primary winch." She wasn't exactly sure which sheet I was referring to, and usually ended up placing the wrong sheet on the winch. This would lead to a state of confusion because I would raise the sail and she would sheet in the wrong one, causing it to flog around wildly.

Maddie came up with a creative solution to our miscommunication. She gave each sail a name!

The Drifter is Dill
The Jib is Josh
The Staysail is Stanley
The Mainsail is Marge
The Trisail is PJ

The first letters coincide to help me learn their names as well. PJ is the odd one out because we would sleep hove to during storms with him flying, hence, he would act as our boats pajamas.

Instantly, our communication improved, and "I'm going to hoist Stanley first, then Josh, please get them on their winches" became a clear command with no confusion. I would go forward, and she would sheet the staysail onto the secondary winch, and the jib onto the primary winch. 

I still don't know why she couldn't learn the real names of the sails, but the important part is that we were able to find a solution to our problem and to keep us sailing smoothly and calmly.

If you guys find yourself having communication issues, an open mind helps to find a creative solution!

Sculling Oar: Testing

While Baltimore was under a temperature inversion, the airs were completely still and created the perfect conditions to test out the sculling oar.

Photo courtesy of Siobhan Fahrmeier

Photo courtesy of Siobhan Fahrmeier

We quietly walked Wisdom out of the slip and motored out of the marina. Just outside the marina, I brought the boat to a full stop and deployed the oar.

This was my very first time sculling ever, so it took me a few minutes to figure out how it all works. At first, the oar was splashing water around and we weren't moving forward.

Once I got the knack of it, I was able to propel us at speeds of 0.2 to 0.3 knots. This is by far not an appreciable speed, so I tried a different rowing position.

I moved the oar from its stern mounted oarlock to the genoa sheet winch and lashed it to the winch drum. The 16 foot oar protruding straight out was able to move us at speeds of 0.2 to 0.5 knots. Slightly better, but still not that fast. 

I once again returned the oar to the stern mounted oar lock but this time I tied the oar into its place. One lashing over the oarlock to keep it from popping out of place, and another lanyard to keep the neck from rising. This allowed me to put all of my force into the sculling motion.

By grabbing the lanyard, I was able to control the pitch of the oar without any force on my wrists. This was a significant help in efficiency, though the speed did not increase much.

I feel that the low speed was a direct result of three factors.

1. My lack of experience sculling
2. Not having the oar properly secured
3. Very dirty bottom and a large fixed three blade propeller

I feel that more practice is necessary to refine my skills, as well as finalizing the installation. The large propeller can be replaced with a feathering prop, but I do like the ability to recharge my motors battery bank. The dirty bottom is the easiest problem to correct, and I think it will have a huge benefit on our speed through the water.

While I didn't think it was very much work while I was sculling, I was incredibly sore the next day. I certainly need to practice more to build up the strength needed to move the boat any considerable distance. 

Morty certainly did enjoy the afternoon stroll!