Cruising

Rope Fenders: Inner Core

The inner core is the working part of the fender. This is where the bulk exists to protect the hull from damage. It needs to be soft to absorb impacts, yet firm to retain its shape. 

Rope Fenders typically use a plastic fender covered in a rope mesh (which is cheating) or tightly wrapped rope. Plastic cores have all the drawbacks of plastic fenders, they simply look nautical. Tightly wrapped cores are much too heavy for Maddie to manage, making them difficult for us to use regularly, so I had to come up with other options.

I came up with an open structure which will provide bulk while still having a lot of dead air space (which has no weight to it), allows the fender to still be soft and flexible, and bulky enough to provide protection to the hull and topsides.

The whole process began by preparing the main line of the fender. The ends of the lines were backspliced using the Tree Surgeons Back Splice with fuzzy ends. This backsplice will hold the line together well while being used and abused. There is no risk of the ends unraveling as the line is pulled through the toe rail or stepped on, and the fuzzy ends pose no threat to anything on board since they are soft and fuzzy.

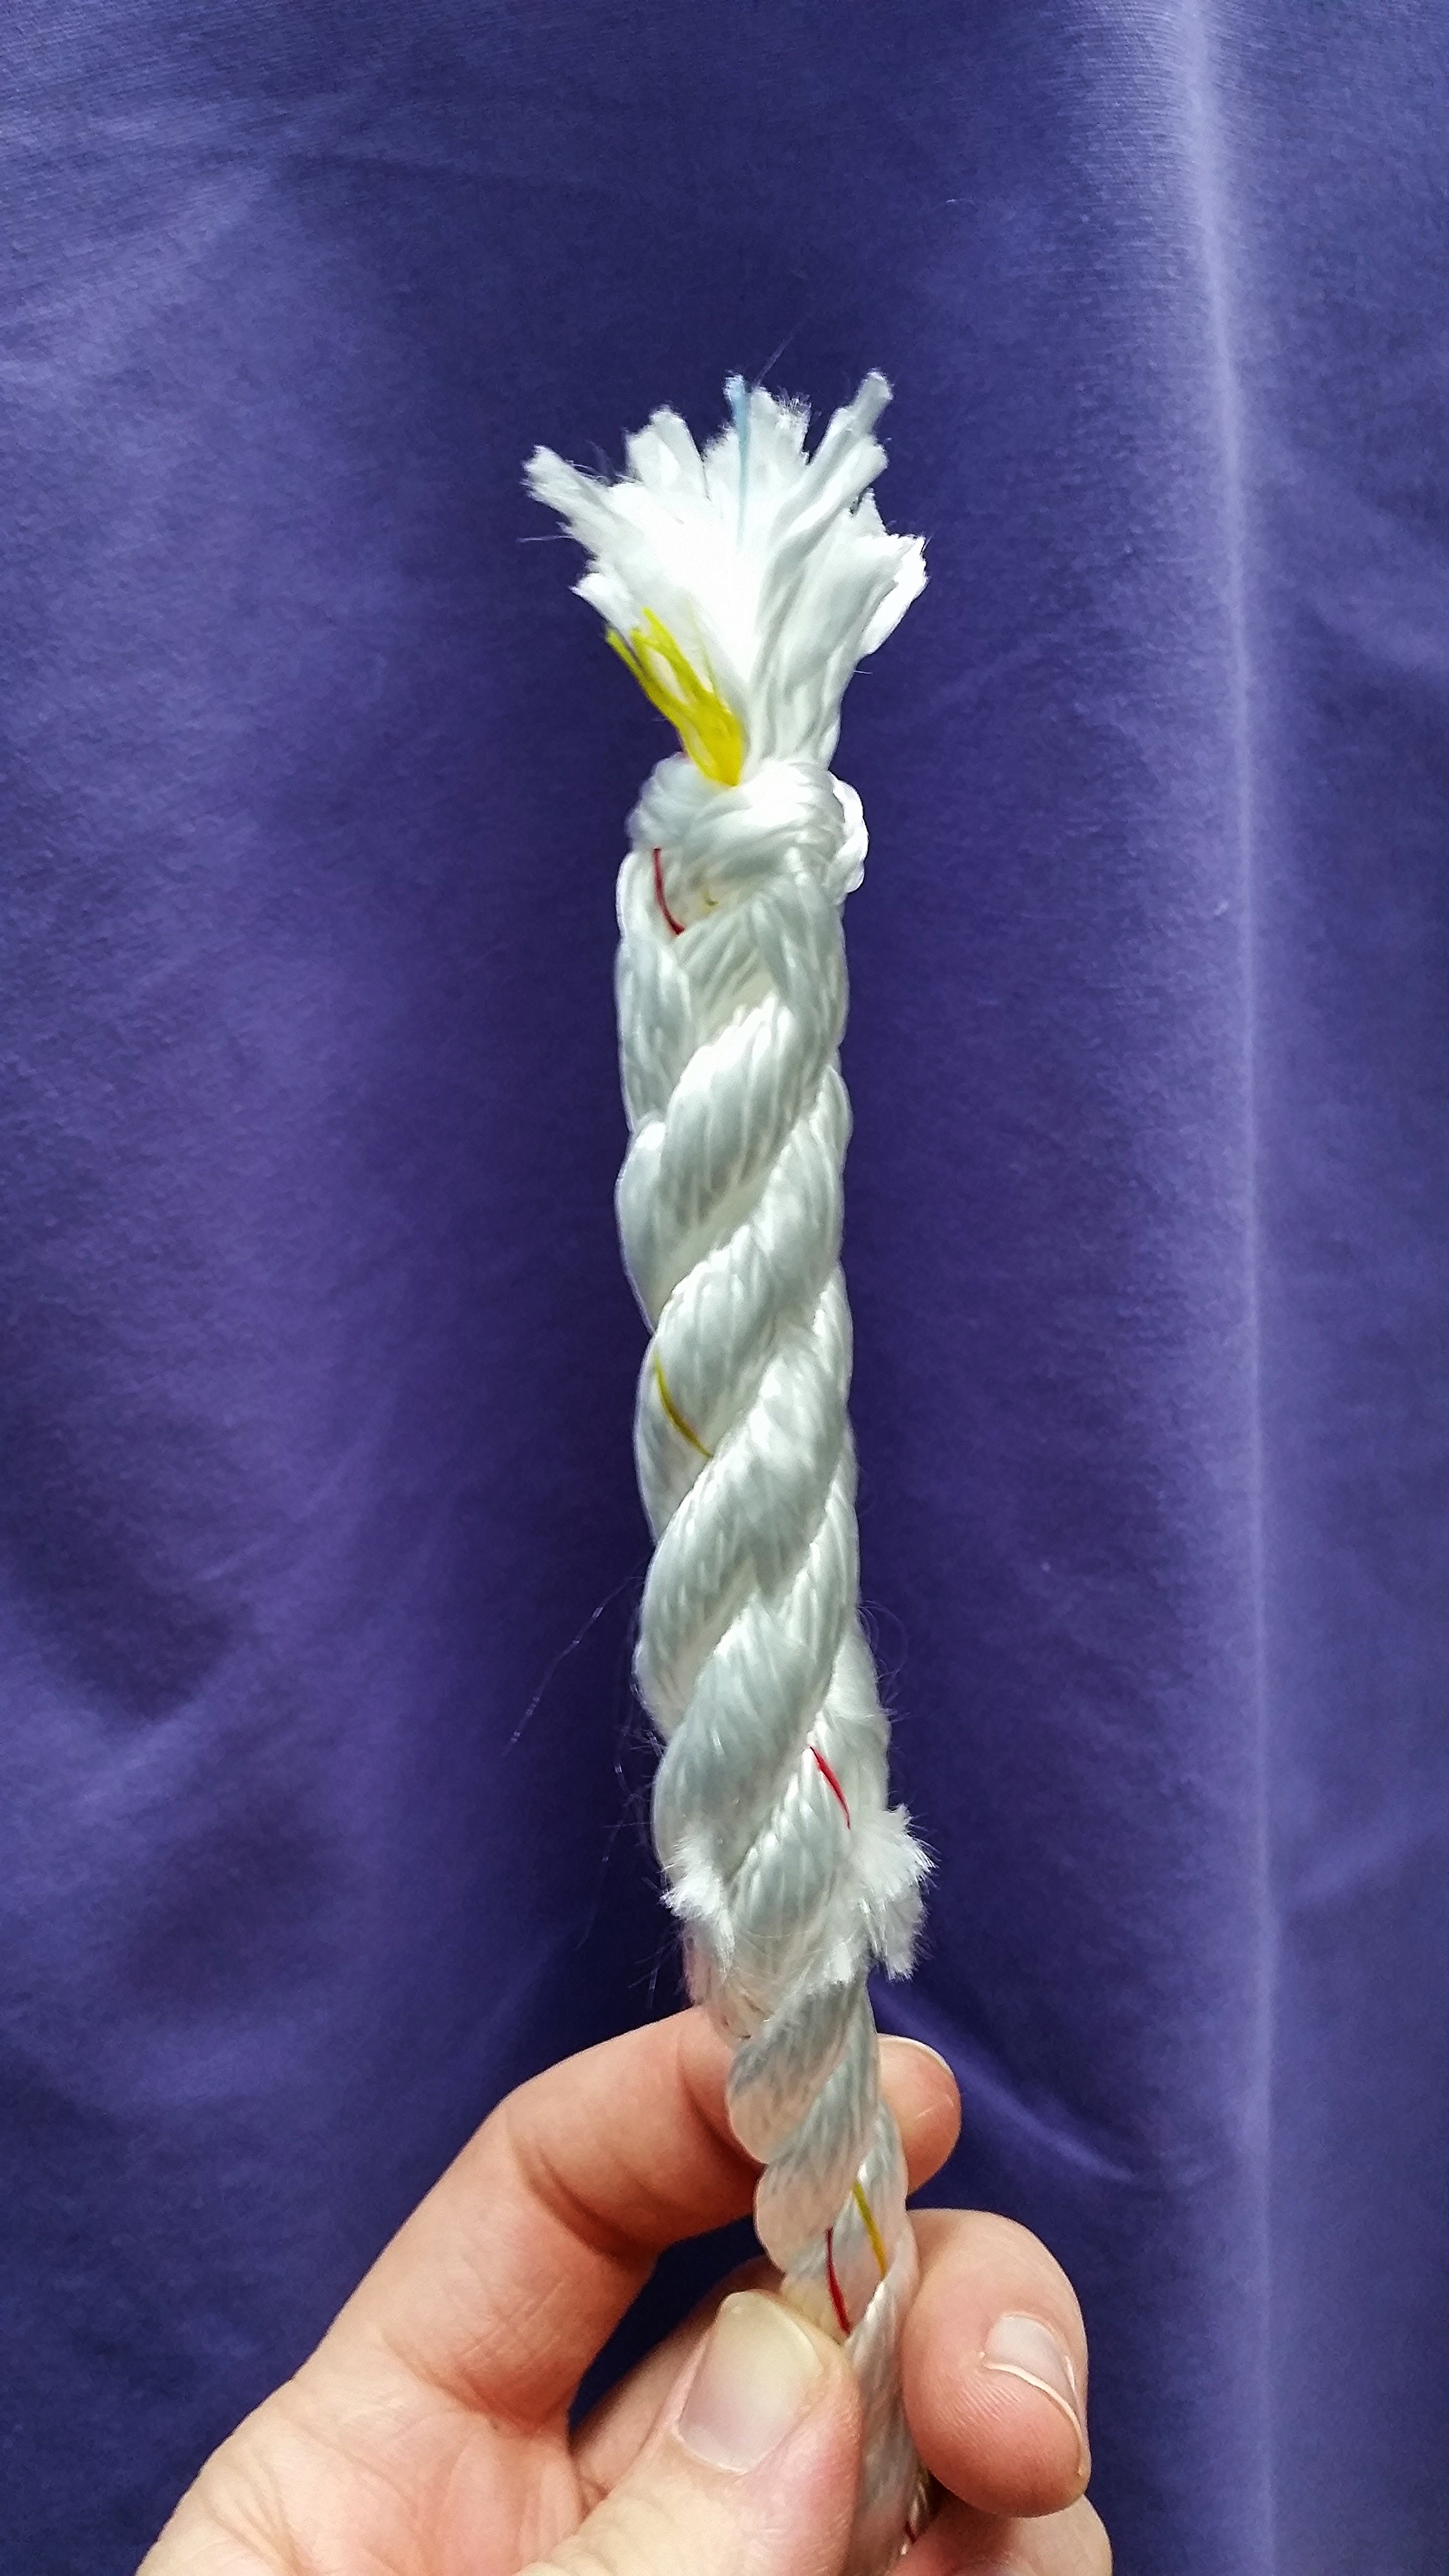
The line selected is 1/2" Three Strand Nylon from New England Ropes. This line will have the fender seized to it, and then run out into the whips that will be used to tie the fender to the boat. I chose Three Strand Nylon because it can be repaired over the years. If a strand or two gets damaged, I can splice in a new strand rather than trying to replace the line that the fender is seized onto.

In 2013, I replaced the running rigging and kept the old lines coiled up in a locker for 2 years. I think this is a wonderful way to put the old sheets and halyards to use again. They will make up the bulk of the fenders in the non load bearing areas. The old line was cut into even lengths and then seized to the fender line.

I used double constrictor knots to seize the old lines to the new fender line. This knot will bind them all together so tightly that there is no risk of them slipping out.

I repeated this on all four fenders before proceeding to the next step.

The next layer added to the fenders is a coiled line that wraps over the first four lines. This coiled layer will provide a lot of bulk while riding over the underlying lines and provide the dead airspace needed to increase the bulk while keeping weight down to a minimum. This once again was repeated on all four fenders.

I did this part of the project while I was between patients at my dental office. I then continued the project once I was back home on board Wisdom.

The first layer was completed, and so it was time to apply the second layer of bulk. Once again, lengthwise lines were run and seized at the ends using Double Constrictor Knots. This bulks up the fender and provides the framework for the next coiled line.

To keep the lengthwise lines in place, I tied them together the way I suture long cuts of tissue, using the "Continuous Locking Technique". It's begins by tying a knot at one end, and then looping the line around the bundle, back through the loop and then onward. This technique provides a tight bind to the bundle without pulling it in any direction.

Once the bundle is tied together, the next layer of coiled line can be installed. 

You can see how just one additional wrapping will greatly increase the bulk of the fender and all the dead air space will keep weight down. I do not suggest wrapping the layers in tape as that will only trap water inside and never allow the fender to properly dry out. They will get wet, and the open internal structure will help them dry out.

Be sure that the coils wrap in opposite directions, this will avoid the possibility of the coils falling into each others grooves, instead they will always intersect and ride over one another, keeping a greater volume with the same mass.

It is impressive the amount of volume that it gained by simply adding one more layer of lengthwise lines and a coil. The fender on the left only has 1 layer, the fender on the right has 2 layers.

This was repeated on all four fenders. As you can see Morty in the corner, it was late and I went to sleep at this point. 

Rope Fenders: The Design Process

I began a new project! I'm building rope fenders that will replace by plastic inflatable ones and also serve the purpose of a fender board. If you would like me to make rope fenders for you as well, let me know what size you want and I can give you an estimate.

I currently have two 10"x26" Taylor Made fenders, and they are not enough for when we tie up to a pier or raft up with friends. My options are add more fenders to my vessel (and figure out where to store them) or make myself rope fenders to meet my needs.

The fenders need to accomplish the following:

Be light enough for Maddie to deploy them
Be soft to protect from impacts
Cover the opening in the gate so that Morty can't fall out
Be long enough to serve as fender boards

I was going to make 2 very large and long fenders, but quickly decided that their weight would make them difficult to manage which would result in us never using them. I then switched ideas to making 4 large and long fenders that are easier to store and deploy.

The fenders are also going to double as a way to close the bottom of the gate while we are under sail. Morty loves to sit on the leeward side, right next to the gate with his head hanging out over the toe rail (this is why we keep him tied to the jacklines to make recovery easier if he were to slip off the side). This is the only place on the boat where the netting to keep him on board is missing, and it is his favorite place to sit.

By being long enough to serve as both fenders and fender boards, we will be protected in any docking and rafting situation while only needing to carry four rope fenders on board.


Pet Net

Morty is our Boat Dog, he has stubby little legs and no fear of heights. He will insist on walking right along the edge of the deck, moments away from falling in.

He has fallen over board in the past, but always from the dinghy. This is because he will insist on standing on the very edge of the gunwale. 

When he falls off the row boat, it is no problem as he is right there and can be easily retrieved by his life vest. If he falls off of Wisdom, recovery would be much more complicated.

To avoid this situation, I wove a net around the lower lifelines. 

The first net was a simple zig zag made out of clothes line. This seemed to serve its purpose, but he would push his head through it and jump off like if it was nothing there at all.

Then I wove a second set, making diamonds. He still popped through the large holes.

Then I wove a third line through the middle, making it a series of triangles that he was sure to not be able to squeeze through. Success!

He chewed through the clothesline. I once watched him do it, taking his razor sharp teeth only 5 seconds to cut the line like a warm knife through melted butter.

When he would make a hole, I would quickly mend the net by tying in a replacement piece. Soon, his favorite areas were more mends than original pieces.

When we changed the lifelines from steel to dyneema, we had to install a new netting, and we decided that we would use dyneema with a very open weave. The idea for dyneema netting was to avoid the chafing that would occur from nylon/dyneema contact as well as to avoid problems with sun degradation. The reason for the open weave is: He will get through it anyways, we might as well not have him cut the dyneema and leave me with more work to do. We figured if he really wanted to get off the boat, he would jump right through it without hurting the netting. For the most part he has behaved himself, and the netting is holding up just fine!

Rowing Dinghy

As you may know, I don't like using motors. I prefer sails or oars as they will always work when they are put to use, they never fail to start or die on you while moving.

My first dinghy (Easter Egg) was an 8 foot cathedral hull. It was extremely stable, but it did not row well at all. It had a flat bottom and a wide entry to the water. As you tried to row, it would scoot all around instead of moving straight through the water and then come to a halt as you finished the rowing stroke. 

While under tow, it would fishtail all over the place. It got up on a plane easily, but presented considerable drag on Wisdom. 

Easter Egg has now become my work barge. She is extremely stable, allowing you to stand on one side of her and she will not tip. Now she lives flipped upside down (so she doesn't fill with rain water) on the finger pier next to Wisdom.

This spawned my desire for a good rowing boat. I really wanted a Whitehall, they are gorgeous, row wonderfully and gracefully. I think the builders know this and charge accordingly. I found one for $18,000 built, and a kit for $6,000. Due to the price point, I then diverted my attention towards other row boats. 

I came across an abandoned Jimmy Skiff from Chesapeake Light Craft and decided to rebuild it. In it's horrible condition, it still rowed wonderfully and won my heart. The reason this boat was abandoned is because the entire port side was rotten. It was so rotten that it was easier to simply make a new one with no rot issues than to try and fix it. Luckily, a new Jimmy Skiff from Chesapeake Light Craft was only $1300. I began building the boat over the winter season and finally launched it on Labor Day. 

We named the Jimmy Skiff "Tooth" to go along with the dentist pun Wisdom-Tooth. 

Tooth has a much sharper bow, allowing it to cut through the water when being rowed. The skeg on the bottom makes Tooth track straight as an arrow, and the flat bottom lets Tooth plane while being towed. The longer waterline also makes Tooth have less drag on Wisdom while being towed. 

Raising Anchor Under Sail

Anchoring instructions all seem to involve the use of the motor. This is how I do it under sail without the use of the motor.

"Raising the anchor" instructions tend to involve motoring up to the anchor while someone brings in the rode, once the anchor is in the roller, then motor out of the anchorage and then begin sailing.

You don't actually need a motor to raise the anchor on a sailboat. 

Light Airs

If in light airs, raise a double reefed main and then begin raising the anchor with the windlass. The main will keep the boat pointed into the wind while the anchor comes up. 

As the anchor comes up, the bow will be into the wind and the reefed mainsail will stall, keeping the boat relatively in the same place.

Once the anchor is up, quickly raise the staysail to balance the sailplan and begin powering up the yacht.

With the sails up, fall off the wind a bit and begin sailing out of the anchorage. 

Once into clear waters, shake out the reefs and sail away.

In Heavy Airs

If it is blowing rather hard, you will begin drifting as soon as the hook comes off the ground. Make sure you are far enough off the lee shore before you begin raising the anchor. 

If you have a lot of leeway, raise the anchor and then raise the staysail to get the vessel moving through the water. Begin traveling on a broad reach as you then raise the reefed mainsail.

After you get all the sails up and set, then set your course and begin sailing towards your destination.

If you don't have much leeway, it may be best to wait until the winds become more favorable. If you have to raise the hook immediately due to deteriorating weather and have little leeway, you will first raise the anchor immediately followed by the reefed main and staysail. Then set the sails and begin working off the lee shore in a hurry before you find yourself on the lee shore.