Standing Rigging

Stay Angle to the Mast

Your standing rigging is there to support your mast and hold it up high into the sky. To do this, the stays need to be strong enough to withstand the loads and also setup at the correct angles to properly transmit these loads through the yacht. 

The minimum angle of a stay approaching a spar is 12 degrees. If the stay approaches the spar at an angle less than 12 degrees, the stay will not be able to exert the needed force on the spar to resist movement.  

Lowers are able to travel directly from the chainplate to the spar without any guidance because they approach at a wide angle, greater than 12 degrees. The further up the mast you go, the lower the angle would be and the less effective the stay would act. 

To fight this problem, spreaders are used to hold the stay out, allowing it to rise up vertically and then turn towards the mast, reaching it at an angle of at least 12 degrees. 

This same engineering tacktic can be seen on other areas of boats. Long bowsprits will have "Dolphin Strikers" which are spreaders for the bobstay, as well as spreaders for the whisker stays. These are all there to help achieve the needed minimum angle of 12 degrees of approach between any spar and stay. 

Storm Sailplan

Storm sails are small and very strong sails that are flown in high winds. While the sails themselves are very strong, there is another aspect of the sails that adds to the survival of the storm without damage to the yacht: where the sails fly. 

IMG_2150.PNG

When a mast breaks during a storm, it almost always breaks off at the first spreader. This means that the spar above the spreader will buckle and break, leaving you with a shortened mast and a broken rig.

What you can learn from this disaster is that the section of the spar above the spreaders is not as strong as the section below the spreaders. It is not a matter of strength of the spar being weaker above the spreader as the spar is the same size and strength over its entire length, its a matter of how the rigging is setup. 

The lowers, which attach below the first spreader do not need a spreader to reach the mast at a good angle (minimum angle for the stay to approach the mast is 12 degrees) without any guidance. The run from chainplate to mast is the ideal angle. The run from chainplate to cap shroud is not as lucky, and the angle would be very small. This is why a spreader is needed to hold the stay outboard, so that it can then turn in towards the mast at an angle of no less than 12 degrees. 

The mast is only supported at a few points on a yacht, and these points are the areas where the stays attach. Your first unsupported length is from the deck to the first spreader. The second unsupported length is from the first spreader to the next set of stays. On a single spreader rig, the next supported section is the mast head. On a multiple spreader rig, it is the next spreader. 

The strongest unsupported section of the spar is the first section, from deck to spreader. Therefore, when loads are high and failure occurs, it occurs above this point, causing the mast to buckle at the first spreader. 

So, flying full sail in a storm is not only bad because you are applying too much strain to the sails, rigging, and yacht, but also because you are applying strain in the wrong areas. Full sail means that the mast is being loaded all the way to the top! The loads it will be subjected to are mind boggling! 

Reefing not only reduces the sail area to decrease the force on the yacht, but it also lowers the sail area, concentrating the loads to the first unsupported section of the spar. Storm sails take this one step further and concentrate the loads entirely to the first unsupported section. 

When you setup your trysail, the tack needs to be set so that it is higher than the stack height of the mainsail. This will allow it to flow easily on either tack. While you might feel inclined to simply add a longer tack pennant to clear the mainsail, it is important not to raise the trysail too high. 

The head of the trysail should end up in the area of the first spreaders, that way the loads are concentrated in the first unsupported span. Yes, the loads during a storm will be strong, but the strongest section of the spar is being loaded and the rest of the mast is simply along for the ride. 

Once the winds calm down, you can raise your full sail on your full spar, instead of trying to jury rig something with the stump of your mast that runs up to your first spreaders. 

An Alternative Method to Tensioning Synthetic Standing Rigging

While passing through Carolina Beach, I met a fellow cruiser who had rigged his previous boat with synthetic standing rigging. He has since sold his ketch and moved onto a gorgeous wooden motor yacht. We got talking and he told me his innovative and wonderful method of tensioning his synthetic standing rigging. 

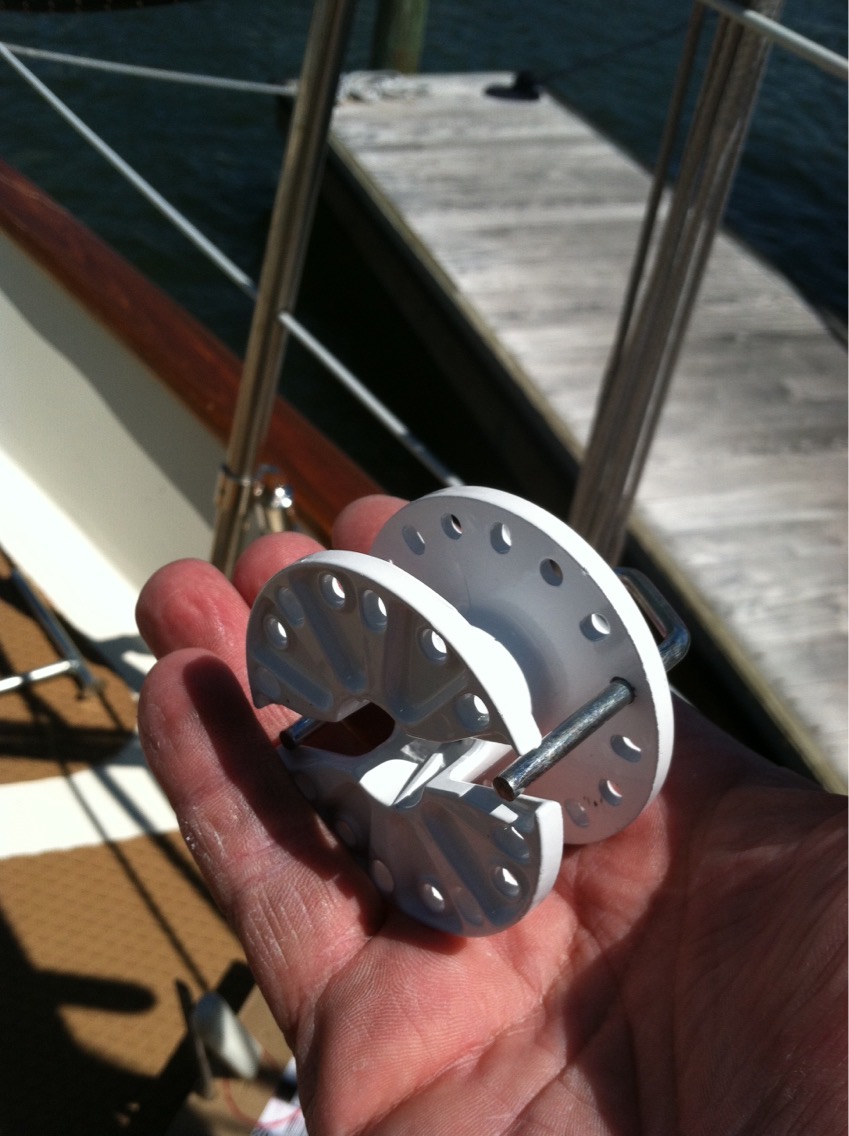
Instead of setting up a complicated pulley system that leads to a deck winch, he simply took a different tool and made his life easier. He used an electric fence wire tensioner. These tensioners cost him around $2 and are made of plastic. (http://www.kencove.com/fence/Wire+Tighteners_detail_SSDR.php) They lasted him a few years and were innexpensive enough to simply replace when the sun weakened them.

IMG_2131.JPG

The only caveat to this system is that you need a special tool that is used to tighten the wires with these devices. The tool has a square end that inserts into the device and has long handles on it. The handles are long enough that he felt it easy to tension his standing rigging without over exerting himself.

IMG_2132.JPG

To tension his rigging, he would tighten the lashings by hand as much as he could and then tie them off. He then slipped the plastic tensioner onto one of the lashings and set it in the slot that is cut for a wire to pass through. 

IMG_2138.PNG

With the tensioner slipped over the lashing, he would then insert the tool and begin winding the lashing around the tensioner. This system is genius because it uses a massive leverage advantage to collect the lashing line and generate the tension needed. This not only makes it easy to setup the rigging, but also quick to adjust the standing rigging as all you need to do is insert the tool and spin it as needed! 

IMG_2133.JPG

Once the tension needed is achieved, a simple pin is inserted to hold everything in place. The pin prevents the tensioner from spinning and unspooling, holding your rigging in place! There are no knots to tie or pulley systems to setup. Simply insert the tool into the key hole and spin until its perfect! 

Yes, the tensioner is made out of plastic and dies after a few years, but the unit costs around $2 and is easy and cost effective to replace when compared to all the time that it will take to tension your standing rigging using the Shroud Frapping Knot.  

If you are considering switching to synthetic standing rigging but concerned that the Shroud Frapping Knot is too complicated for you to learn, this is an easy alternative that achieves the same result of a properly tuned rig with much less involvement and effort. 

Taking Advantage of Winters Stretch

Dyneema has a negative coefficient of thermal expansion, meaning that it expands as it cools. When you tune your rigging for summer sailing, it will become rediculously slack in the winter. This is known as "Winters Stretch" and can be used to your advantage! 

During the year, thimbles and clevis pins will move and shimmy while you sail. They are under tremendous tension and there is no way possible for you to push them back into place without untying the stay and then retensioning it. You need to untie everything to remove the tension on the stay, but in winter, the tension is removed as the stay elongates temporarily! 

When your rigging goes slack, you are presented with the opportunity of the year to push everything back into place and line it all up perfectly! That thimble that rotated a bit when you set up your rigging can now be spun vertically with ease. That clevis pin that spun around and has the cotter pin upside down can now be rotated to line the cotter pin head up and keep it from falling out. 

All of these little jobs that would take hours to perform and correct in the summer can be accomplished in a few minutes with no tools, all thanks to the chilling effects of winter. 

Synthetic Standing Rigging in the Cold

As the temperatures plummet, we have found ourselves trapped in cooler weather while we dream of warmer sailing. We have a few options ahead of us, one is to re-tension the rigging for the cold weather and sail along as normal; the other is to work with the slack rigging and make our way towards warmth as quickly as we can! 

If we were going to be doing high latitude cruising in the winter, then yes, re-tuning the rigging would be a wise choice to make as it will facilitate safe sailing with sound standing rigging. The thing is, we are heading towards warmer latitudes and if we tighten the rigging, we would immediately need to loosen it again as it would contract in the warmth. 

This leads us to our decision to follow the second option: deal with it. 

While the rigging is slack, the biggest concern comes in the form of shock loads. When you jibe accidentally, the loads are greatly increased because the sails slam from one side to the other and yank the rigging along the way. When the rigging is tight, the transfer of force is rather mundane, but when it is slack, the loads go from non-existent to out-of-this-world in a fraction of a second. This shock load can lead to a lot of gear failure and ruin a cruise! 

Dealing with it is rather simple. First, no accidental jibes. Second, don't fly much sail. The loads come from the sails being flown. If you fly small sails, then you won't be stressing the rigging very much. This means that we reef very early and usually sail under canvassed. Third, pick downwind courses.  

Sailing downwind is a great way to reduce the stress on the rigging. Everything moves along nicely as the backstays take up the majority of the loads. The apparent wind is also greatly reduced and you can sail towards your desitnation even faster than if you were beating with slack rigging. 

Running towards warmer weather will get you there in a short period of time, this means that soon, your rigging will warm up and you can stop worrying about it being slack as it will tighten back up on its own as it warms again. 

Our rigging is tuned for 80F, and works well all the way down to 60F. We have found ourselves lately in temperatures ranging from 40F to 50F, so we can't wait to be in warmer weather once more!